You're viewing **Apigee Edge** documentation.
[Go to the
**Apigee X** documentation](http://cloud.google.com/apigee/docs). info
*Edge Microgateway v. 2.5.x*
This topic discusses how to manage and configure Edge Microgateway.
## Upgrading Edge Microgateway if you have an internet connection
1. Execute the following `npm` command to upgrade to the latest version of Edge Microgateway:
```
npm upgrade edgemicro -g
```
To upgrade to a specific version of Edge Microgateway, you need to specify the **version
number** in the upgrade command. **If you do not specify the version number, the
latest version will be installed.** For example, to upgrade to version 2.5.26, use the
following command:
```
npm upgrade edgemicro@2.5.26 -g
```
2. Check the version number. For example, if you installed version 2.5.26:
```
edgemicro --version
current nodejs version is v8.9.0
current edgemicro version is 2.5.26
```
3. Finally, upgrade to the latest version of the **edgemicro-auth** proxy:
```
edgemicro upgradeauth -o org_name -e env_name -u username
```
## Making configuration changes
The configuration files you need to know about include:
- Default system configuration file
- Default config file for a newly initialized Edge Microgateway instance
- Dynamic configuration file for running instances
This section discusses these files and what you need to know about changing them.
### Default system configuration
file
When you install Edge Microgateway, a default system configuration file is placed here:
```
prefix/lib/node_modules/edgemicro/config/default.yaml
```
Where prefix is the `npm` prefix directory. See [Where is Edge Microgateway installed](https://docs.apigee.com/api-platform/microgateway/2.5.x/installing-edge-microgateway#whereisedgemicrogatewayinstalled) if you can't locate this directory.
If you change the system config file, you must reinitialize, reconfigure, and restart Edge
Microgateway:
edgemicro init
edgemicro configure [params]
edgemicro start [params]
### Default config file for newly initialized Edge Microgateway instances
When you run `edgemicro init`, the system config file (described
above), `default.yaml`, is placed in the `~/.edgemicro` directory.
If you change the config file in `~/.edgemicro`, you must reconfigure and restart
Edge Microgateway:
edgemicro stop
edgemicro configure [params]
edgemicro start [params]
### Dynamic
configuration file for running instances
When you run `edgemicro configure \[params\]`, a dynamic
configuration file is created in `~/.edgemicro`. The file is named according to this
pattern: `org-env-config.yaml`, where org and
env are
your Apigee Edge organization and environment names. You can use this file to make configuration
changes, and then reload them with zero-downtime. For example, if you add and configure a plugin,
you can reload the configuration without incurring any downtime, as explained below.
**If Edge Microgateway is running (zero-downtime option):**
1. Reload the Edge Microgateway configuration:
```
edgemicro reload -o org_name -e env_name -k key -s secret
```
Where:
- org_name is your Edge organization name (you must be an organization administrator).
- env_name is an environment in your org (such as "test" or "prod").
- key is the key returned previously by the configure command.
- secret is the key returned previously by the configure command.
For example
```
edgemicro reload -o docs -e test -k 701e70ee718ce6dc188...78b6181d000723 \
-s 05c14356e42ed1...4e34ab0cc824
```
**If Edge Microgateway is stopped:**
1. Restart Edge Microgateway:
```
edgemicro start -o org_name -e env_name -k key -s secret
```
Where:
- org_name is your Edge organization name (you must be an organization administrator).
- env_name is an environment in your organization (such as "test" or "prod").
- key is the key returned previously by the configure command.
- secret is the key returned previously by the configure command.
For example:
```
edgemicro start -o docs -e test -k 701e70ee718ce...b6181d000723 \
-s 05c1435...e34ab0cc824
```
Here is an example config file. For details about configuration file settings, see [Edge Microgateway configuration reference](https://docs.apigee.com/api-platform/microgateway/2.5.x/operation-and-configuration-reference-edge-microgateway#edgemicrogatewayconfigurationreference).
```
edge_config:
bootstrap: >-
https://edgemicroservices-us-east-1.apigee.net/edgemicro/bootstrap/organization/docs/environment/test
jwt_public_key: 'https://docs-test.apigee.net/edgemicro-auth/publicKey'
managementUri: 'https://api.enterprise.apigee.com'
vaultName: microgateway
authUri: 'https://%s-%s.apigee.net/edgemicro-auth'
baseUri: >-
https://edgemicroservices.apigee.net/edgemicro/%s/organization/%s/environment/%s
bootstrapMessage: Please copy the following property to the edge micro agent config
keySecretMessage: The following credentials are required to start edge micro
products: 'https://docs-test.apigee.net/edgemicro-auth/products'
edgemicro:
port: 8000
max_connections: 1000
max_connections_hard: 5000
config_change_poll_interval: 600
logging:
level: error
dir: /var/tmp
stats_log_interval: 60
rotate_interval: 24
plugins:
sequence:
- oauth
headers:
x-forwarded-for: true
x-forwarded-host: true
x-request-id: true
x-response-time: true
via: true
oauth:
allowNoAuthorization: false
allowInvalidAuthorization: false
verify_api_key_url: 'https://docs-test.apigee.net/edgemicro-auth/verifyApiKey'
analytics:
uri: >-
https://edgemicroservices-us-east-1.apigee.net/edgemicro/axpublisher/organization/docs/environment/test
```
## Setting environment variables
The command-line interface commands that require values for your Edge organization and
environment, and the key and secret needed for starting Edge Microgateway can be stored in these
environment variables:
- `EDGEMICRO_ORG`
- `EDGEMICRO_ENV`
- `EDGEMICRO_KEY`
- `EDGEMICRO_SECRET`
Setting these variables is optional. If you set them, you do not have to specify their values
when you use the Command-Line Interface (CLI) to configure and start Edge Microgateway.
## Configuring SSL on the Edge Microgateway
server
You can configure the Microgateway server to use SSL. For example, with SSL configured, you
can call APIs through Edge Microgateway with the "https" protocol, like this:
```
https://localhost:8000/myapi
```
To configure SSL on the Microgateway server, follow these steps:
1. Generate or obtain an SSL certificate and key using the [openssl](https://www.openssl.org) utility or whichever method you prefer.
2. Add the `edgemicro:ssl` attribute to the [Edge Microgateway configuration file](https://docs.apigee.com/api-platform/microgateway/2.5.x/operation-and-configuration-reference-edge-microgateway#makingconfigurationchanges). For a complete list of options, see the table below. For example:
```
edgemicro:
ssl:
key:
cert:
passphrase: admin123 #option added in v2.2.2
rejectUnauthorized: true #option added in v2.2.2
requestCert: true
```
> [!NOTE]
> The key specified in the referenced SSL key file **must not be encrypted**.
3. Restart Edge Microgateway. Follow the steps outlined in [Making configuration changes](https://docs.apigee.com/api-platform/microgateway/2.5.x/operation-and-configuration-reference-edge-microgateway#makingconfigurationchanges) depending on which configuration file you edited: the default file or the runtime config file.
Here's an example of the `edgemicro` section of the config file, with SSL
configured:
```
edgemicro:
port: 8000
max_connections: 1000
max_connections_hard: 5000
logging:
level: error
dir: /var/tmp
stats_log_interval: 60
rotate_interval: 24
plugins:
sequence:
- oauth
ssl:
key: /MyHome/SSL/em-ssl-keys/server.key
cert: /MyHome/SSL/em-ssl-keys/server.crt
passphrase: admin123 #option added in v2.2.2
rejectUnauthorized: true #option added in v2.2.2
```
Here is a list of all of the supported server options:
| Option | Description |
|---|---|
| `key` | Path to a `ca.key` file (in PEM format). |
| `cert` | Path to a `ca.cert` file (in PEM format). |
| `pfx` | Path to a `pfx` file containing the private key, certificate, and CA certs of the client in PFX format. |
| `passphrase` | A string containing the passphrase for the private key or PFX. |
| `ca` | Path to a file containing a list of trusted certificates in PEM format. |
| `ciphers` | A string describing the ciphers to use separated by a ":". |
| `rejectUnauthorized` | If true, the server certificate is verified against the list of supplied CAs. If verification fails, an error is returned. |
| `secureProtocol` | The SSL method to use. For example, SSLv3_method to force SSL to version 3. |
| `servername` | The server name for the SNI (Server Name Indication) TLS extension. |
| `requestCert` | true for 2-way SSL; false for 1-way SSL |
## Using client SSL/TLS options
You can configure Edge Microgateway to be a TLS or SSL client when connecting to target
endpoints. In the Microgateway configuration file, use the targets element to set SSL/TLS
options.
This example provides settings that will be applied to all hosts:
```
edgemicro:
...
targets:
ssl:
client:
key: /Users/jdoe/nodecellar/twowayssl/ssl/client.key
cert: /Users/jdoe/nodecellar/twowayssl/ssl/ca.crt
passphrase: admin123
rejectUnauthorized: true
```
In this example, the settings are applied only to the specified host:
```
edgemicro:
...
targets:
- host: 'myserver.example.com'
ssl:
client:
key: /Users/myname/twowayssl/ssl/client.key
cert: /Users/myname/twowayssl/ssl/ca.crt
passphrase: admin123
rejectUnauthorized: true
```
Here is an example for TLS:
```
edgemicro:
...
targets:
- host: 'myserver.example.com'
tls:
client:
pfx: /Users/myname/twowayssl/ssl/client.pfx
passphrase: admin123
rejectUnauthorized: true
```
Here is a list of all of the supported client options:
| Option | Description |
|---|---|
| `pfx` | Path to a `pfx` file containing the private key, certificate, and CA certs of the client in PFX format. |
| `key` | Path to a `ca.key` file (in PEM format). |
| `passphrase` | A string containing the passphrase for the private key or PFX. |
| `cert` | Path to a `ca.cert` file (in PEM format). |
| `ca` | Path to a file containing a list of trusted certificates in PEM format. |
| `ciphers` | A string describing the ciphers to use separated by a ":". |
| `rejectUnauthorized` | If true, the server certificate is verified against the list of supplied CAs. If verification fails, an error is returned. |
| `secureProtocol` | The SSL method to use. For example, SSLv3_method to force SSL to version 3. |
| `servername` | The server name for the SNI (Server Name Indication) TLS extension. |
## Customizing the edgemicro-auth proxy
By default, Edge Microgateway uses a proxy deployed on Apigee Edge for OAuth2 authentication.
This proxy is deployed when you initially run `edgemicro configure`. You can change
the default configuration of this proxy to add support for custom claims to a JSON Web Token
(JWT), configure token expiration, and generate refresh tokens. For details, see the [edgemicro-auth](https://github.com/apigee/microgateway-edgeauth) page in GitHub.
## Using a custom auth service
By default, Edge Microgateway uses a proxy deployed on Apigee Edge for OAuth2 authentication.
This proxy is deployed when you initially run `edgemicro configure`. By default, this
proxy's URL is specified in the Edge Microgateway config file as follows:
```
authUri: https://myorg-myenv.apigee.net/edgemicro-auth
```
If you want to use your own custom service to handle authentication, change the
`authUri` value in the config file to point to your service. For example, you may have
a service that uses LDAP to verify identity.
> [!NOTE]
> **Important** : If you change the auth service URI, you also need to configure these attributes in your Edge Microgateway config file:
>
> - `edgeconfig:verify_api_key_url` - Set this URL to point to the API key endpoint on your custom auth service. In the default edgemicro-auth proxy, this URL is: `https://myorg-myenv.apigee.net/edgemicro-auth/publicKey`.
> - `edgeconfig:products` - Set this URL to point to the products endpoint on your custom auth service. In the default edgemicro-auth proxy, this URL is: `https://myorg-myenv.apigee.net/edgemicro-auth/products`.
> [!NOTE]
> **Important:** If you override the default auth proxy, the new proxy or service must return a response format that is identical to the default `edgemicro-auth` proxy.
## Managing log files
Edge Microgateway logs information about each request and response. Log files provide useful
information for debugging and troubleshooting.
> [!NOTE]
> This section describes the built-in log utility for Edge Microgateway. If you need to use a third-party logging module, like Bunyan or Winston, you can write a custom plugin. See [Developing custom
> plugins](https://docs.apigee.com/api-platform/microgateway/2.5.x/develop-custom-plugins).
### Where log files are stored
By default, log files are stored in `/var/tmp`.
### How to change the default log
file directory
The directory where log files are stored is specified in the Edge Microgateway configuration
file. See also [Making configuration
changes](https://docs.apigee.com/api-platform/microgateway/2.5.x/operation-and-configuration-reference-edge-microgateway#makingconfigurationchanges).
```
edgemicro:
home: ../gateway
port: 8000
max_connections: -1
max_connections_hard: -1
logging:
level: info
dir: /var/tmp
stats_log_interval: 60
rotate_interval: 24
```
Change the **dir** value to specify a different log file directory.
### Send logs to the console
You can configure logging so that log information is sent to standard output instead of to a
log file. Set the `to_console` flag to true as follows:
```
edgemicro:
logging:
to_console: true
```
With this setting, logs will be sent to standard out. Currently, you cannot send logs to both
stdout and to a log file.
### How to set the logging level
You can set these log levels: **info** , **warn** , and
**error**. The info level is recommended. It logs all API requests and responses,
and it is the default.
### How to change log intervals
You can configure these intervals in the Edge Microgateway config file. See also [Making configuration changes](https://docs.apigee.com/api-platform/microgateway/2.5.x/operation-and-configuration-reference-edge-microgateway#makingconfigurationchanges).
The configurable attributes are:
- **stats_log_interval**: (default: 60) Interval, in seconds, when the stats record is written to the API log file.
- **rotate_interval**: (default: 24) Interval, in hours, when log files are rotated. For example:
```
edgemicro:
home: ../gateway
port: 8000
max_connections: -1
max_connections_hard: -1
logging:
level: info
dir: /var/tmp
stats_log_interval: 60
rotate_interval: 24
```
> [!NOTE]
> Archived log files are not compressed. When the interval starts, a new log file is created with a new timestamp.
### Good log file maintenance practices
As log file data accumulates over time, Apigee recommends that you adopt the following
practices:
- Because log files can become quite large, be sure that the log file directory has sufficient space. See the following sections [Where log files are stored](https://docs.apigee.com/api-platform/microgateway/2.5.x/operation-and-configuration-reference-edge-microgateway#managinglogfiles-wherelogfilesarestored) and [How to change the default log file
directory](https://docs.apigee.com/api-platform/microgateway/2.5.x/operation-and-configuration-reference-edge-microgateway#managinglogfiles-howtochangethedefaultlogfiledirectory).
- Either delete or move log files to a separate archive directory at least once a week.
- If your policy is to delete logs, you can use the CLI command `edgemicro log -c` to remove (clean) older logs.
### Log file naming convention
Each Edge Microgateway instance produces three types of log files:
- **api** - Logs all requests and responses that flow through Edge Microgateway. API counters (stats) and errors are also logged to this file.
- **err** - Logs anything sent to stderr.
- **out** - Logs anything sent to stdout.
This is the naming convention:
```
edgemicro---.log
```
For example:
```
edgemicro-mymachine-local-MTQzNTgNDMxODAyMQ-api.log
edgemicro-mymachine-local-MTQzNTg1NDMODAyMQ-err.log
edgemicro-mymachine-local-mtqzntgndmxodaymq-out.log
```
### About log file contents
*Added in: v2.3.3*
By default, the logging service omits the JSON of downloaded proxies, products, and the JSON
Web Token (JWT). If you wish to output these objects to the log files, set the
`DEBUG=*` when you start Edge Microgateway. For example:
`DEBUG=* edgemicro start -o docs -e test -k abc123 -s xyz456`
> [!NOTE]
> On Windows, use `SET DEBUG=*`
### Contents of the "api" log file
The "api" log file contains detailed information about the flow of requests and responses
through Edge Microgateway. The "api" log files are named like this:
```
edgemicro-mymachine-local-MTQzNjIxOTk0NzY0Nw-api.log
```
For each request made to Edge Microgateway, four events are captured in the "api" log
file:
- Incoming request from the client
- Outgoing request made to the target
- Incoming response from the target
- Outgoing response to the client
Each of these separate entries is represented in a shorthand notation to help make the log
files more compact. Here are four sample entries representing each of the four events. In the log
file, they look like this (the line numbers are only for reference in the doc, they don't appear
in the log file).
```
(1) 1436403888651 info req m=GET, u=/, h=localhost:8000, r=::1:59715, i=0
(2) 1436403888665 info treq m=GET, u=/, h=127.0.0.18080, i=0
(3) 1436403888672 info tres s=200, d=7, i=0
(4) 1436403888676 info res s=200, d=11, i=0
```
Let's look at them one by one:
#### 1. Sample of incoming request from client:
```
1436403888651 info req m=GET, u=/, h=localhost:8000, r=::1:59715, i=0
```
- **1436403888651** - Unix date stamp
- **info** - Depends on the context. Can be info, warn, or error, depending on the log level. Can be stats for a stats record, warn for warnings, or error for errors.
- **req** - Identifies the event. In this case, request from the client.
- **m** - The HTTP verb used in the request.
- **u** - The part of the URL following the basepath.
- **h** - The host and port number where Edge Microgateway is listening.
- **r** - The remote host and port where the client request originated.
- **i** - The request ID. All four event entries will share this ID. Each request is assigned a unique request ID. Correlating log records by request ID can give valuable insight into the target's latency.
- **d** - The duration in milliseconds since the request was received by Edge Microgateway. In the example above, the target's response for request 0 was received after 7 milliseconds (line 3), and the response was sent to the client after an additional 4 milliseconds (line 4). In other words, the total request latency was 11 milliseconds, out of which 7 milliseconds were taken by the target and 4 milliseconds by Edge Microgateway itself.
#### 2. Sample of outgoing request made to the target:
```
1436403888665 info treq m=GET, u=/, h=127.0.0.1:8080, i=0
```
- **1436403888651** - Unix date stamp
- **info** - Depends on the context. Can be info, warn, or error, depending on the log level. Can be stats for a stats record, warn for warnings, or error for errors.
- **treq** - Identifies the event. In this case, target request.
- **m** - The HTTP verb used in the target request.
- **u** - The part of the URL following the basepath.
- **h** - The host and port number of the backend target.
- **i** - The ID of the log entry. All four event entries will share this ID.
**3. Sample of incoming response from the target**
```
1436403888672 info tres s=200, d=7, i=0
```
**1436403888651** - Unix date stamp
- **info** - Depends on the context. Can be info, warn, or error, depending on the log level. Can be stats for a stats record, warn for warnings, or error for errors.
- **tres** - Identifies the event. In this case, target response.
- **s** - The HTTP response status.
- **d** - The duration in milliseconds. The time taken for the API call by the target.
- **i** - The ID of the log entry. All four event entries will share this ID.
**4. Sample of outgoing response to the client**
```
1436403888676 info res s=200, d=11, i=0
```
**1436403888651** - Unix date stamp
- **info** - Depends on the context. Can be info, warn, or error, depending on the log level. Can be stats for a stats record, warn for warnings, or error for errors.
- **res** - Identifies the event. In this case, response to the client.
- **s** - The HTTP response status.
- **d** - The duration in milliseconds. This is the total time taken by the API call, including the time taken by the target API and the time take by Edge Microgateway itself.
- **i** - The ID of the log entry. All four event entries will share this ID.
### Log file schedule
Log files are rotated on the interval specified by the **rotate_interval**
[configuration attribute](https://docs.apigee.com/api-platform/microgateway/2.5.x/operation-and-configuration-reference-edge-microgateway#managinglogfiles-howtochangelogintervals). Entries will continue being added to the
same log file until the rotation interval expires. However, each time Edge Microgateway is
restarted it receives a new UID and creates a new set of log files with this UID. See also
[Good log file maintenance
practices](https://docs.apigee.com/api-platform/microgateway/2.5.x/operation-and-configuration-reference-edge-microgateway#managinglogfiles-goodlogfilemaintenancepractices).
### Error messages
Some log entries will contain error messages. To help identify where and why the errors occur,
see the [Edge Microgateway error
reference](https://docs.apigee.com/api-platform/microgateway/error-code-reference-edge-microgateway).
## Edge Microgateway configuration reference
### Location of the
configuration file
The configurations attributes described in this section are located in the Edge Microgateway
configuration file. See also [Making configuration
changes](https://docs.apigee.com/api-platform/microgateway/2.5.x/operation-and-configuration-reference-edge-microgateway#makingconfigurationchanges).
### edge_config attributes
These settings are used to configure interaction between the Edge Microgateway instance and
Apigee Edge.
- **bootstrap** : (default: none) A URL that points to an Edge Microgateway-specific service running on Apigee Edge. Edge Microgateway uses this service to communicate with Apigee Edge. This URL is returned when you execute the command to generate the public/private key pair: **`edgemicro genkeys`** . See the [Setting up
and configuring Edge Microgateway](https://docs.apigee.com/api-platform/microgateway/2.5.x/setting-and-configuring-edge-microgateway) for details.
- **jwt_public_key** : (default: none) A URL that points to the Edge Microgateway proxy that is deployed on Apigee Edge. This proxy serves as an authentication endpoint for issuing signed access tokens to clients. This URL is returned when you execute the command to deploy the proxy: **edgemicro configure** . See the [Setting up
and configuring Edge Microgateway](https://docs.apigee.com/api-platform/microgateway/2.5.x/setting-and-configuring-edge-microgateway) for details.
### edgemicro attributes
These settings configure the Edge Microgateway process.
- **port**: (default: 8000) The port number on which the Edge Microgateway process listens.
- **max_connections** : (default: -1) Specifies the maximum number of simultaneous incoming connections that Edge Microgateway can receive. If this number is exceeded, the following status is returned:
`res.statusCode = 429; // Too many requests`
- **max_connections_hard**: (default: -1) The maximum number of simultaneous requests that Edge Microgateway can receive before shutting down the connection. This setting is intended to thwart denial of service attacks. Typically, set it to a number larger than max_connections.
- **logging** :
- **level** : (default: error)
- **info** - Logs all requests and responses that flow through an Edge Microgateway instance.
- **warn** - Logs warning messages only.
- **error** - Logs error messages only.
- **dir**: (default: /var/tmp) The directory where log files are stored.
- **stats_log_interval**: (default: 60) Interval, in seconds, when the stats record is written to the api log file.
- **rotate_interval**: (default: 24) Interval, in hours, when log files are rotated.
- **plugins** : Plugins add functionality to Edge Microgateway. For details about developing plugins, see [Develop custom plugins](https://docs.apigee.com/api-platform/microgateway/2.5.x/develop-custom-plugins).
- **dir**: A relative path from ./gateway directory to the ./plugins directory, or an absolute path.
- **sequence**: A list of plugin modules to add to your Edge Microgateway instance. The modules will execute in the order they are specified here.
- **debug:** Adds remote debugging to the Edge Microgateway process.
- **port**: The port number to listen on. For example, set your IDE debugger to listen on this port.
- **args** : Arguments to the debug process. For example: `args
--nolazy`
- **config_change_poll_interval:** (default: 600 seconds) Edge Microgateway loads a new configuration periodically and executes a reload if anything changed. The polling picks up any changes made on Edge (changes to products, microgateway-aware proxies, etc) as well as changes made to the local config file.
- **disable_config_poll_interval:** (default: false) Set to **true** to **turn off** automatic change polling.
- **request_timeout**: Sets a timeout for target requests. The timeout is set in seconds. If a timeout occurs, Edge Microgateway responds with a 504 status code. (Added v2.4.x)
### headers attributes
These settings configure how certain HTTP headers are treated.
- **x-forwarded-for**: (default: true) Set to false to prevent x-forwarded-for headers to be passed to the target. Note that if an x-forwarded-for header is in the request, its value will be set to the client-ip value in Edge Analytics.
- **x-forwarded-host**: (default: true) Set to false to prevent x-forwarded-host headers to be passed to the target.
- **x-request-id**: (default: true) Set to false to prevent x-request-id headers to be passed to the target.
- **x-response-time**: (default: true) Set to false to prevent x-response-time headers to be passed to the target.
- **via**: (default: true) Set to false to prevent via headers to be passed to the target.
### oauth attributes
These settings configure how client authentication is enforced by Edge Microgateway.
> [!NOTE]
> You can find the steps for obtaining and using access tokens in the [Setting up and
> configuring Edge Microgateway](https://docs.apigee.com/api-platform/microgateway/2.5.x/setting-and-configuring-edge-microgateway).
- **allowNoAuthorization**: (default: false) If set to true, API calls are allowed to pass through Edge Microgateway without any Authorization header at all. Set this to false to require an Authorization header (default).
- **allowInvalidAuthorization**: (default: false) If set to true, API calls are allowed to pass if the token passed in the Authorization header is invalid or expired. Set this to false to require valid tokens (default).
- **authorization-header**: (default: Authorization: Bearer) The header used to send the access token to Edge Microgateway. You may wish to change the default in cases where the target needs to use the Authorization header for some other purpose.
- **api-key-header** : (default: x-api-key) The name of the header or query parameter used to pass an API key to Edge Microgateway. See also [Using
an API key](https://docs.apigee.com/api-platform/microgateway/2.5.x/operation-and-configuration-reference-edge-microgateway#usinganapikey).
- **keep-authorization-header**: (default: false) If set to true, the Authorization header sent in the request is passed on to the target (it is preserved).
- **allowOAuthOnly** -- If set to true, every API must carry an Authorization header with a Bearer Access Token. Allows you to permit only the OAuth security model (while maintaining backward compatibility). (Added 2.4.x)
- **allowAPIKeyOnly** -- If set to true, every API must carry an **x-api-key** header (or a custom location) with an API Key.Allows you to permit only the API key security model (while maintaining backward compatibility). (Added 2.4.x)
> [!NOTE]
> Do not set both **allowOAuthOnly** and **allowAPIKeyOnly** to true. The default setting is both flags are set to false (for backward compatibility).
- **gracePeriod** -- This parameter helps prevent errors caused by slight discrepancies between your system clock and the Not Before (nbf) or Issued At (iat) times specified in the JWT authorization token. Set this parameter to the number of seconds to allow for such discrepancies. (Added 2.5.7)
### Plugin-specific
attributes
See Using plugins for details on configurable attributes for each plugin.
## Filtering proxies
You can filter which microgateway-aware proxies an Edge Microgateway instance will process.
When Edge Microgateway starts, it downloads all of the microgateway-aware proxies in the
organization it's associated with. Use the following configuration to limit which proxies the
microgateway will process. For example, this configuration limits the proxies the microgateway
will process to three: `edgemicro_proxy-1`, `edgemicro_proxy-2`,
and `edgemicro_proxy-3`:
```
proxies:
- edgemicro_proxy-1
- edgemicro_proxy-2
- edgemicro_proxy-3
```
## Configuring analytics push frequency
Use these configuration parameters to control the frequency at which Edge Microgateway sends
analytics data to Apigee:
- **bufferSize** (Optional): The maximum number of analytics records that the buffer can hold before beginning to drop the oldest records. Default: 10000
- **batchSize** (Optional): The maximum size of a batch of analytics records sent to Apigee. Default: 500
- **flushInterval** (Optional): The number of milliseconds between each flush of a batch of analytics records sent to Apigee. Default: 5000
For example:
```
analytics:
bufferSize: 15000
batchSize: 1000
flushInterval: 6000
```
## Masking analytics data
The following configuration prevents request path information from showing up in Edge
analytics. Add the following to the microgateway configuration to mask the request URI and/or
request path. Note that the URI consists of the hostname and path parts of the request.
```
analytics:
mask_request_uri: 'string_to_mask'
mask_request_path: 'string_to_mask'
```
## Segregating API calls in Edge Analytics
You can configure the analytics plugin to segregate a specific API path so that it appears as
a separate proxy in the Edge Analytics dashboards. For example, you can
segregate a health check API in the dashboard to avoid confusing it with actual API proxy calls. In the
Analytics dashboard, segregated proxies follow this naming pattern:
```
edgemicro_proxyname-health
```
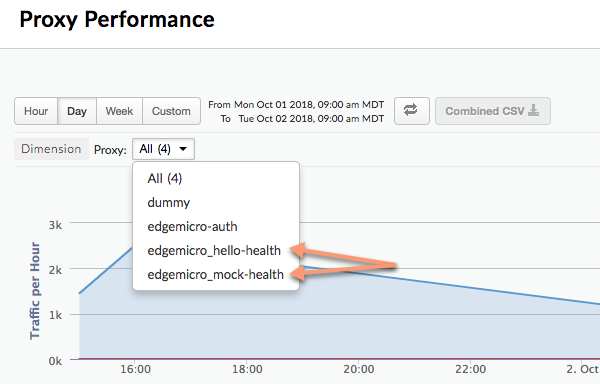
The following image shows two segregated proxies in the Analytics dashboard: `edgemicro_hello-health` and
`edgemicro_mock-health`:
Use these
parameters to segregate relative and absolute paths in the Analytics dashboard as separate proxies:
- **relativePath** (Optional): Specifies a relative path to segregate in the Analytics dashboard. For example, if you specify `/healthcheck`, all API calls that contain the path `/healthcheck` will appear in the dashboard as `edgemicro_proxyname-health`. Note that this flag ignores the proxy basepath. To segregate based on a full path, including basepath, use the `proxyPath` flag.
- **proxyPath** (Optional): Specifies a full API proxy path, including the proxy basepath, to segregate in the analytics dashboard. For example, if you specify `/mocktarget/healthcheck`, where `/mocktarget` is the proxy basepath, all API calls with the path `/mocktarget/healthcheck` will appear in the dashboard as `edgemicro_proxyname-health`.
For example, in the following configuration any API path that contains `/healthcheck` will
be segregated by the analytics plugin. This means, `/foo/healthcheck` and `/foo/bar/healthcheck`
will be segregated as a separate proxy called `edgemicro_proxyname-health` in the analytics dashboard.
```
analytics:
uri: >-
https://xx/edgemicro/ax/org/docs/environment/test
bufferSize: 100
batchSize: 50
flushInterval: 500
relativePath: /healthcheck
```
In the following configuration any API with the proxy path `/mocktarget/healthcheck` will
be will be segregated as a separate proxy called `edgemicro_proxyname-health` in
the analytics dashboard.
```
analytics:
uri: >-
https://xx/edgemicro/ax/org/docs/environment/test
bufferSize: 100
batchSize: 50
flushInterval: 500
proxyPath: /mocktarget/healthcheck
```
## Setting up Edge Microgateway behind a
company firewall
*Supported v2.4.x*
If Edge Microgateway is installed behind a firewall, the gateway may not be able to
communicate with Apigee Edge. In this case, there are two options you can consider:
**Option 1:**
The first option is to set the edgemicro: proxy_tunnel option to true in the
microgateway config file:
```
edge_config:
proxy: http://10.224.16.85:3128
proxy_tunnel: true
```
When **proxy_tunnel** is **true** , Edge Microgateway uses
the HTTP **CONNECT** method to tunnel HTTP requests over a single TCP connection.
(The same is true if the environment variables for configuring the proxy are TLS enabled).
**Option 2:**
The second option is to specify a proxy and set proxy_tunnel to false in the
microgateway config file. For example:
```
edge_config:
proxy: http://10.224.16.85:3128
proxy_tunnel: false
```
In this case, you can set the following variables to control the hosts for each HTTP
proxy that you wish to use, or which hosts should not handle Edge Microgateway proxies:
**HTTP_PROXY** , **HTTPS_PROXY** , and **NO_PROXY**.
You can set **NO_PROXY** as a comma delimited list of domains that Edge
Microgateway should not proxy to. For example:
```
export NO_PROXY='localhost,localhost:8080'
```
Set **HTTP_PROXY** and **HTTPS_PROXY** to the HTTP proxy
endpoint Edge Microgateway can send messages to it. For example:
```
export HTTP_PROXY='http://localhost:3786'
export HTTPS_PROXY='https://localhost:3786'
```
For more information on these variables, see
#### See also
[How to set up Edge Microgateway behind a company firewall](https://community.apigee.com/questions/15352/how-to-setup-micro-gateway-behind-company-firewall.html) on the Apigee Community.
## Using wildcards in Microgateway-aware
proxies
You can use one or more "\*" wildcards in the base path of an
**edgemicro_\*** (Microgateway-aware) proxy. For example, a base path of
**/team/\*/members** allows clients to call
**https://\[host\]/team/blue/members** and
**https://\[host\]/team/green/members** without you needing to create new API proxies
to support new teams. Note that `/**/` is not supported.
**Important:** Apigee does NOT support using a wildcard "\*" as the
first element of a base path. For example, this is NOT supported: `/*/` search.
## Rotating JWT keys
At some time after you initially generate a JWT, you might need to change the
public/private key pair stored in the Edge encrypted KVM. This process of generating a new key
pair is called key rotation.
### How Edge Microgateway uses JWT
JSON Web Token (JWT) is a token standard described in [RFC7519](https://tools.ietf.org/html/rfc7519). JWT provides a way to sign a set of claims,
which can be verified reliably by the recipient of the JWT.
Edge Microgateway uses JWTs as bearer tokens for OAuth security. When you generate
an OAuth token for Edge Microgateway, you receive back a JWT. You can then use the JWT in the
Authorization header of API calls. For example:
```
curl -i http://localhost:8000/hello -H "Authorization: Bearer eyJhbGciOiJ..dXDefZEA"
```
### Generating a new JWT
You can generate a JWT for Edge Microgateway using the `edgemicro token` command or
an API. For example:
```
edgemicro token get -o docs -e test -i G0IAeU864EtBo99NvUbn6Z4CBwVcS2 -s uzHTbwNWvoSmOy
```
This command asks Apigee Edge to generate a JWT that can then be used to verify API
calls. The `-i` and `-s` parameters are the consumer ID and secret values from a developer app
in your Apigee Edge organization.
Or, you can also generate a JWT using the management API:
```
curl -i -X POST "http://org-env.apigee.net/edgemicro-auth/token" \
-H "Content-Type: application/json" \
-d '{
"client_id": "your consumer key",
"client_secret": "your consumer secret",
"grant_type": "client_credentials"
}'
```
Where:
- org is your Edge organization name (you must be an org administrator).
- env is an environment in your org (such as "test" or "prod").
- client_id is the Consumer ID in the Developer App you created previously.
- client_secret is the Consumer Secret in the Developer App you created previously.
### What is key rotation?
At some time after you initially generate a JWT, you might need to change the
public/private key pair stored in the Edge encrypted KVM. This process of generating a new key
pair is called key rotation. When you rotate keys, a new private/public key pair is generated and
stored in the "microgateway" KVM in your Apigee Edge organization/environment. In addition, the
old public key is retained along with its original key ID value.
To generate a JWT, Edge uses information stored in the encrypted KVM. A
KVM called `microgateway`was created and populated with keys when you initially set up (configured)
Edge Microgateway. The keys in the KVM are used to sign and encrypt a JWT.
The KVM keys include:
- **private_key** - The latest (most recently created) RSA private key used to sign
JWTs.
- **public_key** - The latest (most recently created) certificate used to verify JWTs
signed with the private_key.
- **private_key_kid** - The latest (most recently created) private key ID. This key ID
is associated with the private_key value and is used to support key rotation.
- **public_key1_kid** - The latest (most recently created) public key ID. This key is
associated with the public_key1 value and is used to support key rotation. This value
is the same as the private key kid.
- **public_key1** - The latest (most recently created) public key.
When you perform key rotation, existing key values are replaced in the map and new
keys are added to retain the old public keys. For example:
- **public_key2_kid** - The old public key ID. This key is associated with the
public_key2 value and is used to support key rotation.
- **public_key2** - The old public key.
JWTs presented for verification will be verified using the new public key. If
verification fails, then the old public key will be used, until it expires (after 30 minutes). In
this way, you can "rotate" keys without immediately disrupting API traffic.
### How to do key rotation
This section explains how to perform a key rotation.
#### If you configured your Edge Microgateway instance before version 2.5.2
If you configured your Edge Microgateway instance before version 2.5.2, then you must run
the following two commands to upgrade the KVM and the authentication policy:
```
upgradekvm -o org -e env -u username
```
For more information on this command, see [Upgrading
the KVM](https://docs.apigee.com/api-platform/troubleshoot/apigee-edge-troubleshooting).
The next command upgrades the **edgemicro-oauth** proxy that was deployed to
your Apigee org when you configured Edge Microgateway. This proxy provides services required to
generate tokens.
```
upgradeauth -o org -e env -u username
```
For more information on this command, see [Upgrading the
edgemicro-auth proxy](https://docs.apigee.com/api-platform/microgateway/2.5.x/cli-reference-edge-microgateway#upgrading-the-edgemicro-auth-proxy).
#### Rotating the keys
Add the following line to your `~/.edgemicro/org-env-config.yaml` file, where you must
specify the same organization and environment that you configured the microgateway to use:
```
jwk_public_keys: 'https://org-env.apigee.net/edgemicro-auth/jwkPublicKeys'
```
Run the key rotation command to rotate the keys. (For more information on this command, see
[Rotating keys](https://docs.apigee.com/api-platform/microgateway/2.5.x/cli-reference-edge-microgateway#rotating-keys).)
```
edgemicro rotatekey -o org -e env -u username -k kid_value
```
For example:
```
edgemicro rotatekey -o jdoe -e test -u jdoe@google.com -k 2
current nodejs version is v6.9.1
current edgemicro version is 2.5.7
password:
Checking if private key exists in the KVM...
Checking for certificate...
Found Certificate
Generating New key/cert pair...
Extract new public key
Key Rotation successfully completed!
```
The `-k` parameter specifies a Key ID (kid). This ID is used to match a specific key.
Edge Microgateway uses this value to choose among a set of keys during key rotation. For more
information, see Section [4.5 of the
JSON Web Key specification](https://tools.ietf.org/html/rfc7517#section-4.5).
After key rotation, Edge returns multiple keys to Edge Microgateway. Note in the
following example, each key has a unique "kid" (Key ID) value. The microgateway then uses these
keys to validate authorization tokens. If the token validation fails, the microgateway looks to
see if there is an older key in the key set and tries that key. The format of the
returned keys is JSON Web Key (JWK). You can read about this format in [RFC 7517](https://tools.ietf.org/html/rfc7517).
```
{
"keys": [
{
"kty": "RSA",
"n": "nSl7R_0wKLiWi6cO3n8aOJwYGBtinq723Jgg8i7KKWTSTYoszOjgGsJf_MX4JEW1YCScwpE5o4o8ccQN09iHVTlIhk8CNiMZNPipClmRVjaL_8IWvMQp1iN66qy4ldWXzXnHfivUZZogCkBNqCz7VSC5rw2Jf57pdViULVvVDGwTgf46sYveW_6h8CAGaD0KLd3vZffxIkoJubh0yMy0mQP3aDOeIGf_akeZeZ6GzF7ltbKGd954iNTiKmdm8IKhz6Y3gLpC9iwQ-kex_j0CnO_daHl1coYxUSCIdv4ziWIeM3dmjQ5_2dEvUDIGG6_Az9hTpNgPE5J1tvrOHAmunQ",
"e": "AQAB",
"kid": "2"
},
{
"kty": "RSA",
"n": "8BKwzx34BMUcHwTuQtmp8LFRCMxbkKg_zsWD6eOMIUTAsORexTGJsTy7z-4aH0wJ3fT-3luAAUPLBQwGcuHo0P1JnbtPrpuYjaJKSZOeIMOnlryJCspmv-1xG4qAqQ9XaZ9C97oecuj7MMoNwuaZno5MvsY-oi5B_gqED3vIHUjaWCErd4reONyFSWn047dvpE6mwRhZbcOTkAHT8ZyKkHISzopkFg8CD-Mij12unxA3ldcTV7yaviXgxd3eFSD1_Z4L7ZRsDUukCJkJ-8qY2-GWjewzoxl-mAW9D1tLK6qAdc89yFem3JHRW6L1le3YK37-bs6b2a_AqJKsKm5bWw",
"e": "AQAB",
"kid": "1"
}
]
}
```
## Filtering downloaded proxies
By default, Edge Microgateway downloads all of the proxies in your Edge organization
that start with the naming prefix "edgemicro_". You can change this default to download proxies
whose names match a pattern.
1. Open your Edge Micro config file: `~/.edgemicro/org-env-config.yaml`
2. Add the proxyPattern element under edge_config. For example, the following pattern will download proxies such as edgemicro_foo, edgemicro_fast, and edgemicro_first.
```
edge_config:
…
proxyPattern: edgemicro_f*
```
## Specifying products without API proxies
In Apigee Edge, you can create an API product that does not contain any API proxies.
This product configuration allows an API key associated with that product to work for with any
proxy deployed in your organization. As of version 2.5.4, Edge Microgateway supports this product
configuration.
## Debugging and troubleshooting
### Connecting to a debugger
You can run Edge Microgateway with a debugger, such as [node-inspector](https://www.npmjs.com/package/node-inspector). This is useful for
troubleshooting and debugging custom plugins.
1. Restart Edge Microgateway in debug mode. To do this, add `DEBUG=*` to the beginning of the `start` command. For example:
```
DEBUG=* edgemicro start -o myorg -e test -k
db4e9e8a95aa7fabfdeacbb1169d0a8cbe42bec19c6b98129e02 -s
6e56af7c1b26dfe93dae78a735c8afc9796b077d105ae5618ce7ed
```
> [!NOTE]
> On Windows, use `SET DEBUG=*`
2. Start your debugger and set it to listen on the port number for the debugging process.
3. You can now step through the Edge Microgateway code, set breakpoints, watch expressions, and so on.
You can specify standard Node.js flags related to debug mode. For example,
`--nolazy` helps with debugging asynchronous code.
### Checking log files
If you're having problems, be sure to examine the log files for execution details and error
information. For details, see [Managing log files](https://docs.apigee.com/api-platform/microgateway/2.5.x/operation-and-configuration-reference-edge-microgateway#managinglogfiles).
## Using API key security
API keys provide a simple mechanism for authenticating clients making requests to Edge
Microgateway. You can obtain an API key by copying the Consumer Key (also called Client ID) value
from an Apigee Edge product that includes the Edge Microgateway authentication proxy.
### Caching of keys
API keys are exchanged for bearer tokens, which are cached. You can disable caching by setting
the `Cache-Control: no-cache` header on incoming requests to Edge
Microgateway.
### Using an API key
You can pass the API key in an API request either as a query parameter or in a header. By default,
the header and query param name are both `x-api-key`.
Query parameter example:
```
curl http://localhost:8000/foobar?x-api-key=JG616Gjz7xs4t0dvpvVsGdI49G34xGsz
```
Header example:
```
curl http://localhost:8000/foobar -H "x-api-key:JG616Gjz7xs4t0dvpvVsGdI49G34xGsz"
```
### Configuring the API key name
By default, `x-api-key` is the name used for both the API key header and query parameter.
You can change this default in the configuration file, as explained in [Making configuration changes](https://docs.apigee.com/api-platform/microgateway/2.5.x/operation-and-configuration-reference-edge-microgateway#makingconfigurationchanges). For example, to change the
name to **apiKey**:
```
oauth:
allowNoAuthorization: false
allowInvalidAuthorization: false
api-key-header: apiKey
```
In this example, both the query parameter and header name are changed to `apiKey`. The
name `x-api-key` will no longer work in either case. See also
[Making configuration changes](https://docs.apigee.com/api-platform/microgateway/2.5.x/operation-and-configuration-reference-edge-microgateway#makingconfigurationchanges).
For example:
```
curl http://localhost:8000/foobar -H "apiKey:JG616Gjz7xs4t0dvpvVsGdI49G34xGsz"
```
For more information about using API keys with proxy requests, see [Secure Edge Microgateway](https://docs.apigee.com/api-platform/microgateway/2.5.x/setting-and-configuring-edge-microgateway#part4secureedgemicrogateway).
## Using OAuth2 token security
This section explains how to get OAuth2 access tokens and refresh tokens. Access tokens are used to make
secure API calls through the microgateway. Refresh tokens are used to obtain new access tokens.
> [!NOTE]
> For a complete example showing how to obtain and use an OAuth2 access token to make secure API calls, see [Secure
> API calls with an OAuth2 access token](https://docs.apigee.com/api-platform/microgateway/2.5.x/setting-and-configuring-edge-microgateway#Oauthtoken).
### How to get an access token
This section explains how to use the `edgemicro-auth` proxy to get an access token.
You can also get an access token using the `edgemicro token` CLI command.
For details on the CLI, see [Managing tokens](https://docs.apigee.com/api-platform/microgateway/2.5.x/cli-reference-edge-microgateway#managing-tokens).
> [!NOTE]
> You can use API 1 shown below with any Edge Microgateway version. API 2 is available in version 2.5.31 and later versions.
**API 1**
Substitute your org and environment names in the URL, and
substitute the Consumer Id and Consumer Secret values obtained from a developer app on Apigee
Edge for the **client_id** and **client_secret** body parameters:
```
curl -i -X POST "http://-.apigee.net/edgemicro-auth/token" \
-d '{"grant_type": "client_credentials", "client_id": "your_client_id", \
"client_secret": "your_client_secret"}' -H "Content-Type: application/json"
```
**API 2**
(Added in v2.5.31) Send the client credentials as a Basic Authentication header and the `grant_type` as a form parameter. This command form is also discussed in [RFC 6749: The OAuth 2.0 Authorization Framework](https://tools.ietf.org/html/rfc6749).
```
http://-.apigee.net/edgemicro-auth/token -v -u your_client_id:your_client_secret \
-d 'grant_type=client_credentials' -H "Content-Type: application/x-www-form-urlencoded"
```
**Sample output**
The API returns a JSON response. Note that there's no difference between the `token` and `access_token` properties. You can use either one.
```
{
"token": "eyJraWQiOiIxIiwidHlwIjoi",
"access_token": "eyJraWQiOiIxIiwid",
"token_type": "bearer",
"expires_in": "108000"
}
```
### How to get a refresh token
To get a refresh token, make an API call to the `/token` endpoint of the
`edgemicro-auth` proxy. You MUST make this API call with the `password`
grant type. The following steps walk through the process.
1. Get an access and refresh token with the `/token` API. Note that the grant type is `password`:
```
curl -X POST \
https://your_organization-your_environment.apigee.net/edgemicro-auth/token \
-H 'Content-Type: application/json' \
-d '{
"client_id":"mpK6l1Bx9oE5zLdifoDbF931TDnDtLq",
"client_secret":"bUdDcFgv3nXffnU",
"grant_type":"password",
"username":"mpK6lBx9RoE5LiffoDbpF931TDnDtLq",
"password":"bUdD2FvnMsXffnU"
}'
```
The API returns an access token and a refresh token. The response looks similar to
this:
```
{
"token": "your-access-token",
"access_token": "your-access-token",
"token_type": "bearer",
"expires_in": "108000",
"refresh_token": "your-refresh-token",
"refresh_token_expires_in": "431999",
"refresh_token_issued_at": "1562087304302",
"refresh_token_status": "approved"
}
```
2. You can now use the refresh token to get a new access token by calling the `/refresh` endpoint of the same API. For example:
```
curl -X POST \
https://willwitman-test.apigee.net/edgemicro-auth/refresh \
-H 'Content-Type: application/json' \
-d '{
"client_id":"mpK6l1Bx9RoE5zLifoDbpF931TDnDtLq",
"client_secret":"bUdDc2Fv3nMXffnU",
"grant_type":"refresh_token",
"refresh_token":"your-refresh-token"
}'
```
The API returns a new access token. The response looks similar to this:
```
{
"token": "your-new-access-token"
}
```
## Forever monitoring
[Forever](https://www.npmjs.com/package/forever) is a Node.js tool that
automatically restarts a Node.js app in case the process goes down or has an error. Edge
Microgateway has a **forever.json** file that you can configure to control how many
times and with what intervals Edge Microgateway should be restarted. This file configures a
Forever service called [forever-monitor](https://www.npmjs.com/package/forever-monitor), which manages Forever
programmatically.
You can find the **forever.json** file in the Edge Microgateway root install
directory. See [Where is Edge Microgateway installed](https://docs.apigee.com/api-platform/microgateway/2.5.x/installing-edge-microgateway#whereisedgemicrogatewayinstalled). For details on the configuration options, refer to the
[forever-monitor documentation](https://www.npmjs.com/package/forever-monitor).
The `edgemicro forever` command includes flags that let you specify the location of
the `forever.json` file (the `-f` flag), and start/stop the Forever monitoring
process (the `-a` flag). For example:
```
edgemicro forever -f ~/mydir/forever.json -a start
```
For more information, see the [Forever monitoring](https://docs.apigee.com/api-platform/microgateway/2.5.x/cli-reference-edge-microgateway#forevermonitoring) in the CLI reference.
## Specifying a config file endpoint
If you run multiple Edge Microgateway instances, you may wish to manage their configurations
from a single location. You can do this by specifying an HTTP endpoint where Edge Micro can
download its configuration file. You can specify this endpoint when you start Edge Micro using
the **-u** flag.
For example:
```
edgemicro start -o jdoe -e test -u http://mylocalserver/mgconfig -k public_key -s secret_key
```
where the mgconfig endpoint returns the contents of your configuration file. This is the file
that, by default, is located in `~/.edgemicro` and has the naming convention:
`org-env-config.yaml`.
## Disabling TCP connection data buffering
You can use the `nodelay` configuration attribute to disable data buffering for
TCP connections used by Edge Microgateway.
By default TCP connections use the [Nagle
algorithm](https://en.wikipedia.org/wiki/Nagle%27s_algorithm) to buffer data before sending it off. Setting `nodelay` to `true`,
disables this behavior (data will immediately fire off data each time
`socket.write()` is called). See also the [Node.js
documentation](https://nodejs.org/api/net.html#net_socket_setnodelay_nodelay) for more details.
To enable `nodelay`, edit the [Edge Micro config file](https://docs.apigee.com/api-platform/microgateway/2.5.x/operation-and-configuration-reference-edge-microgateway#makingconfigurationchanges) as follows:
```
edgemicro:
nodelay: true
port: 8000
max_connections: 1000
config_change_poll_interval: 600
logging:
level: error
dir: /var/tmp
stats_log_interval: 60
rotate_interval: 24
```
## Running Edge Microgateway in standalone mode
You can run Edge Microgateway disconnected completely from any
Apigee Edge dependency. This scenario, called standalone mode, lets you run and test Edge Microgateway
without an Internet connection.
In standalone mode, the following features do not work, as they require connection
to Apigee Edge:
- OAuth and API key
- Quota
- Analytics
On the other hand, custom plugins and spike arrest work normally, because they do not
require a connection to Apigee Edge. In addition, a new plugin called `extauth` lets you
authorize API calls to the microgateway with a JWT while in standalone mode.
### Configuring and starting the gateway
**To run Edge Microgateway in standalone mode:**
1. Be sure that you have Edge Microgateway version 2.5.25 or later installed. If not, you must execute the following command to upgrade to the latest version:
```
npm install -g edgemicro
```
If you need help, see [Installing Edge
Microgateway](https://docs.apigee.com/api-platform/microgateway/2.5.x/installing-edge-microgateway).
2. Create a configuration file named as follows: `$HOME/.edgemicro/`org_name`-`env_name`-config.yaml`
> [!NOTE]
> You can use any values you wish for `org_name` and `env_name` in the filename. The org/env combination is simply a convention that allows Edge Microgateway to find the file when it starts up.
For example:
```
vi $HOME/.edgemicro/foo-bar-config.yaml
```
3. Paste the following code into the file:
```
edgemicro:
port: 8000
max_connections: 1000
config_change_poll_interval: 600
logging:
level: error
dir: /var/tmp
stats_log_interval: 60
rotate_interval: 24
plugins:
sequence:
- extauth
- spikearrest
headers:
x-forwarded-for: true
x-forwarded-host: true
x-request-id: true
x-response-time: true
via: true
extauth:
publickey_url: https://www.googleapis.com/oauth2/v1/certs
spikearrest:
timeUnit: second
allow: 10
buffersize: 0
```
> [!NOTE]
> The config file contains a special, optional plugin called **extauth** . This plugin verifies a valid JWT token passed to the microgateway. In a later step, you will learn how to obtain and use the token. Also, note that the **spikearrest** plugin is included because it does not rely on connectivity with Edge. The `quota`, `oauth`, and `analytics` plugins are excluded, because they do rely on connectivity with Edge and will not work in disconnected mode. Custom plugins are allowed, and will function as expected.
4. Export the following environment variable with the value "1":
```
export EDGEMICRO_LOCAL=1
```
5. Execute the following `start` command, where you provide values to instantiate the local proxy:
```
edgemicro start -o org_name -e environment_name -a local_proxy_name \
-v local_proxy_version -t target_url -b base_path
```
Where:
- your_org is the "org" name that you used in the configuration file name.
- your_environment is the "env" name that you used in the configuration file name.
- local_proxy_name is the name of the local proxy that will be created. You can use any name you want.
- local_proxy_version is the version number for the proxy.
- target_url is the URL for the target of the proxy. (The *target* is the service that the proxy calls.)
- base_path is the base path of the proxy. This value must start with a forward slash. For a root base path, specify just a forward slash; for example, "/".
For example:
```
edgemicro start -o local -e test -a proxy1 -v 1 -t http://mocktarget.apigee.net -b /
```
6. Test the configuration.
```
curl http://localhost:8000/echo { "error" : "missing_authorization" }
```
Because the `extauth` plugin is in the `foo-bar-config.yaml` file, you
get a "missing_authorization" error. This plugin validates a JWT that must be present in the Authorization
header of the API call. In the next section, you will obtain a JWT that will allow API calls
to go through without the error.
### Example: Obtaining an authorization token
The following example shows how to obtain a JWT from the Edge Microgateway JWT endpoint on Apigee Edge (`edgemicro-auth/jwkPublicKeys`).
This endpoint is deployed when you perform a [standard setup and configuration](https://docs.apigee.com/api-platform/microgateway/2.5.x/setting-and-configuring-edge-microgateway#part1configureedgemicrogateway) of Edge Microgateway.
To obtain the JWT from the Apigee endpoint, you must first do the standard Edge Microgateway setup, and
be connected to the Internet. The Apigee endpoint is used here for example purposes
only and is not required. You can use another JWT token endpoint if you wish. If you do, then you'll need to obtain the JWT using
the API provided for that endpoint.
> [!NOTE]
> Including the `extauth` plugin in your microgateway configuration is optional, but if you include it, you will be required to provide a valid JWT token in the Authorization header for API calls.
The following steps explain how to get a token using the `edgemicro-auth/jwkPublicKeys` endpoint:.
1. You must perform a [standard
setup and configuration](https://docs.apigee.com/api-platform/microgateway/2.5.x/setting-and-configuring-edge-microgateway#part1configureedgemicrogateway) of Edge Microgateway to deploy the `edgemicro-auth` proxy to your organization/environment on Apigee Edge. If you did this step previously, you do not need to repeat it.
2. If you deployed Edge Microgateway to Apigee Cloud, you must be connected to the Internet so that you can obtain a JWT from this endpoint.
3. Stop Edge Microgateway:
```
edgemicro stop
```
4. In the configuration file you created previously (`$HOME/.edgemicro`/org-env`-config.yaml`), point the `extauth:publickey_url` attribute to the `edgemicro-auth/jwkPublicKeys` endpoint in your Apigee Edge organization/environment. For example:
```
extauth:
publickey_url: 'https://your_org-your_env.apigee.net/edgemicro-auth/jwkPublicKeys'
```
5. Restart Edge Microgateway as you did previously, using the org/env names you used in the config file name. For example:
```
edgemicro start -o foo -e bar -a proxy1 -v 1 -t http://mocktarget.apigee.net -b /
```
6. Get a JWT token from the authorization endpoint. Because you are using the `edgemicro-auth/jwkPublicKeys` endpoint, you can use this CLI command:
> [!NOTE]
> For this step, you will need an Internet connection. The following command fetches a token from Apigee Edge. To do this step, you must have a Apigee organization where you performed a standard Edge Microgateway [setup and configuration](https://docs.apigee.com/api-platform/microgateway/2.5.x/setting-and-configuring-edge-microgateway). After you do this step, you do not need to be connected to the Internet. The token will continue to work in standalone mode until it expires.
You can generate a JWT for Edge Microgateway using the `edgemicro token` command or
an API. For example:
```
edgemicro token get -o your_org -e your_env \
-i G0IAeU864EtBo99NvUbn6Z4CBwVcS2 -s uzHTbwNWvoSmOy
```
Where:
- your_org is the name of your Apigee organization for which you previously configured Edge Microgateway.
- your_env is an environment in the organization.
- The `i` option specifies the Consumer Key from a developer app that has a product that includes the `edgemicro-auth` proxy.
- The `s` option specifies the Consumer Secret from a developer app that has a product that includes the `edgemicro-auth` proxy.
This command asks Apigee Edge to generate a JWT that can then be used to verify API
calls.
See also [Generate a token](https://docs.apigee.com/api-platform/microgateway/2.5.x/cli-reference-edge-microgateway#generate-a-token).
### Test the standalone configuration
To test the configuration, call the API with the token added in the Authorization header as follows:
```
curl http://localhost:8000/echo -H "Authorization: Bearer your_token
```
Example:
```
curl http://localhost:8000/echo -H "Authorization: Bearer eyJraWQiOiIxIiwidHlwIjo...iryF3kwcDWNv7OQ"
```
Example output:
```
{
"headers":{
"user-agent":"curl/7.54.0",
"accept":"*/*",
"x-api-key":"DvUdLlFwG9AvGGpEgfnNGwtvaXIlUUvP",
"client_received_start_timestamp":"1535134472699",
"x-authorization-claims":"eyJhdDbiO...M1OTE5MTA1NDkifQ==",
"target_sent_start_timestamp":"1535134472702",
"x-request-id":"678e3080-a7ae-11e8-a70f-87ae30db3896.8cc81cb0-a7c9-11e8-a70f-87ae30db3896",
"x-forwarded-proto":"http",
"x-forwarded-host":"localhost:8000",
"host":"mocktarget.apigee.net",
"x-cloud-trace-context":"e2ac4fa0112c2d76237e5473714f1c85/1746478453618419513",
"via":"1.1 localhost, 1.1 google",
"x-forwarded-for":"::1, 216.98.205.223, 35.227.194.212",
"connection":"Keep-Alive"
},
"method":"GET",
"url":"/",
"body":""
}
```
## Using local proxy mode
In local proxy mode, Edge Microgateway does not require a
[microgateway-aware](https://docs.apigee.com/api-platform/microgateway/2.5.x/setting-and-configuring-edge-microgateway#part2createentitiesonapigeeedge-1createanedgemicrogatewayawareapiproxyonedge) proxy
to be deployed on Apigee Edge. Instead, you configure a "local proxy" by providing
a local proxy name, basepath, and target URL when you
start the microgateway. API calls to the microgateway are then sent to the target
URL of the local proxy. In all other respects, local proxy mode works exactly the same as running
Edge Microgateway in its normal mode. Authentication works the same, as do spike
arrest and quota enforcement, custom plugins, and so on.
> [!NOTE]
> The two important differences between local mode and regular Edge Microgateway configuration are: (1) in local mode, you do not need to create a microgateway-aware proxy on Apigee Edge and (2) when you create an API product on Edge, you must add only one proxy to it, the `edgemicro-auth` proxy. You do not need to add any other proxies to the product.
### Use case and example
Local proxy mode is useful when you only need to associate one single proxy with an Edge Microgateway
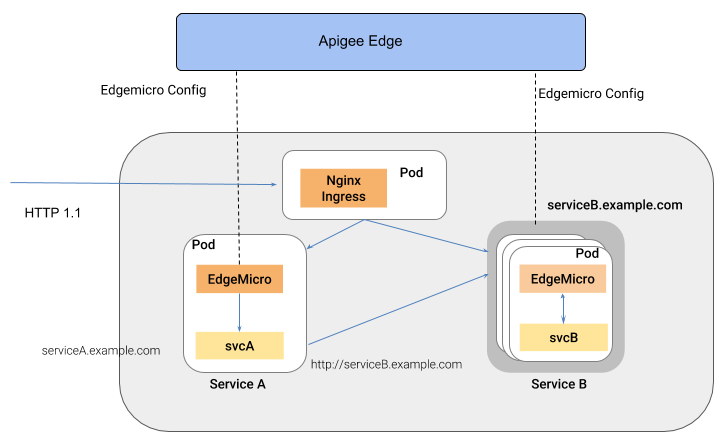
instance. For example, you can inject Edge Microgateway into Kubernetes as a sidecar proxy, where a
microgateway and a service each run in a single pod, and where the microgateway manages traffic to
and from its companion service. The following figure illustrates this architecture where Edge
Microgateway functions as a sidecar proxy in a Kubernetes cluster. Each microgateway instance talks
only to a single endpoint on its companion service:
A benefit of this style of architecture is that Edge Microgateway provides API
management for individual services deployed to a container environment, such as
a Kubernetes cluster.
### Configuring local proxy mode
To configure Edge Microgateway to run in local proxy mode, follow these steps:
1. Be sure that you have Edge Microgateway version 2.5.25 or later installed. If not, you must execute the following command to upgrade to the latest version:
```
npm install -g edgemicro
```
If you need help, see [Installing Edge
Microgateway](https://docs.apigee.com/api-platform/microgateway/2.5.x/installing-edge-microgateway).
2. Run `edgemicro init` to set up your local configuration environment, exactly as you would in a typical Edge Microgateway setup. See also [Configure Edge Microgateway](https://docs.apigee.com/api-platform/microgateway/2.5.x/setting-and-configuring-edge-microgateway#part1configureedgemicrogateway).
3. Run `edgemicro configure`, as you would in a typical Edge Microgateway setup procedure. For example:
```
edgemicro configure -o your_org -e your_env -u your_apigee_username
```
This command deploys the **edgemicro-auth** policy to Edge and returns a key
and secret that you will need to start the microgateway. If you need help, see
[Configure Edge Microgateway](https://docs.apigee.com/api-platform/microgateway/2.5.x/setting-and-configuring-edge-microgateway#part1configureedgemicrogateway).
4. On Apigee Edge, create an API product and with the following mandatory configuration requirements (you can manage all other configurations as you wish):
- You **must** add the **edgemicro-auth** proxy to the product. This proxy was deployed automatically when you ran `edgemicro configure`.
- You **must** provide a resource path. Apigee recommends adding this path to the product: `/**`. To learn more, see [Configuring the behavior of the resource path](https://docs.apigee.com/api-platform/publish/create-api-products#resourcebehavior). See also [Create API
products](https://docs.apigee.com/api-platform/publish/create-api-products) in the Edge documentation.
5. On Apigee Edge, create a developer, or you can use an existing developer if you
wish. For help, see [Adding developers using the Edge management UI](https://docs.apigee.com/api-platform/publish/adding-developers-your-api-product#addingdevelopersusingtheedgemanagementui).
6. On Apigee Edge, create a developer app. You **must** add the API product you just created to the app. For help, see [Registering an app in the Edge
management UI](https://docs.apigee.com/api-platform/publish/creating-apps-surface-your-api#registeringanappintheedgemanagementui).
7. On the machine where Edge Microgateway is installed, export the following environment variable with the value "1".
```
export EDGEMICRO_LOCAL_PROXY=1
```
8. Execute the following `start` command:
```
edgemicro start -o your_org -e your_environment -k your_key -s your_secret \
-a local_proxy_name -v local_proxy_version -t target_url -b base_path
```
Where:
- your_org is your Apigee organization.
- your_environment is an environment in your organization.
- your_key is the key that was returned when you ran `edgemicro configure`.
- your_secret is the secret that was returned when you ran `edgemicro configure`.
- local_proxy_name is the name of the local proxy that will be created.
- local_proxy_version is the version number for the proxy.
- target_url is the URL for the target of the proxy (the service the proxy will call).
- base_path is the base path of the proxy. This value must start with a forward slash. For a root base path, specify just a forward slash; for example, "/".
For example:
```
edgemicro start -o your_org -e test -k 7eb6aae644cbc09035a...d2eae46a6c095f \
-s e16e7b1f5d5e24df...ec29d409a2df853163a -a proxy1 -v 1 \
-t http://mocktarget.apigee.net -b /echo
```
### Testing the configuration
You can test the local proxy configuration by calling the proxy endpoint. For example,
if you specified a basepath of `/echo`, you can call the proxy as follows:
```
curl http://localhost:8000/echo
{
"error" : "missing_authorization",
"error_description" : "Missing Authorization header"
}
```
This initial API call produced an error because you did not provide a valid API key. You can find the key
in the Developer app you created previously. Open the app in the Edge UI, copy
the Consumer Key, and use that key as follows:
```
curl http://localhost:8000/echo -H 'x-api-key:your_api_key'
```
For example:
```
curl http://localhost:8000/echo -H "x-api-key:DvUdLlFwG9AvGGpEgfnNGwtvaXIlUUvP"
```
Example output:
```
{
"headers":{
"user-agent":"curl/7.54.0",
"accept":"*/*",
"x-api-key":"DvUdLlFwG9AvGGpEgfnNGwtvaXIlUUvP",
"client_received_start_timestamp":"1535134472699",
"x-authorization-claims":"eyJhdWQiOi...TQ0YmUtOWNlOS05YzM1OTE5MTA1NDkifQ==",
"target_sent_start_timestamp":"1535134472702",
"x-request-id":"678e3080-a7ae-11e8-a70f-87ae30db3896.8cc81cb0-a7c9-11e8-a70f-87ae30db3896",
"x-forwarded-proto":"http",
"x-forwarded-host":"localhost:8000",
"host":"mocktarget.apigee.net",
"x-cloud-trace-context":"e2ac4fa0112c2d76237e5473714f1c85/1746478453618419513",
"via":"1.1 localhost, 1.1 google",
"x-forwarded-for":"::1, 216.98.205.223, 35.227.194.212",
"connection":"Keep-Alive"
},
"method":"GET",
"url":"/",
"body":""
}
```