` and `` text |
| Accent | Navigation, links, and accented buttons |
| Warn | Warnings and errors |
### Customize the color palette using the basic style editor
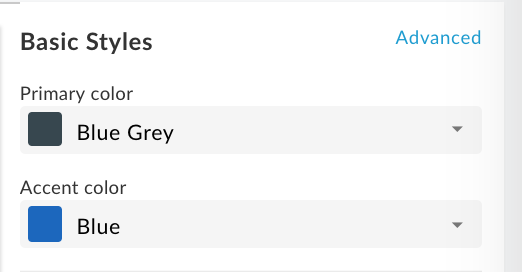
Quickly customize the **primary** and **accent** color palettes using the basic styles editor.
> [!NOTE]
> **Note:** Accent color is used for navigational elements, such as buttons and highlights. Avoid using white or other very light colors for the accent color as this will negatively impact the visibility of navigation.
To customize the color palette using the basic styles editor:
1. [Access the theme editor](https://docs.apigee.com/api-platform/publish/portal/api-portal-themes#theme-editor).
2. To customize the primary color, in the **Primary color** drop-down select a color or click **Custom** and enter a custom hexadecimal color value in the text box.
3. To customize the accent color, in the **Accent color** drop-down select a color or click **Custom** and enter a custom hexadecimal color value in the text box.
4. Click **Save** to save your changes.
5. View your changes in the preview pane or click **Preview** to preview the portal changes in a browser.
**Note**: You can click through your portal navigation in the preview pane to view the changes on all pages.
6. Click **Publish** to publish your theme. You will be prompted to confirm the update.
### Customize the color palette by overriding theme variables
To customize the color palette by overriding theme variables, [access the advanced theme editor](https://docs.apigee.com/api-platform/publish/portal/api-portal-themes#override-variables) and include one or more of the following variables with adjusted values in the **Variables** section to change the primary, secondary, accent, or warning message colors, respectively. See [About the color palette categories](https://docs.apigee.com/api-platform/publish/portal/api-portal-themes#color-palette-categories).
$primary: mat-palette($mat-grey, 800, 100, 900);
$secondary: mat-palette($mat-green, 700, 100, 900);
$accent: mat-palette($mat-blue, 600, 700, 900);
$warn: mat-palette($mat-red);
> [!NOTE]
> **Note:** Accent color is used for navigational elements, such as buttons and highlights. Avoid using white or other very light colors for the accent color as this will negatively impact the visibility of navigation.
View the contents of the imported [material theming SCSS](https://docs.apigee.com/static/files/material-theming.scss.txt) file (`material-theming.scss`) to identify the predefined color variables (such as `$mat-grey`). The numerical values indicate the shading values for the default, lighter, and darker elements, respectively.
Alternatively, you can create your own color variable. For example:
> [!NOTE]
> **Note:** When creating your own color variable, you must define color settings for **all numerical values** listed below. Otherwise, portal pages may not load properly.
$my-color-variable: (
50 : #f9f0e7,
100 : #f0d8c2,
200 : #e6bf9a,
300 : #dba572,
400 : #d49153,
500 : #cc7e35,
600 : #c77630,
700 : #c06b28,
800 : #b96122,
900 : #ad4e16,
A100 : #ffebe0,
A200 : #ffc9ad,
A400 : #ffa77a,
A700 : #ff9661,
// Color to render text presented on a background of the same level
contrast: (
50 : #000000,
100 : #000000,
200 : #000000,
300 : #000000,
400 : #000000,
500 : #000000,
600 : #000000,
700 : #ffffff,
800 : #ffffff,
900 : #ffffff,
A100 : #000000,
A200 : #000000,
A400 : #000000,
A700 : #000000,
)
);
Then, use it to change the color palette, as shown in the following example:
`$primary: mat-palette($my-color-variable, 900, 200, 400);`
## Customize the font family and styles
Customize the font family and styles using the [basic styles editor](https://docs.apigee.com/api-platform/publish/portal/api-portal-themes#font-basic) or by [overriding theme variables](https://docs.apigee.com/api-platform/publish/portal/api-portal-themes#font-advanced). You can also [import a custom font](https://docs.apigee.com/api-platform/publish/portal/api-portal-themes#import-font).
### Customize the font family and styles using the basic styles editor
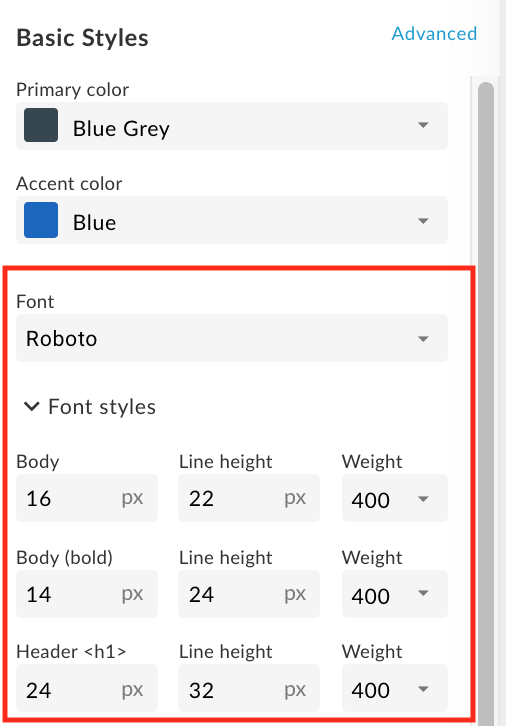
Quickly customize the font family and styles using the basic styles editor, as shown in the following figure.
To customize the font family and styles using the basic styles editor:
1. [Access the theme editor](https://docs.apigee.com/api-platform/publish/portal/api-portal-themes#theme-editor).
2. To change the font family, select a value in the **Font** drop-down.
3. To change the font styles, expand the **Font styles** section and edit the styles, as required, including the font size, line height, and font weight for the desired HTML elements.
4. Click **Save** to save your changes.
5. View your changes in the preview pane or click **Preview** to preview the portal changes in a browser.
**Note**: You can click through your portal navigation in the preview pane to view the changes on all pages.
6. Click **Publish** to publish your theme. You will be prompted to confirm the update.
### Customize the font family and styles by overriding theme variables
To customize the font family and styles by overriding theme variables, [access the advanced theme editor](https://docs.apigee.com/api-platform/publish/portal/api-portal-themes#override-variables) and include one or more of the [font family and style](https://docs.apigee.com/api-platform/publish/portal/api-portal-themes#variable-reference-fonts) variables with adjusted values in the **Variables** section.
For example, to change the default font to Arial, define the following variable:
$typography-main-font-family: 'Arial';
### Import a custom font
Import a Google font (not included in the set of default fonts) or your own custom font, then reference the custom font in your style sheet, as described below.
#### Import a Google font
To import a Google font, [access the advanced theme editor](https://docs.apigee.com/api-platform/publish/portal/api-portal-themes#style-elements) and import the font in the **Custom Styles** section, as shown below:
@import url(https://fonts.googleapis.com/css?family=Indie+Flower);
#### Import a custom font
Import your own custom font using the [@font-face](https://developer.mozilla.org/en-US/docs/Web/CSS/@font-face) CSS rule. The `@font-face` rule supports a number of different file format types, including TrueType (TTF), Web Open Font Format (WOFF), and more.
To import your own custom font:
1. Optionally, upload the font file to the assets manager, as described in [Upload a file](https://docs.apigee.com/api-platform/publish/portal/portal-files#upload-file).
2. [Access the advanced theme editor](https://docs.apigee.com/api-platform/publish/portal/api-portal-themes#style-elements) and add the `@font-face` rule to the **Custom Styles** section, where `font-family` specifies the font name, `url` specifies the location of the font file (in this case, the assets manager), `MyCustomFont.tff` is the name of your custom font file, and `format` specifies the font format.
@font-face {
font-family: 'MyCustomFont';
src: url('files/MyCustomFont.tff') format('truetype')
}
#### Reference the custom font in your style sheet
Reference the custom font in one of the [font family and style](https://docs.apigee.com/api-platform/publish/portal/api-portal-themes#variable-reference-fonts) variables in the **Variables** section. For example:
$typography-main: mat-typography-config(
$font-family: '"Indie Flower", "Oxygen", sans-serif',
$display-4: mat-typography-level(112px, 112px, 300), // One-off huge headers
$display-3: mat-typography-level(56px, 56px, 400), // One-off large headers
$display-2: mat-typography-level(45px, 48px, 400), // One-off medium headers
$display-1: mat-typography-level(34px, 40px, 400), // One-off small headers
$headline: mat-typography-level(24px, 32px, 400), // tags
$title: mat-typography-level(20px, 32px, 500), // tags
$subheading-2: mat-typography-level(16px, 28px, 400), // tags
$subheading-1: mat-typography-level(15px, 24px, 400), // tags
$body-2: mat-typography-level(14px, 24px, 500), // Bolder body text
$body-1: mat-typography-level(16px, 22px, 400), // Base body text
$caption: mat-typography-level(12px, 20px, 400), // Smaller body and hint text
$button: mat-typography-level(14px, 14px, 500), // Buttons
$input: mat-typography-level(16px, 1.125, 400) // Input form fields
);
## Customize the logos
You can customize the logos used in the portal at the following locations:
| Logo location | Default file size |
|---|---|
| [Desktop navigation toolbar](https://docs.apigee.com/api-platform/publish/portal/api-portal-themes#navbar-logo) | 196 x 32 pixels |
| [Mobile navigation toolbar](https://docs.apigee.com/api-platform/publish/portal/api-portal-themes#navbar-logo) | 156 x 32 pixels |
| [Favicon in browser address bar](https://docs.apigee.com/api-platform/publish/portal/api-portal-themes#favicon) (and other locations) | 32 x 32 pixels |
| [Sign In page](https://docs.apigee.com/api-platform/publish/portal/api-portal-themes#sign-in-logo) | 392 x 64 pixels |
### Customize the logo in the navigation toolbar for desktop and mobile displays
Cutomize the logo in the navigation toolbar for desktop and mobile displays. Depending on the width of your browser, you may see the desktop or mobile version of the logo.
You cannot delete the primary logo, you can only replace it. If you do not specify a logo for the mobile display, the primary logo is used by default.
> [!NOTE]
> If your desktop and mobile logos are a different size than the defaults, they are resized automatically to 60% of the height of the navigation toolbar. You can adjust the height of the navigation toolbar, as described in [Customize the navigation toolbar](https://docs.apigee.com/api-platform/publish/portal/api-portal-themes#navbar).
To customize the logo used in the navigation toolbar for desktop and mobile displays:
1. Obtain one or more copies of your company logo that would be suitable for use.
Refer to the previous table for recommended sizes.
2. [Access the theme editor](https://docs.apigee.com/api-platform/publish/portal/api-portal-themes#theme-editor).
3. To replace the logo in the top navigation toolbar on **desktop** displays:
a. Under **Basic Styles** in the right pane click  under the **Primary logo** field.
b. Browse for the **desktop version of your logo** in your local directory.
c. Click **Open** to upload the file.
4. To replace the logo in the top navigation toolbar on **mobile** displays:
a. Under **Basic Styles** in the right pane expand **Logo options** and click  under the **Mobile logo** field.
b. Browse for the **mobile version of your logo** in your local directory.
c. Click **Open** to upload the file.
5. Click **Save** to preview your changes in the left pane.
6. Click **Publish** to publish the changes to your portal. Confirm the operation when prompted.
### Customize the favicon
To customize the [favicon](https://en.wikipedia.org/wiki/Favicon) used in the web browser address bar (and other locations:
1. Obtain a copy of your company logo that would be suitable for use as the favicon.
Refer to the previous table for recommended size.
2. [Access the theme editor](https://docs.apigee.com/api-platform/publish/portal/api-portal-themes#theme-editor).
3. Under **Basic Styles** in the right pane expand **Logo options** and click  under the **Favicon** field.
4. Browse for the **favicon version of your logo** in your local directory.
5. Click **Open** to upload the file.
6. Click **Save** to preview your changes in the left pane.
7. Click **Publish** to publish the changes to your portal. Confirm the operation when prompted.
### Customize the logo on the Sign In page
Customize the logo on the Sign In page when configuring the registration and sign-in experience for your developer program, as described in
[Manage company information](https://docs.apigee.com/api-platform/publish/portal/configure-register-sign-in#manage_company_information).
## Customize the navigation toolbar
The following provide some quick tips for customizing the navigation toolbar:
- Customize the color of the navigation toolbar in the header and footer by changing the **primary color** , as described in [Customize the color palette](https://docs.apigee.com/api-platform/publish/portal/api-portal-themes#color-palette).
- Customize the font size and style of the menu items in the navigation toolbar in the header and footer by changing the **Font** and **Buttons** style, as described in [Customize the font family and styles](https://docs.apigee.com/api-platform/publish/portal/api-portal-themes#font).
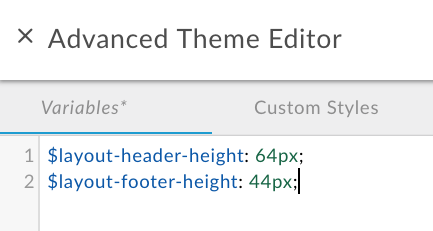
- Customize the height of the header navigation toolbar by [accessing the advanced theme editor](https://docs.apigee.com/api-platform/publish/portal/api-portal-themes#override-variables) and include the following variable with your adjusted value in the **Variables** section: `$layout-header-height: 64px;`
- Customize the height of the footer navigation toolbar by [accessing the advanced theme editor](https://docs.apigee.com/api-platform/publish/portal/api-portal-themes#override-variables) and include the following variable with your adjusted value in the **Variables** section: `$layout-footer-height: 44px;`
- [Customize the logo in the navigation toolbar for desktop and mobile displays](https://docs.apigee.com/api-platform/publish/portal/api-portal-themes#navbar).
## Customize the background image
Customize the background image on the home page by performing any of the following tasks:
- Upload your own version of the **home-background.jpg** image to the assets manager using the same name and relative file size (3000 pixels x 1996 pixels). For more information, see [Manage your assets](https://docs.apigee.com/api-platform/publish/portal/portal-files).
- Modify the background image filename and its padding by [accessing the advanced theme editor](https://docs.apigee.com/api-platform/publish/portal/api-portal-themes#style-elements) and including the following SCSS with adjusted values in the **Custom Styles** section:
#index {
&.main {
.main-content {
padding: 0;
background-image: url('/files/home-background.jpg');
background-size: cover;
}
}
}
- Add a background image to all pages in the portal by [accessing the advanced theme editor](https://docs.apigee.com/api-platform/publish/portal/api-portal-themes#style-elements) and including the following SCSS with the adjusted value in the **Custom Styles** section:
body {
background-image: url('/files/background-image.jpg');
}
## Customize the typography
Customize the typography by accessing the [accessing the advanced theme editor](https://docs.apigee.com/api-platform/publish/portal/api-portal-themes#override-variables) and adjusting the values for one or more of the following typography variables in the **Variables** section:
- `$typography-main`
- `$typography-header`
- `$typography-footer`
- `$typography-context-bar`
For example:
// Main content typography (includes dialog and notification popups)
$typography-main: mat-typography-config(
$font-family: 'Roboto, "Oxygen", sans-serif',
$display-4: mat-typography-level(112px, 112px, 300), // One-off huge headers
$display-3: mat-typography-level(56px, 56px, 400), // One-off large headers
$display-2: mat-typography-level(45px, 48px, 400), // One-off medium headers
$display-1: mat-typography-level(34px, 40px, 400), // One-off small headers
$headline: mat-typography-level(24px, 32px, 400), // tags
$title: mat-typography-level(20px, 32px, 500), // tags
$subheading-2: mat-typography-level(16px, 28px, 400), // tags
$subheading-1: mat-typography-level(15px, 24px, 400), // tags
$body-2: mat-typography-level(14px, 24px, 500), // Bolder body text
$body-1: mat-typography-level(16px, 22px, 400), // Base body text
$caption: mat-typography-level(12px, 20px, 400), // Smaller body and hint text
$button: mat-typography-level(14px, 14px, 500), // Buttons
$input: mat-typography-level(16px, 1.125, 400) // Input form fields
);
Then, you can apply the typography to a specific CSS selector, as shown in the following example:
`@include mat-base-typography($custom-typography-config, '.css-selector');`
Alternatively, you can apply a specific typography level defined in the custom typography to a CSS selector, as shown in the following example:
.css-selector {
@include mat-typography-level-to-styles($custom-typography-config, display-3);
}
## Customize the theme using the advanced theme editor
Customize the theme by [overriding theme variables](https://docs.apigee.com/api-platform/publish/portal/api-portal-themes#override-variables) or by [customizing theme style elements](https://docs.apigee.com/api-platform/publish/portal/api-portal-themes#style-elements) directly in the advanced theme editor.
> [!NOTE]
> The style customizations that are in effect can be influenced by CSS specificity rules, as described in [Understand CSS specificity rules](https://docs.apigee.com/api-platform/publish/portal/api-portal-themes#css-specificity-rules).
### Override theme variables
Override theme variables in the **Variables** section of the advanced theme editor. For a list of theme variables, see [Theme variable reference](https://docs.apigee.com/api-platform/publish/portal/api-portal-themes#variable-reference).
For example, to customize the height of the header and footer navigation toolbars, include the following variables, respectively, with adjusted values in the **Variables** section of the advanced theme editor:
For additional examples, see:
- [Customize the color palette by overriding theme variables](https://docs.apigee.com/api-platform/publish/portal/api-portal-themes#color-palette-advanced)
- [Customize the font family and styles by overriding theme variables](https://docs.apigee.com/api-platform/publish/portal/api-portal-themes#font-advanced)
To override theme variables:
1. [Access the theme editor](https://docs.apigee.com/api-platform/publish/portal/api-portal-themes#theme-editor).
2. In the right pane, click **Advanced**.
3. Click **Variables**.
4. Add your variable overrides.
For a list of variables that can be overridden, see [Theme variable reference](https://docs.apigee.com/api-platform/publish/portal/api-portal-themes#variable-reference).
5. Click **Save** to save your changes.
6. Click **x** to close the advanced theme editor.
7. View your changes in the preview pane or click **Preview** to preview the portal changes in a browser. **Note**: You can click through your portal navigation in the preview pane to view the changes on all pages.
8. Click **Publish** to publish your theme. You will be prompted to confirm the update.
### Customize theme style elements
Customize the theme style elements directly in the **Custom Styles** section of the advanced theme editor.
For example, to change the color of the **Create button on the New App page** that appears when [registering apps](https://docs.apigee.com/api-platform/publish/portal/portal-interact#register-apps) in the portal, include the following theme style element with an adjusted value:
.main .main-content button.app-save {
color: blue;
}
See also [Customize the background image](https://docs.apigee.com/api-platform/publish/portal/api-portal-themes#background-image).
> [!NOTE]
> Note the following:
>
> - All SCSS style elements are supported.
> - When customizing the theme consider that future updates to the base theme could cause unexpected results.
To customize the theme style elements:
1. [Access the theme editor](https://docs.apigee.com/api-platform/publish/portal/api-portal-themes#theme-editor).
2. In the right pane, click **Advanced**.
3. Click **Custom Styles**.
4. Add your theme styles elements.
5. Click **Save** to save your changes.
6. Close **x** to close the advanced theme editor.
7. View your changes in the preview pane or click **Preview** to preview the portal changes in a browser.
**Note**: You can click through your portal navigation in the preview pane to view the changes on all pages.
8. Click **Publish** to publish your theme. You will be prompted to confirm the update.
## Create a full-width panel in a portal page
> [!NOTE]
> In the [20.07.27 release](https://docs.apigee.com/release/notes/200727-apigee-edge-public-cloud-release-notes-integrated-portal#full-width-panel), the maximum width of page content has been limited to improve responsiveness, which may constrain any formerly full-width panels within custom pages.
To create a full-width panel in a portal page:
1. Add the following theme style elements in the advanced theme editor, as described in [Customize theme style elements](https://docs.apigee.com/api-platform/publish/portal/api-portal-themes#style-elements):
.full-width__container {
position: relative;
left: 50%;
right: 50%;
max-width: 100vw;
margin-left: -50vw;
margin-right: -50vw;
background-image: url("/files/your-image.jpg");
background-size: cover;
background-position: 50% 50%;
padding: 0;
}
.full-width__centered {
@include centered-content();
}
.full-width__content {
// Add any 'additional' padding here and NOT in .full-width__centered. Adding padding to
// .full-width__centered will result in a horizontal scroll bar. You can exclude this class
// and corresponding container if no additional padding control other than the
// min page padding is needed.
}
2. Edit the portal page content to include the following `` element, as described in [Develop portal content using the page editor](https://docs.apigee.com/api-platform/publish/portal/page-editor):
Full Width Container
This content will align with the page header and other content outside
of this full width container
## Publish the theme
> [!NOTE]
> Apigee recommends that you preview all content in your portal before publishing to your live portal.
To publish to the live portal the theme and style customizations that you have added:
1. [Access the theme editor](https://docs.apigee.com/api-platform/publish/portal/api-portal-themes#theme-editor).
2. Click **Publish**.
To view your published content in the live portal, click **View Portal** in the top navigation toolbar.
## Understand CSS specificity rules
> [!NOTE]
> Use of the `!important` rule on a style element declaration to override other declarations is considered bad practice and is not recommended. The `!important` rule impacts the cascading and specificity rules of CSS and can make debugging your style element declarations more difficult.
CSS specificity describes the method used by a browser to determine precedence for CSS style element declarations when conflicts arise. CSS specificity is calculated by applying a weight to a specific CSS style element declaration based on its selector type. The more specific the CSS selector, the higher the weight. An ID attribute, for example, will be given a higher weight in the calculation than a type selector.
For example, if you define the following style elements in your CSS code, the paragraph element will be colored red because the p style element declaration within a div element is more specific than the p style element declaration.
div p { color: red } ← More specific
p { color: blue }
Similarly, if you define the following style element declarations in your CSS code, then any text enclosed in `` tags will be colored blue because the id attribute style declaration within a div element is more specific than the `div` style element declaration.
div#test { background-color: blue; } ← More specific
div { background-color: red; }
For style element declarations with the same specificity, the last style element declaration defined will take precedence. For example, given the order of the following style element declarations, the paragraph element will be colored blue.
p { color: red }
p { color: blue } ← Last specified
## Theme variable reference
The following sections summarize the variables that can be overridden in the Variables section of the advanced theme editor, as described in [Override theme variables](https://docs.apigee.com/api-platform/publish/portal/api-portal-themes#override-variables).
- [Base theme variable](https://docs.apigee.com/api-platform/publish/portal/api-portal-themes#variable-reference-base)
- [Color palette variables](https://docs.apigee.com/api-platform/publish/portal/api-portal-themes#variable-reference-color-palette)
- [Font family and style variables](https://docs.apigee.com/api-platform/publish/portal/api-portal-themes#variable-reference-fonts)
- [Typography variables](https://docs.apigee.com/api-platform/publish/portal/api-portal-themes#variable-reference-typography)
### Base theme variable
Customize the foreground colors of the base theme used throughout the site. Valid values are `light` and `dark`.
$base-theme: light;
### Color palette variables
Customize the color palette by modifying the following variables to change the primary, secondary, accent, and warning message colors, respectively. See [About the color palette categories](https://docs.apigee.com/api-platform/publish/portal/api-portal-themes#color-palette-categories).
$primary: mat-palette($mat-grey, 800, 100, 900);
$secondary: mat-palette($mat-green);
$accent: mat-palette($mat-blue);
$warn: mat-palette($mat-red);
The numerical values indicate the shading values for the default, lighter, and darker elements, respectively. View the contents of the [material theming SCSS](https://docs.apigee.com/static/files/material-theming.scss.txt) file (`material-theming.scss`) to identify the predefined color variables.
For example, you can change the primary color palette to green, as follows:
$primary: mat-palette($mat-green, 800, 100, 900);
To customize only the **shading values** for the default color set defined in the base theme, include the following code with adjusted shading values:
$primary: mat-palette($custom-hex-primary, 800, 100, 900);
$secondary: mat-palette($custom-hex-secondary, 800, 100, 900);
$accent: mat-palette($custom-hex-accent, 800, 100, 900);
$warn: mat-palette($custom-hex-warn, 800, 100, 900);
### Font family and style variables
Customize the font family and styles.
// If using a custom font, import it by URL.
$typography-main-font-family: 'Roboto, sans-serif';
// Must resolve to a pixel value
$layout-responsive-breakpoint: 900px;
$layout-header-height: 64px;
$layout-header-menu-item-height: 36px;
$layout-header-menu-item-horiz-padding: 16px;
$layout-header-nested-menu-item-vert-padding: 5px;
$layout-header-menu-resp-item-height: 64px;
$layout-footer-height: 44px;
$layout-footer-menu-item-height: 36px;
$layout-footer-menu-item-horiz-padding: 16px;
$layout-footer-nested-menu-item-vert-padding: 5px;
$layout-context-bar-height: 60px;
$layout-context-bar-button-height: 36px;
$layout-context-bar-button-horiz-padding: 16px;
$layout-main-content-max-width: 1400px;
$layout-main-content-vert-padding: 38px;
$layout-horizontal-min-padding: 24px;
// Uses variables declared above
$typography-header: $typography-main;
$typography-footer: $typography-main;
$typography-context-bar: $typography-main;
Specify your own custom typography for more fine-grained control, as shown in the following example:
$typography-context-bar: mat-typography-config(
$font-family: 'Ubuntu, sans-serif',
$headline: mat-typography-level(30px, 30px, 500), // Title
$button: mat-typography-level(19px, 19px, 200) // Action buttons
);
### Typography variables
Customize the [angular material typography](https://material.angular.io/guide/typography). Each typography level defines a font size, line height, and font weight.
$typography-main-display-4: mat-typography-level(112px, 112px, 300);
$typography-main-display-3: mat-typography-level(56px, 56px, 400);
$typography-main-display-2: mat-typography-level(45px, 48px, 400);
$typography-main-display-1: mat-typography-level(34px, 40px, 400);
$typography-main-headline: mat-typography-level(24px, 32px, 400);
$typography-main-title: mat-typography-level(20px, 32px, 400);
$typography-main-subheading-2: mat-typography-level(16px, 28px, 400);
$typography-main-subheading-1: mat-typography-level(15px, 24px, 400);
$typography-main-body-2: mat-typography-level(14px, 24px, 400);
$typography-main-body-1: mat-typography-level(16px, 22px, 400);
$typography-main-caption: mat-typography-level(12px, 20px, 400);
$typography-main-button: mat-typography-level(14px, 14px, 700);
$typography-main-input: mat-typography-level(16px, 1.125, 400);
// Copies properties declared above into a cohesive object
$typography-main: mat-typography-config(
$font-family: $typography-main-font-family,
$display-4: $typography-main-display-4,
$display-3: $typography-main-display-3,
$display-2: $typography-main-display-2,
$display-1: $typography-main-display-1,
$headline: $typography-main-headline,
$title: $typography-main-title,
$subheading-2: $typography-main-subheading-2,
$subheading-1: $typography-main-subheading-1,
$body-2: $typography-main-body-2,
$body-1: $typography-main-body-1,
$caption: $typography-main-caption,
$button: $typography-main-button,
$input: $typography-main-input);