You're viewing **Apigee Edge** documentation.
[Go to the
**Apigee X** documentation](http://cloud.google.com/apigee/docs/api-platform/publish/portal/manage-portals). info
> [!NOTE]
> **Note:** The integrated portal is available as an Apigee-managed solution for Apigee Edge for Public Cloud customers only. If you are an Apigee Edge for Private Cloud customer, refer to the customer-managed [Drupal portal solution](https://docs.apigee.com/api-platform/publish/drupal/open-source-drupal).
Create and manage your portals, as described in the following sections.
## About the portal roles
You need one of the following roles to manage your portals. To assign roles to a user, see [Assigning roles](https://docs.apigee.com/api-platform/system-administration/understanding-roles).
| Role | Description |
|---|---|
| Portal Administrator | Full CRUD access to the portals in your organization. Before you can assign this role, you need to create a [custom role](https://docs.apigee.com/api-platform/system-administration/creating-custom-roles) named `portaladmin`. To create the `portaladmin` role: 1. [Access the Roles page](https://docs.apigee.com/api-platform/system-administration/creating-custom-roles#ui). 2. Click **+ Custom role**. 3. Enter **portaladmin** as the Role Name. When you set the name to `portaladmin`, permission edit fields will be hidden on the custom role edit page. You are not required to configure access permissions when creating this role. 4. Click **Save**. 5. [Assign the role to one or more users](https://docs.apigee.com/api-platform/system-administration/understanding-roles#assigningrolestoauser). |
| Organization Administrator | Super user. Has full CRUD access to resources in the organization. This is a [built-in-role](https://docs.apigee.com/api-platform/system-administration/edge-built-roles). |
| Read-only Organization Administrator | Has read-only access to resources in the organization. This is a [built-in-role](https://docs.apigee.com/api-platform/system-administration/edge-built-roles). |
## Explore the Portals page
To access the Portals page, use one of the following methods:
- Select **Publish \> Portals** in the side navigation bar.
- When editing a portal, click **Portals** in the top navigation bar.
The portals page opens and lists the current portals.
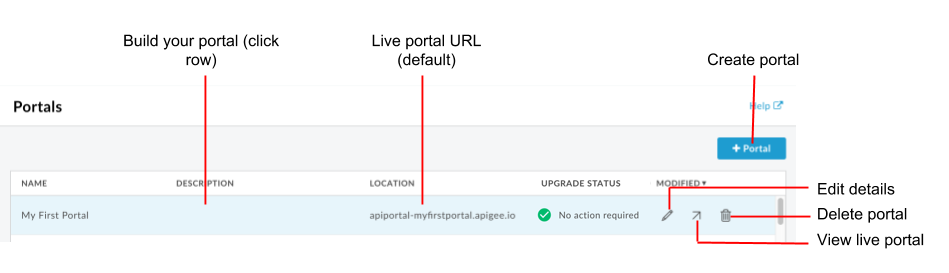
As highlighted in the previous figure, the Portals page enables you to:
- Quickly determine which portals are using the new portal front-end
- [Create a portal](https://docs.apigee.com/api-platform/publish/portal/manage-portals#create-portal)
- [Build your portal and its contents](https://docs.apigee.com/api-platform/publish/portal/manage-portals#build)
- [View the live portal](https://docs.apigee.com/api-platform/publish/portal/view-live-portal)
- [Edit portal details](https://docs.apigee.com/api-platform/publish/portal/manage-portals#edit-portal-details)
- [Delete a portal](https://docs.apigee.com/api-platform/publish/portal/manage-portals#delete-portal)
> [!NOTE]
> **Note:** The **Upgrade status** column displays only if there are one or more portals that need to be upgraded from an older version of the portal. For more information, see [Upgrade to the new version of the portal](https://docs.apigee.com/api-platform/publish/portal/migrate). In the figure above, the portal shown is already using the new version and no action is required.
## Create a portal
Create multiple portals for your organization, as required.
When you create a new portal, a set of starter pages is provided for you to use as a jump-off point. See [About the sample portal](https://docs.apigee.com/api-platform/publish/portal/build-integrated-portal#sample-portal) and [Quick tips for customizing the sample portal](https://docs.apigee.com/api-platform/publish/portal/portal-quick-tips).
> [!NOTE]
> **Note** : You can create a **maximum of 10 portals** in your organization.
To create a new portal:
1. [Access the Portals page](https://docs.apigee.com/api-platform/publish/portal/manage-portals#view-portals).
2. Click **+ Portal**.
3. Enter the following information in the Create a Portal dialog:
| Field | Description |
|---|---|
| Name | Name of portal. The name can contain only letters, numbers, spaces, and the following special characters: period (.), comma (,), dash (-), or underscore (_). Must be unique across all organizations. **Note**: If you delete a portal, you cannot immediately create a portal with the same name as the deleted portal will be stored temporarily in the Trash folder. |
| Domain | (Read only) As you enter the portal name, the default domain for the portal is displayed. For example: '*orgname-portalname* .apigee.io', where *'orgname'* is the organization name and *'portalname'* is defined using the portal name converted to all lowercase and with spaces removed. **Note** : You can customize the domain name, as described in [Customize your domain](https://docs.apigee.com/api-platform/publish/portal/custom-domain). |
| Description | Description of your portal. This information is for internal use only. It will not be displayed on your live portal. |
4. Click **Create**.
## Build your portal
To build your portal and its contents:
1. [Access the Portals page](https://docs.apigee.com/api-platform/publish/portal/manage-portals#view-portals).
2. Click the name of the portal you want to build. The portal landing page is displayed.
3. Build the portal and its contents, as described in [steps to build your portal](https://docs.apigee.com/api-platform/publish/portal/portal-steps).
## Edit portal name and description
To edit portal details, including name and description:
> [!NOTE]
> **Note:** You cannot modify the default URL once the portal is created. However, you can create a [custom domain](https://docs.apigee.com/api-platform/publish/portal/custom-domain).
1. [Access the Portals page](https://docs.apigee.com/api-platform/publish/portal/manage-portals#view-portals).
2. Position your cursor over an existing portal to display the actions menu.
3. Click .
4. Edit the portal name and description.
5. Click **Update**.
## View the live portal
To view the live portal:
1. [Access the Portals page](https://docs.apigee.com/api-platform/publish/portal/manage-portals#view-portals).
2. Position your cursor over an existing portal to display the actions menu.
3. Click .
The live portal opens in a new browser tab.
## Delete a portal
There are times when you may need to delete a portal. For example, if you have created a test portal to try out features in your local environment, you may wish to delete it after the testing phase is complete.
> [!NOTE]
> **Note:** Existing app registrations and API keys of individual developers will not be impacted when you delete a portal, but all Team related app registrations and API Keys will be deleted. See [Where app registration and API keys are stored](https://docs.apigee.com/api-platform/publish/portal/build-integrated-portal#app-keys).
To delete a portal:
1. [Access the Portals page](https://docs.apigee.com/api-platform/publish/portal/manage-portals#view-portals).
2. Position your cursor over an existing portal to display the actions menu.
3. Click .
4. To confirm the delete operation:
a. Type **DELETE** in the text field.
b. Click **Delete**.