You're viewing **Apigee Edge** documentation.
[Go to the
**Apigee X** documentation](http://cloud.google.com/apigee/docs/api-platform/publish/portal/page-editor). info
> [!NOTE]
> **Note:** The integrated portal is available as an Apigee-managed solution for Apigee Edge for Public Cloud customers only. If you are an Apigee Edge for Private Cloud customer, refer to the customer-managed [Drupal portal solution](https://docs.apigee.com/api-platform/publish/drupal/open-source-drupal).
Using the page editor, you define your portal content using Markdown or HTML.
## Explore the page editor
Access the page editor by clicking the name of a page when viewing the list of pages, as described in [Manage the pages in your portal](https://docs.apigee.com/api-platform/publish/portal/portal-pages).
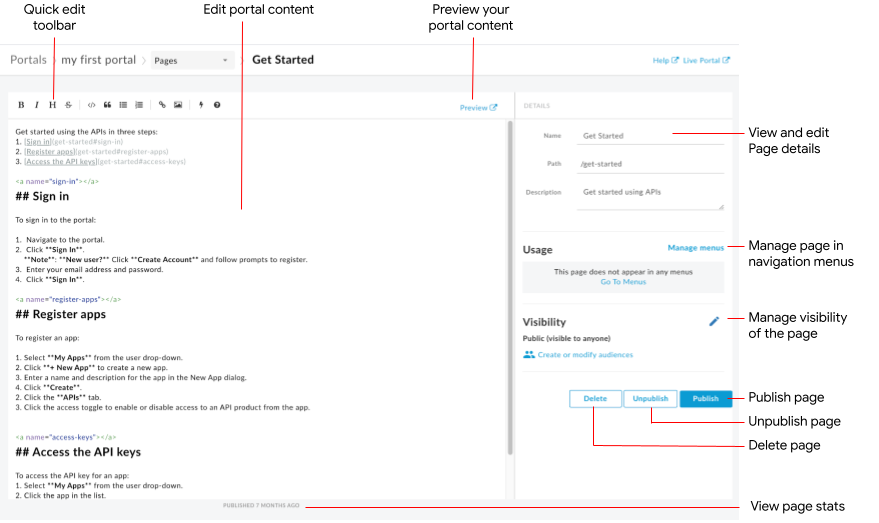
As highlighted in the previous figure, the page editor enables you to:
- [Edit portal content](https://docs.apigee.com/api-platform/publish/portal/page-editor#edit-content) and [add Angular Material components](https://docs.apigee.com/api-platform/publish/portal/page-editor#angular-material) in the left pane
- Use the quick edit toolbar to apply formats or insert markdown tags quickly
- Edit page details, such as name, path, and description, in the right pane
- [Manage the visibility for a page](https://docs.apigee.com/api-platform/publish/portal/page-editor#visibility) in the right pane
- [Preview the portal content](https://docs.apigee.com/api-platform/publish/portal/page-editor#preview)
- Publish or unpublish a page (see [Publish your portal content](https://docs.apigee.com/api-platform/publish/portal/portal-publish))
- Manage the page in your navigation menus (see [Set up navigation](https://docs.apigee.com/api-platform/publish/portal/portal-menus))
- View the amount of time since the page was last published
- [Delete a page](https://docs.apigee.com/api-platform/publish/portal/portal-pages#delete-page)
## Editing content in the page editor
Markdown is a simple formatting language that uses plain text markup that is both easy to read and write. Its syntax is specified using punctuation characters. Markdown is converted to HTML before rendering in your browser.
The **quick edit toolbar** at the top of the page editor provides shortcuts for applying formats (such as bold, italic, and so on) or inserting Markdown tags (such as lists, images, links, and so on). For a quick summary of Markdown syntax, click  in the quick edit toolbar to view the [Markdown syntax quick reference](https://docs.apigee.com/api-platform/publish/portal/markdown-reference).
To undo or redo the last edit, click **Command-z** or **Command-Shift-z**, respectively.
> [!NOTE]
> **Note** : When adding links, note the following:
>
> - When adding links to other pages and images in your portal, it is recommended that you use relative paths rather than absolute paths to avoid broken links if you later decide to [customize your domain](https://docs.apigee.com/api-platform/publish/portal/custom-domain).
> - When adding links to sections within the portal, you need to include the page name followed by the anchor in your link definition. For example, \[Link to anchor\] (pagename#anchorname)
Markdown is recommended if you want to keep your formatting workflow simple. However, it is not intended to replace HTML. There is a wide range of formatting you can do in HTML that you cannot do in Markdown. For example, you can specify a CSS class for an element in HTML; you cannot do this in Markdown:
You can insert HTML anywhere within the content body by simply entering the HTML tags.
> [!NOTE]
> **Note:** When using HTML, note the following:
>
> - Markdown syntax is not valid within HTML tags.
> - You must add a line break between an HTML text block and the Markdown text block that follows it in order for the Markdown content to be formatted correctly.
For information about HTML tags, see the [HTML5 specification](https://www.w3.org/TR/html5/).
## Add Angular Material components
[Angular Material](https://material.angular.io/) provides a state-of-the-art UI component library. Angular Material components enable you to quickly easily construct consistent, responsive, and accessible user interfaces utilizing modern design principles.
### Available components
The portal experience is built using Angular Material, and a limited set of Angular Material components may be used in pages, summarized in the following table.
> [!NOTE]
> **Note:** The Home page in the [sample portal](https://docs.apigee.com/api-platform/publish/portal/building-your-developer-portal#sample-portal) demonstrates how some of these components are used and rendered. A subset of the examples in the table below are based on the Home page contents, with some of the styling removed for readability.
| Component | Example |
|---|---|
| [Buttons](https://material.angular.io/components/button/overview) | The following code creates a rectangular button with elevation.```` ``` Quick Start ``` ```` The following code creates a circular button with a transparent background that includes the warning icon. The color of the button is defined using the [warn color palette](https://docs.apigee.com/api-platform/publish/portal/api-portal-themes#color-palette). |
| [Card](https://material.angular.io/components/card/overview) | The following code creates a card. The card includes button and icon components, as well as heading and body text. The color of the button is defined using the [primary color palette](https://docs.apigee.com/api-platform/publish/portal/api-portal-themes#color-palette).```` ``` class
APIs
Learn about and try our APIs.
``` ```` |
| [Icon](https://material.angular.io/components/icon/overview) | The following code creates a checkmark icon. For a complete list of icons that are supported, see [Material Design - Icons](https://material.io/icons/).```` ``` check_circle ``` ```` |
| [Toolbar](https://material.angular.io/components/toolbar/overview) | The following code creates a simple toolbar with text and a shopping cart icon. ```` ``` My Storeadd_shopping ``` ```` |
## Manage the visibility for a page in your portal
Manage the visibility of a page in your portal by allowing access to:
- Public (visible to anyone)
- Authenticated users
- Selected audiences (if you have [enrolled in the beta release of the audiences feature](https://docs.apigee.com/api-platform/publish/portal/portal-audience#enroll))
To manage the visibility for a page in your portal:
1. Click **Manage** adjacent to the audience in the right pane of the page editor.
2. Select the visibility setting. If you have [enrolled in the beta release of the audiences feature](https://docs.apigee.com/api-platform/publish/portal/portal-audience#enroll), select one of the following options:
- **Public (visible to anyone)** to allow all users to view the page.
- **Authenticated users** to allow only registered users to view the page.
- **Selected audiences** to select the specific audiences that you want to be able to view the page. See [Manage the audiences for your portal](https://docs.apigee.com/api-platform/publish/portal/portal-audience).
To manage your audiences, click **Create or modify audiences**.
Otherwise, select one of the following options:
- **Anonymous users** to allow all users to view the page.
- **Registered users** to allow only registered users to view the page.
3. Click **Apply**.
## Preview portal content
To preview the portal content, click **Preview** in page editor toolbar. Navigate through other pages in your portal to preview the content, as desired.
> [!NOTE]
> **Note:** Apigee recommends that you preview all portal content before you publish it.
## Publishing portal content
To publish portal content, click **Publish** in the right pane. To unpublish the portal content, click **Unpublish** in the right pane.
See also [Publishing your portal content](https://docs.apigee.com/api-platform/publish/portal/portal-publish).
## Delete a page
To delete a page from the portal editor, click **Delete** in the right pane of the page editor. You are prompted to confirm the operation.