You're viewing **Apigee Edge** documentation.
[Go to the
**Apigee X** documentation](http://cloud.google.com/apigee/docs/api-platform/publish/portal/portal-identity-provider). info
> [!NOTE]
> **Note:** The integrated portal is available as an Apigee-managed solution for Apigee Edge for Public Cloud customers only. If you are an Apigee Edge for Private Cloud customer, refer to the customer-managed [Drupal portal solution](https://docs.apigee.com/api-platform/publish/drupal/open-source-drupal).
For integrated portals, you can define identity providers to support the authentication types defined in the following table.
| Authentication type | Description |
|---|---|
| [Built-in](https://docs.apigee.com/api-platform/publish/portal/portal-identity-provider#built-in) | Requires users to pass their credentials (username and password) to the integrated portal for authentication. When you create a new portal, the built-in identity provider is configured and enabled. To understand the sign-in experience from the user perspective, see [Sign in to the portal using user credentials (built-in provider)](https://docs.apigee.com/api-platform/publish/portal/portal-interact#built-in). |
| [SAML (Beta)](https://docs.apigee.com/api-platform/publish/portal/portal-identity-provider#saml) | Security assertion markup language (SAML) is a standard protocol for single sign-on (SSO) environment. SSO authentication using SAML enables users to log in to your Apigee Edge integrated portals without having to create new accounts. Users log in using their centrally managed account credentials. To understand the sign in experience from the user perspective, see [Sign in to the portal using SAML](https://docs.apigee.com/api-platform/publish/portal/portal-interact#saml-auth). |
## Benefits of SAML authentication for integrated portals
Configuring SAML as an identity provider for an integrated portal offers the following benefits:
- **Set up your developer program once and re-use it across multiple integrated portals.** Choose your developer program when creating your integrated portal. Easily update or change the developer program as requirements evolve.
- **Take full control of user management**
Connect your company SAML server to the integrated portal. When users leave your organization and are deprovisioned centrally, they will no longer be able to authenticate with your SSO service to use the integrated portal.
## Configure the built-in identity provider
Configure the built-in identity provider, as described in the following sections.
### Access the Built-in Identity Provider page
To access the built-in identity provider:
1. Select **Publish \> Portals** in the side navigation bar to display the list of portals.
2. Click the row of the portal for which you want to view teams.
3. Click **Accounts** on the portal landing page. Alternatively, you can select **Accounts** in the portal drop-down in the top navigation bar.
4. Click the **Authentication** tab.
5. In the **Identity providers** section, click the **Built-in** provider type.
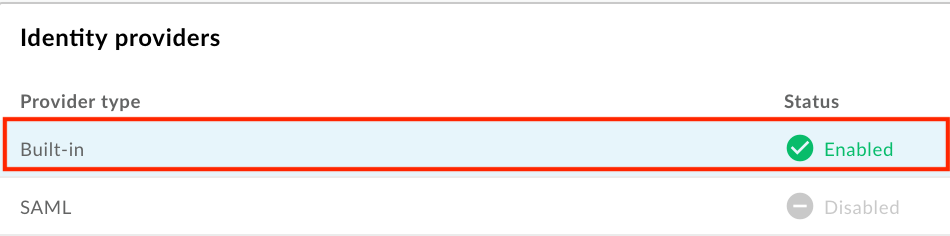
6. Configure the built-in identity provider, as described in the following sections:
- [Enable the built-in identity provider](https://docs.apigee.com/api-platform/publish/portal/portal-identity-provider#enable)
- [Restrict portal registration by email address or domain](https://docs.apigee.com/api-platform/publish/portal/portal-identity-provider#restrict-account-access)
- [Configure email notifications](https://docs.apigee.com/api-platform/publish/portal/portal-identity-provider#configure-email)
### Enable the built-in identity provider
To enable the built-in identity provider:
1. [Access the Built-in Identity Provider page](https://docs.apigee.com/api-platform/publish/portal/portal-identity-provider#access).
2. Click  in the **Provider Configuration** section.
3. Select the **Enabled** checkbox to enable the identity provider.

To disable the built-in identity provider, deselect the checkbox.
> [!NOTE]
> **Note:** At least one identity provider must be enabled to allow users to sign in.
4. Click **Save**.
### Restrict portal registration by email address or domain
Restrict portal registration by identifying the individual email addresses (`developer@some-company.com`) or email domains (`some-company.com`, without the leading `@`) that can create accounts on your portal.
To match all nested subdomains, prepend the `*.` wildcard string to a domain or subdomain. For example, `*.example.com` will match `test@example.com`, `test@dev.example.com`, and so on.
If left blank, any email address can be used to register on the portal.
> [!NOTE]
> **Notes:**
>
> - When users create an account, as described in [Create a user account on the integrated portal](https://docs.apigee.com/api-platform/publish/portal/portal-interact#register), if the email address is allowed access, a confirmation email is sent with a link to complete the registration process.
> - Users with existing accounts, created before the restriction was configured, will continue to be able to sign in to the portal (regardless of whether their email or email domain are permitted access).
> - Email address and domain values are case-insensitive.
> - See also [Configure manual activation of user accounts](https://docs.apigee.com/api-platform/publish/portal/configure-register-sign-in#configure_manual_activation_of_user_accounts).
To restrict portal registration by email address or domain:
1. [Access the Built-in Identity Provider page](https://docs.apigee.com/api-platform/publish/portal/portal-identity-provider#access).
2. Click  in the **Provider Configuration** section.
3. In the Account restrictions section, enter an email address or email domain that you want to allow to register and sign in to the portal in the text box and click **+**.
4. Add additional entries, as required.
5. To delete an entry, click **x** adjacent to the entry.
6. Click **Save**.
### Configure email notifications
> [!NOTE]
> **Note:** Apigee recommends that you configure the SMTP server for the email notifications originating from the portal. See [Configure an SMTP server](https://docs.apigee.com/api-platform/publish/portal/configure-email#smtp).
For the built-in provider, you can enable and configure the following email notifications:
| Email notification | Recipient | Trigger | Description |
|---|---|---|---|
| Account Notify | API provider | Portal user creates a new account | If you [configured your portal to require manual activation of user accounts](https://docs.apigee.com/api-platform/publish/portal/configure-register-sign-in#manual-approval), you need to [manually activate the user account](https://docs.apigee.com/api-platform/publish/portal/api-portal-users#activate_user_account) before the portal user can sign in. > [!NOTE] > **Notes:** > - Ensure that you [Configuring notifications for new user account registration](https://docs.apigee.com/api-platform/publish/portal/configure-register-sign-in#notifications). > - For the beta release, the portal user is given no indication that their account must be manually activated before they can sign in. It is recommended that if you configure manual activation, you expedite the activation of new developer accounts. |
| Account Verify | Portal user | Portal user creates a new account | Provides a secure link to verify account creation. The link expires in 10 minutes. |
When configuring the email notifications:
- Use HTML tags to format the text. Be sure to send a test email to validate the formatting appears as expected.
- You can insert one or more of the following variables which will be substituted when the email notification is sent.
| Variable | Description |
|---|---|
| `{``{firstName}``}` | First name |
| `{``{lastName}``}` | Last name |
| `{``{email}``}` | Email address |
| `{``{siteurl}``}` | Link to the live portal |
| `{``{verifylink}``}` | Link used for account verification |
To configure email notifications:
1. [Access the Built-in Identity Provider page](https://docs.apigee.com/api-platform/publish/portal/portal-identity-provider#access).
2. To configure email notifications sent to:
- API providers for new developer account activation, click  in **Account Notify** section.
- Portal users to verify their identity, click  in **Account Verify** section.
3. Edit the **Subject** and **Body** fields.
4. Click **Send Test Email** to send a test email to your email address.
5. Click **Save**.
## Configure the SAML identity provider (beta)
> [!NOTE]
> **Note:** This is the **beta release of the SAML identity provider**.
Configure the SAML identity provider, as described in the following sections.
> [!CAUTION]
> **Caution:** Identity provider-initiated sign-in flows carry a security risk (for example, risk of a login CSRF or DDOS attack) and are not recommended. Apigee recommends using the integrated portal-initiated sign-in flow, where users click **Sign In** on the integrated portal to initiate authentication.
### Access the SAML Identity Provider page
To access the SAML identity provider:
1. Select **Publish \> Portals** in the side navigation bar to display the list of portals.
2. Click the row of the portal for which you want to view teams.
3. Click **Accounts** on the portal landing page. Alternatively, you can select **Accounts** in the portal drop-down in the top navigation bar.
4. Click the **Authentication** tab.
5. In the **Identity providers** section, click the **SAML** provider type.

6. Configure the SAML identity provider, as described in the following sections:
- [Enable the SAML identity provider](https://docs.apigee.com/api-platform/publish/portal/portal-identity-provider#enable-saml)
- [Configure SAML settings](https://docs.apigee.com/api-platform/publish/portal/portal-identity-provider#saml-settings)
- [Configure custom user attributes for the SAML identity provider](https://docs.apigee.com/api-platform/publish/portal/portal-identity-provider#custom-attributes)
- [Upload a new certificate](https://docs.apigee.com/api-platform/publish/portal/portal-identity-provider#cert)
### Enable the SAML identity provider
To enable the SAML identity provider:
1. [Access the SAML Identity Provider page](https://docs.apigee.com/api-platform/publish/portal/portal-identity-provider#access-saml).
2. Click  in the **Provider Configuration** section.
3. Select the **Enabled** checkbox to enable the identity provider.

To disable the SAML identity provider, deselect the checkbox.
> [!NOTE]
> **Note:** At least one identity provider must be enabled to allow users to sign in.
4. Click **Save**.
5. If you have configured a custom domain, see [Use a custom domain with the SAML identity provider](https://docs.apigee.com/api-platform/publish/portal/portal-identity-provider#custom-domain-saml).
### Configure SAML settings
To configure the SAML settings:
1. [Access the SAML Identity Provider page](https://docs.apigee.com/api-platform/publish/portal/portal-identity-provider#access-saml).
2. In the **SAML Settings** section, click .
3. Click **Copy** adjacent to the **SP metadata URL** .

> [!NOTE]
> **Note:** The SAML identity provider must be [enabled](https://docs.apigee.com/api-platform/publish/portal/portal-identity-provider#enable-saml) in order for the SP metadata URL to be populated.
4. Configure your SAML identity provider using the information in the service provider (SP) metadata file.
For some SAML identity providers, you will be prompted only for the metadata URL. For others, you will need to extract specific information from the metadata file and enter it into a form.
In the latter case, paste the URL into a browser to download the SP metadata file and extract the required information. For example, the entity ID or sign-in URL can be extracted from the following elements in the SP metadata file:
> [!NOTE]
> **Note:** In the SP metadata file, the sign-in URL is referred to as the \`AssertionConsumerService\` (ACS) URL.
- ``
- ``
5. Configure the SAML settings for the **identity provider**.
In the **SAML Settings** section, edit the following values *obtained from your SAML identity provider metadata file*:
| SAML setting | Description |
|---|---|
| Sign-in URL | URL to which users are redirected to sign-in to the SAML identity provider. For example: `https://dev-431871.oktapreview.com/app/googledev431871_devportalsaml_1/exkhgdyponHIp97po0h7/sso/saml` |
| Sign-out URL | URL to which users are redirected to sign-out of the SAML identity provider. Leave this field **blank** if: - Your SAML identity provider does not provide a sign-out URL - You do not want users to be signed out of your SAML identity provider when they sign out of the integrated portal - You want to enable a custom domain (refer to the [known issue](https://docs.apigee.com/release/known-issues#saml)) > [!NOTE] > **Note:** This field is deprecated and will be removed in a future release. |
| IDP entity ID | Unique ID for the SAML identity provider. For example: `http://www.okta.com/exkhgdyponHIp97po0h7` |
6. Click **Save**.
### Configure custom user attributes for the SAML identity provider
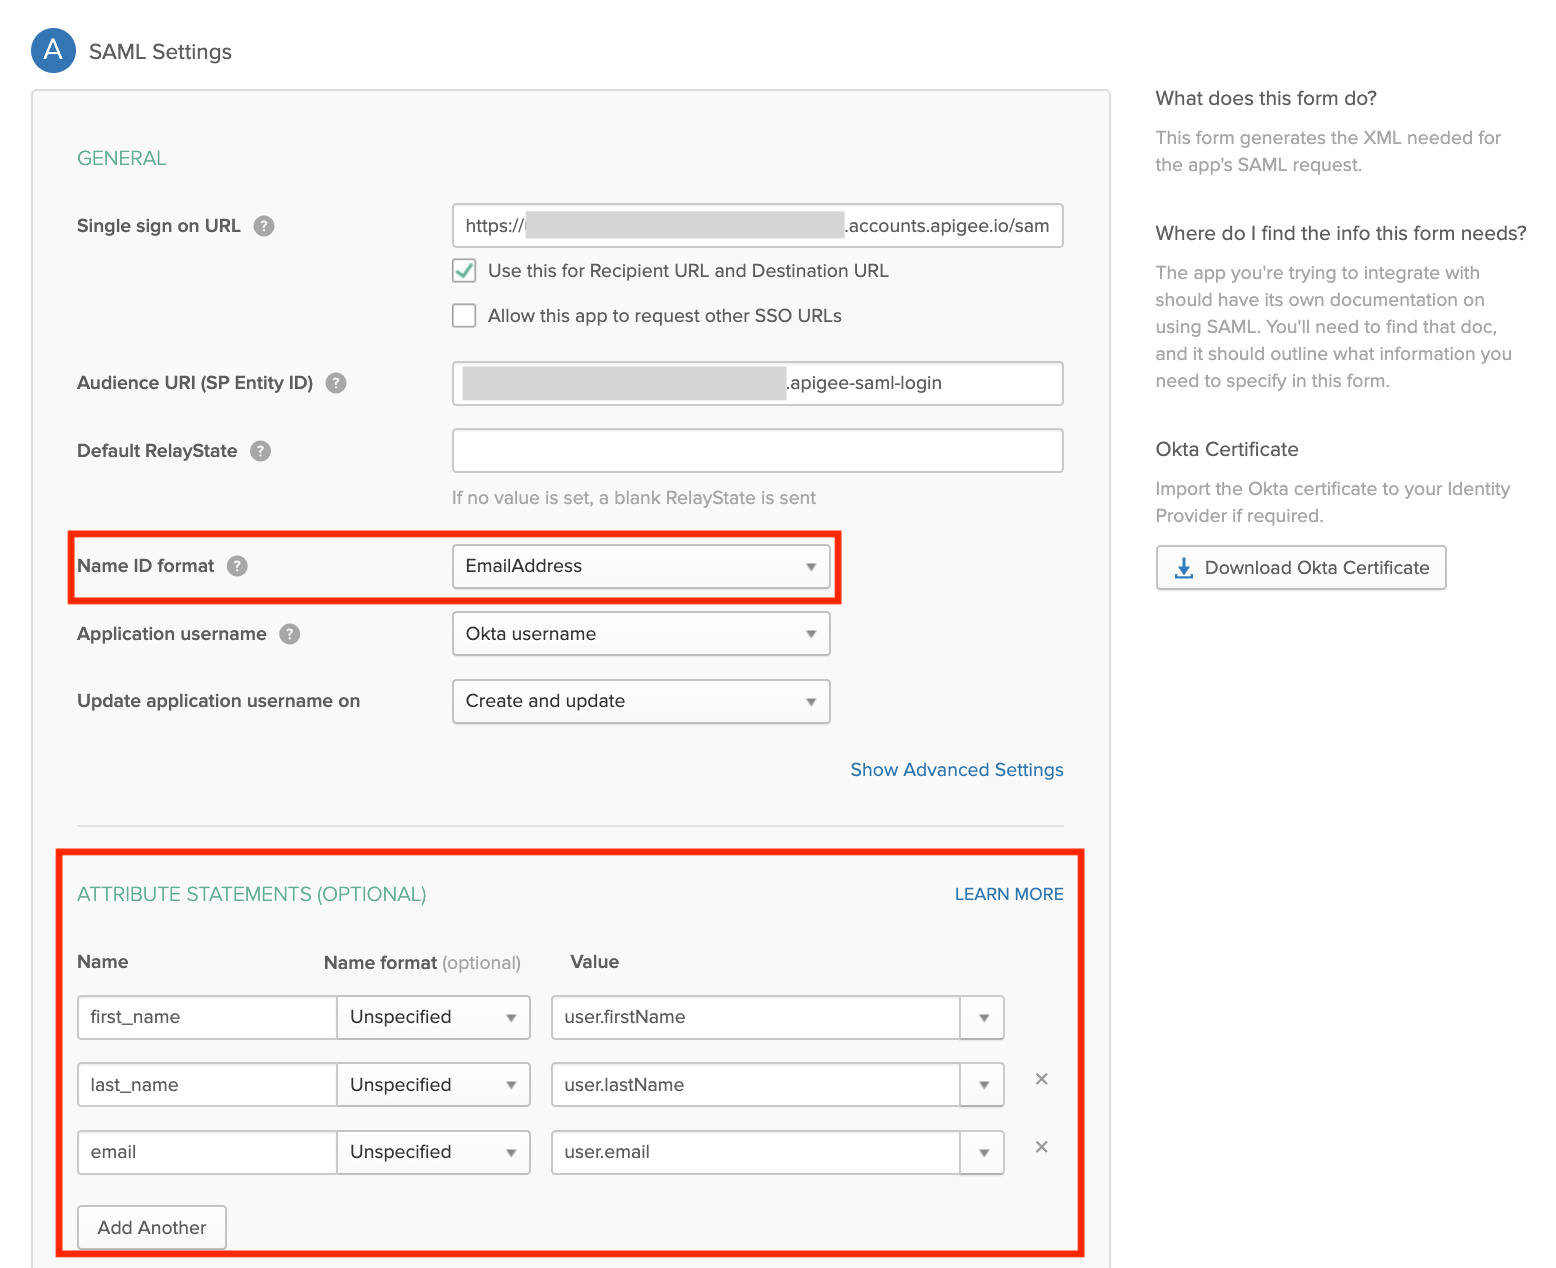
To ensure proper mapping between the SAML identity provider and [portal developer accounts](https://docs.apigee.com/api-platform/publish/portal/api-portal-users), it is recommended that you create and configure the custom user attributes defined in the following table for your SAML identity provider. Set the value of each custom attribute to the corresponding user attribute defined by your SAML identity provider (for example, Okta).
> [!NOTE]
> **Note:** Custom attribute mapping is limited to the three attributes defined in the following table. Full support for custom attribute mapping is not available at this time.
| Custom attribute | Example (Okta) |
|---|---|
| `first_name` | `user.firstName` |
| `last_name` | `user.lastName` |
| `email` | `user.email` |
> [!NOTE]
> **Note:** In addition, ensure that the `NameID` attribute is mapped to the user's email address, which serves as the unique identifier of the portal developer account.
The following shows how to configure custom user attributes and the `NameID` attribute using Okta as your third-party SAML identity provider.
### Use a custom domain with the SAML identity provider
After you configure and enable the SAML identity provider, you can configure a custom domain (such as, `developers.example.com`), as described in [Customize your domain](https://docs.apigee.com/api-platform/publish/portal/custom-domain).
It is important to keep the configuration settings in sync between the custom domain and SAML identity provider. If the configuration settings get out of sync, you may experience issues during authorization. For example, the authorization request sent to the SAML identity provider may have an `AssertionConsumerServiceURL` that is not defined using the custom domain.
To keep the configuration settings in sync between the custom domain and SAML identity provider:
- If you configure or update the custom domain **after** you enable and configure the SAML identity provider, save the custom domain configuration and ensure it is enabled. Wait approximately 30 minutes for the cache to invalidate, then re-configure your SAML identity provider using the updated information in the service provider (SP) metadata file, as described in [Configure SAML settings](https://docs.apigee.com/api-platform/publish/portal/portal-identity-provider#configure_saml_settings). You should see your custom domain in the SP Metadata.
- If you configure a custom domain **before** you configure and enable the SAML identity provider, you need to [reset the custom domain](https://docs.apigee.com/api-platform/publish/portal/portal-identity-provider#reset-domain) (described below) to ensure that the SAML identity provider is configured correctly.
- If you need to reset (disable and re-enable) the SAML identity provider, as described in [Enable the SAML identity provider](https://docs.apigee.com/api-platform/publish/portal/portal-identity-provider#enable-saml), you must also
[Reset the custom domain](https://docs.apigee.com/api-platform/publish/portal/portal-identity-provider#reset-domain) (described below).
#### Reset the custom domain
To reset (disable and enable) the custom domain:
1. Select **Publish \> Portals** in the left navigation and select your portal.
2. Select **Settings** in the drop-down menu in the top navigation bar or on the landing page.
3. Click the **Domains** tab.
4. Click **Disable** to disable the custom domain.
5. Click **Enable** to re-enable the custom domain.
For more information, see [Customize your domain](https://docs.apigee.com/api-platform/publish/portal/custom-domain).
### Upload a new certificate
To upload a new certificate:
1. Download the certificate from your SAML identity provider.
> [!NOTE]
> **Note:** The certificate must be in PEM or PKCSS format. If necessary, [convert an x509 certificate to PEM format](https://docs.apigee.com/api-platform/publish/portal/portal-identity-provider#x509).
2. [Access the SAML Identity Provider page](https://docs.apigee.com/api-platform/publish/portal/portal-identity-provider#access-saml).
3. Click the row of the identity zone for which you want to upload a new certificate.
4. In the **Certificate** section, click .
5. Click **Browse** and navigate to the certificate in your local directory.
6. Click **Open** to upload the new certificate.
The Certificate information fields are updated to reflect the selected certificate.
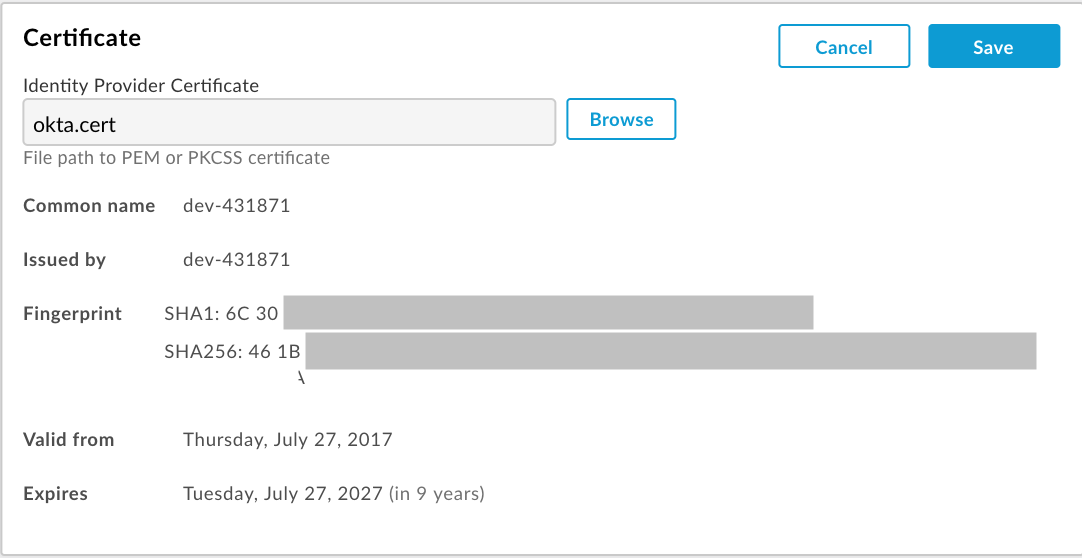
7. Verify that the certificate is valid and has not expired.
8. Click **Save**.
### Convert an x509 certificate to PEM format
If you download an x509 certificate, you need to convert it to PEM format.
To convert an x509 certificate to PEM format:
1. Copy the contents of the `ds:X509Certificate element` from the SAML identity provider metadata file and paste it into your favorite text editor.
2. Add the following line at the top of the file:
`---BEGIN CERTIFICATE---`
3. Add the following line at the bottom of the file:
`---END CERTIFICATE---`
4. Save the file using a `.pem` extension.
The following provides an example of the PEM file contents:
---BEGIN CERTIFICATE---
MIICMzCCAZygAwIBAgIJALiPnVsvq8dsMA0GCSqGSIb3DQEBBQUAMFMxCzAJBgNV
BAYTAlVTMQwwCgYDVQQIEwNmb28xDDAKBgNVBAcTA2ZvbzEMMAoGA1UEChMDZm9v
MQwwCgYDVQQLEwNmb28xDDAKBgNVBAMTA2ZvbzAeFw0xMzAzMTkxNTQwMTlaFw0x
ODAzMTgxNTQwMTlaMFMxCzAJBgNVBAYTAlVTMQwwCgYDVQQIEwNmb28xDDAKBgNV
BAcTA2ZvbzEMMAoGA1UEChMDZm9vMQwwCgYDVQQLEwNmb28xDDAKBgNVBAMTA2Zv
bzCBnzANBgkqhkiG9w0BAQEFAAOBjQAwgYkCgYEAzdGfxi9CNbMf1UUcvDQh7MYB
OveIHyc0E0KIbhjK5FkCBU4CiZrbfHagaW7ZEcN0tt3EvpbOMxxc/ZQU2WN/s/wP
xph0pSfsfFsTKM4RhTWD2v4fgk+xZiKd1p0+L4hTtpwnEw0uXRVd0ki6muwV5y/P
+5FHUeldq+pgTcgzuK8CAwEAAaMPMA0wCwYDVR0PBAQDAgLkMA0GCSqGSIb3DQEB
BQUAA4GBAJiDAAtY0mQQeuxWdzLRzXmjvdSuL9GoyT3BF/jSnpxz5/58dba8pWen
v3pj4P3w5DoOso0rzkZy2jEsEitlVM2mLSbQpMM+MUVQCQoiG6W9xuCFuxSrwPIS
pAqEAuV4DNoxQKKWmhVv+J0ptMWD25Pnpxeq5sXzghfJnslJlQND
---END CERTIFICATE---