You're viewing **Apigee Edge** documentation.
[Go to the
**Apigee X** documentation](http://cloud.google.com/apigee/docs/api-platform/publish/portal/portal-pages). info
> [!NOTE]
> **Note:** The integrated portal is available as an Apigee-managed solution for Apigee Edge for Public Cloud customers only. If you are an Apigee Edge for Private Cloud customer, refer to the customer-managed [Drupal portal solution](https://docs.apigee.com/api-platform/publish/drupal/open-source-drupal).
> [!NOTE]
> **Note:** For information about editing, previewing, and publishing portal pages, and managing the audience for the pages in your portal, see [Develop portal content using the page editor](https://docs.apigee.com/api-platform/publish/portal/page-editor).
Manage the pages in your portal, as described in the following sections.
## About the reserved URL paths
The following URL paths are reserved for use by the developer portal and
cannot be specified as the page path (or as the prefix of a nested page path,
such as `docs/...` or `apis/...`) when creating pages:
- `a`
- `accounts/create`
- `apis`
- `consumers/api`
- `create`
- `docs`
- `files`
- `login`
- `logout`
- `logos`
- `my-apps`
- `portals/api`
- `siteid`
- `sites`
- `smartdocs`
- `teams`
The reserved path `/create` can be used as the target URL of a `MenuItem` or
be linked to from a Page.
The `/create` reserved path will redirect to the
[accounts creation page](https://docs.apigee.com/api-platform/publish/portal/configure-register-sign-in).
## Explore the Pages page
To access the Pages page:
- Select **Publish \> Portals** in the side navigation bar, select your portal, and click **Pages** on the landing page.
- When editing a portal, select **Pages** in the drop-down menu in the top navigation bar.
The list of pages in your portal is displayed.
> [!NOTE]
> **Note:** For a list of the default pages provided with the sample portal, see [About the sample portal](https://docs.apigee.com/api-platform/publish/portal/building-your-developer-portal#sample-portal).
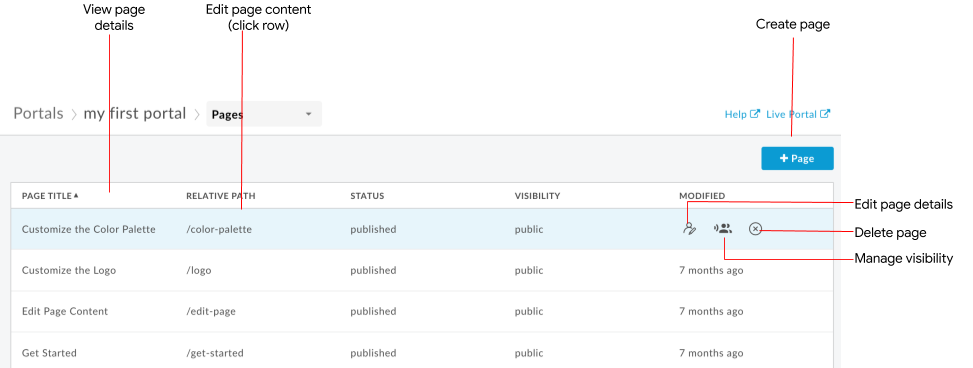
As highlighted in the previous figure, the Pages page lets you:
- [Create a page](https://docs.apigee.com/api-platform/publish/portal/portal-pages#create-page)
- View page details, including name, relative path, status, visibility, and amount of time since the page was last modified
- Edit page [content](https://docs.apigee.com/api-platform/publish/portal/portal-pages#edit-page-contents) and [details](https://docs.apigee.com/api-platform/publish/portal/portal-pages#edit-page-details)
- [Manage the visibility](https://docs.apigee.com/api-platform/publish/portal/portal-pages#visibility) of a page in your portal
- [Delete](https://docs.apigee.com/api-platform/publish/portal/portal-pages#delete-page) pages in your portal
- Sort the list of pages by column (the arrow indicates the active column and direction of the sorted content)
## Create a page
> [!NOTE]
> **Note**: You can create a maximum of 200 pages in your portal.
To create a new page:
1. [Access the Pages page](https://docs.apigee.com/api-platform/publish/portal/portal-pages#explore-ui).
2. Click **+Page**.
3. In the Create a Page dialog, enter the following details:
| Field | Description | Required? |
|---|---|---|
| Name | Name of the page. The page name must be unique within the portal. The name is used in the portal page header and browser tab. | Yes |
| Path | User-friendly relative URL to use for the page (up to 255 characters). For best practices, see [Implement search engine optimization (SEO)](https://docs.apigee.com/api-platform/publish/portal/portal-best-practices#seo). Defaults to the page name with spaces converted to dashes. The path must meet the following requirements: - Use lowercase letters (`a-z`), numbers (`0-9`), dashes (`-`), and forward slashes (`/`) only. Forward slashes can be used to create nested page paths (for example, `guides/getting-started`). Spaces and other special characters are not allowed. - Start and end with a lowercase letter or number (do not include a leading or trailing `/` or `-`). - Do not include consecutive dashes (`--`), consecutive forward slashes (`//`), or adjacent dashes and forward slashes (`/-` or `-/`). **Note** : Avoid specifying a reserved URL path (or a path starting with `/`) when creating a page. For a list of reserved URL paths, see [About the reserved URL paths](https://docs.apigee.com/api-platform/publish/portal/portal-pages#reserved-paths). | Yes |
4. Click **Create** to create the new page.
## Edit the contents of a page
To edit the contents of a page:
1. [Access the Pages page](https://docs.apigee.com/api-platform/publish/portal/portal-pages#explore-ui).
2. Click the name of the page that you want to edit.
3. Edit the contents of the page. See [Develop portal content using the page editor](https://docs.apigee.com/api-platform/publish/portal/page-editor).
Changes that you make to the page are saved automatically.
## Edit the page details
To edit the details for a page, including the name, description, and relative
path:
1. [Access the Pages page](https://docs.apigee.com/api-platform/publish/portal/portal-pages#explore-ui).
2. Position the cursor over the page you want to edit and click  in the actions menu.
3. Edit the page details.
4. Click **Update**.
## Manage the visibility of a page in your portal (beta)
> [!IMPORTANT]
> **Note:** To use the features described in this section, you must have [enrolled in the beta release of the audience management feature](https://docs.apigee.com/api-platform/publish/portal/portal-audience#enroll).
To manage the visibility of a page in your portal:
1. [Access the Pages page](https://docs.apigee.com/api-platform/publish/portal/portal-pages#explore-ui).
2. Position the cursor over the page for which you want to manage visibility and click  in the actions menu. The Visibility dialog opens.
3. Select one of the following options:
- **Public (visible to anyone)** to allow all users to view the page.
- **Authenticated users** to allow only registered users to view the page.
- **Selected audiences** to select the specific audiences that you want to be able to view the page. For information about managing the audiences defined for your portal, see [Manage the audiences for your portal](https://docs.apigee.com/api-platform/publish/portal/portal-audience).
> [!NOTE]
> **Note:** If you set the visibility to **Authenticated users** or **Selected audiences**, the page won't be indexed by search engines.
4. Click **Save**.
## Delete pages from your portal
> [!NOTE]
> **Notes** :
>
> - You cannot delete the Home page. The `index` URL path serves as the default landing page for your portal.
> - To avoid having an orphaned navigation menu or menu item with a broken link to a page that has been removed, it is recommended that you delete any relevant navigation menus or menu items items first, then delete the page.
To delete a page from your portal:
1. [Access the Pages page](https://docs.apigee.com/api-platform/publish/portal/portal-pages#explore-ui).
2. Position the cursor over the page you want to edit and click  in the actions menu.
3. Click **Delete** to confirm the operation.