
You're viewing Apigee Edge documentation.
Go to the
Apigee X documentation. info
Publish APIs to your portal to make them available for consumption by app developers, as described in the following sections.
Overview of API publishing
The process of publishing APIs to your portal is a two-step process:
- Select the API product that you want to publish to your portal.
- Render API reference documentation from a snapshot of your OpenAPI document or GraphQL schema to enable app developers to learn about your APIs. (For more information about snapshots, see What is a snapshot?)
What is published to the portal?
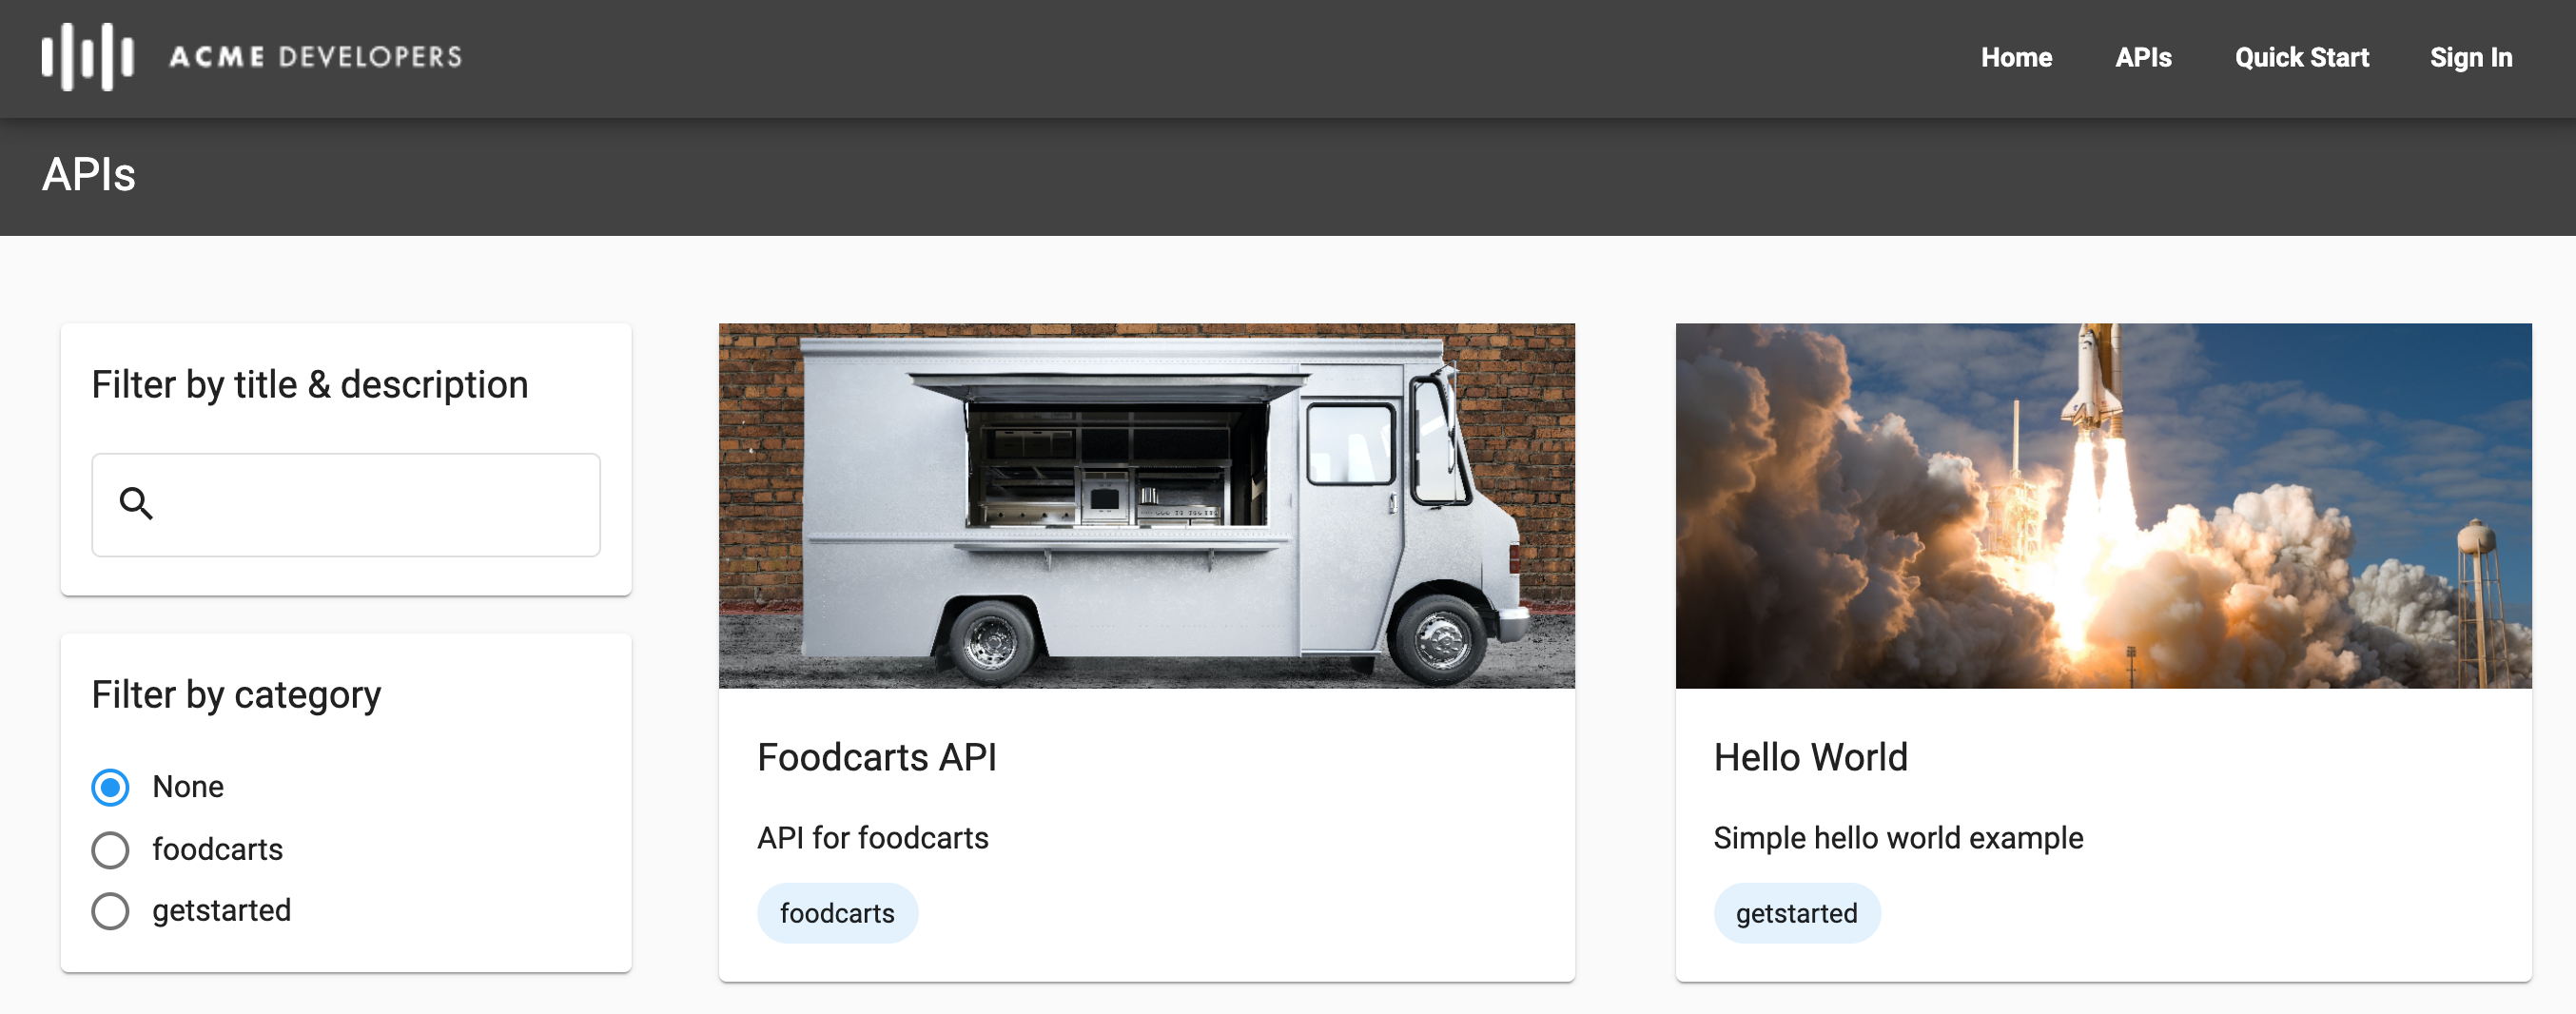
When you publish an API, the following updates are made to your portal automatically:The APIs page (included with the sample portal) provides a list of all APIs published to your portal, listed in alphabetical order, with links to the respective API reference documentation for more information. Optionally, you can customize the following:
- Image displayed for each API card
- Categories used for tagging APIs to enable developers to discover related APIs on the APIs page
SmartDocs (OpenAPI)
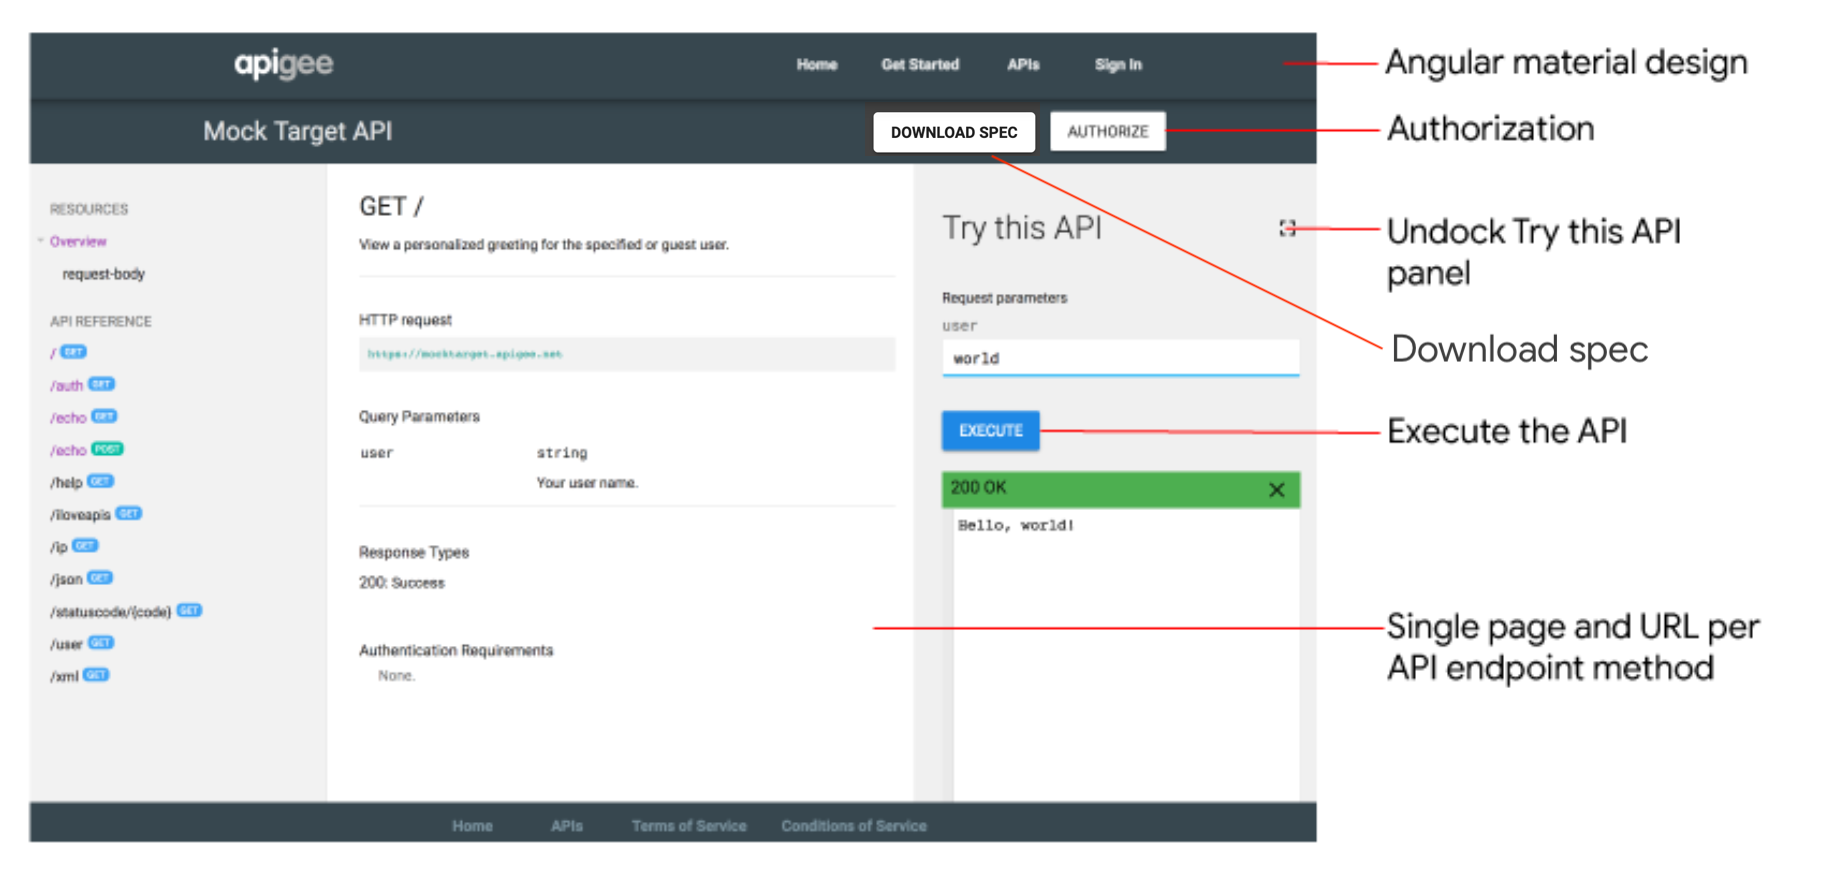
When you publish an API using an OpenAPI document, the SmartDocs API reference documentation is added to your portal.
Developers can review your SmartDocs API reference documentation and use the Try this API panel to make an API request and view the output. Try this API works with unsecured endpoints or secured endpoints using Basic, API Key, or OAuth Authentication, based on the security method defined in your OpenAPI document. For OAuth, the following flows are supported: authorization code, password, and client credentials.
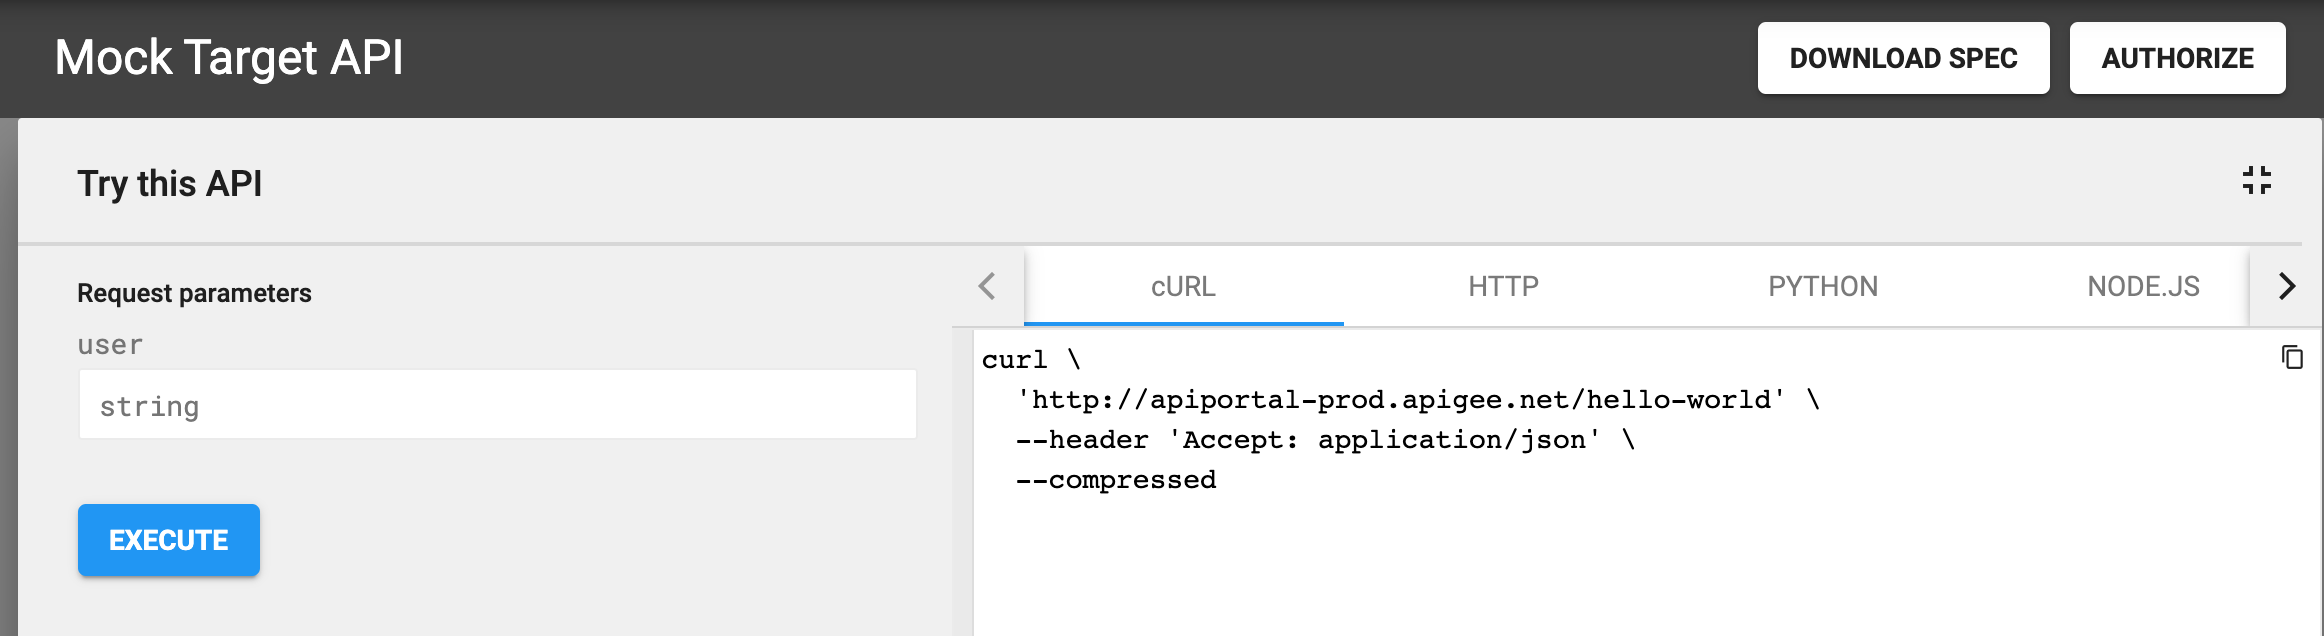
Click ![]() to expand the Try this API panel. The expanded panel enables you to view the curl call and code samples in various formats, such as HTTP, Python, Node.js, and more, as shown below.
to expand the Try this API panel. The expanded panel enables you to view the curl call and code samples in various formats, such as HTTP, Python, Node.js, and more, as shown below.
GraphQL Explorer
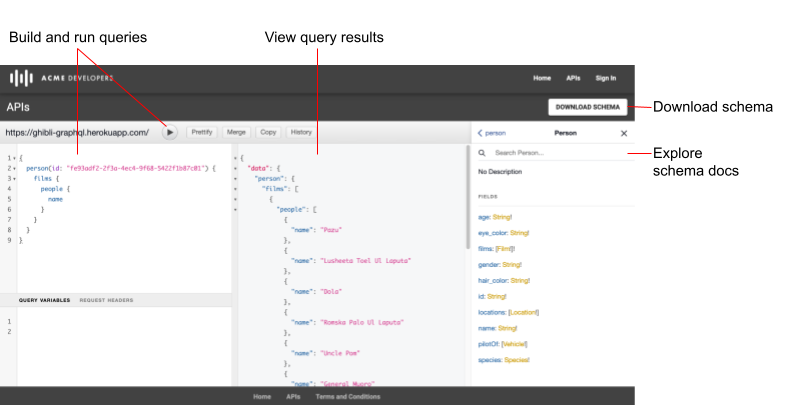
When you publish an API using a GraphQL schema, the GraphQL Explorer is added to your portal. The GraphQL Explorer is an interactive playground for running queries against your API. The explorer is based on GraphiQL, a reference implementation of the GraphQL IDE developed by the GraphQL Foundation.
Developers can use the GraphQL Explorer to explore the schema-based interactive documentation, build and run queries, view query results, and download the schema. To secure access to your API, developers can pass authorization headers in the Request Headers pane.
For more information about GraphQL, see graphql.org.
What is a snapshot?
Each OpenAPI or GraphQL document serves as the source of truth throughout the lifecycle of an API. The same document is used at each phase in the API lifecycle, from development to publishing to monitoring. When you modify a document, you need to be cognizant of the impact the changes have on your API through other lifecycle phases, as described in What happens if I modify a document?
When you publish your API, you take a snapshot of the OpenAPI or GraphQL document to render API reference documentation. That snapshot represents a specific version of the document. If you modify the document, you may decide to take another snapshot of the document in order to reflect the latest changes in the API reference documentation.
About callback URLs
If your apps require a callback URL, such as when using the OAuth 2.0 authorization code grant type (often referred to as "three-legged OAuth"), you can require developers to specify a callback URL when they register their apps. The callback URL typically specifies the URL of an app that is designated to receive an authorization code on behalf of the client app. For more information, see Implementing the authorization code grant type.
You can configure whether or not to require a callback URL during app registration when adding an API to your portal. You can modify this setting at any time, as described in Manage the callback URL for an API.
When registering an app, developers must enter a callback URL for all APIs that require it, as described in Register apps.
Configure your API proxy to support "Try this API"
Before publishing your APIs using an OpenAPI document, you'll need to configure your API proxy to support making requests on the Try this API panel in the SmartDocs API reference documentation, as follows:
- Add CORS support to your API proxies to enforce client-side cross-origin requests
CORS is a standard mechanism that allows JavaScript XMLHttpRequest (XHR) calls executed in a web page to interact with resources from non-origin domains. CORS is a commonly implemented solution to the "same-origin policy" that is enforced by all browsers.
- Update your API proxy configuration if you are using basic authentication or OAuth2
The following table summarizes the API proxy configuration requirements to support the Try this API panel in the SmartDocs API reference documentation based on the authentication access.
| Auth access | Policy configuration requirements |
|---|---|
| None or API key | Add CORS support to your API proxy. For convenience, use the sample CORS solution provided on GitHub or follow the steps described in Adding CORS support to an API proxy. |
| Basic authentication | Perform the following steps:
|
| OAuth2 |
|
Explore the API catalog
To view the API catalog:
1. Select Publish > Portals and select your portal.
2. Click API catalog on the portal home page.
Alternatively, you can select API catalog in the portal drop-down menu in the top navigation bar.
The APIs tab in the API catalog displays a list of the APIs that have been added to your portal.
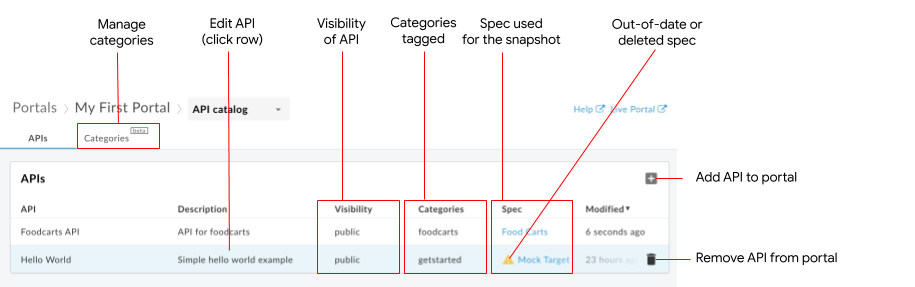
As highlighted in the previous figure, the APIs tab enables you to:
- View the details of the APIs available on your portal
- Add an API to your portal
- Edit an API on your portal by performing one or more of the following tasks:
- Manage the snapshot of a document associated with an API product to update the API reference documentation
- Publish or unpublish an API on your portal
- Manage the visibility of an API in your portal:
- Manage the callback URL for an API
- Manage the image for an API card
- Tag an API using categories
- Edit the API title and description
- Remove an API from your portal
- Manage the categories used to discover related APIs
- Quickly identify specs that are out-of-date or that have beezn deleted from the spec store
- Quickly identify "orphaned" APIs whose associated API product has been removed from Edge, and re-create the API product or delete the API from your portal
Add an API to your portal
To add an API to your portal:
- Access the API catalog.
- Click the APIs tab, if not already selected.
Click +.
The Add an API product to the catalog dialog displays.
Select the API product that you want to add to your portal.
Click Next.
The API details page displays.Configure the API reference documentation content and its visibility on the portal:
Field Description Published Select Published to publish the API to your portal. Deselect the checkbox if you are not ready to publish the API. You can change the setting later, as described in Publish or unpublish an API on your portal. Display title Update the title of your API that is displayed in the catalog. By default, the API product name is used. You can change the display title later, as described in Edit the display title and description. Display description Update the description of your API that is displayed in the catalog. By default, the API product description is used. You can change the display description later, as described in Edit the display title and description. Require developers to specify a callback URL Enable if you want to require that app developers specify a callback URL. You can add or update the callback URL later, as described in Manage the callback URL for an API. API documentation To use an OpenAPI document: - Select OpenAPI document.
- Click Select document.
- Perform one of the following steps:
- Click the My Specs tab and select a spec from the spec store.
- Click the Upload File tab and upload a file.
- Click the Import from a URL tab and import a spec from a URL.
- Click Select.
To use a GraphQL schema:
- Select GraphQL Schema.
- Click Select Document.
- Navigate to and select the GraphQL schema.
- Click Select.
Alternatively, you can select No documentation and add one later after the API has been added, as described in Managing the snapshot of the document.
API visibility If you have not enrolled in the beta release of the audience management feature, select one of the following options:
- Anonymous users to allow all users to view the API.
- Registered users to allow only registered users to view the API.
If you have enrolled in the beta release of the audience management feature, select one of the following options:
- Public (visible to anyone) to allow all users to view the API.
- Authenticated users to allow only registered users to view the API.
- Selected audiences to select the specific audiences that you want to be able to view the API.
You can manage audience visibility later, as described in Manage the visibility of an API in your portal.
Display image To display an image on the API card on the APIs page, click Select image. In the Select image dialog, select an existing image, upload a new image, or provide the URL of an external image, and click Select. Preview the API thumbnail and click Select. You can add an image later, as described in Manage the image for an API card. When specifying an image with an external URL, the image won't be uploaded to your assets; additionally, loading of the image in the integrated portal will be subject to its availability, which may be blocked or restricted by content security policies. Categories Add the categories to which the API will be tagged to enable app developers to discover related APIs on the APIs page. To identify a category:
- Select a category from the drop-down list.
- Add a new category by typing its name and pressing Enter. The new category will be added to the Categories page and made available when adding or editing other APIs.
Click Save.
Manage the snapshot of the document
After you publish your API, at any time you can take a new snapshot of the OpenAPI or GraphQL document to update the API reference documentation that is published on your portal.
To manage the snapshot of the document:
- Access the API catalog.
- Click the APIs tab, if not already selected.
- Click in the row of the API that you want to edit.
- Check the snapshot status.
If it is out of date, the following message is displayed:

- Click
 .
. - Perform one of the following tasks:
- To refresh a snapshot of an OpenAPI document that is out of date, click Refresh Snapshot.
- To change the document that is used to generate the documentation for the API, under API documentation click Select Document and select the new document.
- Click Save.
API reference documentation is rendered from the document and added to the API Reference page. The snapshot status is updated to current:

Publish or unpublish an API on your portal
To publish or unpublish an API on your portal:
- Access the API catalog.
- Click the APIs tab, if not already selected.
- Click in the row of the API that you want to edit.
- Click .
- Under API details, select or deselect Published (listed in the catalog) to publish or unpublish the API on your portal, respectively.
- Click Save.
Manage the visibility of an API in your portal
Manage the visibility of an API in your portal by allowing access to:
- Public (visible to anyone)
- Authenticated users
- Selected audiences (if you have enrolled in the beta release of the audience management feature)
To manage the visibility of an API in your portal:
- Access the API catalog.
- Click the APIs tab, if not already selected.
- Click in the row of the API that you want to edit.
- Click .
- Under API visibility, select one of the following options:
Select the visibility setting. If you have enrolled in the beta release of the audiences feature, select one of the following options:
- Public (visible to anyone) to allow all users to view the page.
- Authenticated users to allow only registered users to view the page.
- Selected audiences to select the specific audiences that you want to be able to view the page. See Manage the audiences for your portal.
- Anonymous users to allow all users to view the page.
- Registered users to allow only registered users to view the page.
Click Submit.
Manage the callback URL for an API
Manage the callback URL for an API. See About callback URLs.
To manage the callback URL for an API:
- Access the API catalog.
- Click the APIs tab, if not already selected.
- Click in the row of the API that you want to edit.
- Click .
- Under API details, select or deselect Published (listed in the catalog) to publish or unpublish the API on your portal, respectively.
- Click Save.
Manage the image for an API card
Manage the image that appears with an API card on the APIs page by adding or changing the current image.
To manage the image for an API card:
- Access the API catalog.
- Click the APIs tab, if not already selected.
- Click in the row of the API that you want to edit.
- Click .
Under API details:
- Click Select image to specify or upload an image if no image is currently selected.
- Click Change image to specify or upload a different image.
- Click x in the image to remove it.
When specifying an image, specify either an image with an external URL used for the catalog item, or a file path for image files stored in the portal, for example,
/files/book-tree.jpg. When specifying the URL of an external image, the image won't be uploaded to your assets; additionally, loading of the image in the integrated portal will be subject to its availability, which may be blocked or restricted by content security policies.Click Save.
Tag an API using categories
Tag an API using categories in one of the following ways:
- Manage the categories to which an API is tagged when editing the API, as described below.
- Manage the APIs tagged to a category when editing the category.
To tag an API to categories when editing the API:
- Access the API catalog.
- Click the APIs tab, if not already selected.
- Click in the row of the API that you want to edit.
- Click .
- Click within the Categories field and perform one of the following steps:
- Select a category from the drop-down list.
- Add a new category by typing its name and pressing Enter. The new category will be added to the Categories page and made available when adding or editing other APIs.
- Repeat to tag the API to more categories.
- Click Save.
Edit the display title and description
To edit the display title and description:
- Access the API catalog.
- Click the APIs tab, if not already selected.
- Click in the row of the API that you want to edit.
- Click .
- Edit the Display title and Display description fields, as required.
- Click Save.
Remove an API from your portal
To remove an API from your portal:
- Access the API catalog.
- Select the APIs, if not already selected.
- Position your cursor over the API in the list to display the actions menu.
- Click
 .
.
Manage categories used to discover related APIs
Tag an API using categories to enable app developers to discover related APIs on the APIs page of the live portal. Add and manage categories, as described in the following sections.
Explore the Categories page
To view the Categories page:
- Select Publish > Portals and select your portal.
- Click API catalog on the portal home page.
Alternatively, you can select API catalog in the portal drop-down menu in the top navigation bar.
- Click the Categories tab.
The Categories tab in the API catalog displays the list of the categories that have been defined for your portal.
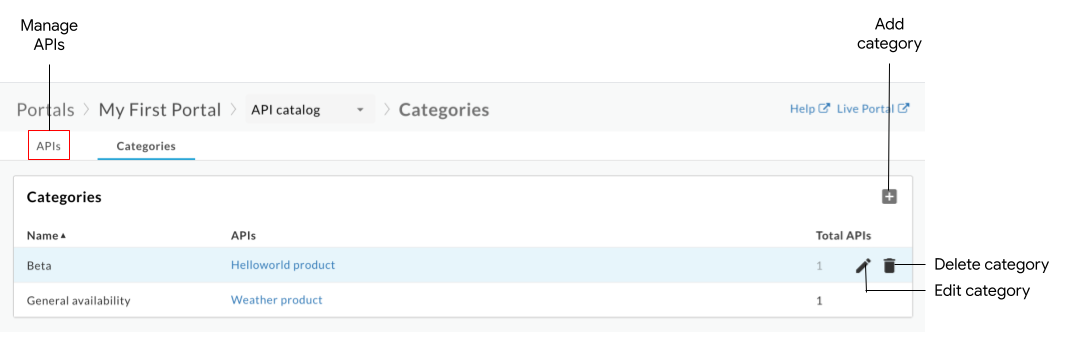
As highlighted in the previous figure, the APIs page enables you to:
- View the categories and the APIs to which they are tagged
- Add a category
- Edit a category
- Delete a category
- Manage APIs published to your portal. See Explore the API catalog
Add a category
Add a category in one of the following ways:
- Enter the name of a category when adding an API to the portal
- Manually add a category as described below
The new category will be added to the Categories page and made available when adding or editing other APIs.
To manually add a category:
- Access the Categories page.
- Click +.
- Enter the name of your new category.
- Optionally, select one or more APIs to tag to the category.
- Click Create.
Edit a category
To edit a category:
- Access the Categories page.
- Click .
- Edit the name of the category.
- Add or remove API tags.
- Click Save.
Delete a category
When you delete a category, all API tags to that category are also deleted.
To delete a category:
- Access the Categories page.
- Position your cursor over the category that you want to edit to display the actions menu.
- Click .
- Edit the name of the category.
- Add or remove APIs.
- Click Save.
Troubleshoot issues with your published APIs
The following sections provide information to help you troubleshoot specific errors with our published APIs.
Error: Failed to fetch error returned when using Try this API
When using Try this API, if the TypeError: Failed to fetch error is returned, consider the following possible causes and resolutions:
For mixed content errors, the error may be caused by a known swagger-ui issue. One possible workaround is to make sure that you specify HTTPS before HTTP in the
schemesdefinition in your OpenAPI document. For example:schemes: - https - httpFor Cross-Origin Resource Sharing (CORS) restriction errors, ensure that CORS is supported for your API proxies. CORS is a standard mechanism that enables client-side cross-origin requests. See Configure your API proxy to support Try this API.
Error: 'Access-Control-Allow-Origin' header contains multiple values '*, *', but only one is allowed
When using Try this API, you may receive the following error message if the Access-Control-Allow-Origin header already exists:
The 'Access-Control-Allow-Origin' header contains multiple values '*, *', but only one is allowed.
To correct this error, modify the AssignMessage policy to use <Set> to set the CORS headers instead of <Add>, as shown in the excerpt below.
For more information, see the relevant community article.
<AssignMessage async="false" continueOnError="false" enabled="true" name="add-cors">
    <DisplayName>Add CORS</DisplayName>
    <FaultRules/>
    <Properties/>
    <Set>
        <Headers>
            <Header name="Access-Control-Allow-Origin">{request.header.origin}</Header>
            <Header name="Access-Control-Allow-Headers">origin, x-requested-with, accept, content-type, authorization</Header>
            <Header name="Access-Control-Max-Age">3628800</Header>
            <Header name="Access-Control-Allow-Methods">GET, PUT, POST, DELETE</Header>
        </Headers>
    </Set>
    <IgnoreUnresolvedVariables>true</IgnoreUnresolvedVariables>
    <AssignTo createNew="false" transport="http" type="response"/>
</AssignMessage>
Error: Request header field not allowed
When using Try this API, if you receive a Request header field not allowed error, similar to the example below, you may need to update the headers supported in the CORS policy. For example:
Access to XMLHttpRequest ... has been blocked by CORS policy: Request header field
content-type is not allowed by Access-Control-Allow-Headers in preflight response
In this example, you need to add the content-type header to the Access-Control-Allow-Headers section in your CORS AssignMessage policy, as described in
Attaching an Add CORS policy to a new API proxy.
Error: Access denied when calling an API proxy using OAuth2
Apigee’s OAuthV2 policy returns a token response that contains certain non-RFC-compliant properties. For example, the policy will return a token with the value BearerToken, instead of the expected RFC-compliant value Bearer. This invalid token_type response can result in an Access denied error when using Try this API.
To correct this issue, you can create a JavaScript or AssignMessage policy to transform the policy output into a compliant format. For more information, see non-RFC-compliant behavior.