You're viewing **Apigee Edge** documentation.
[Go to the
**Apigee X** documentation](http://cloud.google.com/apigee/docs/api-platform/security/oauth/using-access-tokens). info
When you call an API proxy on Apigee Edge that has OAuth security, Edge is responsible for
verifying access tokens. Think of Edge as the gatekeeper -- no API call can pass through that
does not have an access token that can be verified.
> [!IMPORTANT]
> **Tip:** When verifying an access token, if you happen to see this error: "Invalid API call as no apiproduct match found", go to this [Apigee Community article](https://discuss.google.dev/t/oauth2-0-access-token-verification-throws-invalid-api-call-as-no-apiproduct-match-found-error/17064) for details on the cause of this error and steps to correct it.
## Adding a VerifyAccessToken policy
To configure token verification, place an [OAuthV2 policy](https://docs.apigee.com/api-platform/reference/policies/oauthv2-policy) with the
**VerifyAccessToken** operation at the very beginning of the API proxy flow (the
beginning of the ProxyEndpoint Preflow). If placed there, access tokens will be verified before
any other processing takes place, and if a token is rejected, Edge stops processing and returns
an error back to the client.
1. Access the API proxies page, as described below.
### Edge
To access the API proxies page using the Edge UI:
1. Sign in to [apigee.com/edge](https://apigee.com/edge).
2. Select **Develop \> API Proxies** in the left navigation bar.
### Classic Edge (Private Cloud)
> [!NOTE]
> **Note:** The Classic Edge UI is available with Edge for Private Cloud only.
To access the API proxies page using the Classic Edge UI:
1. Sign in to `http://ms-ip:9000`, where ms-ip is the IP address or DNS name of the Management Server node.
2. Select **APIs \> API Proxies** in the top navigation bar.
2. From the list, select the proxy you wish to protect.
3. In the overview page, click the **Develop** tab.
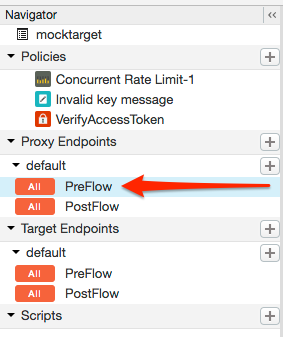
4. In the Navigator, select **PreFlow** for an endpoint listed under Proxy Endpoints. Typically, the endpoint you want is called "default", although it is possible to create multiple proxy endpoints. If you do have multiple endpoints, you will probably want to follow these steps to perform token verification on each one.
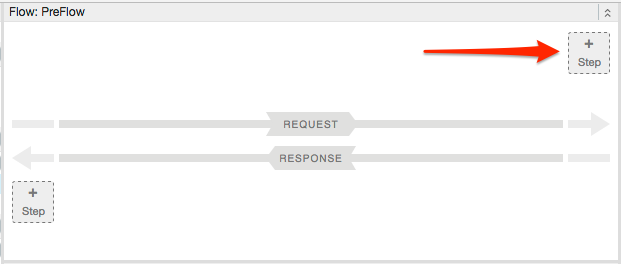
5. In the proxy flow editor, click **+ Step** .
6. Select **Policy Instance New**.
7. From the policy list, select **OAuth v2.0**.
8. Optionally, change the policy name and display name. For example, for better readability, you might change the display name and name both to "VerifyAccessToken".
9. Click **Add**.
The default policy is already configured with the VerifyAccessToken operation, so you do not
have to do anything further:
```
OAuth v2.0 1
false
VerifyAccessToken
```
> [!NOTE]
> **Note:** By default, VerifyAccessToken expects the access token to be sent in an Authorization header as a Bearer token. For example:
>
> ```
> -H "Authorization: Bearer Rft3dqrs56Blirls56a"
> ```
>
> You can change this default in the ` ` element in the
> OAuthV2 policy, as explained in the [OAuthV2 policy
> documentation](https://docs.apigee.com/api-platform/reference/policies/oauthv2-policy#accesstokenelement).