> [!CAUTION]
> **Caution:** This documentation covers Edge for Private Cloud 4.19.01, which is no longer supported. Google does not provide security patches, bug fixes, or technical support for this version. The current supported version is 4.54.00. See the [Edge for Private Cloud documentation](https://docs.apigee.com/private-cloud/latest/overview) for the current version, or [All versions](https://docs.apigee.com/private-cloud/versions) to compare releases.
*Edge for Private Cloud v4.19.01*
After you install the Edge `apigee-setup` utility on a node, use the
`apigee-setup` utility to install one or more Edge components on the node.
The apigee-setup utility uses a command in the form:
```
/opt/apigee/apigee-setup/bin/setup.sh -p component -f configFile
```
Where component is the Edge component to install, and
configFile is the silent configuration file containing the installation
information. The configuration file must be accessible or readable by the "apigee" user. For
example, you can create a new directory for the files, place them in the /usr/local or
/usr/local/share directory, or anywhere else on the node accessible by the "apigee"
user.
For example, to install the Edge Management Server:
```
/opt/apigee/apigee-setup/bin/setup.sh -p ms -f /usr/local/myConfig
```
For information on installing the Edge `apigee-setup`, see
[Install the Edge apigee-setup utility](https://docs.apigee.com/private-cloud/v4.19.01/install-edge-apigee-setup-utility).
## Installation considerations
As you write your config file, take into consideration the following options.
### Setting up Postgres
master-standby replication
By default, Edge installs all Postgres nodes in master mode. However, in production systems
with multiple Postgres nodes, you must configure them to use master-standby replication so that
if the master node fails, the standby node can continue to server traffic.
You can enable and configure master-standby replication at install time by using properties in
the silent config file. Or, you can enable master-standby replication after installation. For
more, see [Set up master-standby
replication for Postgres](https://docs.apigee.com/private-cloud/v4.19.01/set-master-standby-replication-postgres).
### Enabling Cassandra
authentication
By default, Cassandra installs without authentication enabled. That means anyone can access
Cassandra. You can enable authentication after installing Edge, or as part of the installation
process.
> [!NOTE]
> **Note:** While you can enable authentication when you install Cassandra, you cannot change the default username and password. You must perform that step manually after the installation of Cassandra completes.
For more, see [Enable Cassandra
authentication](https://docs.apigee.com/private-cloud/v4.19.01/enable-cassandra-authentication).
### Using a protected
port when creating a virtual host
If you want to create a virtual host that binds the Router to a protected port, such as port
numbers less than 1000, then you have to configure the Router to run as a user with access to
those ports. By default, the Router runs as the user "apigee" which does not have access to
privileged ports.
For information about how to configure a virtual host and Router to access ports below 1000,
see [Setting up a virtual host](https://docs.apigee.com/private-cloud/v4.19.01/setting-virtual-host).
## Specifying the components to install
The following table lists the options you pass to the `-p` option of the
`apigee-service` utility to specify which components to install on the node:
| Component | Description |
|---|---|
| `c` | Install Cassandra only. |
| `zk` | install ZooKeeper only. |
| `ds` | Install ZooKeeper and Cassandra. |
| `ld` | Install OpenLDAP only. |
| `ms` | Install Edge Management Server, which also installs the Edge UI and OpenLDAP. If you set `USE_LDAP_REMOTE_HOST=y` in the config file, then OpenLDAP installation is skipped and the Management Server uses OpenLDAP installed on a different node. |
| `r` | Install Edge Router only. |
| `mp` | Install Edge Message Processor only. |
| `rmp` | Install Edge Router and Message Processor. |
| `ui` | Install the Edge UI. |
| `qs` | Install Qpid Server only. |
| `ps` | Install Postgres Server only. |
| `pdb` | Install Postgres database only - used only when installing the Apigee Developer Services portal (or simply, *the portal* ). See [Install the portal](https://docs.apigee.com/private-cloud/v4.19.01/portal-installation). |
| `sax` | Install the analytics components, meaning Qpid and Postgres. Use this option for development and testing only, not for production. |
| `sso` | Install the Edge SSO module. |
| `mo` | Install Monetization. |
| `sa` | Install Edge standalone, meaning Cassandra, ZooKeeper, Management Server, OpenLDAP, Edge UI, Router, and Message Processor. This option omits the Edge analytics components: Qpid and Postgres. Use this option for development and testing only, not for production. |
| `aio` | Install all components on a single node. Use this option for development and testing only, not for production. |
| `dp` | Install the portal. |
## Creating a configuration file
The configuration file contains all the information necessary to install Edge. You can often
use the same configuration file to install all components in an Edge installation.
> [!NOTE]
> **Note:** In the configuration file, you must specify all Cassandra nodes by IP address. Other components can be specified by IP address or DNS name.
However, you will have to use different configuration files, or modify your configuration
file, if:
- You are installing multiple OpenLDAP servers and need to configure replication as part of a 13-node installation. Each file requires different values for `LDAP_SID` and `LDAP_PEER`.
- You are creating multiple data centers as part of a 12-node installation. Each data center requires different settings for properties such as `ZK_CLIENT_HOSTS` and `CASS_HOSTS`.
Each installation topology described below shows an example config file for that topology. For
a complete reference on the config file, see [Edge Configuration File Reference](https://docs.apigee.com/private-cloud/v4.19.01/edge-configuration-file-reference).
> [!WARNING]
> **Warning:** **Creating a config file on a Windows machine and
> then copying it to a Linux machine can add additional end-of-line, carriage return, or newline
> characters to the file that are not compatible with all Linux utilities.** This situation can also occur if you copy text from a Windows editor and paste into a Linux window. As an alternative, you can use the Linux `dos2unix` utility to clean up a config file created on Windows. Or, make sure to do all editing of config files in a Linux editor.
## Test system requirements without running
an install
Edge for the Private Cloud supports the `ENABLE_SYSTEM_CHECK=y` property to check CPU
and memory requirements on a machine as part of an install. However, in previous releases of Edge,
that check required you to actually perform the install.
You can now use the "-t" flag to make that check without having to do an install. For example,
to check the system requirements for an "aio" install without actually doing the install, use the
following command:
```
/opt/apigee/apigee-setup/bin/setup.sh -p aio -f configFile -t
```
This command displays any errors with the system requirements to the screen.
See [Installation requirements](https://docs.apigee.com/private-cloud/v4.19.01/installation-requirements) for a list of
system requirements for all Edge components.
## Installation log files
By default, the setup.sh utility writes log information about the installation to:
```javascript
/opt/apigee/var/log/apigee-setup/setup.log
```
If the user running the `setup.sh` utility does not have access to that directory,
it writes the log to the `/tmp` directory as a file named
`setup_username.log`.
If the user does not have access to `/tmp`, the `setup.sh` utility
fails.
## Install Edge components
This section describes how to install Edge components for the different topologies. The order
of component installation is based on your desired topology.
All of the installation example shown below assume that you are installing:
- With Cassandra authentication disabled (default). See [Enable Cassandra authentication](https://docs.apigee.com/private-cloud/v4.19.01/enable-cassandra-authentication) for more.
- With Postgres master-standby replication disabled (default). See [Set up master-standby replication for
Postgres](https://docs.apigee.com/private-cloud/v4.19.01/set-master-standby-replication-postgres) for more.
- Message Processor and Router on the same node. If you install the Message Processors and Routers on different nodes, install all the Message Processors first, and then all the Routers.
### Prerequisites
Before you can install Edge components, you must:
- Check the [Installation requirements](https://docs.apigee.com/private-cloud/v4.19.01/installation-requirements) for prerequisites and a list of required files to obtain before proceeding with the installation. Ensure that you have reviewed the requirements before beginning the installation process.
- Disable SELinux or set it to permissive mode. See [Install the Edge apigee-setup utility](https://docs.apigee.com/private-cloud/v4.19.01/install-edge-apigee-setup-utility) for more.
### All-in-one installation
1. Install all components on a single node using the command:
```
/opt/apigee/apigee-setup/bin/setup.sh -p aio -f configFile
```
2. Restart the Edge UI component after the installation is complete:
```
/opt/apigee/apigee-service/bin/apigee-service edge-ui restart
```
3. Test the installation as described at [Test the install](https://docs.apigee.com/private-cloud/v4.19.01/test-install).
4. Onboard your organization as described at [Onboard an
organization](https://docs.apigee.com/private-cloud/v4.19.01/onboard-organization).
See a video of an Edge all-in-one install
[here](https://community.apigee.com/articles/21648/video-of-an-edge-private-cloud-aio-install.html).
Shown below is a silent configuration file for this topology. For a complete reference on
the config file, see [Edge configuration file
reference](https://docs.apigee.com/private-cloud/v4.19.01/edge-configuration-file-reference).
```javascript
# With SMTP
IP1=IP_or_DNS_name_of_Node_1
HOSTIP=$(hostname -i)
ENABLE_SYSTEM_CHECK=y
ADMIN_EMAIL=opdk@google.com
# Admin password must be at least 8 characters long and contain one uppercase
# letter, one lowercase letter, and one digit or special character
APIGEE_ADMINPW=ADMIN_PASSWORD
LICENSE_FILE=/tmp/license.txt
MSIP=$IP1
LDAP_TYPE=1
APIGEE_LDAPPW=LDAP_PASSWORD
MP_POD=gateway
REGION=dc-1
ZK_HOSTS="$IP1"
ZK_CLIENT_HOSTS="$IP1"
# Must use IP addresses for CASS_HOSTS, not DNS names.
CASS_HOSTS="$IP1"
# Default is postgres
PG_PWD=postgres
SKIP_SMTP=n
SMTPHOST=smtp.example.com
SMTPUSER=smtp@example.com
# omit for no username
SMTPPASSWORD=SMTP_PASSWORD
# omit for no password
SMTPSSL=n
SMTPPORT=25
SMTPMAILFROM="My Company "
# Set up username and password to access Qpid broker's management console
QPID_MGMT_USERNAME=qpid
QPID_MGMT_PASSWORD=QPIDPass1234
```
### 2-node standalone installation
See [Installation topologies](https://docs.apigee.com/private-cloud/v4.19.01/installation-topologies) for the list of Edge
topologies and node numbers.
1. Install Standalone Gateway and node 1
```
/opt/apigee/apigee-setup/bin/setup.sh -p sa -f configFile
```
2. Install Analytics on node 2:
```
/opt/apigee/apigee-setup/bin/setup.sh -p sax -f configFile
```
3. Restart the Edge UI component on node 1:
```
/opt/apigee/apigee-service/bin/apigee-service edge-ui restart
```
4. Test the installation as described at [Test the install](https://docs.apigee.com/private-cloud/v4.19.01/test-install).
5. Onboard your organization as described at [Onboard an
organization](https://docs.apigee.com/private-cloud/v4.19.01/onboard-organization).
Shown below is a silent configuration file for this topology. For a complete reference on
the config file, see [Edge configuration file
reference](https://docs.apigee.com/private-cloud/v4.19.01/edge-configuration-file-reference).
```javascript
# With SMTP
IP1=IP_of_Node_1
HOSTIP=$(hostname -i)
ENABLE_SYSTEM_CHECK=y
ADMIN_EMAIL=opdk@google.com
APIGEE_ADMINPW=ADMIN_PASSWORD
LICENSE_FILE=/tmp/license.txt
MSIP=$IP1
LDAP_TYPE=1
APIGEE_LDAPPW=LDAP_PASSWORD
MP_POD=gateway
REGION=dc-1
ZK_HOSTS="$IP1"
ZK_CLIENT_HOSTS="$IP1"
# Must use IP addresses for CASS_HOSTS, not DNS names.
CASS_HOSTS="$IP1"
# Default is postgres
PG_PWD=postgres
SKIP_SMTP=n
SMTPHOST=smtp.example.com
SMTPUSER=smtp@example.com
# omit for no username
SMTPPASSWORD=SMTP_PASSWORD
# omit for no password
SMTPSSL=n
SMTPPORT=25
SMTPMAILFROM="My Company "
```
### 5-node installation
See [Installation topologies](https://docs.apigee.com/private-cloud/v4.19.01/installation-topologies) for the list of Edge topologies and node numbers.
1. Install Datastore cluster on nodes 1, 2 and 3:
```
/opt/apigee/apigee-setup/bin/setup.sh -p ds -f configFile
```
2. Install Management Server on node 1:
```
/opt/apigee/apigee-setup/bin/setup.sh -p ms -f configFile
```
3. Install Router and Message Processor on nodes 2 and 3:
```
/opt/apigee/apigee-setup/bin/setup.sh -p rmp -f configFile
```
4. Install Analytics on node 4 and 5:
```
/opt/apigee/apigee-setup/bin/setup.sh -p sax -f configFile
```
5. Restart the Edge UI component on node 1:
```
/opt/apigee/apigee-service/bin/apigee-service edge-ui restart
```
6. Test the installation as described at [Test the install](https://docs.apigee.com/private-cloud/v4.19.01/test-install).
7. Onboard your organization as described at [Onboard an
organization](https://docs.apigee.com/private-cloud/v4.19.01/onboard-organization).
Shown below is a silent configuration file for this topology. For a complete reference on
the config file, see [Edge configuration file
reference](https://docs.apigee.com/private-cloud/v4.19.01/edge-configuration-file-reference).
```javascript
# With SMTP
IP1=IP_of_Node_1
IP2=IP_of_Node_2
IP3=IP_of_Node_3
IP4=IP_of_Node_4
IP5=IP_of_Node_5
HOSTIP=$(hostname -i)
ENABLE_SYSTEM_CHECK=y
ADMIN_EMAIL=opdk@google.com
APIGEE_ADMINPW=ADMIN_PASSWORD
LICENSE_FILE=/tmp/license.txt
MSIP=$IP1
USE_LDAP_REMOTE_HOST=n
LDAP_TYPE=1
APIGEE_LDAPPW=LDAP_PASSWORD
MP_POD=gateway
REGION=dc-1
ZK_HOSTS="$IP1 $IP2 $IP3"
ZK_CLIENT_HOSTS="$IP1 $IP2 $IP3"
# Must use IP addresses for CASS_HOSTS, not DNS names.
CASS_HOSTS="$IP1 $IP2 $IP3"
# Default is postgres
PG_PWD=postgres
PG_MASTER=$IP4
PG_STANDBY=$IP5
SKIP_SMTP=n
SMTPHOST=smtp.example.com
SMTPUSER=smtp@example.com
# omit for no username
SMTPPASSWORD=SMTP_PASSWORD
# omit for no password
SMTPSSL=n
SMTPPORT=25
SMTPMAILFROM="My Company "
```
### 9-node clustered installation
See [Installation topologies](https://docs.apigee.com/private-cloud/v4.19.01/installation-topologies) for the list of Edge
topologies and node numbers.
1. Install Datastore Cluster Node on node 1, 2 and 3:
```
/opt/apigee/apigee-setup/bin/setup.sh -p ds -f configFile
```
2. Install Apigee Management Server on node 1:
```
/opt/apigee/apigee-setup/bin/setup.sh -p ms -f configFile
```
3. Install Router and Message Processor on nodes 4 and 5:
```
/opt/apigee/apigee-setup/bin/setup.sh -p rmp -f configFile
```
4. Install Apigee Analytics Qpid Server on node 6 and 7:
```
/opt/apigee/apigee-setup/bin/setup.sh -p qs -f configFile
```
5. Install Apigee Analytics Postgres Server on node 8 and 9:
```
/opt/apigee/apigee-setup/bin/setup.sh -p ps -f configFile
```
6. Restart the Edge UI component on node 1:
```
/opt/apigee/apigee-service/bin/apigee-service edge-ui restart
```
7. Test the installation as described at [Test the install](https://docs.apigee.com/private-cloud/v4.19.01/test-install).
8. Onboard your organization as described at [Onboard an
organization](https://docs.apigee.com/private-cloud/v4.19.01/onboard-organization).
Shown below is a silent configuration file for this topology. For a complete reference on
the config file, see [Edge configuration file
reference](https://docs.apigee.com/private-cloud/v4.19.01/edge-configuration-file-reference).
```javascript
# With SMTP
IP1=IP_of_Node_1
IP2=IP_of_Node_2
IP3=IP_of_Node_3
IP8=IP_of_Node_8
IP9=IP_of_Node_9
HOSTIP=$(hostname -i)
ENABLE_SYSTEM_CHECK=y
ADMIN_EMAIL=opdk@google.com
APIGEE_ADMINPW=ADMIN_PASSWORD
LICENSE_FILE=/tmp/license.txt
MSIP=$IP1
USE_LDAP_REMOTE_HOST=n
LDAP_TYPE=1
APIGEE_LDAPPW=LDAP_PASSWORD
MP_POD=gateway
REGION=dc-1
ZK_HOSTS="$IP1 $IP2 $IP3"
ZK_CLIENT_HOSTS="$IP1 $IP2 $IP3"
# Must use IP addresses for CASS_HOSTS, not DNS names.
CASS_HOSTS="$IP1 $IP2 $IP3"
# Default is postgres
PG_PWD=postgres
SKIP_SMTP=n
PG_MASTER=$IP8
PG_STANDBY=$IP9
SMTPHOST=smtp.example.com
SMTPUSER=smtp@example.com
# omit for no username
SMTPPASSWORD=SMTP_PASSWORD
# omit for no password
SMTPSSL=n
SMTPPORT=25
SMTPMAILFROM="My Company "
```
### 13-node clustered installation
This section describes the order of installation for a 13-node cluster. For a list of Edge
topologies and node numbers, see [Installation topologies](https://docs.apigee.com/private-cloud/v4.19.01/installation-topologies).
The order of installation for a 13-node cluster is as follows:
1. Install Datastore Cluster Node on node 1, 2 and 3:
```
/opt/apigee/apigee-setup/bin/setup.sh -p ds -f configFile
```
2. Install OpenLDAP on node 4 and 5:
```
/opt/apigee/apigee-setup/bin/setup.sh -p ld -f configFile
```
3. Install Apigee Management Server on node 6 and 7:
```
/opt/apigee/apigee-setup/bin/setup.sh -p ms -f configFile
```
4. Install Apigee Analytics Postgres Server on node 8 and 9:
```
/opt/apigee/apigee-setup/bin/setup.sh -p ps -f configFile
```
5. Install Router and Message Processor on nodes 10 and 11:
```
/opt/apigee/apigee-setup/bin/setup.sh -p rmp -f configFile
```
6. Install Apigee Analytics Qpid Server on node 12 and 13:
```
/opt/apigee/apigee-setup/bin/setup.sh -p qs -f configFile
```
7. Restart the Edge UI component on nodes 6 and 7:
```
/opt/apigee/apigee-service/bin/apigee-service edge-ui restart
```
8. Test the installation as described at [Test the install](https://docs.apigee.com/private-cloud/v4.19.01/test-install).
9. Onboard your organization as described at [Onboard an
organization](https://docs.apigee.com/private-cloud/v4.19.01/onboard-organization).
Shown below is a sample silent configuration file for this topology. For a complete reference
on the config file, see [Edge configuration file
reference](https://docs.apigee.com/private-cloud/v4.19.01/edge-configuration-file-reference).
|---|---|
| ```javascript # For all nodes except IP4 and IP5 # (which are the OpenLDAP nodes) IP1=IP_of_Node_1 IP2=IP_of_Node_2 IP3=IP_of_Node_3 IP4=IP_of_Node_4 IP5=IP_of_Node_5 IP6=IP_of_Node_6 IP7=IP_of_Node_7 IP8=IP_of_Node_8 IP9=IP_of_Node_9 HOSTIP=$(hostname -i) ENABLE_SYSTEM_CHECK=y ADMIN_EMAIL=opdk@google.com APIGEE_ADMINPW=ADMIN_PASSWORD LICENSE_FILE=/tmp/license.txt # Management Server on IP6 only MSIP=$IP6 USE_LDAP_REMOTE_HOST=y LDAP_HOST=$IP4 LDAP_PORT=10389 # Management Server on IP7 only # MSIP=$IP7 # USE_LDAP_REMOTE_HOST=y # LDAP_HOST=$IP5 # LDAP_PORT=10389 # Use the same password for both OpenLDAP nodes APIGEE_LDAPPW=LDAP_PASSWORD MP_POD=gateway REGION=dc-1 ZK_HOSTS="$IP1 $IP2 $IP3" ZK_CLIENT_HOSTS="$IP1 $IP2 $IP3" # Must use IP addresses for CASS_HOSTS, not DNS names. CASS_HOSTS="$IP1 $IP2 $IP3" # Default is postgres PG_PWD=postgres PG_MASTER=$IP8 PG_STANDBY=$IP9 SKIP_SMTP=n SMTPHOST=smtp.example.com SMTPUSER=smtp@example.com # omit for no username SMTPPASSWORD=SMTP_PASSWORD # omit for no password SMTPSSL=n SMTPPORT=25 SMTPMAILFROM="My Company " ``` | ```javascript # For OpenLDAP nodes only (IP4 and IP5) IP1=IP_of_Node_1 IP2=IP_of_Node_2 IP3=IP_of_Node_3 IP4=IP_of_Node_4 IP5=IP_of_Node_5 IP6=IP_of_Node_6 IP7=IP_of_Node_7 IP8=IP_of_Node_8 IP9=IP_of_Node_9 HOSTIP=$(hostname -i) ENABLE_SYSTEM_CHECK=y ADMIN_EMAIL=opdk@google.com APIGEE_ADMINPW=ADMIN_PASSWORD # For the OpenLDAP Server on IP4 only MSIP=$IP6 USE_LDAP_REMOTE_HOST=n LDAP_TYPE=2 LDAP_SID=1 LDAP_PEER=$IP5 # For the OpenLDAP Server on IP5 only # MSIP=$IP7 # USE_LDAP_REMOTE_HOST=n # LDAP_TYPE=2 # LDAP_SID=2 # LDAP_PEER=$IP4 # Set same password for both OpenLDAPs. APIGEE_LDAPPW=LDAP_PASSWORD ``` |
### 12-node clustered installation
Before you install Edge on a 12-node clustered topology (two data centers), you must understand
how to set the ZooKeeper and Cassandra properties in the silent config file.
- ZooKeeper For the `ZK_HOSTS` property for both data centers, specify the IP addresses or DNS names of all
ZooKeeper nodes from both data centers, in the same order, and mark any nodes with the with
`:observer` modifier. Nodes without the `:observer` modifier are called
"voters". You must have an odd number of "voters" in your configuration.
In this topology, the ZooKeeper host on host 9 is the observer:
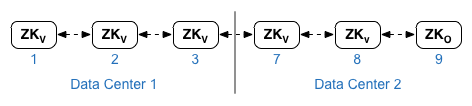
For the `ZK_CLIENT_HOSTS` property for each data center, specify the IP addresses or DNS names of
only the ZooKeeper nodes in the data center, in the same order, for all ZooKeeper nodes in the
data center. In the example configuration file shown below, node 9 is tagged with the
`:observer` modifier so that you have five voters: Nodes 1, 2, 3, 7, and 8.
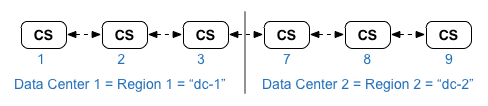
- Cassandra
All datacenters must to have the same number of Cassandra nodes.
For `CASS_HOSTS` for each data center, ensure that you specify all Cassandra IP addresses (not
DNS names) for both data centers. For data center 1, list the Cassandra nodes in that data
center first. For data center 2, list the Cassandra nodes in that data center first. List the
Cassandra nodes in the same order for all Cassandra nodes in the data center.
All Cassandra nodes must have a suffix ":d,r". For example
`ip:1,1` = datacenter 1 and rack/availability zone 1; and
`ip:2,1` = datacenter 2 and rack/availability zone 1.
For example, "192.168.124.201:1,1 192.168.124.202:1,1 192.168.124.203:1,1 192.168.124.204:2,1
192.168.124.205:2,1 192.168.124.206:2,1"
The first node in rack/availability zone 1 of each datacenter will be used as the seed
server.
In this deployment model, Cassandra setup will look like the following:
See [Installation topologies](https://docs.apigee.com/private-cloud/v4.19.01/installation-topologies) for the list of Edge
topologies and node numbers.
1. Install Datastore Cluster Node on node 1, 2, 3, 7, 8, and 9:
```
/opt/apigee/apigee-setup/bin/setup.sh -p ds -f configFile
```
2. Install Apigee Management Server with OpenLDAP replication on node 1 and 7:
```
/opt/apigee/apigee-setup/bin/setup.sh -p ms -f configFile
```
3. Install Router and Message Processor on nodes 2, 3, 8 and 9:
```
/opt/apigee/apigee-setup/bin/setup.sh -p rmp -f configFile
```
4. Install Apigee Analytics Qpid Server on node 4, 5, 10, and 11:
```
/opt/apigee/apigee-setup/bin/setup.sh -p qs -f configFile
```
5. Install Apigee Analytics Postgres Server on node 6 and 12:
```
/opt/apigee/apigee-setup/bin/setup.sh -p ps -f configFile
```
6. Restart the Edge UI component on nodes 1 and 7:
```
/opt/apigee/apigee-service/bin/apigee-service edge-ui restart
```
7. Test the installation as described at [Test the install](https://docs.apigee.com/private-cloud/v4.19.01/test-install).
8. Onboard your organization as described at [Onboard an
organization](https://docs.apigee.com/private-cloud/v4.19.01/onboard-organization).
Shown below is a silent configuration file for this topology. For a complete reference on the
config file, see [Edge configuration file
reference](https://docs.apigee.com/private-cloud/v4.19.01/edge-configuration-file-reference).
- Configures OpenLDAP with replication across two OpenLDAP nodes.
- Specifies the `:observer` modifier on one ZooKeeper node. In a single data center installation, omit that modifier.
|---|---|
| ```javascript # Datacenter 1 IP1=IP_of_Node_1 IP2=IP_of_Node_2 IP3=IP_of_Node_3 IP6=IP_of_Node_6 IP7=IP_of_Node_7 IP8=IP_of_Node_8 IP9=IP_of_Node_9 IP12=IP_of_Node_12 HOSTIP=$(hostname -i) MSIP=$IP1 ENABLE_SYSTEM_CHECK=y ADMIN_EMAIL=opdk@google.com APIGEE_ADMINPW=ADMIN_PASSWORD LICENSE_FILE=/tmp/license.txt USE_LDAP_REMOTE_HOST=n LDAP_TYPE=2 LDAP_SID=1 LDAP_PEER=$IP7 APIGEE_LDAPPW=LDAP_PASSWORD MP_POD=gateway-1 REGION=dc-1 ZK_HOSTS="$IP1 $IP2 $IP3 $IP7 $IP8 $IP9:observer" ZK_CLIENT_HOSTS="$IP1 $IP2 $IP3" # Must use IP addresses for CASS_HOSTS, not DNS names. CASS_HOSTS="$IP1:1,1 $IP2:1,1 $IP3:1,1 $IP7:2,1 $IP8:2,1 $IP9:2,1" # Default is postgres PG_PWD=postgres PG_MASTER=$IP6 PG_STANDBY=$IP12 SKIP_SMTP=n SMTPHOST=smtp.example.com SMTPUSER=smtp@example.com # omit for no username SMTPPASSWORD=SMTP_PASSWORD # omit for no password SMTPSSL=n SMTPPORT=25 SMTPMAILFROM="My Company " ``` | ```javascript # Datacenter 2 IP1=IP_of_Node_1 IP2=IP_of_Node_2 IP3=IP_of_Node_3 IP6=IP_of_Node_6 IP7=IP_of_Node_7 IP8=IP_of_Node_8 IP9=IP_of_Node_9 IP12=IP_of_Node_12 HOSTIP=$(hostname -i) MSIP=$IP7 ENABLE_SYSTEM_CHECK=y ADMIN_EMAIL=opdk@google.com APIGEE_ADMINPW=ADMIN_PASSWORD LICENSE_FILE=/tmp/license.txt USE_LDAP_REMOTE_HOST=n LDAP_TYPE=2 LDAP_SID=2 LDAP_PEER=$IP1 APIGEE_LDAPPW=LDAP_PASSWORD MP_POD=gateway-2 REGION=dc-2 ZK_HOSTS="$IP1 $IP2 $IP3 $IP7 $IP8 $IP9:observer" ZK_CLIENT_HOSTS="$IP7 $IP8 $IP9" # Must use IP addresses for CASS_HOSTS, not DNS names. CASS_HOSTS="$IP7:2,1 $IP8:2,1 $IP9:2,1 $IP1:1,1 $IP2:1,1 $IP3:1,1" # Default is postgres PG_PWD=postgres PG_MASTER=$IP6 PG_STANDBY=$IP12 SKIP_SMTP=n SMTPHOST=smtp.example.com SMTPUSER=smtp@example.com # omit for no username SMTPPASSWORD=SMTP_PASSWORD # omit for no password SMTPSSL=n SMTPPORT=25 SMTPMAILFROM="My Company " ``` |