
You're viewing Apigee Edge documentation.
Go to the
Apigee X documentation. info
Apigee Edge enables you to quickly expose backend services as APIs. You do this by creating an API proxy that provides a facade for the backend service that you want to expose. You only need to provide the network address for the backend service, along with some information that Edge uses to create the API proxy that is exposed to developers.
The API proxy decouples your backend service implementation from the API that developers consume. This shields developers from future changes to your backend services. As you update backend services, developers, insulated from those changes, can continue to call the API uninterrupted.
Watch this video for an overview of the process of creating an API proxy.
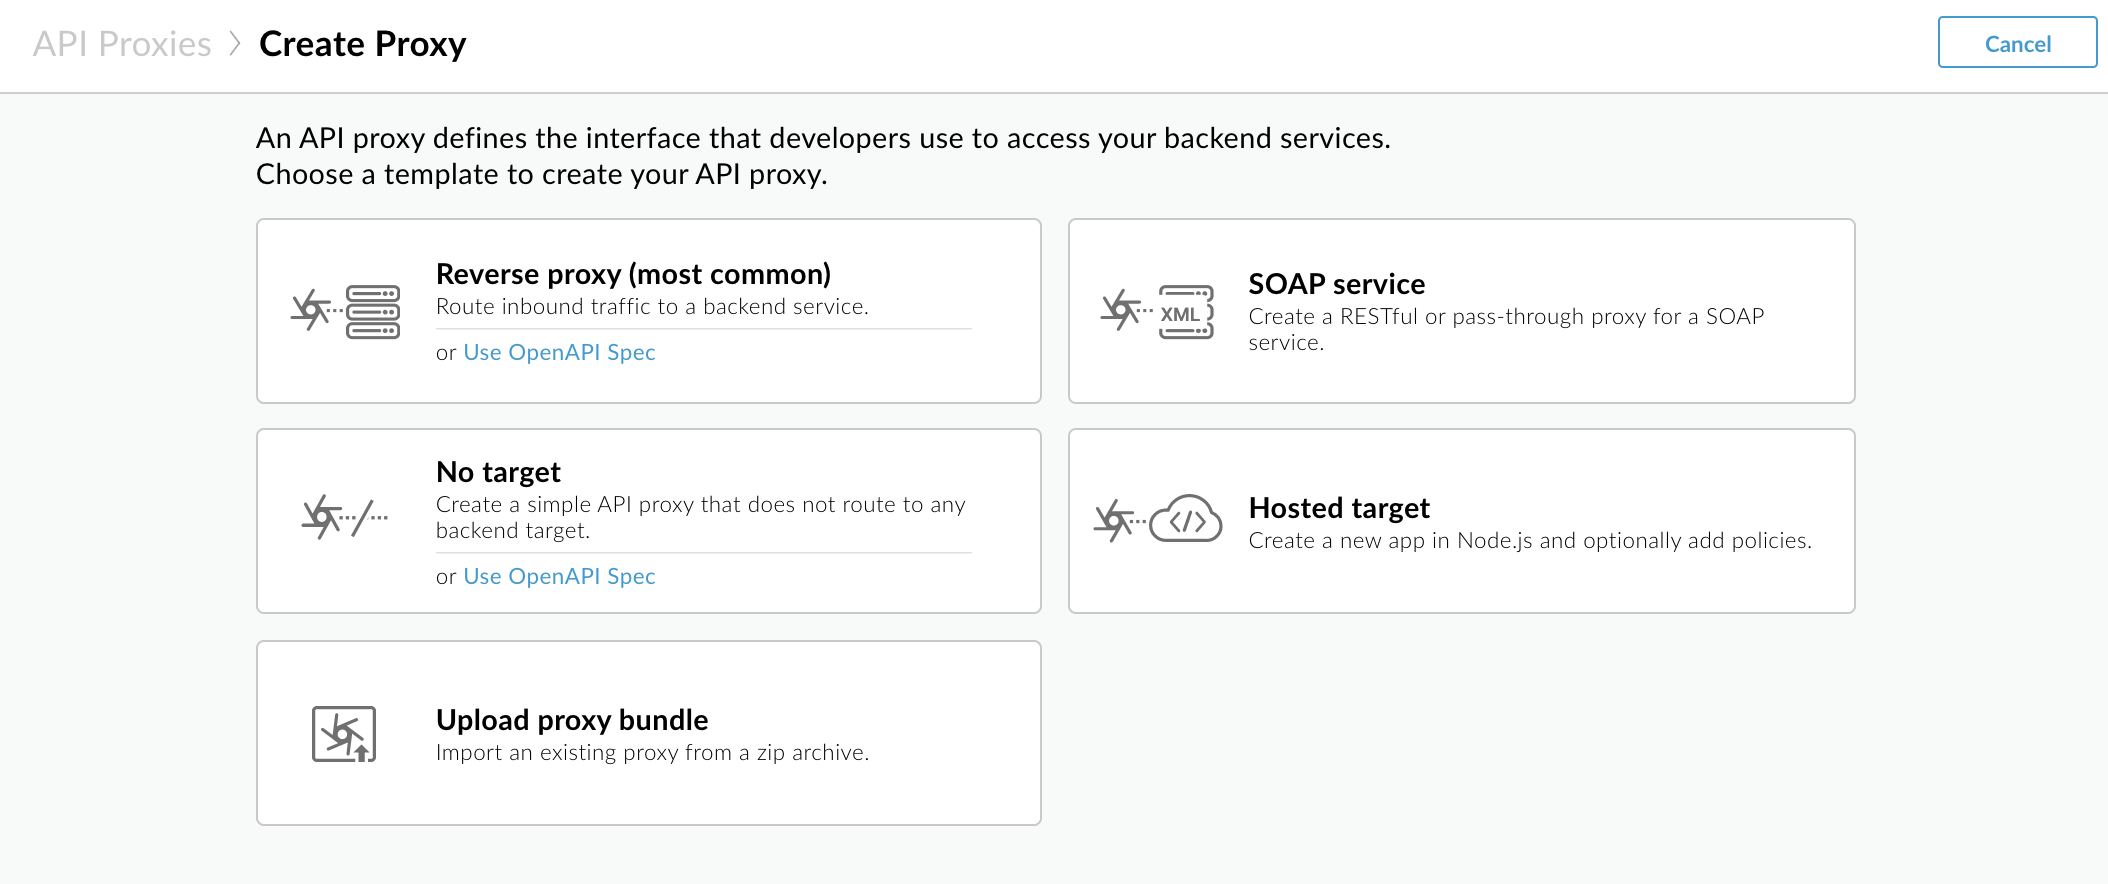
Creating an API proxy using the UI
The easiest way to create an API proxy is using the Create Proxy wizard.
Edge
To access the Create Proxy wizard using the Edge UI:
- Sign in to apigee.com/edge.
- Select Develop > API Proxies in the left navigation bar.
- Click +Proxy.
The Create Proxy wizard displays and leads you through the steps to generate and add minimal features to an API proxy.
Classic Edge (Private Cloud)
To access the Create Proxy wizard using the Classic Edge UI:
- Sign in to
http://ms-ip:9000, where ms-ip is the IP address or DNS name of the Management Server node. - Select APIs > API Proxies in the top navigation bar.
- Click + API Proxy.
The Create Proxy wizard displays and leads you through the steps to generate and add minimal features to an API proxy.
The first page of the wizard enables you create an API proxy from the following sources:
| Type | Description |
|---|---|
| Reverse proxy (most common) |
An API proxy that routes inbound requests to existing HTTP backend services. Can be a JSON or XML API. See Creating a reverse proxy for an HTTP service later in this section. Click Use OpenAPI Spec to generate the proxy from a valid OpenAPI Specification. For more informations on this option, see Using OpenAPI Specifications to generate proxies later in this section. |
| SOAP service | An API proxy generated from a WSDL file. See Exposing a SOAP-based web service as an API proxy. |
| No target |
An API proxy with no API backend ("no target"). Similar to creating a reverse proxy for an HTTP service described previously, except you will not specify an existing API when defining the API proxy details. Click Use OpenAPI Spec to generate the proxy from a valid OpenAPI specification. For more informations on this option, see Using OpenAPI Specifications to generate proxies later in this section. |
| Hosted target |
An API proxy that routes to a Node.js application that is deployed to the Hosted Targets environment. See Hosted Targets overview. |
| Upload proxy bundle | An existing API proxy bundle (for example one of the sample API proxies available on GitHub.) See Importing an API proxy from an API proxy bundle. |
The following sections describe how to create an API proxy using each source.
Creating a reverse proxy for an HTTP service
Edge generates reverse proxies based on two pieces of information:
- URL of the backend service
- URI path that uniquely identifies the API that will be exposed by the API proxy to consumer apps
The backend service URL typically represents a service-enabled application owned by your organization. It can also point to a publicly available API. The API or service can be under your control (for example, an internal HR application or a Rails application in the Cloud) or it can be a third-party API or service (for example, Twitter or Instagram).
Edge
- Access the Create Proxy wizard, as described in Creating an API proxy using the UI previously in this section.
- In the Create Proxy wizard, click Reverse proxy (most common). To generate the proxy from an existing, valid OpenAPI Specification, click Use OpenAPI Spec. For details on this option, see Using OpenAPI Specifications to generate proxies below.
- On the Details page of the wizard, enter the following information.
Field Description Name Name displayed for your API. Specify alphanumeric characters, dash (-), or underscore (_). Base path URI fragment that appears after the http(s)://[host] address of your API proxy. Edge uses the base path URI to match and route incoming request messages to the proper API proxy.
NOTE: The API proxy base path defaults to the value specified for the
Namefield converted to all lower case.Following the base path are any additional resource URLs. Here's the full URL structure that clients will use to call your API proxy:
https://[host]/base_path/conditional_flow_pathNOTE: The base path must be unique; you cannot deploy two API proxies with the same base path. If you edit a deployed API proxy and set the base path to the same value as the base path of another API proxy, Edge automatically undeploys the API proxy when you save it. Before you can redeploy the API proxy, you must edit the base path so that it is unique.
Use wildcards in base paths
Use one or more
/*/wildcards in API proxy base paths to future-proof your API proxies. For example, a base path of/team/*/membersallows clients to callhttps://[host]/team/blue/membersandhttps://[host]/team/green/memberswithout you needing to create new API proxies to support new teams. Note that/**/is not supported.Description (Optional) Description of the API. Target (Existing API) URL of the backend service that this API proxy invokes. - On the Common policies page of the wizard, configure the following:
- Security authorization requirements under Security: Authorization. See Adding security later in this section.
- Support for Cross-origin resource sharing (CORS) under Security: Browser. See Adding support for CORS later in this section.
- Quotas to protect your backend service from high traffic under Quota. See Quotas. (Not available if Pass-through authorization is selected.)
- Monetization limit enforcement for monetization-enabled organizations under Monetization. See Enforce monetization limits on API proxies.
- On the Virtual hosts page of the wizard, select the virtual hosts the API proxy will bind to when deployed. For more information, see About virtual hosts.
- On the Summary page, select the deployment environment(s), if desired, and click Create and deploy.
Your new API proxy is created and deployed in the selected environment.
- Click Edit proxy to display the details page for the API proxy.
Classic Edge (Private Cloud)
- Access the Create Proxy wizard, as described in Creating an API proxy using the UI previously in this section.
- In the Build a Proxy wizard, select Reverse proxy (most common). To generate the proxy from an existing, valid OpenAPI spec, click Use OpenAPI. For details on this option, see Using OpenAPI Specifications to generate proxies below.
- Click Next.
- On the Details page of the wizard, enter the following information.
Field Description Proxy Name The name displayed for your API. Proxy Base Path The Proxy Base Path is a URI fragment after the http(s)://[host] address of your API proxy. Edge uses the Base Path URI to match and route incoming request messages to the proper API proxy.
Note: For Apigee's recommendations on API versioning, see Versioning in the Web API Design: The Missing Link e-book.
After the base path are any additional resource URLs. Here's the full URL structure that clients will use to call your API proxy:
https://[host]/base_path/conditional_flow_pathNote: The base path must be unique. If you later edit this proxy and set its base path to be the same as another API proxy, this API proxy is automatically undeployed when you save it. You must edit the base path before you can redeploy it.
Using a wildcard in base paths
You can use one or more
/*/wildcards in API proxy base paths to future-proof your proxies. For example, a base path of/team/*/membersallows clients to callhttps://[host]/team/blue/membersandhttps://[host]/team/green/memberswithout you needing to create new API proxies to support new teams. Note that /**/ is not supported.Note: The Proxy Base Path defaults to the value specified for Proxy Name converted to all lower case unless you explicitly edit the content in the Proxy Base Path field.
Existing API The URL that the API Platform invokes on behalf of apps that call your API through the API proxy URL. Description The description of the API. - On the Security page of the wizard, configure the following:
- Security authentication requirements. See Adding security later in this section.
- Support for Cross-origin resource sharing (CORS). See Adding support for CORS later in this section.
- On the Virtual Hosts page of the wizard, select the virtual hosts the API proxy will bind to when deployed. For more information, see About virtual hosts.
- Select the deployment environment(s) and click Build and Deploy
An acknowledgment is sent confirming that your new API proxy was successfully created and deployed in the selected environment. - Click View the <proxy name> proxy in the editor to display the details page for the API proxy.
Importing an API proxy from an API proxy bundle
Often you define API proxies as a collection of XML files, along with any other supporting files. By defining your API proxies as a set of files external to Edge you can maintain them in a source-control system, and then import them into Edge for testing and deployment.
Watch this video to learn how to create and import an API proxy from an API proxy bundle.
Edge
To import API proxies from an API proxy bundle:
- Access the Create Proxy wizard, as described in Creating an API proxy using the UI previously in this section.
- Click Upload proxy bundle.
- On the Upload proxy bundle page in the proxy wizard, enter the following information.
Field Description ZIP bundle ZIP file containing the API proxy configuration. Drag and drop or click to navigate to the file. Name Name displayed for your API. Defaults to the name of the ZIP file without the extension. - Click Next.
- On the Summary page, select the deployment environment(s), if desired, and click Create and deploy
An acknowledgment is displayed confirming that your new API proxy was successfully created. - Click Edit proxy to display the details page for the API proxy.
Classic Edge (Private Cloud)
- Access the Create Proxy wizard, as described in Creating an API proxy using the UI previously in this section.
- In the Build a Proxy wizard, select Proxy bundle.
- Click Next.
- On the Details page in the proxy wizard, enter the following information.
Field Description ZIP Bundle Click Choose File and navigate to the ZIP file containing the API proxy configuration. Proxy Name The name displayed for your API. - Review the build information and click Build.
If successful, a message is displayed and Edge automatically deploys the imported API proxy to the selected environment in your organization. The API exposed by the API proxy is available to be invoked. - Click View the <proxy name> proxy in the editor to display the details page for the API proxy.
- To deploy the proxy, click the Deployment drop-down, select the environment you want to deploy to, and respond to the prompt.
Exposing a SOAP-based web service as an API proxy
In the Create Proxy wizard, click SOAP Service, and follow the wizard to create a pass-through or REST-based proxy for a SOAP service. For details, see Exposing a SOAP service as an API proxy.
Adding security
On the Common policies (Edge) or Security (Classic Edge) page of the Create Proxy wizard, select the type of security authorization you wish to add. The following table summarizes the available options:
| Security authorization | Description |
|---|---|
| API Key | Adds simple API key verification to the API proxy that you are defining. In response, the API Platform adds a VerifyAPIKey policy and an AssignMessage policy to your API proxy. The VerifyAPIKey policy validates API keys presented by requesting apps. The AssignMessage policy strips the API key, supplied in the API call as a query parameter, from the request forwarded to the backend server. |
| OAuth 2.0 | Adds OAuth 2.0 based authentication to your API proxy. Apigee Edge automatically adds two policies to your API proxy: one policy to verify an access token and another policy to strip the access token from the message before forwarding it to your backend service. To learn how to obtain an access token, see OAuth. |
| Pass through (no authorization) | No authorization required. Requests are passed to the backend without any security checks on Apigee Edge. |
Adding support for CORS
CORS (Cross-origin resource sharing) is a standard mechanism that allows a Web browser to make direct requests to another domain. The CORS standard defines a set of HTTP headers that Web browsers and servers use to implement cross-domain communication.
You can add support for CORS to your API by selecting Add CORS headers on the Common policies (Edge) or Security (Classic Edge) page of the Create Proxy wizard.
For more detailed information about CORS support, including adding CORS preflight support to a proxy, see Adding CORS support to an API proxy.
Using OpenAPI Specifications to generate proxies
This section discusses the Use OpenAPI option that is available for generating from an OpenAPI Specification the following types of API proxies: reverse, Node.js, or no target.
What is an OpenAPI Specification?
 "The Open API Initiative (OAI) is focused on
creating, evolving and promoting a vendor neutral API Description Format based on the Swagger
Specification." For more information about the Open API Initiative, see https://openapis.org.
"The Open API Initiative (OAI) is focused on
creating, evolving and promoting a vendor neutral API Description Format based on the Swagger
Specification." For more information about the Open API Initiative, see https://openapis.org.
An OpenAPI Specification uses a standard format to describe a RESTful API. Written in either JSON or YAML format, an OpenAPI Specification is machine readable, but is also easy for humans to read and understand. The specification describes such elements of an API as its base path, paths and verbs, headers, query parameters, operations, content types, response descriptions, and more. In addition, an OpenAPI Specification is commonly used to generate API documentation.
Here's a fragment from an OpenAPI Specification that describes Apigee's mock target service, http://mocktarget.apigee.net. For more information, see https://github.com/apigee/api-platform-samples/tree/master/default-proxies/helloworld/openapi.
openapi: 3.0.0
info:
  description: OpenAPI Specification for the Apigee mock target service endpoint.
  version: 1.0.0
  title: Mock Target API
paths:
  /:
    get:
      summary: View personalized greeting
      operationId: View a personalized greeting
      description: View a personalized greeting for the specified or guest user.
      parameters:
        - name: user
          in: query
          description: Your user name.
          required: false
          schema:
            type: string
      responses:
        "200":
          description: Success
  /help:
    get:
      summary: Get help
      operationId: Get help
      description: View help information about available resources in HTML format.
      responses:
        "200":
          description: Success
...
Through the Create Proxy wizard, you can import an OpenAPI Specification and use it to generate an API proxy. Once the proxy is generated, you can use the Edge UI to further develop it by adding policies, implementing custom code, and so on -- just like any Edge proxy.
Creating an API proxy from an OpenAPI Specification
Create your API proxies from an OpenAPI Specification. In just a few clicks, you'll have an API proxy with the paths, parameters, conditional flows, and target endpoints generated automatically. Then, you can add features such as OAuth security, rate limiting, and caching.
In the Create Proxy wizard, click Use OpenAPI Spec and follow the wizard to create a reverse or no target proxy from an OpenAPI Specification. For details, see Create an API proxy from an OpenAPI Specification.
Watch this video to learn how to create an API proxy from an OpenAPI Specification.
Updating the flows in an API proxy using an OpenAPI Specification
After you create an API proxy from an OpenAPI Specification, if you modify the specification to add additional resource paths you can use the specification to add the associated conditional flows to the API proxy.
To update the flows in an API proxy using an OpenAPI Specification:
- Add the new resource paths to the OpenAPI Specification. See Editing an existing OpenAPI Specification.
- Open the API Proxy in the UI and click the Develop tab.
- In the Navigator, click + next to the Proxy endpoint that you want to update.
The New Conditional Flow dialog box opens. - Click From OpenAPI if it is not already selected.
If there are resources in the OpenAPI Specification that do not have a corresponding conditional flow in the API proxy, they are listed in the dialog, as shown in the following figure.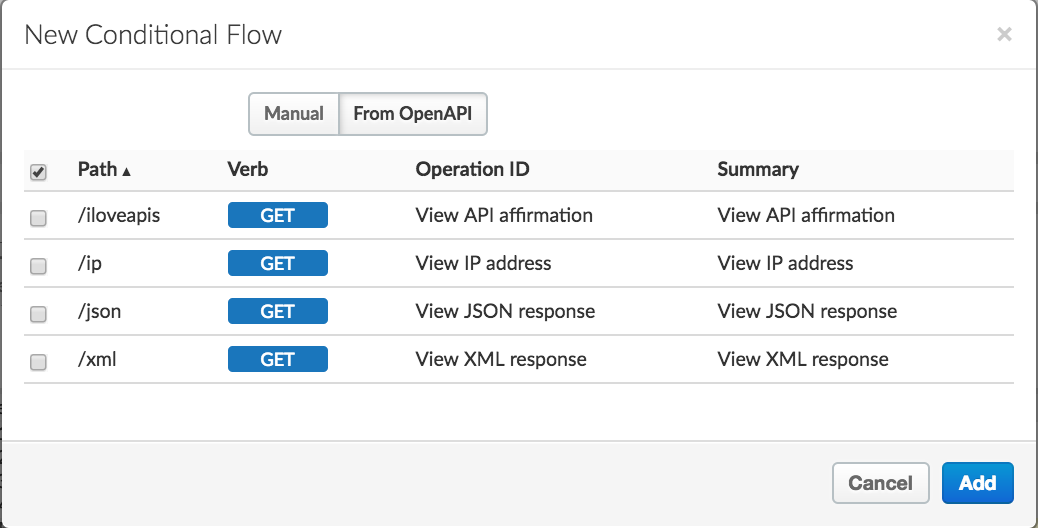
- Select each of the resources for which you want to add a conditional flow.
- Click Add.
The conditional flows are added to your API proxy.
Creating a new revision of an API proxy
Create a new revision of an API proxy, as described below.
Edge
To create a new revision of an API proxy using the Edge UI:
- Sign in to apigee.com/edge.
- Select Develop > API Proxies in the left navigation bar.
- Click the API proxy in the list that you want to copy.
- Select Project > Save as New Revision.
Classic Edge (Private Cloud)
To create a new revision of an API proxy using the Classic Edge UI:
- Sign in to
http://ms-ip:9000, where ms-ip is the IP address or DNS name of the Management Server node. - Select APIs > API Proxies in the top navigation bar.
- Click the API proxy in the list that you want to copy.
- Select Project > Save as New Revision.
Copying an API proxy
Copy an existing API proxy to a new API proxy, as described below.
Edge
To copy an API proxy using the Edge UI:
- Sign in to apigee.com/edge.
- Select Develop > API Proxies in the left navigation bar.
- Click the API proxy in the list that you want to copy.
- Select Project > Save as New API Proxy.
- In the Save as New Proxy dialog, enter the name of the new API proxy.
- Click Add.
Classic Edge (Private Cloud)
To copy an API proxy using the Classic Edge UI:
- Sign in to
http://ms-ip:9000, where ms-ip is the IP address or DNS name of the Management Server node. - Select APIs > API Proxies in the top navigation bar.
- Click the API proxy in the list that you want to copy.
- Select Project > Save as New API Proxy.
- In the Save as New Proxy dialog, enter the name of the new API proxy.
- Click Add.
Backing up an API proxy
You can back up an existing API proxy as a set of XML files in an API proxy bundle. Once exported to a bundle, you can import the API proxy to a new proxy, as described in Importing an API proxy from an API proxy bundle previously in this section. For more information, see Download API proxies.
Creating an API proxy using the API
To create an API proxy using the API, see API proxies API.