
You're viewing Apigee Edge documentation.
Go to the
Apigee X documentation. info
As an API provider, managing the companies and developers participating in your monetized API ecosystem could be time consuming if you had to do it all yourself. There are profiles to manage; bank, tax, and billing details to maintain; roles to assign; and so on. The developer portal allows those management tasks to be handled by the companies and developers themselves while giving you full visibility into the ecosystem from the management UI and API.
Before you begin
Before enabling self-service in your developer portal, be sure you understand the basic developer portal concepts and perform the key configuration steps. For example, it's important to know that you can control whether users are automatically activated on registration or require manual approval from you. If you haven't already, familiarize yourself with the developer portal topics in Build your portal using Drupal.
In addition to reviewing and performing core developer portal environment setup, also review and perform the following monetization-specific topics:
About company and developer self-service in your developer portal
With monetization enabled in your organization, in addition to any developer portal configuration you've already performed, your portal may be ready for self-service. Self-service tasks that developers can perform include:
| Task | Configuration information |
| Register themselves | |
| Create companies | Enabling company management in the portal |
| Invite developers to join companies (and remove developers from companies) | Enabling company management in the portal |
| Change user roles | Configure monetization |
| Maintain their own billing, tax, bank, and other profile details | Configure monetization |
| Agree to your terms of service | Set up monetization terms and conditions in the develper portal (optional) |
| Register new apps, select the API packages/plans they want to use, and access their API keys | Configuring app registration |
| Add money (top up balances) to prepaid accounts | Configure monetization |
| Generate statements and reports (billing and revenue) | Configure monetization |
Example of self-service interactions in developer portal
Below are examples of self-service interactions in the developer portal:
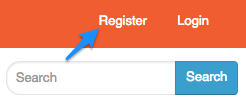
- When developers register on the portal (clicking the Register link),
they are automatically logged in (unless you want to manually approve them first) and can create
their own company. They automatically become a monetization administrator of the company, and
they can enter all the profile, billing, and banking information for the company.
- When developers navigate and perform tasks in the developer portal (accepting invitations,
registering apps, and so on), they do so in the context of their own account or company
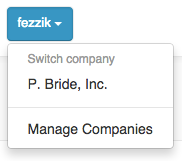
membership. There's a drop-down menu to select the company they want to work in. For example,
if a user selects a company and registers an app, the app is owned by the company.
To manage company details (if they have administrator rights), users select Manage Companies in the drop-down menu and select the company they want to manage (or their username if they're functioning as a stand-alone developer).
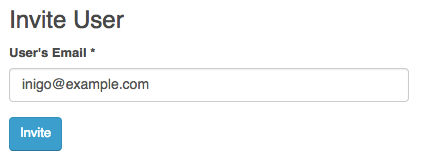
- A company administrator can also invite developers to join their company. (The developers
must already have Apigee accounts.) The following figure shows the Invite User field in the
developer portal, under the company Settings > Users page.
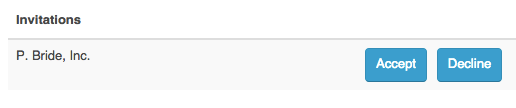
- Invited developers get an email notification about the company invitation, and they can log
into the portal to accept the invitation on their Manage Companies page, as shown in the
following figure.
- Company administrators can cancel invitations to developers on the company's Settings > Users page.
- Company administrators can change the roles of developers on the company's Settings > Users page. For example, they can make a developer a Monetization Administrator to allow company administration rights.
Enabling company management in the portal
By default, the ability to manage companies is available in the portal if you are using the Apigee Responsive theme. The Company drop-down menu may be obscured if you are using the Fixed Top Navbar position configuration setting. To ensure that the Manage Companies drop-down is displayed, switch to use the Static Top Navbar position setting, as follows:
- Log into the developer portal as an administrator.
- Select Appearance > Settings > Apigee Responsive in the admin bar.
- Select Components under Bootstrap Settings.
- Click Navbar.
- Select Static Top in the Navbar Position drop-down.
- Click Save configuration to save the changes.
If you are using your own custom theme, add the Switch Company block to your theme by selecting Structure > Blocks in the admin bar and dragging the Switch Company block to the desired region of the page. Click Save blocks to save the configuration.