
You're viewing Apigee Edge documentation.
Go to the
Apigee X documentation. info
What is a webhook?
A webhook defines an HTTP callback handler that is triggered by an event. You can create webhooks and configure them to handle event notifications, as an alternative to using the monetization notification templates, as described in Set up notifications using notification templates.
To set up notifications using webhooks, complete the following steps using the Edge Management UI, or Management and Monetization API:
- Add webhooks that define the callback handlers for the notification events using the UI or API.
- Set up the callback handler.
- Set up the notification for an adjustable rate plan using the UI or API.
Managing webhooks
Add and manage webhooks that define the callback handlers for the notification events using the UI or API.
Managing webhooks using the UI
Add and manage webhooks that define the callback handlers for the notification events using the UI, as described in the following sections.
- Exploring the Webhooks page
- Adding a webhook using the UI
- Editing a webhook using the UI
- Deleting a webhook using the UI
Exploring the Webhooks page
Access the Webhooks page, as described below.
Edge
To access the Webhooks page using the Edge UI:
- Sign in to apigee.com/edge.
- Select Publish > Monetization > Webhooks in the left navigation bar.
The Webhooks page is is displayed.
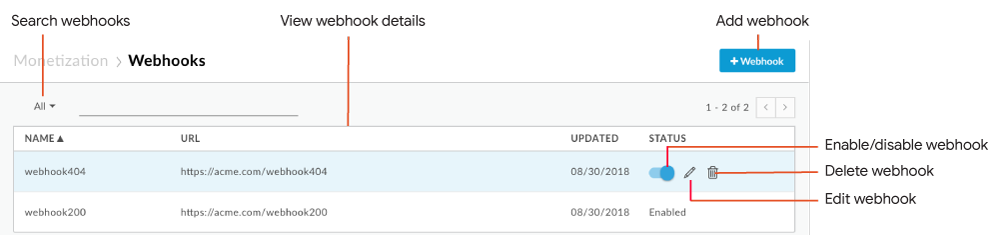
As highlighted in the figure, the Webhooks page enables you to:
- View details for existing webhooks.
- Add a webhook.
- Enable or disable, edit or delete a webhook.
- Search the list of webhooks.
Classic Edge (Private Cloud)
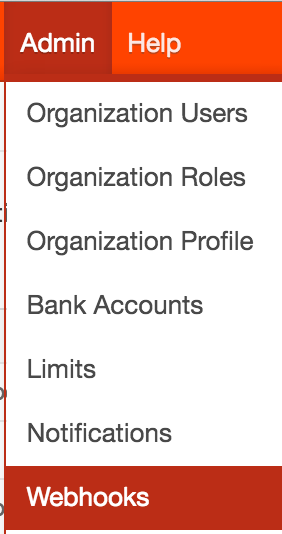
To access the Webhooks page using the Classic Edge UI:
- Sign in to
http://ms-ip:9000, where ms-ip is the IP address or DNS name of the Management Server node. Select Admin > Webhooks.
The Webhooks page is displayed.
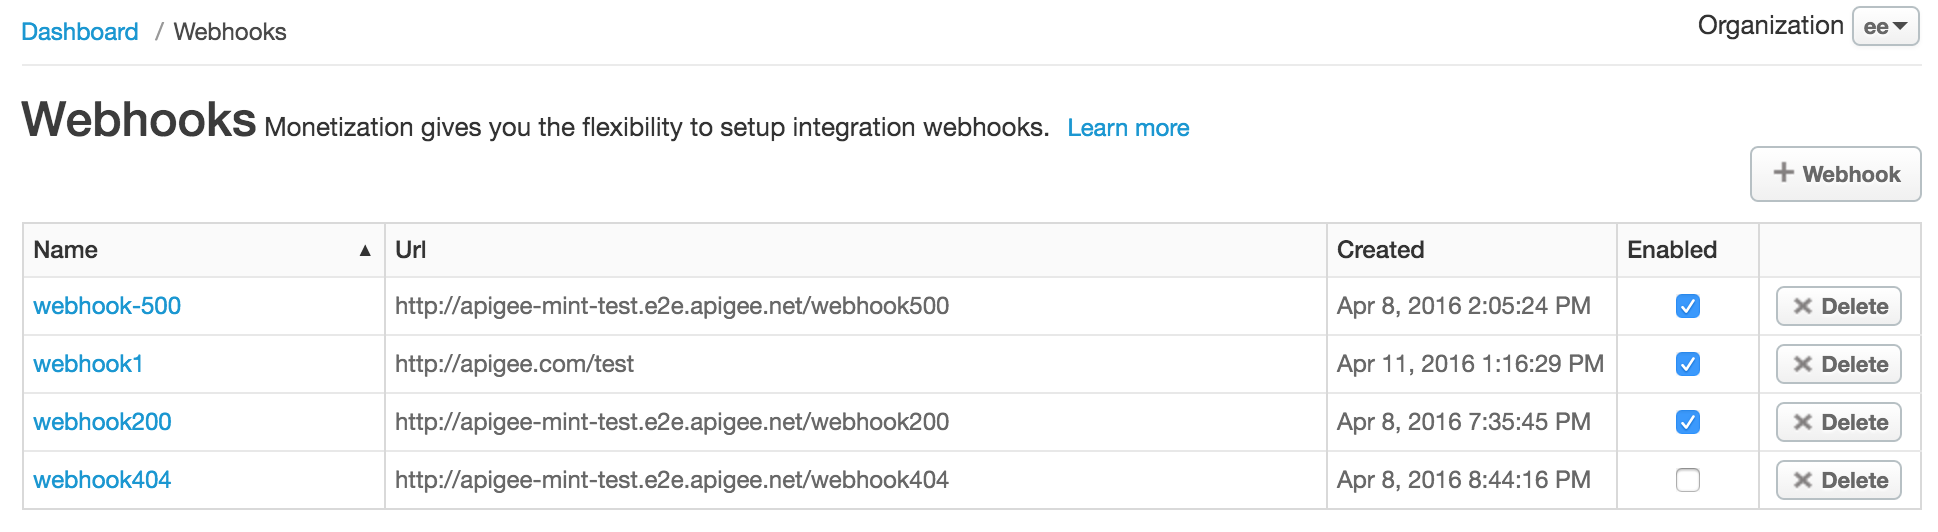
The Webhooks page enables you to:
- View details for existing webhooks.
- Add a webhook.
- Enable or disable, edit or delete a webhook.
- Search the list of webhooks.
Adding a webhook using the UI
To add a webhook using the UI:
- Access the Webhooks page.
- Click + Webhook.
- Enter the following information (all fields are required).
Field Description Name Name of the webhook. Url URL of the callback handler that will be called when the event notification is triggered. See Setting up the callback handler. - Click Save.
The webhook is added to the list and enabled by default.
Editing a webhook usin the UI
To edit a webhook using the UI:
- Access the Webhooks page.
- Position your cursor over the webhook that you want to edit and click
 in the actions menu.
 - Edit the webhook fields, as required.
- Click Update Webhook.
Enabling or disabling a webhook using the UI
To enable or disable a webhook using the UI:
- Access the Webhooks page.
- Position your cursor over the webhook and toggle the status switch to enable or disable it.
Deleting a webhook using the UI
To delete a webhook using theUI:
- Access the Webhooks page.
- Position the cursor over the webhook you want to delete and click
 .
.
The webhook is deleted and removed from the list.
Managing webhooks using the API
Add and manage webhooks using the API as described in the following sections.
- Viewing all webhooks using the API
- Viewing a webhook using the API
- Adding a webhook using the API
- Editing a webhook using the API
- Deleting a webhook using the API
Viewing all webhooks using the API
View all webhooks by issuing a GET request to /mint/organizations/{org_name}/webhooks.
For example:
curl -X GET "https://api.enterprise.apigee.com/v1/mint/organizations/myorg/webhooks" \
  -H "Content-Type: application/json " \
  -u email:password
The following provides an example of the response returned:
{
  "totalRecords": 2,
  "webhooks": [
    {
      "created": 1460162656342,
      "enabled": false,
      "id": "21844a37-d26d-476c-93ed-38f3a4b24691",
      "name": "webhook1",
      "postUrl": "http://mycompany.com/callbackhandler1",
      "updated": 1460162656342,
      "updatedBy": "joe@example.com"
    },
        {
      "created": 1460138724352,
      "createdBy": "joe@example.com",
      "enabled": true,
      "id": "a39ca777-1861-49cf-a397-c9e92ab3c09f",
      "name": "webhook2",
      "postUrl": "http://mycompany.com/callbackhandler2",
      "updated": 1460138724352,
      "updatedBy": "joe@example.com"
    }

  ]
}
Viewing a webhook using the API
View a single webhook by issuing a GET request to
/mint/organizations/{org_name}/webhooks/{webhook_id}.
For example:
curl -X GET "https://api.enterprise.apigee.com/v1/mint/organizations/myorg/webhooks/21844a37-d26d-476c-93ed-38f3a4b24691" \
  -H "Content-Type: application/json " \
  -u email:password
The following provides an example of the response:
{
   "created": 1460162656342,
   "enabled": false,
   "id": "21844a37-d26d-476c-93ed-38f3a4b24691",
   "name": "webhook1",
   "postUrl": "http://mycompany.com/callbackhandler1",
   "updated": 1460162656342,
   "updatedBy": "joe@example.com"
 }
Adding a webhook using the API
Add a webhook by issuing a POST request to /mint/organizations/{org_name}/webhooks.
You must pass the name of the webhook and the URL of the callback handler that will be called
when the event notification is triggered.
For example, the following creates a webhook named webhook3 and assigns
callbackhandler3 to the webhook:
curl -X POST "https://api.enterprise.apigee.com/v1/mint/organizations/myorg/webhooks"
  -H "Content-Type: application/json "
  -d '{
    "name": "webhook3",
    "postURL": "http://mycompany.com/callbackhandler3"
    }' \
    -u email:password
The following provides an example of the response:
{
  "created": 1460385534555,
  "createdBy": "joe@example.com",
  "enabled": false,
  "id": "0a07eb1f-f485-4539-8beb-01be449699b3",
  "name": "webhook3",
  "orgId": "myorg",
  "postUrl": "http://mycompany.com/callbackhandler3",
  "updated": 1460385534555,
  "updatedBy": "joe@example.com"
}
Editing a webhook using the API
Edit a webhook by issuing a PUT request to
/mint/organizations/{org_name}/webhooks/{webhook_id}. Pass the updates in the body of the
request.
For example, the following updates the callback handler associated with
webhook1:
curl -X PUT "https://api.enterprise.apigee.com/v1/mint/organizations/myorg/webhooks/0a07eb1f-f485-4539-8beb-01be449699b3" \
  -H "Content-Type: application/json " \
  -d '{
    "postURL": "http://mycompany.com/callbackhandler4"
  }' \
  -u email:password
The following provides an example of the response:
{
  "created": 1460385534555,
  "enabled": false,
  "id": "0a07eb1f-f485-4539-8beb-01be449699b3",
  "name": "webhook3",
  "orgId": "myorg",
  "postUrl": "http://mycompany.com/callbackhandler4",
  "updated": 1460385534555,
  "updatedBy": "joe@example.com"
}
Enabling or disabling a webhook using the API
Enable or disable a webhook by issuing a POST request to
/mint/organizations/{org_name}/webhooks/{webhook_id}, as you did when updating a webhook,
and set the enabled attribute in the request body to true or false, respectively. If you disable the webhook, it will not be triggered when
an event occurs.
For example, the following enables webhook3:
curl -X POST "https://api.enterprise.apigee.com/v1/mint/organizations/myorg/webhooks/0a07eb1f-f485-4539-8beb-01be449699b3" \
  -H "Content-Type: application/json " \
  -d '{
    "enabled": "true"
  }' \
  -u email:password
The following provides an example of the response:
{
  "created": 1460385534555,
  "enabled": true,
  "id": "0a07eb1f-f485-4539-8beb-01be449699b3",
  "name": "webhook3",
  "orgId": "myorg",
  "postUrl": "http://mycompany.com/callbackhandler4",
  "updated": 1460385534555,
  "updatedBy": "joe@example.com"
}
Deleting a webhook using the API
Delete a webhook by issuing a DELETE request to
/mint/organizations/{org_name}/webhooks/{webhook_id}.
To specify whether or not to force the deletion of the webhook if there are processes in
progress, set the forceDelete query parameter to true or
false. The forceDelete query parameter is enabled (true)
by default.
For example, the following deletes webhook3:
curl -X DELETE "https://api.enterprise.apigee.com/v1/mint/organizations/myorg/webhooks/21844a37-d26d-476c-93ed-38f3a4b24691" \
  -H "Content-Type: application/json " \
  -u email:password
Setting up the callback handler
The following shows the format of the JSON request that is sent to the callback handler defined by a webhook when an event notification is triggered. You must ensure that the callback handler processes the request appropriately.
{
        "orgName": "{org_id}",
        "developerEmail": "{dev_email}",
        "developerFirstName": "{first_name}",
        "developerLastName": "{last_name}",
        "companyName": "{company_name}",
        "applicationName": "{app_name}",
        "packageName": "{api_package_name}",
        "packageId": "{api_package_id}",
        "ratePlanId": "{rateplan_id}",
        "ratePlanName": "{rateplan_name}",
        "ratePlanType": "{rateplan_type}",
        "developerRatePlanQuotaTarget": {quota_target},
        "quotaPercentUsed": {percentage_quota_used},
        "ratePlanStartDate": {rateplan_startdate},
        "ratePlanEndDate": {rateplan_enddate},
        "nextBillingCycleStartDate": {next_billing_cycle_startdate},
        "products": ["{api_product_name}","{api_product_name}"],
        "developerCustomAttributes": [],
        "triggerTime": {trigger_time},
        "triggerReason": "{trigger_reason}",
        "developerQuotaResetDate": "{devquota_resetdate}"
}
Setting up notifications for an adjustable rate plan
Set up notifications using webhooks for an adjustable rate plan using the UI or API.
Setting up notifications for an adjustable rate plan using the UI
Set up notifications using webhooks for an adjustable rate plan using the UI, as described below.
Access the Notifications dialog for an adjustable rate plan
Access the Notifications dialog for an adjustable rate plan, as described below.
Edge
To access the notifications dialog using the Edge UI:
- Create and publish an adjustable notification rate plan, as described in Specify adjustable notification plan details.
- Access the Rate Plans page by selecting Publish > Monetization > Rate Plans in the left navigation bar.
- Position your cursor over the published Adjustable notification rate plan to display actions.
- Click +Notify.
The Notifications dialog is displayed.
Note: The rate plan must be published in order for the +Notify action to display.
Classic Edge (Private Cloud)
To access the Notifications page:
- Create an adjustable notification rate plan, as described in Specify adjustable notification plan details.
- Select Publish > Packages to view the rate plans.
- Click +Notify in the Actions column for the rate plan.
The Notifications dialog is displayed.
Adding notifications for an adjustable rate plan using the UI
To add notifications for an adjustable rate plan the UI:
- Access the Notifications dialog.
- Set the notification condition under Notification Intervals by
specifying a percentage of the target number of transactions at which time you want a
notification to be triggered. Specifically:
- To set an exact percentage, enter the percentage in the At/From % field and leave the To % field blank.
- To set a percentage range, enter the start and end percentage in the At/From % and To % fields, respectively, and an increment value in the Step % field. By default, notifications are sent in 10% increments within the specified range.
The
Notify Atfield is updated to reflect each percentage of the target number of transactions that will trigger an event. - To set additional notification conditions, click +Add and repeat step 4.
- Set the notification action under Webhooks by selecting one or more webhooks to manage callback handling when notifications are triggered.
- Click Create Notification.
Editing notifications for an adjustable rate plan using the UI
To edit notifications for an adjustable rate plan the UI:
- Access the Notifications dialog.
- Click +Notify in the Actions column for the rate plan.
- Click Edit.
- Modify the values, as required.
- Click Save Notification.
Deleting notifications for an adjustable rate plan using the UI
To delete a notification condition and action:
- Access the Notifications dialog.
- Click +Notify in the Actions column for the rate plan.
- Click Delete Notification.
Setting up notifications for an adjustable rate plan using the API
To set up a notification for an adjustable rate plan using the API, use the procedure described in Managing notification conditions and actions using the API and use the attributes described in this section.
To set up the notification condition (notificationCondition), use the
following attribute values. For more information, see Configuration
properties for notification conditions.
| Attribute | Value |
|---|---|
RATEPLAN |
ID of the adjustable notification rate plan. |
PUBLISHED |
TRUE to indicate that the adjustable notification rate plan must be
published. |
UsageTarget |
Percentage of the target number of transactions at which time you want a notification to
be triggered.
This attribute enables you to notify developers when they're nearing or have reached their target number of transactions for an adjustable notification rate card plan that they've purchased. For example, if a developer has purchased an adjustable notification rate plan and the target number of transactions for the developer has been set to 1000, you can notify them when they reached 800 transactions (80% of the target number of transactions), 1000 transactions (100%), or 1500 transactions (150%).
|
To set up the notification action, under actions set the following values. For
more information, see Configuration
properties for notification actions.
| Attribute | Value |
|---|---|
actionAttribute |
WEBHOOK to trigger a webhook. |
value |
ID of the webhook that you defined in the previous section, Creating webhooks using the API. |
The following provides an example of how to create a notification condition that triggers a webhook when the percentage of the target number of transactions reaches 80%, 90%, 100%, 110%, and 120%.
{
    "notificationCondition": [
      {
        "attribute": "RATEPLAN",
        "value": "123456"
      },
      {
        "attribute": "PUBLISHED",
        "value": "TRUE"
      },
      {
        "attribute": "UsageTarget",
        "value": "%= 80 to 120 by 10"
      }
    }
    ],
   "actions": [{
          "actionAttribute": "WEBHOOK",
          "value": "b0d77596-142e-4606-ae2d-f55c3c6bfebe",
        }]
  }
For information about viewing, updating, and deleting a notification condition and action, see:
- Viewing a notification condition and action using the API
- Editing a notification condition and action using the API
- Deleting a notification condition and action using the API
Webhook response codes
The following summarizes the webhook response codes and how they are interpreted by the system.
| Response Code | Description |
|---|---|
2xx |
Success |
5xx |
Failed request. The system will retry the request up to three times in 5-minute intervals. Note: The read and connection timeouts for webhook requests are 3 seconds each, which can result in failed requests. |
Other response |
Failed request. The system will not retry the request. |