Edge for Private Cloud v4.18.05
When SAML is enabled, the principal (an Edge UI user) requests access to the service provider (Edge SSO). Edge SSO then requests and obtains an identity assertion from the SAML identity provider (IDP) and uses that assertion to create the OAuth2 token required to access the Edge UI. The user is then redirected to the Edge UI.
Edge supports many IDPs, including Okta and the Microsoft Active Directory Federation Services (ADFS). For information on configuring ADFS for use with Edge, see Configuring Edge as a Relying Party in ADFS IDP. For Okta, see the following section.
To configure your SAML IDP, Edge requires an email address to identify the user. Therefore, the identity provider must return an email address as part of the identity assertion.
in addition, you might require some or all of the following:
| Setting | Description |
|---|---|
| Metadata URL |
The SAML IDP might require the metadata URL of Edge SSO. The metadata URL is in the form: protocol://apigee_sso_IP_DNS:port/saml/metadata For example: http://apigee_sso_IP_or_DNS:9099/saml/metadata |
| Assertion Consumer Service URL |
Can be used as the redirect URL back to Edge after the user enters their IDP credentials, in the form: protocol://apigee_sso_IP_DNS:port/saml/SSO/alias/apigee-saml-login-opdk For example: http://apigee_sso_IP_or_DNS:9099/saml/SSO/alias/apigee-saml-login-opdk |
|
Single logout URL |
You can configure Edge SSO to support single logout. See Configure single sign-out from the Edge UI for more. The Edge SSO single logout URL has the form: protocol://apigee_sso_IP_DNS:port/saml/SingleLogout/alias/apigee-saml-login-opdk For example: http://apigee_sso_IP_DNS:9099/saml/SingleLogout/alias/apigee-saml-login-opdk |
|
The SP entity ID (or Audience URI) |
For Edge SSO: apigee-saml-login-opdk |
Configuring Okta
To configure Okta:
- Log in to Okta.
- Select Applications and then select your SAML application.
- Select the Assignments tab to add any users to the application. These user will be able to log in to the Edge UI and make Edge API calls. However, you must first add each user to an Edge organization and specify the user's role. See Register new Edge users for more.
- Select the Sign on tab to obtain the Identity Provider metadata URL. Store that URL because you need it to configure Edge.
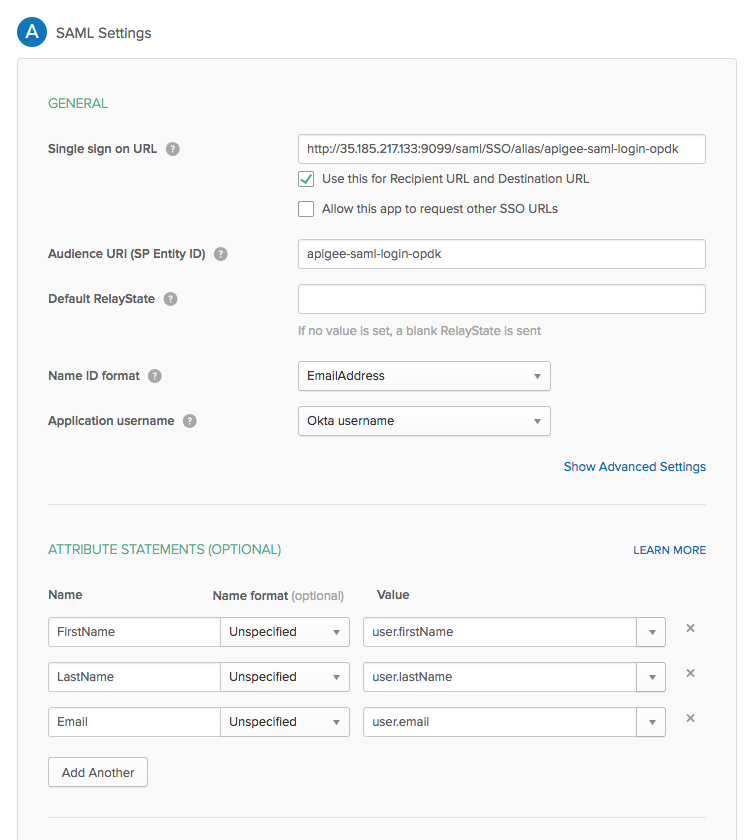
- Select the General tab to configure the Okta application, as shown in the table below:
| Setting | Description |
|---|---|
| Single sign on URL | Specifies the redirect URL back to Edge for use after the user enters their Okta
credentials. This URL is in the form:
http://apigee_sso_IP_DNS:9099/saml/SSO/alias/apigee-saml-login-opdk If you plan to enable TLS on https://apigee_sso_IP_DNS:9099/saml/SSO/alias/apigee-saml-login-opdk Where apigee_sso_IP_DNS is the IP address or DNS name of the
node hosting Note that this URL is case sensitive and SSO must appear in caps. If you have a load balancer in front to |
| Use this for Recipient URL and Destination URL | Set this checkbox. |
| Audience URI (SP Entity ID) | Set to apigee-saml-login-opdk |
| Default RelayState | Can leave blank. |
| Name ID format | Specify EmailAddress. |
| Application username | Specify Okta username. |
| Attribute Statements (Optional) | Specify FirstName, LastName, and
Email as shown in the image below. |
The SAML settings dialog box should appear as below once you are done: