
You're viewing Apigee Edge documentation.
Go to the
Apigee X documentation. info
Set up permissions for assigned service agents
To set up permissions for assigned service agents, in preparation for the changes described above, do the following steps.
- Find the name of your Google Cloud service agent by entering the following
command:
curl -X GET \
  "https://api.enterprise.apigee.com/v1/organizations/ORG" \
  -u email:password \
  | jq -r '.properties.property[] | select(.name=="serviceAgent.analytics") | .value'
were ORG is your organization. This returns the name and value of the service agent as shown below.:
"property" : [ { "name" : "serviceAgent.analytics", "value" : "service-9q1ibk@gcp-sa-apigee-uap.iam.gserviceaccount.com" }, - Open the IAM dashboard in the Google Cloud console.
- Select your Google Cloud project.
- Click Add at the top of the IAM pane.
- In the New principals field, enter the service agent
valuereturned in step 1. For example, thevalueshown in step 1 isservice-9q1ibk@gcp-sa-apigee-uap.iam.gserviceaccount.com. - Click the +Add Another Role button and add the following roles:
- BigQuery User
- Storage Admin
- Click Save.
Apigee Analytics data
Apigee Analytics collects and analyzes a broad spectrum of data that flows across your APIs and provides visualization tools, including interactive dashboards, custom reports, and other tools that identify trends in API proxy performance. Now, you can unlock this rich content by exporting analytics data from Apigee Analytics to your own data repository, such as Google Cloud Storage or Google BigQuery. You can then take advantage of the powerful query and machine learning capabilities offered by Google BigQuery and TensorFlow to perform your own data analysis. You can also combine the exported analytics data with other data, such as web logs, to gain new insights into your users, APIs, and applications.Export data format
Export analytics data to one of the following formats:
Comma-separated values (CSV)
The default delimiter is a comma (,) character. Supported delimiter characters include comma (,), pipe (|), and tab (\t). Configure the value using the
csvDelimiterproperty, as described in Export request property reference .JSON (newline delimited)
Allows the newline character to be used as a delimiter.
The exported data includes all the analytics metrics and dimensions built into Edge, and any custom analytics data that you add. For a description of the exported data, see Analytics metrics, dimensions, and filters reference.
You can export analytics data to the following data repositories:
Overview of the export process
The following steps summarize the process used to export your analytics data:
Configure your data repository (Cloud Storage or BigQuery) for data export. You must ensure that your data repository has been configured correctly, and that the service account used to write data to the data repository has the correct permissions.
Create a data store that defines the properties of the data repository (Cloud Storage or BigQuery) where you export your data, including the credentials used to access the data repository.
When you create a data store, you upload the data repository credentials to the Edge Credentials Vault to securely store them. The data export mechanism then uses those credentials to write data to your data repository.
Use the data export API to initiate the data export. The data export runs asynchronously in the background.
Use the data export API to determine when the export completes.
When the export completes, access the exported data in your data repository.
The following sections describe these steps in more detail.
Configure your data repository
The analytics data export mechanism writes data to Cloud Storage or BigQuery. In order for that write to occur, you must:
- Create a Google Cloud Platform service account.
- Set the role of the service account so that it can access Cloud Storage or BigQuery.
Create a service account for Cloud Storage or BigQuery
A service account is a type of Google account that belongs to your application instead of to an individual user. Your application then uses the service account to access a service.
A service account has a service account key represented by a JSON string. When you create the Edge data store that defines the connection to your data repository, you pass it this key. The data export mechanism then uses the key to access your data repository.
The service account associated with the key must be a Google Cloud Platform project owner and have write access to the Google Cloud Storage bucket. To create a service key and download the required payload, see Creating and Managing Service Account Keys in the Google Cloud Platform documentation.
For example, when you first download your key it will be formatted as a JSON object:
{
  "type": "service_account",
  "project_id": "myProject",
  "private_key_id": "12312312",
  "private_key": "-----BEGIN PRIVATE KEY-----\n...",
  "client_email": "client_email@developer.gserviceaccount.com",
  "client_id": "879876769876",
  "auth_uri": "https://accounts.google.com/organizations/oauth2/auth",
  "token_uri": "https://oauth2.googleapis.com/token",
  "auth_provider_x509_cert_url": "https://www.googleapis.com/oauth2",
  "client_x509_cert_url": "https://www.googleapis.com"
}
Configure Google Cloud Storage
Before you can export data to Google Cloud Storage:
- Ensure that the BigQuery and Cloud Resource Manager APIs are enabled in your Google Cloud Platform project. See Enabling APIs for instructions. Apigee uses the BigQuery API to leverage BigQuery export features when exporting to Cloud Storage and the Cloud Resource Manager API to check permission before each export.
Ensure that the service account is assigned to the following roles:
- BigQuery Job User
- Storage Object Creator
- Storage Admin (required only for testing the data store as described in Test a data store configuration. If this role is too broad, you can add the
storage.buckets.getpermission to an existing role instead.)
Alternatively, if you want to modify an existing role, or create a custom role, add the following permissions to the role:
bigquery.jobs.createstorage.objects.createstorage.buckets.get(required only for testing the data store as described in Test a data store configuration)
Configure Google BigQuery
Before you can export data to Google BigQuery:
- Ensure that the BigQuery and Cloud Resource Manager APIs are enabled in your Google Cloud Platform project. See Enabling APIs for instructions. Apigee uses the Cloud Resource Manager API to check permission before each export.
- Ensure that the BigQuery API is enabled in your Google Cloud Platform project. See Enabling and Disabling APIs for instructions.
Ensure that the service account is assigned to the following roles:
- BigQuery Job User
- BigQuery Data Editor
If you want to modify an existing role, or create a custom role, add the following permissions to the role:
bigquery.datasets.createbigquery.datasets.getbigquery.jobs.createbigquery.tables.createbigquery.tables.getbigquery.tables.updateData
Create a data store
The data store defines the connection to your export data repository (Cloud Storage, BigQuery), including the credentials used to access the data repository.
About the Edge Credentials Vault
Edge uses the Credentials Vault to securely store the credentials used to access your export data repository. For a service to be able to access the credentials in the Edge Credentials Vault, you must define a credential consumer.
When creating a data store by using the Edge UI, as described below, Edge automatically creates the consumer used to access the credentials.
Test a data store configuration
When you create the data store, Edge does not test or validate that your credentials and data repository configuration are valid. That means you can create the data store and not detect any errors until you run your first data export.
Alternatively, test the data store configuration before creating it. Testing is useful because a large data export process can take a long time to execute. By testing your credentials and data store configuration before you start downloading large amounts of data, you can quickly fix any issues with your settings.
If the test succeeds, then create the data store. If the test fails, fix the errors then retest the configuration. You only create the data store after the tests are successful.
To enable the test feature you must:
- Ensure that the Cloud Resource Manager API is enabled in your Google Cloud Platform project. See Enabling and Disabling APIs for instructions.
Create a data store
To create a data store in the UI:
Log in to https://apigee.com/edge as an org administrator and select your organization.
NOTE: You must be an Edge organization administrator to be able to create a data store.
Select Admin > Analytics Datastores from the left navigation bar. The Analytics Datastores page displays.
Select the + Add Datastore button. You are prompted to select the data store type:
Choose an export data target type:
- Google Cloud Storage
- Google BigQuery
The configuration page appears:
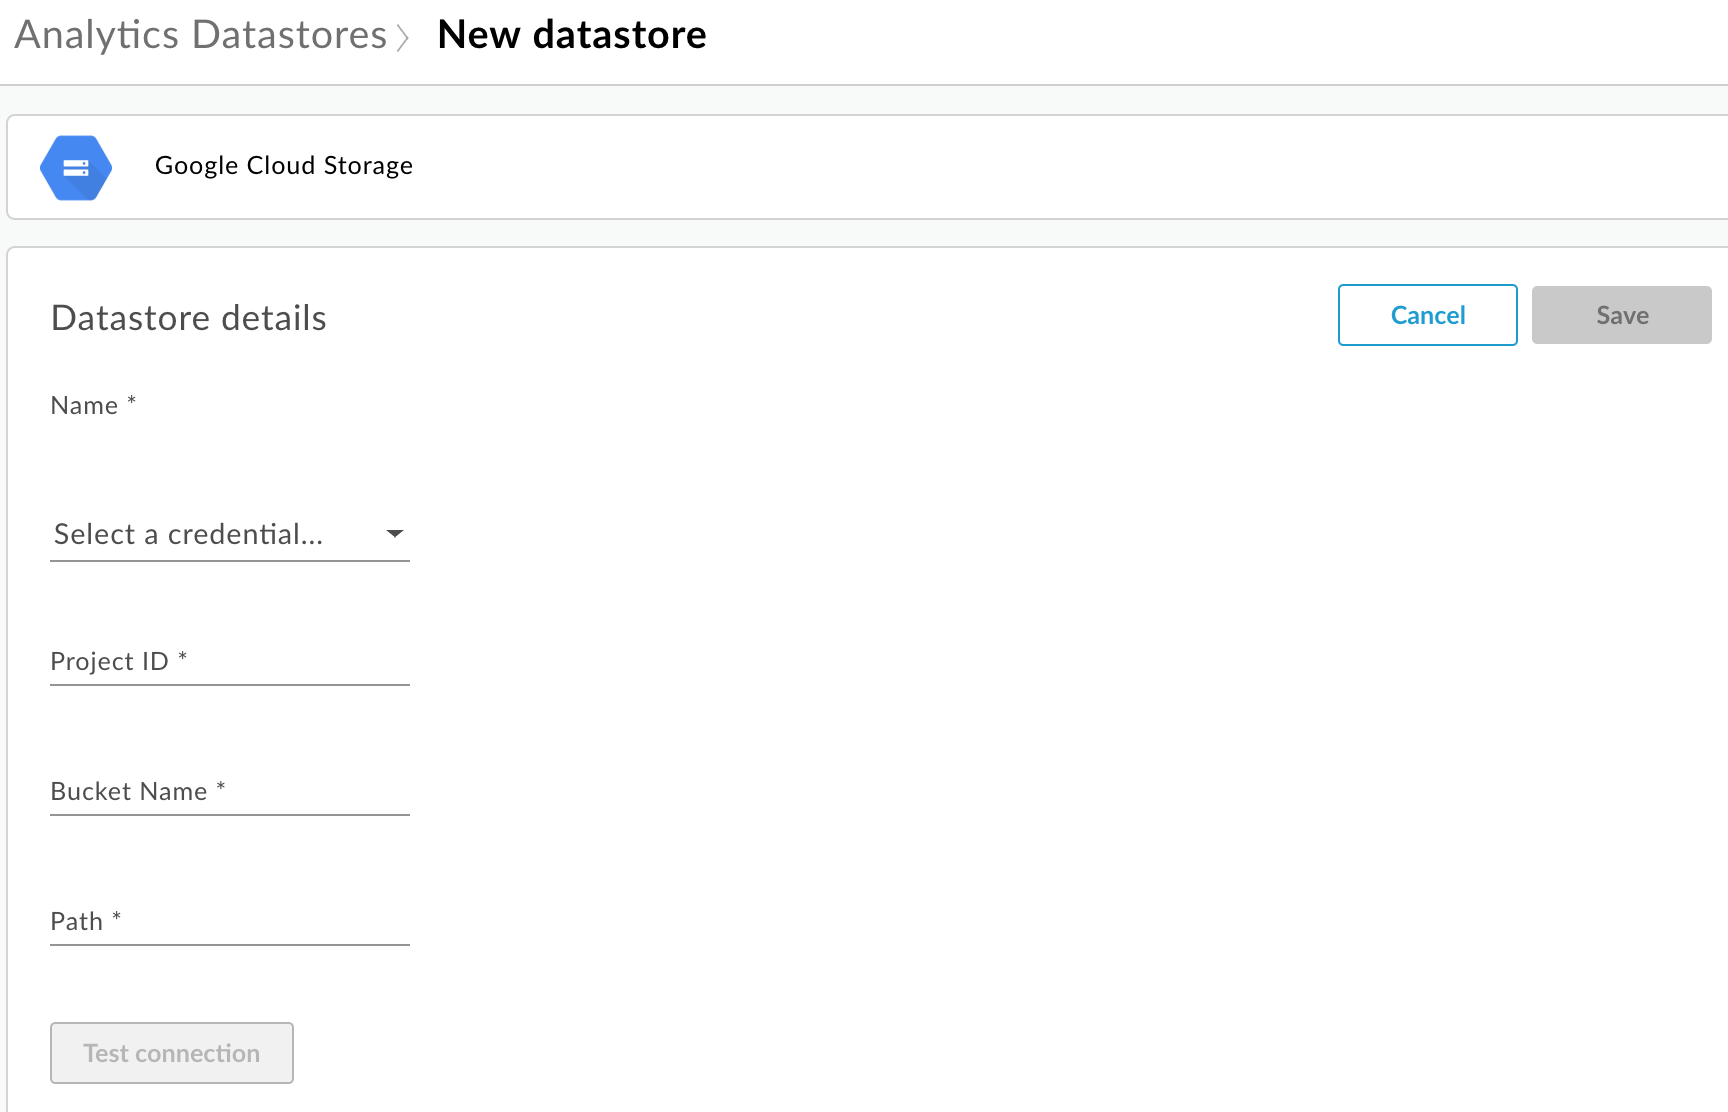
Enter the data store Name.
Select a credential used to access the data repository. A drop-down list of available credentials appears.
The credentials are specific to a data repository type. See Create a service account for Cloud Storage or BigQuery for more.
If you have already uploaded the credentials, select the credentials from the drop-down list. Ensure that you select credentials appropriate for the data repository type.
If you are adding new credentials to the data store, select Add new. In the dialog box, enter:
- The Credentials name.
- The Credentials content is the JSON service account key specific to your data repository as defined by Create a service account for Cloud Storage or BigQuery.
- Select Create.
Enter the properties specific to the data repository type:
- For Google Cloud Storage:
Property Description Required? Project ID Google Cloud Platform project ID. To create a Google Cloud Platform project, see Creating and Managing Projects in the Google Cloud Platform documentation.
Yes Bucket Name Name of the bucket in Cloud Storage to which you want to export analytics data. The bucket must exist before you perform a data export. To create a Cloud Storage bucket, see Creating Storage Buckets in the Google Cloud Platform documentation.
Yes Path Directory in which to store the analytics data in the Cloud Storage bucket. Yes - For BigQuery:
Property Description Required? Project ID Google Cloud Platform project ID. To create a Google Cloud Platform project, see Creating and Managing Projects in the Google Cloud Platform documentation.
Yes Dataset Name Name of the BigQuery dataset to which you want to export analytics data. Ensure that the dataset is created before requesting data export. To create a BigQuery dataset, see Creating and Using Datasets in the Google Cloud Platform documentation.
Yes Table Prefix The prefix for the names of the tables created for the analytics data in the BigQuery dataset. Yes
- For Google Cloud Storage:
Select Test connection to ensure that the credentials can be used to access the data repository.
If the test is successful, save your data store.
If the test fails, fix any issues and retry the test. Move the mouse over the error message in the UI to display additional information in a tooltip.
After the connection test passes, Save the data store.
Modify a data store
To modify a data store:
Log in to https://apigee.com/edge as an org administrator and select your organization.
Select Admin > Analytics Datastores from the left navigation bar. The Analytics Datastores page displays.
Move the mouse pointer over the Modified column of the report to modify. An edit and delete icon appears.
Edit or delete the data store.
If you edited the data store, select Test connection to ensure that the credentials can be used to access the data store.
If the test is successful, you can view the sample data in your data repository.
If the test fails, fix any issues and retry the test.
After the connection test passes, Update the data store.
Export analytics data
To export analytics data, issue a POST request to the
/analytics/exports API. Pass the following information in the request body:
- Name and description of the export request
- Date range of exported data (value can only span one day)
- Format of exported data
- Data store name
- Whether monetization is enabled on the organization
Examples of export requests are provided below. For a complete description of the request body properties, see Export request property reference.
The response from the POST is in the form:
{
    "self": "/organizations/myorg/environments/test/analytics/exports/a7c2f0dd-1b53-4917-9c42-a211b60ce35b",
    "created": "2017-09-28T12:39:35Z",
    "state": "enqueued"
}
Note that the state property in the response is set to enqueued. The POST request works asynchronously. That means it continues to run in the background after the request returns a response. Possible values for state include: enqueued, running, completed, failed.
Use the URL returned in the self property to view the status of the data export request, as described in Viewing the status of an analytics export request. When the request completes, the value of the state property in the response is set to completed. You can then access the analytics data in your data repository.
Example 1: Export data to Cloud Storage
The following request exports a complete set of raw data for the last 24 hours from the test environment in the myorg organization. The content is exported to Cloud Storage in JSON:
curl -X POST -H "Content-Type:application/json" \
"https://api.enterprise.apigee.com/v1/organizations/myorg/environments/test/analytics/exports" \
  -d \
  '{
    "name": "Export raw results to Cloud Storage",
    "description": "Export raw results to Cloud Storage for last 24 hours",
    "dateRange": {
      "start": "2018-06-08",
      "end": "2018-06-09"
    },
    "outputFormat": "json",
    "datastoreName": "My Cloud Storage data repository"
  }' \
  -u orgAdminEmail:password
Use the URI specified by the self property to monitor the job status as described
in Viewing the status of an analytics export request.
Example 2: Export data to BigQuery
The following request exports a comma-delimited CSV file to BigQuery:
curl -X POST -H "Content-Type:application/json"  \
  "https://api.enterprise.apigee.com/v1/organizations/myorg/environments/test/analytics/exports" \
  -d \
  '{
    "name": "Export query results to BigQuery",
    "description": "One-time export to BigQuery",
    "dateRange": {
      "start": "2018-06-08",
      "end": "2018-06-09"
    },
    "outputFormat": "csv",
    "csvDelimiter": ",",
    "datastoreName": "My BigQuery data repository"
  }' \
  -u orgAdminEmail:password
Note: The exported CSV file creates a BigQuery table with the following prefix:
<PREFIX>_<EXPORT_DATE>_api_<UUID>_from_<FROM_DATE>_to_<TO_DATE>
Use the URI specified by the self property to monitor the job status as described in Viewing the status of an analytics export request.
Example 3: Export monetization data
If monetization is enabled on an environment in the organization, you can perform two types of data exports:
- Standard data export as shown in the previous two examples.
- Monetization data export to export data specific to monetization.
To perform a monetization data export, specify "dataset":"mint" in the
request payload. The organization and environment must support monetization to set this option, otherwise
omit the dataset property from the payload:
  '{
    "name": "Export raw results to Cloud Storage",
    "description": "Export raw results to Cloud Storage for last 24 hours",
    "dateRange": {
      "start": "2018-06-08",
      "end": "2018-06-09"
    },
    "outputFormat": "json",
    "datastoreName": "My Cloud Storage data repository",
    "dataset":"mint"
  }'
About export API quotas
To prevent overuse of expensive data export API calls,
Edge enforces a quota on calls to the /analytics/exports API:
For organizations and environments that do not have monetization enabled, the quota is:
- 70 calls per month per organization/environment.
For example, if you have two environments in your org,
prodandtest, you can make 70 API calls per month for each environment.For organizations and environments with monetization enabled, the quota is:
- 70 calls per month for each organization and environment for standard data.
- 70 calls per month for each organization and environment for monetization data.
For example, if you enable monetization on your
prodorg, you can make 70 API calls for standard data and 70 additional API calls for monetization data.
If you exceed the call quota, the API returns an HTTP 429 response.
Viewing the status of all analytics export requests
To view the status for all analytics export requests, issue a GET request to
/analytics/exports.
For example, the following request returns the status of all analytics export requests for the test environment in the myorg organization:
curl -X GET \
  "https://api.enterprise.apigee.com/v1/organizations/myorg/environments/test/analytics/exports" \
  -u email:password
The following provides an example of the response listing two export requests, one enqueued (created and in the queue) and one completed:
[
  {
    "self":
"/v1/organizations/myorg/environments/test/analytics/exports/e8b8db22-fe03-4364-aaf2-6d4f110444ba",
    "name": "Export results To Cloud Storage",
    "description": "One-time export to Google Cloud Storage",
    "userId": "my@email.com",
    "datastoreName": "My Cloud Storage data store",
    "executionTime": "36 seconds",
    "created": "2018-09-28T12:39:35Z",
    "updated": "2018-09-28T12:39:42Z",
    "state": "enqueued"
  },
  {
    "self":
"/v1/organizations/myorg/environments/test/analytics/exports/9870987089fe03-4364-aaf2-6d4f110444ba"
    "name": "Export raw results to BigQuery",
    "description": "One-time export to BigQuery",
    ...
  }
]
Viewing the status of an analytics export request
To view the status of a specific analytics export request, issue a GET request to
/analytics/exports/{exportId},
where {exportId} is the ID associated with the analytics export request.
For example, the following request returns the status of the analytics export request with the ID 4d6d94ad-a33b-4572-8dba-8677c9c4bd98.
curl -X GET \
"https://api.enterprise.apigee.com/v1/organizations/myorg/environments/test/analytics/exports/4d6d94ad-a33b-4572-8dba-8677c9c4bd98" \
-u email:password
The following provides an example of the response:
{
  "self":
"/v1/organizations/myorg/environments/test/analytics/exports/4d6d94ad-a33b-4572-8dba-8677c9c4bd98",
  "name": "Export results To Cloud Storage",
  "description": "One-time export to Google Cloud Storage",
  "userId": "my@email.com",
  "datastoreName": "My Cloud Storage data store",
  "executionTime": "36 seconds",
  "created": "2018-09-28T12:39:35Z",
  "updated": "2018-09-28T12:39:42Z",
  "state": "enqueued"
}
If the analytics export returns no analytics data, then executionTime is set to "0 seconds".
Export request property reference
The following table describes the properties that you can pass in the request body in JSON format when exporting analytics data.
| Property | Description | Required? |
|---|---|---|
description
|
Description of the export request. | No |
name
|
Name of the export request. | Yes |
dateRange
|
Specify the
"dateRange": {
    "start": "2018-07-29",
    "end": "2018-07-30"
}
The NOTE: To ensure all data is captured from the previous day, you may need to delay the start time of the export request (for example, 00:05:00 AM UTC). |
Yes |
outputFormat
|
Specify as either json or csv.
|
Yes |
csvDelimiter
|
Delimiter used in the CSV output file, if |
No |
datastoreName
|
The name of the data store containing the definition of your data store. | Yes |
For example:
{
    "name": "Export raw results to Cloud Storage",
    "description": "Export raw results to Cloud Storage for last 24 hours",
    "dateRange": {
      "start": "2018-06-08",
      "end": "2018-06-09"
    },
    "outputFormat": "json",
    "datastoreName": "My Cloud Storage data repository"
  }