
This document describes how to add a data center (also called a region) to an existing data center.
Considerations before adding a data center
Before you install add a data center, you must understand how to configure OpenLDAP, ZooKeeper, Cassandra, and Postgres servers across the data centers. You must also ensure that the necessary ports are open between the nodes in the two data centers.
- OpenLDAP
Each data center has its own OpenLDAP server configured with replication enabled. When you install the new data center, you must configure OpenLDAP to use replication, and you must reconfigure the OpenLDAP server in the existing data center to use replication.
- ZooKeeper
For the
ZK_HOSTSproperty for both data centers, specify the IP addresses or DNS names of all ZooKeeper nodes from both data centers, in the same order, and mark any nodes with the with “:observer” modifier. Nodes without the:observermodifier are called "voters". You must have an odd number of "voters" in your configuration.In this topology, the ZooKeeper host on host 9 is the observer:
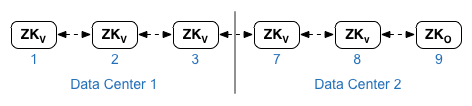
In the example configuration file shown below, node 9 is tagged with the
:observermodifier so that you have five voters: Nodes 1, 2, 3, 7, and 8.For the
ZK_CLIENT_HOSTSproperty for each data center, specify the IP addresses or DNS names of only the ZooKeeper nodes in the data center, in the same order, for all ZooKeeper nodes in the data center. - Cassandra
For
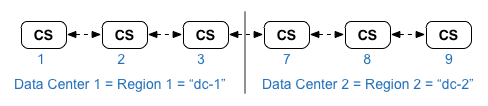
CASS_HOSTSfor each data center, ensure that you specify all Cassandra IP addresses (not DNS names) for both data centers. For data center 1, list the Cassandra nodes in that data center first. For data center 2, list the Cassandra nodes in that data center first. List the Cassandra nodes in the same order for all Cassandra nodes in the data center.All Cassandra nodes must have a suffix ':d,r'; for example 'ip:1,1 = data center 1 and rack/availability zone 1 and 'ip:2,1 = data center 2 and rack/availability zone 1.
For example, "192.168.124.201:1,1 192.168.124.202:1,1 192.168.124.203:1,1 192.168.124.204:2,1 192.168.124.205:2,1 192.168.124.206:2,1"
The first node in rack/availability zone 1 of each data center will be used as the seed server. In this deployment model, Cassandra setup will look like this:
-
Postgres
By default, Edge installs all Postgres nodes in master mode. However, when you have multiple data centers, you configure Postgres nodes to use master-standby replication so that if the master node fails, the standby node can continue to server traffic. Typically, you configure the master Postgres server in one data center, and the standby server in the second data center.
If the existing data center is already configured to have two Postgres nodes running in master/standby mode, then as part of this procedure, deregister the existing standby node and replace it with a standby node in the new data center.
The following table shows the before and after Postgres configuration for both scenarios:
Before After Single Master Postgres node in dc-1
Master Postgres node in dc-1
Standby Postgres node in dc-2
Master Postgres node in dc-1
Standby Postgres node in dc-1
Master Postgres node in dc-1
Standby Postgres node in dc-2
Deregister old Standby Postgres node in dc-1
- Port requirements
You must ensure that the necessary ports are open between the nodes in the two data centers. For a port diagram, see Port requirements.
Updating the existing data center
Adding a data center requires you to perform the steps to install and configure the new data center nodes, but it also requires you to update nodes in the original data center. These modifications are necessary because you are adding new Cassandra and ZooKeeper nodes in the new data center that have to be accessible to the existing data center, and you have to reconfigure OpenLDAP to use replication.
Creating the configuration files
Shown below are the silent configuration files for the two data centers, where each data center has 6 nodes as shown in Installation topologies. Notice that the config file for dc-1 adds additional settings to:
- Configure OpenLDAP with replication across two OpenLDAP nodes.
- Add the new Cassandra and ZooKeeper nodes from dc-2 to the config file for dc-1.
# Datacenter 1 IP1=IPorDNSnameOfNode1 IP2=IPorDNSnameOfNode2 IP3=IPorDNSnameOfNode3 IP7=IPorDNSnameOfNode7 IP8=IPorDNSnameOfNode8 IP9=IPorDNSnameOfNode9 HOSTIP=$(hostname -i) MSIP=$IP1 ADMIN_EMAIL=opdk@google.com APIGEE_ADMINPW=Secret123 LICENSE_FILE=/tmp/license.txt USE_LDAP_REMOTE_HOST=n LDAP_TYPE=2 LDAP_SID=1 LDAP_PEER=$IP7 APIGEE_LDAPPW=secret MP_POD=gateway-1 REGION=dc-1 ZK_HOSTS="$IP1 $IP2 $IP3 $IP7 $IP8 $IP9:observer" ZK_CLIENT_HOSTS="$IP1 $IP2 $IP3" # Must use IP addresses for CASS_HOSTS, not DNS names. CASS_HOSTS="$IP1:1,1 $IP2:1,1 $IP3:1,1 $IP7:2,1 $IP8:2,1 $IP9:2,1" SKIP_SMTP=n SMTPHOST=smtp.example.com SMTPUSER=smtp@example.com SMTPPASSWORD=smtppwd SMTPSSL=n SMTPPORT=25 SMTPMAILFROM="My Company <myco@company.com>" |
# Datacenter 2 IP1=IPorDNSnameOfNode1 IP2=IPorDNSnameOfNode2 IP3=IPorDNSnameOfNode3 IP7=IPorDNSnameOfNode7 IP8=IPorDNSnameOfNode8 IP9=IPorDNSnameOfNode9 HOSTIP=$(hostname -i) MSIP=$IP7 ADMIN_EMAIL=opdk@google.com APIGEE_ADMINPW=Secret123 LICENSE_FILE=/tmp/license.txt USE_LDAP_REMOTE_HOST=n LDAP_TYPE=2 LDAP_SID=2 LDAP_PEER=$IP1 APIGEE_LDAPPW=secret MP_POD=gateway-2 REGION=dc-2 ZK_HOSTS="$IP1 $IP2 $IP3 $IP7 $IP8 $IP9:observer" ZK_CLIENT_HOSTS="$IP7 $IP8 $IP9" # Must use IP addresses for CASS_HOSTS, not DNS names. CASS_HOSTS="$IP7:2,1 $IP8:2,1 $IP9:2,1 $IP1:1,1 $IP2:1,1 $IP3:1,1" SKIP_SMTP=n SMTPHOST=smtp.example.com SMTPUSER=smtp@example.com SMTPPASSWORD=smtppwd SMTPSSL=n SMTPPORT=25 SMTPMAILFROM="My Company <myco@company.com>" |
Add a new data center
Use the procedure below to install a new data center.
In the procedure, the data centers have the following names:
- dc-1: the existing data center
- dc-2: the new data center
To add a new data center:
- On dc-1, rerun setup.sh on the original Cassandra nodes with the new dc-1
config file that includes the Cassandra nodes from dc-2:
/opt/apigee/apigee-setup/bin/setup.sh -p ds -f configFile1
- On dc-1, rerun setup.sh on the Management Server node:
/opt/apigee/apigee-setup/bin/setup.sh -p ms -f configFile1
- On dc-2, install
apigee-setupon all nodes. See Install the Edge apigee-setup utility for more info. - On dc-2, install Cassandra and ZooKeeper on the appropriate nodes:
/opt/apigee/apigee-setup/bin/setup.sh -p ds -f configFile2
- On dc-2, run the rebuild command on all Cassandra nodes, specifying the
region name of dc-1:
/opt/apigee/apigee-cassandra/bin/nodetool [-u username -pw password] -h cassIP rebuild dc-1
You only need to pass your username and password if you enabled JMX authentication for Cassandra.
- On dc-2, install the Management Server on the appropriate node:
/opt/apigee/apigee-setup/bin/setup.sh -p ms -f configFile2
- On the Management Server node in dc-2, install
apigee-provision, which installs theapigee-adminapi.shutility:/opt/apigee/apigee-service/bin/apigee-service apigee-provision install
- On dc-2, install the Routes and Message Processors on the appropriate nodes:
/opt/apigee/apigee-setup/bin/setup.sh -p rmp -f configFile2
- On dc-2, install Qpid on the appropriate nodes:
/opt/apigee/apigee-setup/bin/setup.sh -p qs -f configFile2
- On dc-2, install Postgres on the appropriate node:
/opt/apigee/apigee-setup/bin/setup.sh -p ps -f configFile2
- Setup Postgres master/standby for the Postgres nodes. The Postgres node in dc-1 is the
master, and the Postgres node in dc-2 is the standby server.
- On the master node in dc-1, edit the config file to set:
PG_MASTER=IPorDNSofDC1Master
PG_STANDBY=IPorDNSofDC2Standby
- Enable replication on the new master:
/opt/apigee/apigee-service/bin/apigee-service apigee-postgresql setup-replication-on-master -f configFIle
- On the standby node in dc-2, edit the config file to set:
PG_MASTER=IPorDNSofDC1Master
PG_STANDBY=IPorDNSofDC2Standby
- On the standby node in dc-2, stop the server and then delete any
existing Postgres data:
/opt/apigee/apigee-service/bin/apigee-service apigee-postgresql stop
rm -rf /opt/apigee/data/apigee-postgresql/
If necessary, you can backup this data before deleting it.
- Configure the standby node in dc-2:
/opt/apigee/apigee-service/bin/apigee-service apigee-postgresql setup-replication-on-standby -f configFile
- On the master node in dc-1, edit the config file to set:
- On dc-1, update the analytics configuration and configure the organizations.
- On the Management Server node of dc-1, get the UUID of the Postgres
node:
apigee-adminapi.sh servers list -r dc-1 -p analytics -t postgres-server \
  --admin adminEmail --pwd adminPword --host localhost
The UUID appears at the end of the returned data. Save that value.
- On the Management Server node of dc-2, get the UUID of the Postgres node as shown in the previous step. Save that value.
- On the Management Server node of dc-1, determine the name of the
analytics and consumer groups. Many of the commands below require that information.
By default, the name of the analytics group is "axgroup-001", and the name of the consumer group is "consumer-group-001". In the silent config file for a region, you can set the name of the analytics group by using the
AXGROUPproperty.If you are unsure of the names of the analytics and consumer groups, use the following command to display them:
apigee-adminapi.sh analytics groups list \
  --admin adminEmail --pwd adminPword --host localhost
This command returns the analytics group name in the name field, and the consumer group name in the consumer-groups field.
- On the Management Server node of dc-1, remove the existing Postgres
server from the analytics group:
- Remove the Postgres node from the consumer-group:
apigee-adminapi.sh analytics groups consumer_groups datastores remove \
  -g axgroup-001 -c consumer-group-001 -u UUID \
  -Y --admin adminEmail --pwd adminPword --host localhost
If dc-1 is configured to have two Postgres nodes running in master/standby mode, remove both:
apigee-adminapi.sh analytics groups consumer_groups datastores remove \
  -g axgroup-001 -c consumer-group-001 -u "UUID_1,UUID_2" \
  -Y --admin adminEmail --pwd adminPword --host localhost
- Remove the Postgres node from the analytics group:
apigee-adminapi.sh analytics groups postgres_server remove \
  -g axgroup-001 -u UUID -Y --admin adminEmail \
  --pwd adminPword --host localhost
If dc-1 is configured to have two Postgres nodes running in master/standby mode, remove both:
apigee-adminapi.sh analytics groups postgres_server \
  remove -g axgroup-001 -u UUID1,UUID2 -Y --admin adminEmail \
  --pwd adminPword --host localhost
- Remove the Postgres node from the consumer-group:
- On the Management Server node of dc-1, add the new master/standby
Postgres servers to the analytics group:
- Add both Postgres servers to the analytics group:
apigee-adminapi.sh analytics groups postgres_server \
  add -g axgroup-001 -u "UUID_1,UUID_2" --admin adminEmail \
  --pwd adminPword --host localhost
Ehere UUID_1 corresponds to the master Postgres node in dc-1, and UUID_2 corresponds to the standby Postgres node in dc-2.
- Add the PG servers to the consumer-group as master/standby:
apigee-adminapi.sh analytics groups consumer_groups datastores \
  add -g axgroup-001 -c consumer-group-001 -u "UUID_1,UUID_2" --admin adminEmail \
  --pwd adminPword --host localhost
- Add both Postgres servers to the analytics group:
- Add the Qpid servers from dc-2 to the analytics group:
- On the Management Server node of dc-1, get the UUIDs of the Qpid
nodes in dc-2:
apigee-adminapi.sh servers list -r dc-2 -p central -t qpid-server \
  --admin adminEmail --pwd adminPword --host localhost
The UUIDs appear at the end of the returned data. Save those values.
- On the Management Server node of dc-1, add the Qpid nodes to the
analytics group (run both commands):
apigee-adminapi.sh analytics groups qpid_server \ add -g axgroup-001 -u "UUID_1" --admin adminEmail \ --pwd adminPword --host localhost
apigee-adminapi.sh analytics groups qpid_server \ add -g axgroup-001 -u "UUID_2" --admin adminEmail \ --pwd adminPword --host localhost - On the Management Server node of dc-1, add the Qpid nodes to the
consumer group (run both commands):
apigee-adminapi.sh analytics groups consumer_groups consumers \
  add -g axgroup-001 -c consumer-group-001 -u "UUID_1" \
  --admin adminEmail --pwd adminPword --host localhost

apigee-adminapi.sh analytics groups consumer_groups consumers \
  add -g axgroup-001 -c consumer-group-001 -u "UUID_2" \
  --admin adminEmail --pwd adminPword --host localhost
- On the Management Server node of dc-1, get the UUIDs of the Qpid
nodes in dc-2:
- Deregister and delete the old Postgres standby server from dc-1:
- Deregister the existing dc-1 Postgres standby server:
apigee-adminapi.sh servers deregister -u UUID -r dc-1 \
  -p analytics -t postgres-server -Y --admin adminEmail \
  --pwd adminPword --host localhost
Where UUID is the old standby Postgres node in dc-1.
- Delete the existing dc-1 Postgres standby server:
apigee-adminapi.sh servers delete -u UUID \
  --admin adminEmail --pwd adminPword --host localhost
- Deregister the existing dc-1 Postgres standby server:
- On the Management Server node of dc-1, get the UUID of the Postgres
node:
- Update Cassandra keyspaces with correct replication factor for the two data centers. You
only have to run this step once on any Cassandra server in either data center:
- Start the Cassandra
cqlshutility:/opt/apigee/apigee-cassandra/bin/cqlsh cassandraIP
- Execute the following CQL commands at the "cqlsh>" prompt to set the replication
levels for Cassandra keyspaces:
ALTER KEYSPACE "identityzone" WITH replication = { 'class': 'NetworkTopologyStrategy', 'dc-1': '3','dc-2': '3' };ALTER KEYSPACE "system_traces" WITH replication = { 'class': 'NetworkTopologyStrategy', 'dc-1': '3','dc-2': '3' };- View the keyspaces by using the command:
select * from system.schema_keyspaces;
- Exit
cqlsh:exit
- Start the Cassandra
- Run the following
nodetoolcommand on all Cassandra nodes in dc-1 to free memory:/opt/apigee/apigee-cassandra/bin/nodetool [-u username -pw password] -h cassandraIP cleanup
You only need to pass your username and password if you enabled JMX authentication for Cassandra.
- For each organization and for each environment that you want to support across data centers:
- On the Management Server node of dc-1, add the new MP_POD to the
Organization:
apigee-adminapi.sh orgs pods add -o orgName -r dc-2 -p gateway-2 \
  --admin adminEmail --pwd adminPword --host localhost
Where gateway-2 is the name of the gateway pod as defined by the MP_POD property in the dc-2 config file.
- Add the new Message Processors to the org and environment:
- On the Management Server node of dc-2, get the UUIDs of the
Message Processor nodes in dc-2:
apigee-adminapi.sh servers list -r dc-2 -p gateway-2 \
  -t message-processor --admin adminEmail --pwd adminPword --host localhost
The UUIDs appear at the end of the returned data. Save those values.
- On the Management Server node of dc-1, for each Message Processor
in dc-2, add the Message Processor to an environment for the org:
apigee-adminapi.sh orgs envs servers add -o orgName -e envName \
  -u UUID --admin adminEmail --pwd adminPword --host localhost
- On the Management Server node of dc-2, get the UUIDs of the
Message Processor nodes in dc-2:
- On the Management Server node of dc-1, check the organization:
apigee-adminapi.sh orgs apis deployments -o orgName -a apiProxyName \
  --admin adminEmail --pwd adminPword --host localhost
Where apiProxyName is the name of an API proxy deployed in the organization.
- On the Management Server node of dc-1, add the new MP_POD to the
Organization: