
本文說明如何將資料中心 (也稱為區域) 新增至現有資料中心。
新增資料中心前的注意事項
安裝資料中心之前,請務必瞭解如何在資料中心之間設定 SymasLDAP、ZooKeeper、Cassandra 和 Postgres 伺服器。此外,您也必須確保兩個資料中心節點之間已開啟必要通訊埠。
- SymasLDAP
每個資料中心都有自己的 SymasLDAP 伺服器,且已啟用複製功能。安裝新資料中心時,您必須設定 SymasLDAP 使用複製功能,並重新設定現有資料中心的 SymasLDAP 伺服器,以使用複製功能。
- ZooKeeper
針對兩個資料中心的
ZK_HOSTS屬性,以相同順序指定兩個資料中心中所有 ZooKeeper 節點的 IP 位址或 DNS 名稱,並以「:observer」修飾符標記任何節點。沒有:observer修飾符的節點稱為「投票者」。設定中的「投票者」人數必須為奇數。在這個拓撲中,主機 9 上的 ZooKeeper 主機是觀察者:
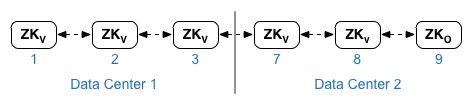
在下方的設定檔範例中,節點 9 標記了
:observer修飾符,因此您有五個選民:節點 1、2、3、7 和 8。針對每個資料中心的
ZK_CLIENT_HOSTS屬性,請依相同順序,為資料中心內的所有 ZooKeeper 節點指定資料中心內 ZooKeeper 節點的 IP 位址或 DNS 名稱。 - Cassandra
針對每個資料中心,請務必為兩個資料中心指定所有 Cassandra IP 位址 (而非 DNS 名稱)。
CASS_HOSTS如果是資料中心 1,請先列出該資料中心的 Cassandra 節點。如果是資料中心 2,請先列出該資料中心的 Cassandra 節點。以相同的順序列出資料中心內所有 Cassandra 節點的 Cassandra 節點。所有 Cassandra 節點都必須有「:d,r」後置字元,例如「ip:1,1」代表資料中心 1 和機架/可用區 1,「ip:2,1」則代表資料中心 2 和機架/可用區 1。
例如「192.168.124.201:1,1 192.168.124.202:1,1 192.168.124.203:1,1 192.168.124.204:2,1 192.168.124.205:2,1 192.168.124.206:2,1」
每個資料中心機架/可用區 1 的第一個節點會做為種子伺服器。在這個部署模型中,Cassandra 設定如下所示:
-
Postgres
根據預設,Edge 會以主要模式安裝所有 Postgres 節點。不過,如果您有多個資料中心,可以設定 Postgres 節點使用主要/待命複寫功能,這樣一來,如果主要節點發生故障,待命節點就能繼續處理流量。通常,您會在一個資料中心設定主要 Postgres 伺服器,並在第二個資料中心設定待命伺服器。
如果現有資料中心已設定為以主要/待命模式執行兩個 Postgres 節點,請按照這個程序取消註冊現有的待命節點,並以新資料中心的待命節點取代。
下表顯示這兩種情境的 Postgres 設定前後差異:
之前 使用後 dc-1 中的單一主要 Postgres 節點
dc-1 中的主要 Postgres 節點
dc-2 中的待命 Postgres 節點
dc-1 中的主要 Postgres 節點
dc-1 中的待機 Postgres 節點
dc-1 中的主要 Postgres 節點
dc-2 中的待命 Postgres 節點
在 dc-1 中取消註冊舊的 Standby Postgres 節點
- 通訊埠需求
請務必確保兩個資料中心節點之間的必要通訊埠已開啟。 如需通訊埠圖表,請參閱「通訊埠需求」。
更新現有資料中心
新增資料中心時,您必須執行安裝及設定新資料中心節點的步驟,同時也必須更新原始資料中心的節點。您必須進行這些修改,因為您要在新的資料中心新增 Cassandra 和 ZooKeeper 節點,這些節點必須可供現有資料中心存取,而且您必須重新設定 SymasLDAP,才能使用複寫功能。
建立設定檔
以下顯示兩個資料中心的無聲設定檔,每個資料中心都有 6 個節點,如「安裝拓撲」所示。請注意,dc-1 的設定檔會將其他設定新增至:
- 設定 SymasLDAP,在兩個 SymasLDAP 節點之間進行複製。
- 將 dc-2 中的新 Cassandra 和 ZooKeeper 節點新增至 dc-1 的設定檔。
# Datacenter 1 IP1=IPorDNSnameOfNode1 IP2=IPorDNSnameOfNode2 IP3=IPorDNSnameOfNode3 IP7=IPorDNSnameOfNode7 IP8=IPorDNSnameOfNode8 IP9=IPorDNSnameOfNode9 HOSTIP=$(hostname -i) MSIP=$IP1 ADMIN_EMAIL=opdk@google.com APIGEE_ADMINPW=Secret123 LICENSE_FILE=/tmp/license.txt USE_LDAP_REMOTE_HOST=n LDAP_TYPE=2 LDAP_SID=1 LDAP_PEER=$IP7 APIGEE_LDAPPW=secret MP_POD=gateway-1 REGION=dc-1 ZK_HOSTS="$IP1 $IP2 $IP3 $IP7 $IP8 $IP9:observer" ZK_CLIENT_HOSTS="$IP1 $IP2 $IP3" # Must use IP addresses for CASS_HOSTS, not DNS names. CASS_HOSTS="$IP1:1,1 $IP2:1,1 $IP3:1,1 $IP7:2,1 $IP8:2,1 $IP9:2,1" SKIP_SMTP=n SMTPHOST=smtp.example.com SMTPUSER=smtp@example.com SMTPPASSWORD=smtppwd SMTPSSL=n SMTPPORT=25 SMTPMAILFROM="My Company <myco@company.com>" |
# Datacenter 2 IP1=IPorDNSnameOfNode1 IP2=IPorDNSnameOfNode2 IP3=IPorDNSnameOfNode3 IP7=IPorDNSnameOfNode7 IP8=IPorDNSnameOfNode8 IP9=IPorDNSnameOfNode9 HOSTIP=$(hostname -i) MSIP=$IP7 ADMIN_EMAIL=opdk@google.com APIGEE_ADMINPW=Secret123 LICENSE_FILE=/tmp/license.txt USE_LDAP_REMOTE_HOST=n LDAP_TYPE=2 LDAP_SID=2 LDAP_PEER=$IP1 APIGEE_LDAPPW=secret MP_POD=gateway-2 REGION=dc-2 ZK_HOSTS="$IP1 $IP2 $IP3 $IP7 $IP8 $IP9:observer" ZK_CLIENT_HOSTS="$IP7 $IP8 $IP9" # Must use IP addresses for CASS_HOSTS, not DNS names. CASS_HOSTS="$IP7:2,1 $IP8:2,1 $IP9:2,1 $IP1:1,1 $IP2:1,1 $IP3:1,1" SKIP_SMTP=n SMTPHOST=smtp.example.com SMTPUSER=smtp@example.com SMTPPASSWORD=smtppwd SMTPSSL=n SMTPPORT=25 SMTPMAILFROM="My Company <myco@company.com>" |
新增資料中心
請按照下列程序安裝新的資料中心。
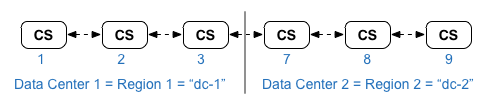
在程序中,資料中心具有下列名稱:
- dc-1:現有資料中心
- dc-2:新的資料中心
如要新增資料中心,請按照下列步驟操作:
- 在 dc-1 上,使用新的 dc-1 設定檔 (包含 dc-2 的 Cassandra 節點),在原始 Cassandra 節點上重新執行 setup.sh:
/opt/apigee/apigee-setup/bin/setup.sh -p ds -f configFile1
- 在 dc-1 上,於管理伺服器節點上重新執行 setup.sh:
/opt/apigee/apigee-setup/bin/setup.sh -p ms -f configFile1
如果使用營利,請重新執行營利設定指令:
/opt/apigee/apigee-setup/bin/setup.sh -p mo -f mint_configFile1
- 在 dc-2 上,在所有節點上安裝
apigee-setup。詳情請參閱「安裝 Edge apigee-setup 公用程式」。 - 在 dc-2 上,在適當的節點上安裝 Cassandra 和 ZooKeeper:
/opt/apigee/apigee-setup/bin/setup.sh -p ds -f configFile2
- 在 dc-2 上,對所有 Cassandra 節點執行重建指令,並指定 dc-1 的區域名稱:
/opt/apigee/apigee-cassandra/bin/nodetool [-u username -pw password] -h cassIP rebuild dc-1
只有在為 Cassandra 啟用 JMX 驗證時,才需要傳遞使用者名稱和密碼。
- 在 dc-2 上,在適當的節點上安裝管理伺服器:
/opt/apigee/apigee-setup/bin/setup.sh -p ms -f configFile2
- 在 dc-2 的管理伺服器節點上,安裝
apigee-provision,這會安裝apigee-adminapi.sh公用程式:/opt/apigee/apigee-service/bin/apigee-service apigee-provision install
- 在 dc-2 上,在適當的節點上安裝 Routes 和 Message Processors:
/opt/apigee/apigee-setup/bin/setup.sh -p rmp -f configFile2
- 在 dc-2 上,於適當節點安裝 Qpid:
/opt/apigee/apigee-setup/bin/setup.sh -p qs -f configFile2
- 在 dc-2 上,於適當節點上安裝 Postgres:
/opt/apigee/apigee-setup/bin/setup.sh -p ps -f configFile2
- 為 Postgres 節點設定 Postgres 主機/待命。dc-1 中的 Postgres 節點是主要節點,dc-2 中的 Postgres 節點則是待命伺服器。
- 在 dc-1 的主要節點上,編輯設定檔以設定:
PG_MASTER=IPorDNSofDC1Master
PG_STANDBY=IPorDNSofDC2Standby
- 在新主機上啟用複製功能:
/opt/apigee/apigee-service/bin/apigee-service apigee-postgresql setup-replication-on-master -f configFIle
- 在 dc-2 的待命節點上,編輯設定檔以設定:
PG_MASTER=IPorDNSofDC1Master
PG_STANDBY=IPorDNSofDC2Standby
- 在 dc-2 的待命節點上停止伺服器,然後刪除所有現有的 Postgres 資料:
/opt/apigee/apigee-service/bin/apigee-service apigee-postgresql stop
rm -rf /opt/apigee/data/apigee-postgresql/
如有需要,您可以在刪除資料前備份。
- 在 dc-2 中設定待命節點:
/opt/apigee/apigee-service/bin/apigee-service apigee-postgresql setup-replication-on-standby -f configFile
- 在 dc-1 的主要節點上,編輯設定檔以設定:
- 在 dc-1 上,更新 Analytics 設定並設定機構。
- 在 dc-1 的管理伺服器節點上,取得 Postgres 節點的 UUID:
apigee-adminapi.sh servers list -r dc-1 -p analytics -t postgres-server \
  --admin adminEmail --pwd adminPword --host localhost
UUID 會顯示在傳回資料的結尾。儲存該值。
- 在 dc-2 的管理伺服器節點上,取得 Postgres 節點的 UUID,如上一個步驟所示。儲存該值。
- 在 dc-1 的管理伺服器節點上,判斷 Analytics 和消費者群組的名稱。以下許多指令都需要這項資訊。
預設情況下,分析群組的名稱為「axgroup-001」,而消費者群組的名稱為「consumer-group-001」。在區域的無聲設定檔中,您可以使用
AXGROUP屬性設定 Analytics 群組的名稱。如果不確定分析和消費者群組的名稱,請使用下列指令顯示這些名稱:
apigee-adminapi.sh analytics groups list \
  --admin adminEmail --pwd adminPword --host localhost
這個指令會在名稱欄位中傳回 Analytics 群組名稱,並在 consumer-groups 欄位中傳回消費者群組名稱。
- 在 dc-1 的管理伺服器節點上,從分析群組中移除現有的 Postgres 伺服器:
- 從消費者群組中移除 Postgres 節點:
apigee-adminapi.sh analytics groups consumer_groups datastores remove \
  -g axgroup-001 -c consumer-group-001 -u UUID \
  -Y --admin adminEmail --pwd adminPword --host localhost
如果 dc-1 設定為在主要/待命模式下執行兩個 Postgres 節點,請移除這兩個節點:
apigee-adminapi.sh analytics groups consumer_groups datastores remove \
  -g axgroup-001 -c consumer-group-001 -u "UUID_1,UUID_2" \
  -Y --admin adminEmail --pwd adminPword --host localhost
- 從 Analytics 群組中移除 Postgres 節點:
apigee-adminapi.sh analytics groups postgres_server remove \
  -g axgroup-001 -u UUID -Y --admin adminEmail \
  --pwd adminPword --host localhost
如果 dc-1 設定為以主要/待機模式執行兩個 Postgres 節點,請移除這兩個節點:
apigee-adminapi.sh analytics groups postgres_server \
  remove -g axgroup-001 -u UUID1,UUID2 -Y --admin adminEmail \
  --pwd adminPword --host localhost
- 從消費者群組中移除 Postgres 節點:
- 在 dc-1 的管理伺服器節點上,將新的主要/待命 Postgres 伺服器新增至 Analytics 群組:
- 將兩個 Postgres 伺服器新增至 Analytics 群組:
apigee-adminapi.sh analytics groups postgres_server \
  add -g axgroup-001 -u "UUID_1,UUID_2" --admin adminEmail \
  --pwd adminPword --host localhost
其中 UUID_1 對應於 dc-1 中的主要 Postgres 節點,UUID_2 則對應於 dc-2 中的待命 Postgres 節點。
- 將 PG 伺服器新增至消費者群組,做為主要/待命伺服器:
apigee-adminapi.sh analytics groups consumer_groups datastores \
  add -g axgroup-001 -c consumer-group-001 -u "UUID_1,UUID_2" --admin adminEmail \
  --pwd adminPword --host localhost
- 將兩個 Postgres 伺服器新增至 Analytics 群組:
- 將 dc-2 中的 Qpid 伺服器新增至 Analytics 群組:
- 在 dc-1 的管理伺服器節點上,取得 dc-2 中 Qpid 節點的 UUID:
apigee-adminapi.sh servers list -r dc-2 -p central -t qpid-server \
  --admin adminEmail --pwd adminPword --host localhost
UUID 會顯示在傳回資料的結尾。儲存這些值。
- 在 dc-1 的管理伺服器節點上,將 Qpid 節點新增至 Analytics 群組 (執行下列兩個指令):
apigee-adminapi.sh analytics groups qpid_server \ add -g axgroup-001 -u "UUID_1" --admin adminEmail \ --pwd adminPword --host localhost
apigee-adminapi.sh analytics groups qpid_server \ add -g axgroup-001 -u "UUID_2" --admin adminEmail \ --pwd adminPword --host localhost - 在 dc-1 的管理伺服器節點上,將 Qpid 節點新增至消費者群組 (執行下列兩個指令):
apigee-adminapi.sh analytics groups consumer_groups consumers \ add -g axgroup-001 -c consumer-group-001 -u "UUID_1" \ --admin adminEmail --pwd adminPword --host localhost
apigee-adminapi.sh analytics groups consumer_groups consumers \ add -g axgroup-001 -c consumer-group-001 -u "UUID_2" \ --admin adminEmail --pwd adminPword --host localhost如果您使用營利,請在 dc-1 的管理伺服器節點上,將 Qpid 節點新增至 MINT 群組:
apigee-adminapi.sh analytics groups qpid_server \
add -g mxgroup001 -u UUID_1 --admin adminEmail \
--pwd adminPword --host localhost

apigee-adminapi.sh analytics groups qpid_server \
add -g mxgroup001 -u UUID_2 --admin adminEmail \
--pwd adminPword --host localhost
- 在 dc-1 的管理伺服器節點上,取得 dc-2 中 Qpid 節點的 UUID:
- 從 dc-1 取消註冊並刪除舊的 Postgres 待命伺服器:
- 取消註冊現有的 dc-1 Postgres 待命伺服器:
apigee-adminapi.sh servers deregister -u UUID -r dc-1 \
-p analytics -t postgres-server -Y --admin adminEmail \
--pwd adminPword --host localhost
其中 UUID 是 dc-1 中的舊待命 Postgres 節點。
- 刪除現有的 dc-1 Postgres 待命伺服器:
apigee-adminapi.sh servers delete -u UUID \
--admin adminEmail --pwd adminPword --host localhost
- 取消註冊現有的 dc-1 Postgres 待命伺服器:
- 在 dc-1 的管理伺服器節點上,取得 Postgres 節點的 UUID:
- 更新 Cassandra 鍵空間,為兩個資料中心設定正確的複製因數。您只需在任一資料中心的任何 Cassandra 伺服器上執行這個步驟一次:
- 啟動 Cassandra
cqlsh公用程式:/opt/apigee/apigee-cassandra/bin/cqlsh cassandraIP
- 在「cqlsh>」提示中執行下列 CQL 指令,為 Cassandra 鍵空間設定複製層級:
ALTER KEYSPACE "identityzone" WITH replication = { 'class': 'NetworkTopologyStrategy', 'dc-1': '3','dc-2': '3' };ALTER KEYSPACE "system_traces" WITH replication = { 'class': 'NetworkTopologyStrategy', 'dc-1': '3','dc-2': '3' };- 使用下列指令查看鍵空間:
SELECT * FROM system_schema.keyspaces;
- 結束
cqlsh:exit
- 啟動 Cassandra
- 在 dc-1 中的所有 Cassandra 節點上執行下列
nodetool指令,釋放記憶體:/opt/apigee/apigee-cassandra/bin/nodetool [-u username -pw password] -h cassandraIP cleanup
只有在為 Cassandra 啟用 JMX 驗證時,才需要傳遞使用者名稱和密碼。
- 針對每個機構和每個要支援的資料中心環境:
- 在 dc-1 的管理伺服器節點上,將新的 MP_POD 新增至機構:
apigee-adminapi.sh orgs pods add -o orgName -r dc-2 -p gateway-2 \
  --admin adminEmail --pwd adminPword --host localhost
其中 gateway-2 是閘道 Pod 的名稱,由 dc-2 設定檔中的 MP_POD 屬性定義。
- 將新的訊息處理工具新增至機構和環境:
- 在 dc-2 的管理伺服器節點上,取得 dc-2 中訊息處理器節點的 UUID:
apigee-adminapi.sh servers list -r dc-2 -p gateway-2 \
  -t message-processor --admin adminEmail --pwd adminPword --host localhost
UUID 會顯示在傳回資料的結尾。儲存這些值。
- 在 dc-1 的管理伺服器節點上,針對 dc-2 中的每個訊息處理器,將訊息處理器新增至機構的環境:
apigee-adminapi.sh orgs envs servers add -o orgName -e envName \
  -u UUID --admin adminEmail --pwd adminPword --host localhost
- 在 dc-2 的管理伺服器節點上,取得 dc-2 中訊息處理器節點的 UUID:
- 在 dc-1 的管理伺服器節點上,檢查機構:
apigee-adminapi.sh orgs apis deployments -o orgName -a apiProxyName \
  --admin adminEmail --pwd adminPword --host localhost
其中 apiProxyName 是在機構中部署的 API Proxy 名稱。
- 在 dc-1 的管理伺服器節點上,將新的 MP_POD 新增至機構:
如果您使用營利,請在 DC2 中安裝營利節點。
在 DC2 的管理伺服器和訊息處理器節點中,執行 MINT 設定指令:
/opt/apigee/apigee-setup/bin/setup.sh -p mo -f mint_configFile1