
Install and configure Apigee SSO describes how to install and configure the Apigee SSO to use HTTP on the default port 9099. By default, the Apigee SSO uses HTTP.
To enable HTTPS access, you can configure the Apigee SSO using one of the following modes:
- SSL_PROXY: Configures Apigee SSO in proxy mode, meaning you have installed a load balancer in front of the OpenLDAP node and terminated TLS on the load balancer. The Apigee SSO listens on HTTP, but issues URLs using the HTTPS scheme of your load balancer.
- SSL_TERMINATION: Enables TLS access directly on the Apigee SSO on the port of your choice. You must specify a standard PEM-encoded certificate and private key for this mode.
You can choose to enable HTTPS at the time you initially install and configure the Apigee SSO, or you can enable it later.
The following sections describes the additional tokens
to be updated in the configuration files (/opt/silent.conf
and /opt/apigee/customer/application/openldap.properties).
The setup-sso script
automatically parses the variables from both the files,
applies the configuration, and starts the embedded Apigee SSO.
Refer to
Install and configure Apigee SSO for tokens that the configuration
file needs to have for successful SSO configuration.
Enable SSL_PROXY mode
In SSL_PROXY mode, your system
uses a load balancer in front of the Apigee SSO and terminates TLS on the load balancer. In
the following figure, the load balancer terminates TLS on port 443, and then forwards requests to
the Apigee SSO on port 9099:
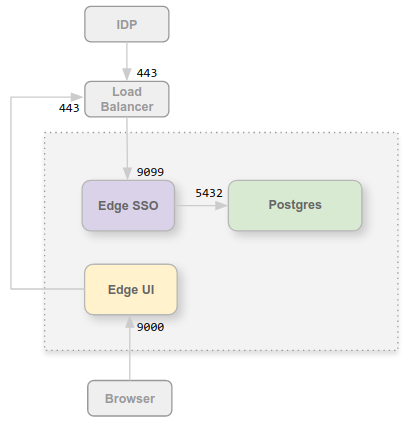
In this configuration, you trust the connection from the load balancer to the OpenLDAP node, so there is no need to use TLS for that internal connection. However, external entities, such as the IDP, now must access the Apigee SSO on port 443, not on the unprotected port of 9099.
The reason to configure the Apigee SSO in SSL_PROXY mode is that the Apigee SSO
auto-generates redirect URLs used externally by the IDP as part of the authentication
process. Therefore, these redirect URLs must contain the external port number and HTTPS scheme on the load
balancer (port 443 in this example), and not the internal HTTP port on the Apigee SSO (port 9099).
To configure Apigee SSO for SSL_PROXY mode:
- Add the following settings to your
/opt/apigee/customer/application/openldap.propertiesfile:# Update the port the Apigee SSO listens on locally. etc_sso_config_bind_port=9099 # Set the publicly accessible Issuer URL (the load balancer URL). # This prevents setup-sso from automatically appending the port. etc_sso_config_issuer_url=https://load_balancer_IP_or_DNS
- Update your New Edge UI configuration for HTTPS by ensuring the following properties are set in your
/opt/silent.conffile:SSO_PUBLIC_URL_SCHEME=https SSO_PUBLIC_URL_HOSTNAME=load_balancer_IP_or_DNS SSO_PUBLIC_URL_PORT=443
- Execute the
setup-ssoscript to apply the configuration, restart the Apigee SSO, and automatically update the Edge Management Server:/opt/apigee/apigee-service/bin/apigee-service apigee-openldap setup-sso -f /opt/silent.conf
- Update your IDP configuration (such as Okta or ADFS) to make an HTTPS request to the load balancer to access the Apigee SSO. For more information, see Configure your SAML IDP.
- Execute the UI configuration script to automatically configure and restart the New Edge UI server:
/opt/apigee/apigee-service/bin/apigee-service edge-management-ui configure-sso -f /opt/silent.conf
Enable SSL_TERMINATION mode
For SSL_TERMINATION mode, you must:
- Generate a standard PEM-encoded TLS cert and key. For production, you must generate a certificate signed by a CA. You cannot use a self-signed certificate.
- Update the property files to bind to the secure port and load the certificates.
To install the certificate and key:
- Create a directory for the certificates on the OpenLDAP node:
sudo mkdir -p /opt/apigee/customer/application/certs/
- Copy your PEM-encoded certificate (
.crt) and private key (.key) to the new directory. - Change the owner of the directory and files to the "apigee" user, and secure the permissions:
sudo chown -R apigee:apigee /opt/apigee/customer/application/certs/
sudo chmod 600 /opt/apigee/customer/application/certs/sso.key
sudo chmod 644 /opt/apigee/customer/application/certs/sso.crt
To configure Apigee SSO for SSL_TERMINATION mode:
- Add the following settings to your
/opt/apigee/customer/application/openldap.propertiesfile:# 1. Enable HTTPS listener and configure TLS cert/key lib_settings_enable_sso_https=true etc_sso_config_bind_port_ssl=9443 etc_sso_config_tls_cert_file=/opt/apigee/customer/application/certs/sso.crt etc_sso_config_tls_key_file=/opt/apigee/customer/application/certs/sso.key # 2. Update the Issuer URL to use HTTPS and the SSL port/hostname etc_sso_config_issuer_url=https://hostname_or_IP_of_openldap:9443 # 3. (Optional) Disable plain HTTP if only HTTPS is desired # lib_settings_enable_sso_http=false
- Update your New Edge UI configuration for HTTPS by ensuring the following properties are set in your
/opt/silent.conffile:MANAGEMENT_UI_SSO_ENABLED=y SSO_PUBLIC_URL_SCHEME=https SSO_PUBLIC_URL_HOSTNAME=hostname_or_IP_of_openldap SSO_PUBLIC_URL_PORT=9443
- Execute the
setup-ssoscript to apply the configuration, restart the Apigee SSO, and automatically update the Edge Management Server:/opt/apigee/apigee-service/bin/apigee-service apigee-openldap setup-sso -f /opt/silent.conf
- Update your IDP configuration (such as Okta or ADFS) to make an HTTPS request on port 9443 to access the Apigee SSO. For more information, see Configure your SAML IDP.
- Execute the UI configuration script to automatically configure the New Edge UI server:
/opt/apigee/apigee-service/bin/apigee-service edge-management-ui configure-sso -f /opt/silent.conf