
You're viewing Apigee Edge documentation.
Go to the
Apigee X documentation. info
This document describes how to create, modify, and delete keystores and truststores for Edge for the Cloud and for Edge for the Private Cloud versions 4.18.01 and later.
About keystores/truststores and virtual hosts for Edge Cloud
The process of creating keystores/truststores for Edge Cloud requires that you follow all of the rules about using virtual hosts. For example, with virtual hosts in the Cloud:
- Virtual hosts must use TLS.
- Virtual hosts can only use port 443.
- You must use a signed TLS cert. Unsigned certs are not allowed for use with virtual hosts in the Cloud.
- The domain name specified by the TLS cert must match the host alias of the virtual host.
Learn more:
Implementing keystores and truststores in Edge
To configure functionality that relies on public key infrastructure, such as TLS, you need to create keystores and truststores that contain the necessary keys and digital certificates.
In Edge, keystores and truststores are both represented by a keystore entity that contain one or more aliases. That is, there is no implementation difference between a keystore and a truststore on Edge.
The difference between keystores and truststore is derived from the kinds of entries that they contain and how they are used in TLS handshaking:
- keystore - a keystore entity that contains one or more aliases, where each alias contains a cert/key pair.
- truststore - a keystore entity that contains one or more aliases, where each alias contains a cert only.
When configuring TLS for a virtual host or target endpoint, keystores and truststores provide
different roles in the TLS handshaking process. When configuring a virtual host or target
endpoint, you specify keystores and truststores separately in the <SSLInfo>
tag, as shown below for a virtual host:
<VirtualHost name="myTLSVHost">
    <HostAliases>
        <HostAlias>apiTLS.myCompany.com</HostAlias>
    </HostAliases>
    <Interfaces/>
    <Port>9006</Port>
    <SSLInfo>
        <Enabled>true</Enabled>
        <ClientAuthEnabled>false</ClientAuthEnabled>
        <KeyStore>ref://keystoreref</KeyStore>
        <KeyAlias>myKeyAlias</KeyAlias>
    </SSLInfo>
</VirtualHost>
In this example, you specify the name of the keystore and alias used by the virtual host for its TLS keystore. You use a reference to specify the keystore name so that you can change it later when the cert expires. The alias contains a cert/key pair used to identify the virtual host to a TLS client accessing the virtual host. In this example, there is no truststore required.
If a truststore is required, for example for a 2-way TLS configuration, use the
<TrustStore> tag to specify the truststore:
<VirtualHost name="myTLSVHost">
    <HostAliases>
        <HostAlias>apiTLS.myCompany.com</HostAlias>
    </HostAliases>
    <Interfaces/>
    <Port>9006</Port>
    <SSLInfo>
        <Enabled>true</Enabled>
        <ClientAuthEnabled>true</ClientAuthEnabled>
        <KeyStore>ref://keystoreref</KeyStore>
        <KeyAlias>myKeyAlias</KeyAlias>
        <TrustStore>ref://truststoreref</TrustStore>
    </SSLInfo>
</VirtualHost>
In this example, the <TrustStore> tag references a keystore only, it does
not specify a specific alias. Each alias in the keystore contains a cert, or a cert chain, that
is used as part of the TLS handshaking process.
Supported certificate formats
| Format | API and UI upload supported | Northbound supported | Validated |
|---|---|---|---|
| PEM | Yes | Yes | Yes |
| * PKCS12 | Yes | Yes | Yes Note: Apigee internally converts PKCS12 to PEM. |
| * DER | No | No | Yes |
| * PKCS7 | No | No | No |
* We recommend using PEM if possible.
Using PKCS12 keystores with Edge for Private Cloud 4.53.00 or later
If you are using Edge for Private Cloud 4.53.00 or later, you should use only a PKCS12 keystore to upload keys and related certificates to Apigee. For assistance with converting your existing keys and certificates to the PKCS12/PFX format, refer to Converting certificates to supported format.
About implementing an alias
On Edge, a keystore contains one or more aliases, where each alias contains:
- TLS certificate as a PEM or PKCS12/PFX file - either a certificate signed by a certificate authority (CA), a file containing a chain of certificates where the last certificate is signed by a CA, or a self-signed cert.
- Private key as a PEM or PKCS12/PFX file. Edge supports key sizes up to 2048 bits. A passphrase is optional.
On Edge, a truststore contains one or more aliases, where each alias contains a:
- TLS certificate as a PEM file - either a certificate signed by a certificate authority (CA), a chain of certificates where the last certificate is signed by a CA, or a self-signed cert.
Edge provides a UI and API that you use to create keystores, create aliases, upload cert/key pairs, and update certs. The UI and API that you use to create a truststore are the same as you use to create a keystore. The difference is that when you create a truststore, you create aliases that contain only a cert.
About the format of the cert and key files
You can represent certs and keys as PEM files or as PKCS12/PFX files. PEM files comply with
the X.509 format. If your cert or private key is not defined by a PEM file, you can convert it to
a PEM file by using utilities such as openssl.
However, many .crt files and .key files are already in the PEM format. If these files are text files, and are enclosed in:
-----BEGIN CERTIFICATE-----
-----END CERTIFICATE-----
or:
-----BEGIN ENCRYPTED PRIVATE KEY-----
-----END ENCRYPTED PRIVATE KEY-----
Then the files are compatible with the PEM format and you can use them in a keystore or truststore without converting them to a PEM file.
About cert chains
If a cert is part of a chain, you handle it differently based on whether the cert is used in a keystore or in a truststore:
- Keystore - If a cert is part of a chain, then you must create a single file containing all the certs in the chain. The certs have to be in order and the last cert must be a root certificate or an intermediate cert signed by a root certificate.
- Truststore - If a cert is part of a chain, then you must either create a single file containing all the certs and upload that file to an alias, or upload all certs in the chain separately to the truststore using a different alias for each cert. If you upload them as a single cert, the certs have to be in order and the last cert must be a root certificate or an intermediate cert signed by a root certificate.
- If you create a single file that contains multiple certs, you must insert an empty line between each cert.
For example, you can combine all of the certs into a single PEM file. The certs have to be in order and the last cert must be a root certificate or an intermediate cert signed by a root certificate:
-----BEGIN CERTIFICATE-----
(Your Primary TLS certificate)
-----END CERTIFICATE-----

-----BEGIN CERTIFICATE-----
(Intermediate certificate)
-----END CERTIFICATE-----

-----BEGIN CERTIFICATE-----
(Root certificate or intermediate certificate signed by a root certificate)
-----END CERTIFICATE-----
If your certs are represented as PKCS12/PFX files, you can use the openssl
command to create a PKCS12/PFX file from chain of certs, as shown below:
openssl pkcs12 -export -out certificate.pfx -inkey privateKey.key -in certificate.crt -certfile CACert.crt
When working with cert chains in a truststore, you do not always have to upload all the
certs in the chain. For example, you upload a client certificate, client_cert_1, and
the client certificate issuer's certificate, ca_cert.
During two-way TLS authentication, client authentication succeeds when the server sends
client_cert_1 to the client as part of the TLS handshaking process.
Alternatively, you have a second cert, client_cert_2, signed by the same cert,
ca_cert. However, you do not upload client_cert_2 to the truststore.
The truststore still contains only client_cert_1 and ca_cert.
When the server passes client_cert_2 as part of TLS handshaking, the request
succeeds. This is because Edge allows TLS verification to succeed when client_cert_2
does not exist in the truststore but was signed by the a cert that exists in the truststore. If
you remove the CA certificate, ca_cert, from the truststore then TLS verification
fails.
FIPS considerations
If you are using Edge for Private Cloud 4.53.00 or later on a FIPS-enabled operating system, you should use only a PKCS12 keystore to upload keys and related certificates to Apigee.
Explore the TLS Keystores page
Access the TLS Keystores page, as described below.Edge
To access the TLS Keystores page using the Edge UI:
- Sign in to https://apigee.com/edge as an organization administrator.
- Select your organization.
- Select Admin > Environment > TLS Keystores.
Classic Edge (Private Cloud)
To access the TLS Keystores page using the Classic Edge UI:
- Sign in to
http://ms-ip:9000as an organization administrator, where ms-ip is the IP address or DNS name of the Management Server node. - Select your organization.
- Select Admin > Environment Configuration > TLS Keystores.
The TLS Keystores page is displayed:
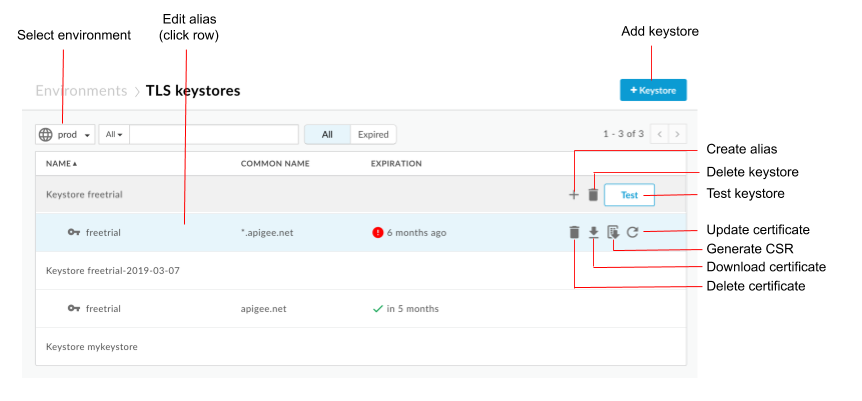
As highlighted in the previous figure, the TLS Keystores page enables you to:
- Select an environment
- Create a keystore and alias
- Test and delete keystores
- View and delete aliases
View an alias
To view an alias:
- Access the TLS Keystores page.
- Select the Environment (typically
prodortest). - Click the row associated with the alias that you want to view.
Details for the alias cert and key are displayed.
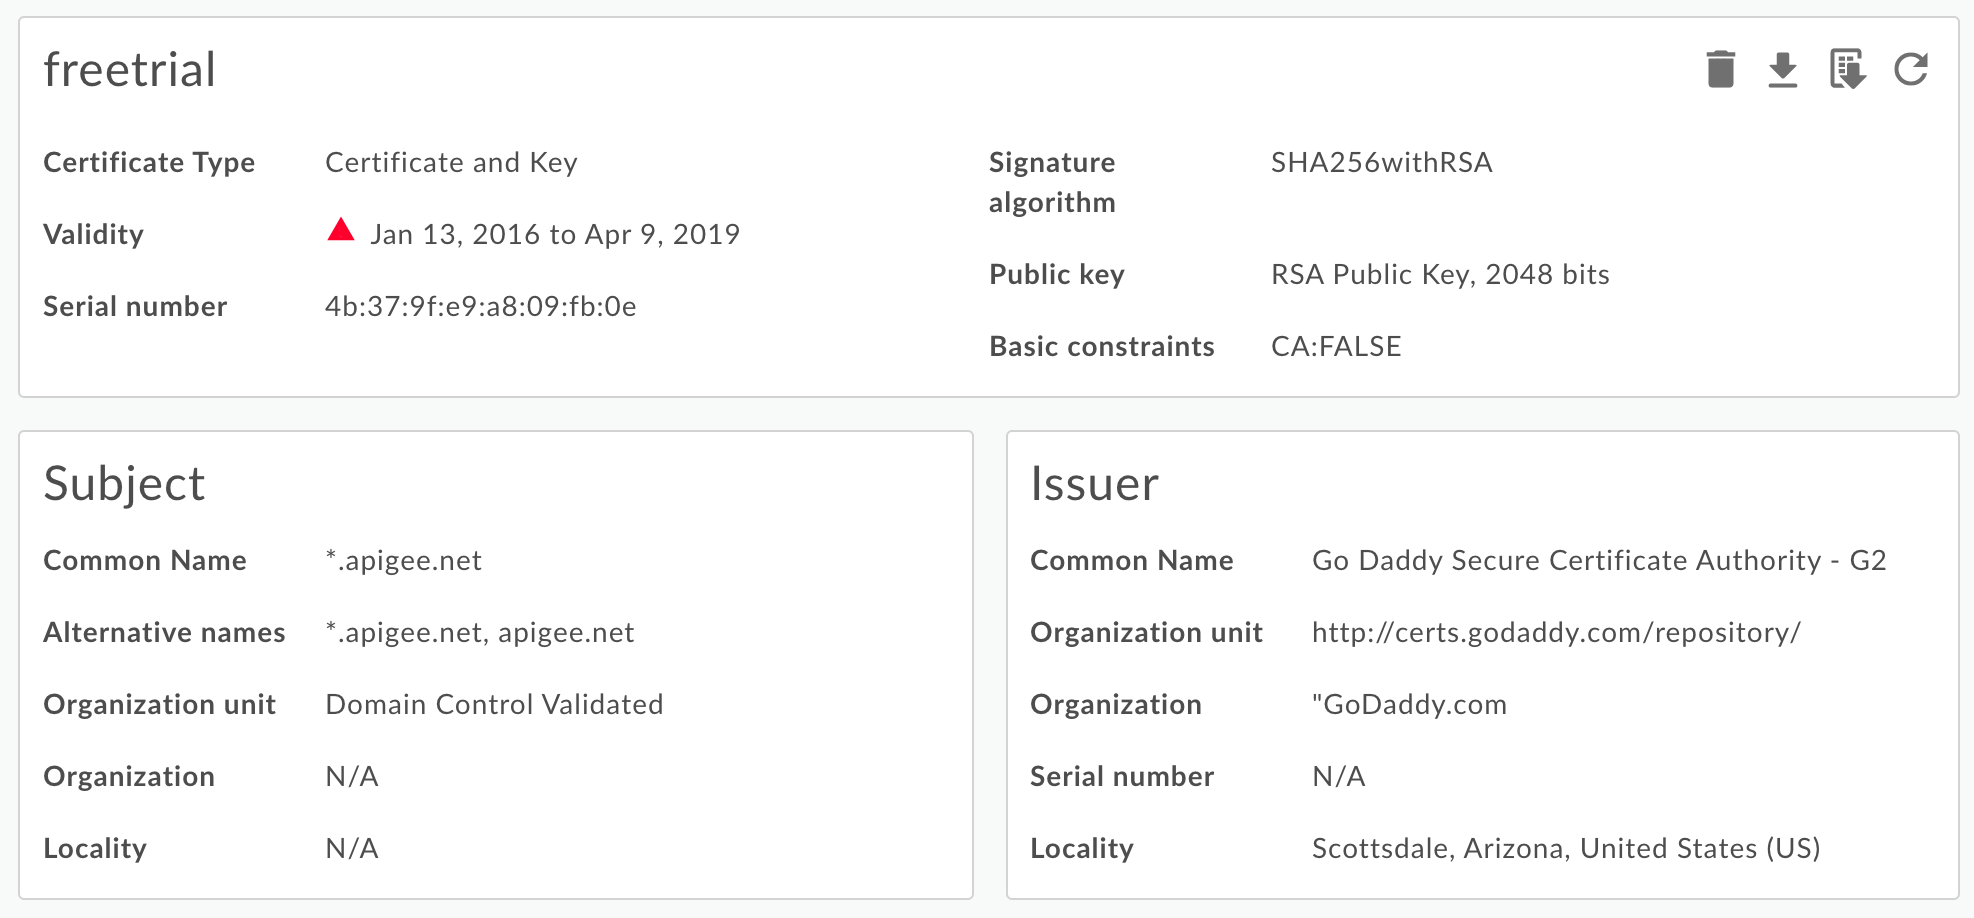
You can see all information about the alias, including the expiration date. - Manage the cert using the buttons at the top of the page to:
- Download the cert as a PEM file.
- Generate a CSR. If you have an expired cert and want to renew it, you can download a Certificate Signing Request (CSR). You then send the CSR to your CA to obtain a new cert.
- Update a certificate. Caution: If you update a certificate that is
currently being used by a virtual host or target server/target endpoint then you must
contact Apigee Edge Support to restart the Routers and Message Processors. The recommended way to update a
cert is to:
- Create a new keystore or truststore.
- Add the new cert to the new keystore or truststore.
- Update the reference in the virtual host or target server/target endpoint to the keystore or truststore. See Update a TLS certificate for the Cloud for more.
- Delete the alias. Note: If you delete an alias, and it is currently being used by a virtual host or target endpoint, then the virtual host or target endpoint will fail.
Create a keystore/truststore and alias
You can create a keystore for use as either a TLS keystore or a TLS truststore. A keystore is specific to an environment in your organization, for example the test or prod environment. Therefore, if you want to test the keystore in a test environment before deploying it to your production environment, you must create it in both environments.
To create a keystore in an environment, you only need to specify the keystore name. After you create a named keystore in an environment, you can then create aliases and upload a cert/key pair (keystore) or upload a cert only (truststore) to the alias.
To create a keystore:
- Access the TLS Keystores page.
- Select the Environment (typically
prodortest). - Click + Keystore.
- Specify the keystore name. The name can only contain alphanumeric characters.
- Click Add Keystore. The new keystore appears in the list.
- Use one of the following procedures to add an alias. See also Supported certificate file formats.
Creating an alias from a cert (truststore only)
To create an alias from a cert:
- Access the TLS Keystores page.
- Position the cursor over the keystore in to display the action menu and click +.
- Specify the Alias Name.
- Under Certificate details, select Certificate Only in the Type drop-down.
- Click Choose File next to Certificate File, navigate to the PEM file containing the cert, and click Open.
- By default, the API checks to make sure the certificate hasn't expired. Optionally select Allow Expired Certificate to skip validation.
- Select Save to upload the cert and create the alias.
Creating an alias from a JAR file (keystore only)
To create an alias from a JAR file:
- Access the TLS Keystores page.
- Position the cursor over the keystore in to display the action menu and click +.
- Specify the Alias Name.
- Under Certificate details, select JAR File in the Type drop-down.
- Click Choose File next to JAR File, navigate to the JAR file containing the cert and key, and click Open.
- If the key has a password, specify the Password. if the key has no password, leave this field blank.
- By default, the API checks to make sure the certificate hasn't expired. Optionally select Allow Expired Certificate to skip validation.
- Select Save to upload the key and cert and create the alias.
Creating an alias from a cert and key (keystore only)
To create an alias from a cert and key:
- Access the TLS Keystores page.
- Position the cursor over the keystore in to display the action menu and click +.
- Specify the Alias Name.
- Under Certificate details, select Certificate and Key in the Type drop-down.
- Click Choose File next to Certificate File, navigate to the PEM file containing the cert, and click Open.
- If the key has a password, specify the Key Password. if the key has no password, leave this field blank.
- Click Choose File next to Key File, navigate to the PEM file containing the key, and click Open.
- By default, the API checks to make sure the certificate hasn't expired. Optionally select Allow Expired Certificate to skip validation.
- Select Save to upload the key and cert and create the alias.
Creating an alias from a PKCS12/PFX file (keystore only)
To create an alias from a PKCS12 file containing the cert and key:
- Access the TLS Keystores page.
- Position the cursor over the keystore in to display the action menu and click +.
- Specify the Alias Name.
- Under Certificate details, select PKCS12/PFX in the Type drop-down.
- Click Choose File next to PKCS12/PFX, navigate to the file containing the key and cert, and click Open.
- If the key has a password, specify the Password for the PKCS12/PFX file. if the key has no password, leave this field blank.
- By default, the API checks to make sure the certificate hasn't expired. Optionally select Allow Expired Certificate to skip validation.
- Select Save to upload the file and create the alias.
Creating an alias from a self-signed certificate (keystore only)
To create an alias that uses a self-signed certificate, you fill in a form with the necessary information required to create the cert. Edge then creates the cert and a private key pair and uploads them to the alias.
To create an alias from a self-signed cert:
- Access the TLS Keystores page.
- Position the cursor over the keystore in to display the action menu and click +.
- Specify the Alias Name.
- Under Certificate details, select Self-Signed Certificate in the Type drop-down.
- Fill in the form by using the table below.
- Select Save to create the cert and private key pair and to upload them to the alias.
In the generated certificate, you will see the following additional fields:
- Issuer
The entity that signed and issued the certificate. For a self-signed certificate, this is the CN you specified when you created the cert. - Validity
The certificate validity period represented as two dates: the date on which the certificate validity period begins and the date on which the certificate validity period ends. Both can be encoded as UTCTime or GeneralizedTime values.
The following table describes the form fields:
| Form Field | Description | Default | Required |
|---|---|---|---|
| Alias Name | Alias name. Maximum length is 128 characters. | N/A | Yes |
| Key Size | Size of the key, in bits. Default and maximum value is 2048 bits. | 2048 | No |
| Signature Algorithm | Signature algorithm to generate private key. Valid values are "SHA512withRSA", "SHA384withRSA" and "SHA256withRSA" (default). | SHA256withRSA | No |
| Certificate validity in days | Validity duration of certificate, in days. Accepts positive non zero value. | 365 | No |
| Common Name |
Common Name (CN) of the organization identifies the fully qualified domain name(s)
associated with the certificate. It is typically composed by a host and a domain name.
For example, api.enterprise.apigee.com, www.apigee.com, etc. Max length is 64 characters.
Depending on the certificate type, the CN can be one or more hostnames belonging to the same domain (e.g. example.com, www.example.com), a wildcard name (e.g. *.example.com) or a list of domains. Do not include any protocol (http:// or https://), port number, or resource path. The certificate is valid only if the request hostname matches at least one of the certificate common names. |
N/A | Yes |
| Email address. Maximum length is 255 characters. | N/A | No | |
| Org Unit Name | Organization team name. Maximum length is 64 characters. | N/A | No |
| Org Name | Organization name. Maximum length is 64 characters. | N/A | No |
| Locality | City/Town name. Maximum length is 128 characters. | N/A | No |
| State/Province | State/Province name. Maximum length is 128 characters. | N/A | No |
| Country | Two letter country code. Example, IN for India, US for United States of America. | N/A | No |
| Alternative Names |
List of alternative host names. Allows additional identities to be bound to the subject
of the certificate. Defined options include an Internet electronic mail address, a DNS
name, an IP address, and a uniform resource identifier (URI).
Max of 255 characters for each value. You can separate names by comma, or by pressing the Enter key after each name. |
N/A | No |
Test a keystore or truststore
You can test your truststore and keystore in the Edge UI to verify that they are configured properly. The Test Ui validates a TLS request from Edge to a backend service. The backend service can be configured to support one-way or two-way TLS.
To test one-way TLS:
- Access the TLS Keystores page.
- Select the Environment (typically
prodortest). - Position your cursor over the TLS keystore you want to test to display the actions menu and click Test. The following dialog
box appears showing the name of the truststore:
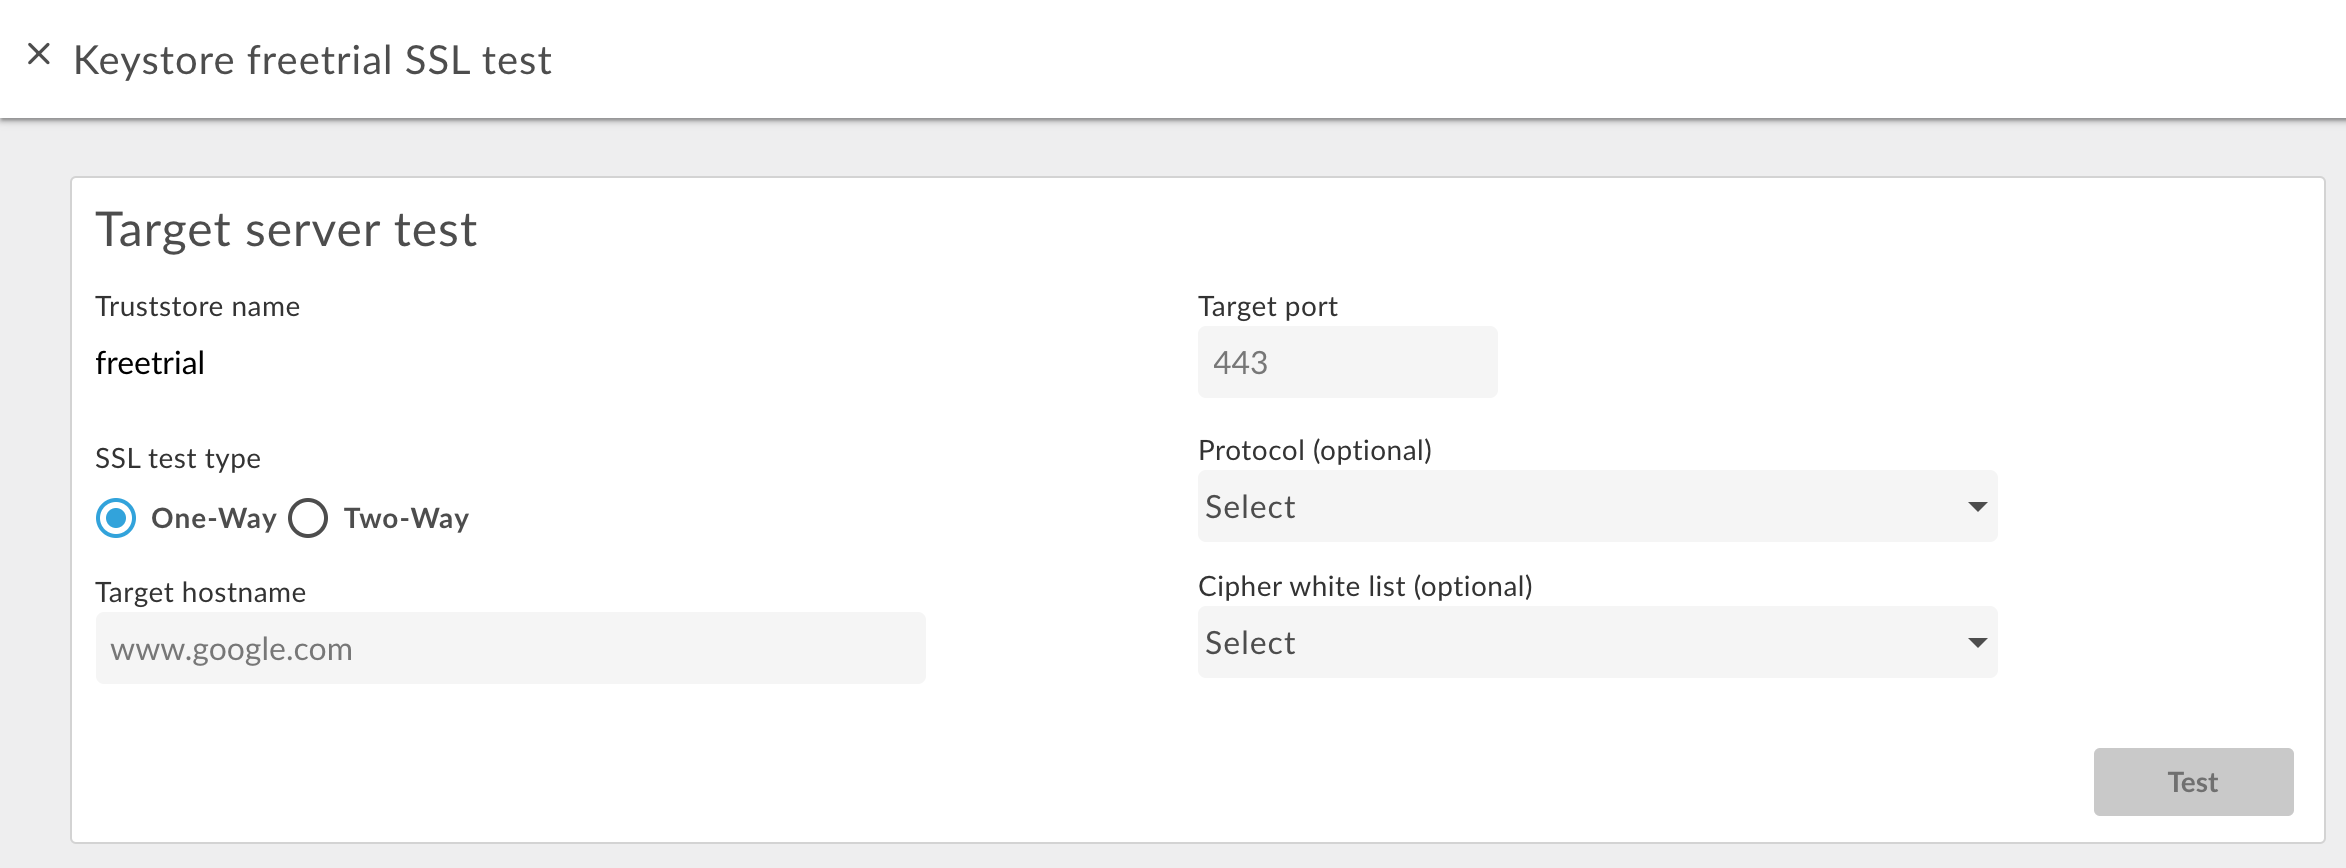
- Enter the hostname of the backend service.
- Enter the TLS port number (typically 443).
- Optionally specify any Protocols or Ciphers.
- Select Test.
To test two-way TLS:
- For the desired truststore, select the Test button.
- In the dialog box, select Two Way for the SSL Test Type.
The following dialog box appears:
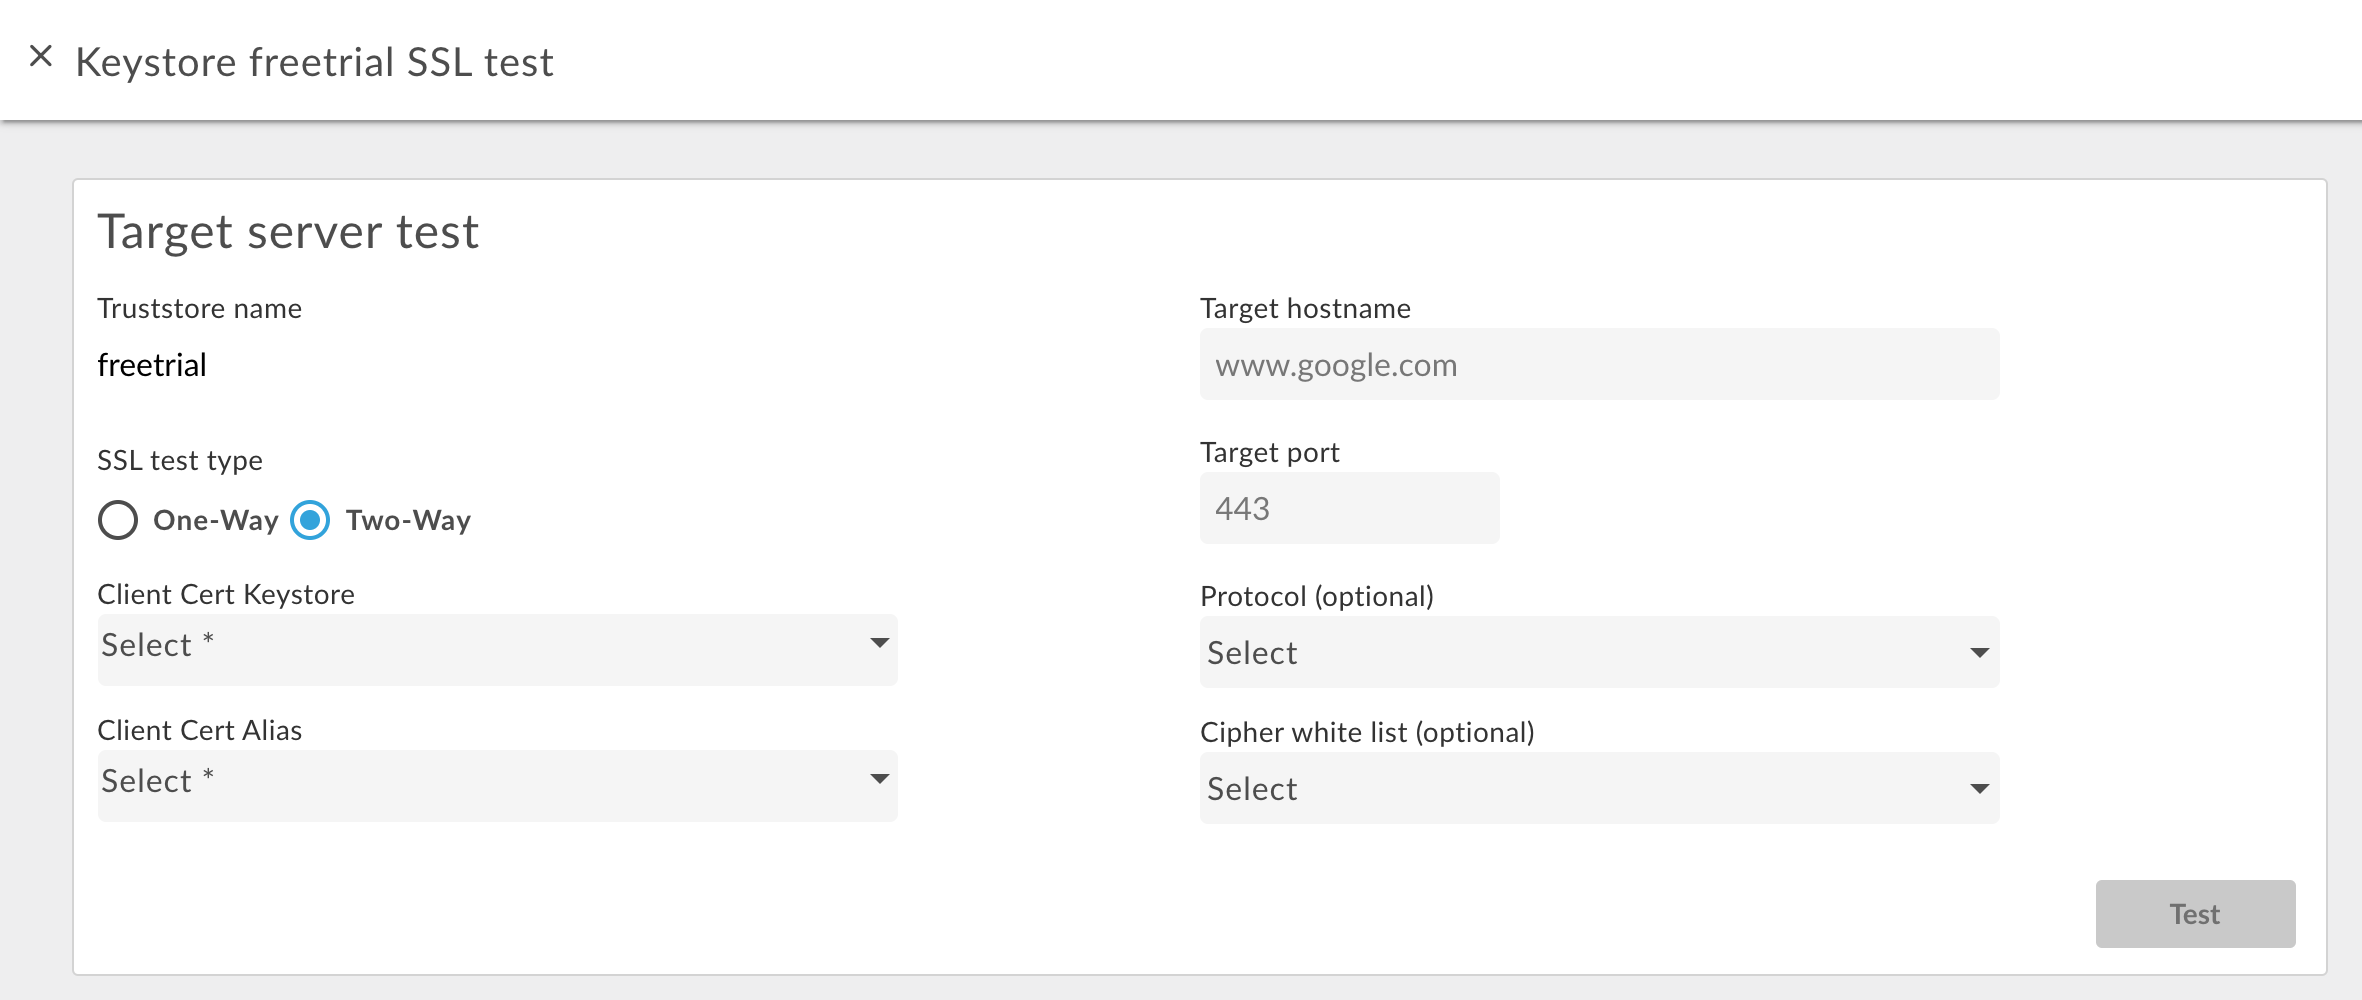
- Specify the name of the keystore used in two-way TLS.
- Specify the alias name in the keystore containing the cert and key.
- Enter the hostname of the backend service.
- Enter the TLS port number (typically 443).
- Optionally specify any Protocols or Ciphers.
- Select Test.
Add a cert to a truststore for two-way TLS
When using two-way TLS for inbound connections, meaning an API request into Edge, the truststore contains a cert or CA chain for each client allowed to make requests to Edge.
When you initially configure the truststore, you can add all the certs for the known clients. However, over time, you might want to add additional certs to the truststore as you add new clients.
To add new certs to a truststore used for two-way TLS:
- Ensure that you are using a reference to the truststore in the virtual host.
- Upload a new cert to the truststore as described above in Creating an alias from a cert (truststore only).
Update the truststore reference to set it to the same value. This update causes Edge to reload the truststore and the new cert.
See Modifying a reference for more.
Delete a keystore/truststore or alias
You must use caution when deleting a keystore/truststore or alias. If you delete a keystore, truststore, or alias that is being used by a virtual host, target endpoint, or target server, all API calls through the virtual host or target endpoint/target server will fail.
Typically, the process you use to delete a keystore/truststore or alias is:
- Create a new keystore/truststore or alias as described above.
- For inbound connections, meaning an API request into Edge, update the virtual host configuration to reference the new keystore and key alias.
- For outbound connections, meaning from Apigee to a backend server:
- Update the TargetEndpoint configuration for any API proxies that referenced the old keystore and key alias to reference the new keystore and key alias. If your TargetEndpoint references a TargetServer, update the TargetServer definition to reference the new keystore and key alias.
- If the keystore and truststore are referenced directly from the TargetEndpoint definition, then you must redeploy the proxy. If the TargetEndpoint references a TargetServer definition, and the TargetServer definition references the keystore and truststore, then no proxy redeployment is necessary.
- Confirm that your API proxies are functioning correctly.
- Delete the keystore/truststore or alias.
Delete a keystore
You can delete a keystore or truststore by positioning your cursor over the keystore or trustore in the list to display the actions
menu and clicking ![]() . If you delete a keystore or truststore that is being
used by a virtual host or target endpoint/target server, all API calls through the virtual host
or target endpoint/target server will fail.
. If you delete a keystore or truststore that is being
used by a virtual host or target endpoint/target server, all API calls through the virtual host
or target endpoint/target server will fail.
Caution: You should not delete a keystore until you have converted your virtual hosts and target endpoints/target servers to use a new keystore.
Delete an alias
You can delete an alias bby positioning your cursor over the alias in the list to display the actions
menu and clicking ![]() . If you delete an alias that is being used by a virtual host or
target endpoint/target server, all API calls through the virtual host or target endpoint/target
server will fail.
. If you delete an alias that is being used by a virtual host or
target endpoint/target server, all API calls through the virtual host or target endpoint/target
server will fail.
Caution: You should not delete an alias until you have converted your virtual hosts and target endpoints/target servers to use a new keystore and alias.