
You're viewing Apigee Edge documentation.
Go to the
Apigee X documentation. info
This section describes how to enable SAML for Apigee Edge so that authentication for members of your organization(s) can be delegated to your own identity service. For an overview of SAML and identity zone management in Edge, see SAML overview.
Video: Watch a short video to learn about how to access Apigee Edge APIs before and after enabling single sign-on (SSO) using SAML.
About the zoneadmin role
You must be a zoneadmin to manage identity zones in Edge. The zoneadmin role provides full CRUD procedures for managing identity zones only.
To have the zoneadmin role assigned to your Apigee Edge account, contact Apigee Edge Support.
Before you begin
Before you begin, obtain the following information from your third-party SAML identity provider:
- Certificate for signature verification (PEM or PKCSS format). If necessary, convert an x509 certificate to PEM format
Configuration information (defined in the following table)
Configuration Description Sign-in URL URL to which users are redirected to sign-in to the SAML identity provider. Sign-out URL URL to which users are redirected to sign-out of the SAML identity provider. IDP entity ID Unique URL for this identity provider. For example: https://idp.example.com/saml
In addition, configure your third-party SAML identity provider with the following settings:
- Ensure that the
NameIDattribute is mapped to the user's email address. The user's email address serves as the unique identifier of the Edge developer account. The following shows an example using Okta, where the Name ID format field defines theNameIDattribute.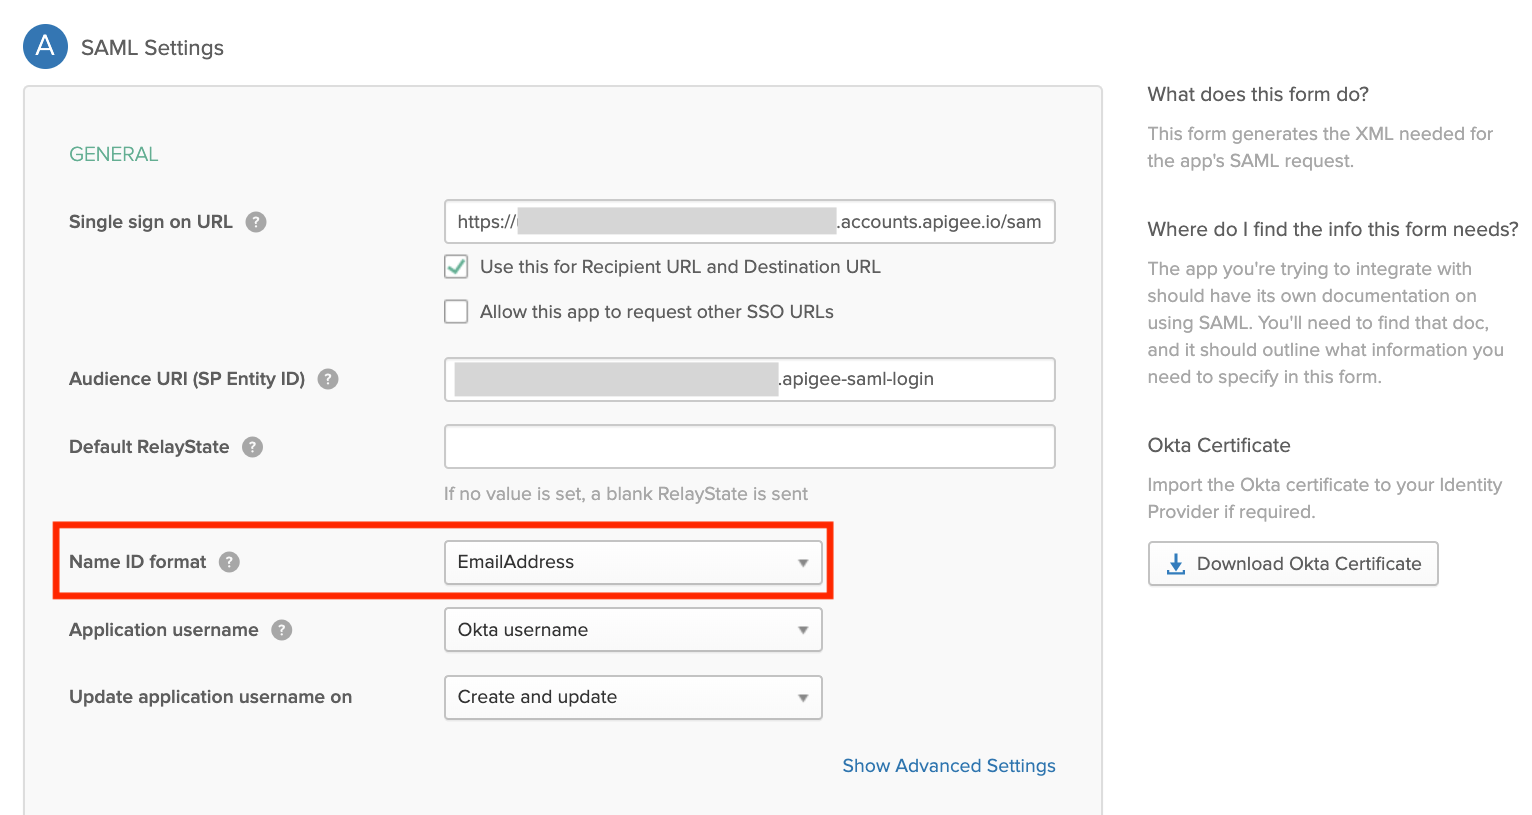
- (Optional) Set the authenticated session duration to 15 days to match the duration of the Edge UI authenticated session duration.
Explore the Edge SSO Zone Administration page
Manage identity zones for Edge using the Edge SSO Zone Administration page. The Edge SSO Zone Administration page exists outside of your organization enabling you to assign multiple organizations to the same identity zone.
To access the Edge SSO Zone Administration page:
- Sign in to https://apigee.com/edge using an Apigee Edge user account with zoneadmin privileges.
- Select Admin > SSO in the left navigation bar.
The Edge SSO Zone Administration page displays (outside of your organization).
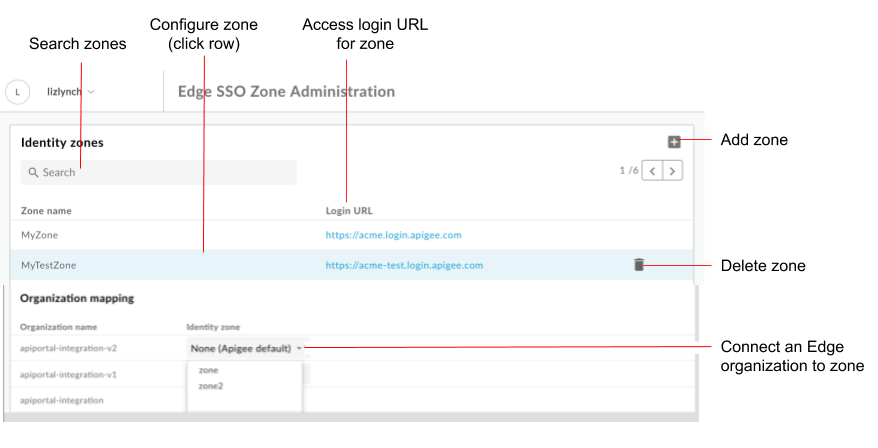
As highlighted in the figure, the Edge SSO Zone Administration page enables you to:
- View all identity zones
- View login URL for each zone
- Add and delete an identity zone
- Configure the SAML identity provider
- Connect an Edge organization to an identity zone
- Delete a portal identity zone
Add an identity zone
To add an identity zone:
- Access the Edge SSO Zone Administration page.
- In the Identity zones section, click +.
Enter a name and description for the identity zone.
The zone name must be unique across all Edge organizations.Note: Apigee reserves the right to remove any zone name that is deemed unjustifiable.
Enter a string to append to the subdomain, if required.
For example, ifacmeis the zone name, you may want to define a production zone,acme-prodand a test zone,acme-test.
To create the production zone enter prod as the subdomain suffix. In this case, the URL used to access the Edge UI would be:acme-prod.apigee.com, as described in Access your organization using the identity zone.Note: The appended subdomain suffix must be unique across all your zones.
Click OK.
Configure the SAML identity provider
Configure the SAML identity provider by performing the following steps:
- Configure SAML settings.
- Upload a new certificate.
If necessary, convert an x509 certificate to PEM format.
Configure SAML settings
To configure the SAML settings:
- Access the Edge SSO Zone Administration page.
- Click the row of the identity zone for which you want to configure the SAML identity provider.
- In the SAML Settings section, click
 .
. Click Copy adjacent to the SP metadata URL.

Configure your SAML identity provider using the information in the service provider (SP) metadata file.
For some SAML identity providers, you will be prompted only for the metadata URL. For others, you will need to extract specific information from the metadata file and enter it into a form.
In the latter case, paste the URL into a browser to download the SP metadata file and extract the required information. For example, the entity ID or sign-in URL can be extracted from the following elements in the SP metadata file:Note: In the SP metadata file, the sign-in URL is referred to as the
AssertionConsumerService(ACS) URL.<md:EntityDescriptor xmlns:md="urn:oasis:names:tc:SAML:2.0:metadata" ID="diyyaumzqchrbui-a5vnmu1sp8qzekbd.apigee-saml-login" entityID="diyyaumzqchrbui-a5vnmu1sp8qzekbd.apigee-saml-login"><md:AssertionConsumerService Binding="urn:oasis:names:tc:SAML:2.0:bindings:HTTP-POST" Location="https://diyyaumzqchrbui-a5vnmu1sp8qzekbd.portal-login.apigee.com/saml/SSO/alias/diyyaumzqchrbui-a5vnmu1sp8qzekbd.apigee-saml-login" index="0" isDefault="true"/>
Note: If required by your SAML identity provider, set the audience restriction to zoneID.apigee-saml-login, which you can copy from the
entityIDelement in the SP metadata file (shown above).Configure the SAML settings for the SAML identity provider.
In the SAML Settings section, edit the following values obtained from your SAML identity provider metadata file:
SAML setting Description Sign-in URL URL to which users are redirected to sign-in to the SAML portal identity provider.
For example:https://dev-431871.oktapreview.com/app/googledev431871_devportalsaml_1/exkhgdyponHIp97po0h7/sso/samlSign-out URL URL to which users are redirected to sign-out of the SAML portal identity provider.
Note: If your SAML identity provider does not provide a sign-out URL, leave this field blank. In this case, it will be set to the same value used for the sign-in URL.IDP entity ID Unique URL for the SAML identity provider.
For example:http://www.okta.com/exkhgdyponHIp97po0h7Note: Depending on the SAML identity provider, this field may be named differently, such as
Entity ID,SP Entity ID,Audience URI, and so on.Note: Apigee SSO does not support the following 2 features:
- Automatic IDP certificate refresh by using an IDP metadata URL and downloading the metadata periodically to update changes on the Apigee SSO Service Provider side.
- Uploading an entire IDP Metadata xml file or using an IDP Metadata URL for automatic IDP configuration.
Click Save.
Next, upload a certificate in PEM or PKCSS format, as described in the next section.
Upload a new certificate
To upload a new certificate:
Download the certificate for signature verification from your SAML identity provider.
Note: The certificate must be in PEM or PKCSS format. If necessary, convert an x509 certificate to PEM format.
Click the row of the identity zone for which you want to upload a new certificate.
In the Certificate section, click
. Click Browse and navigate to the certificate in your local directory.
Click Open to upload the new certificate.
The Certificate information fields are updated to reflect the selected certificate.
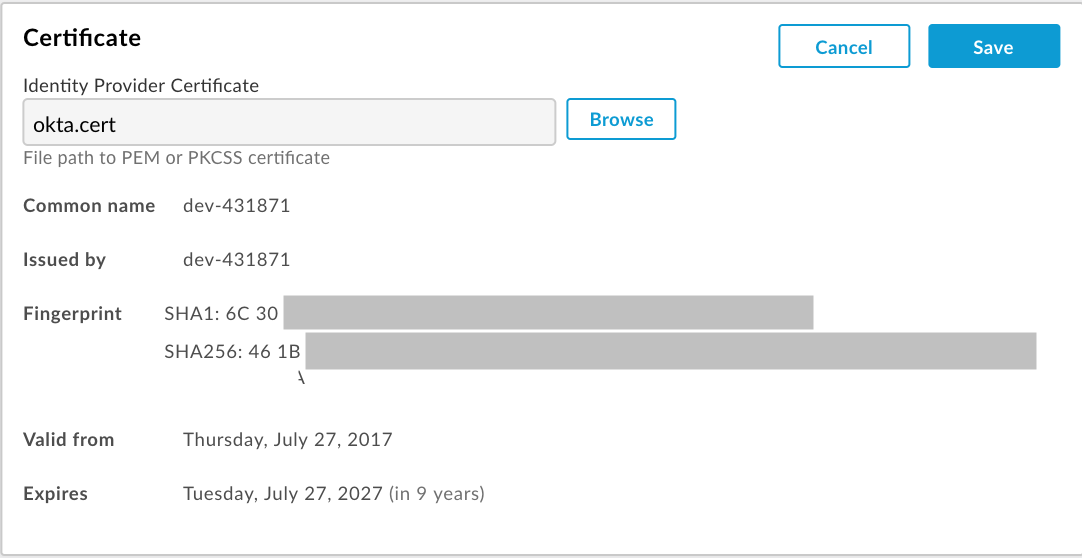
Verify that the certificate is valid and has not expired.
Click Save.
Convert an x509 certificate to PEM format
If you download an x509 certificate, you need to convert it to PEM format.
To convert an x509 certificate to PEM format:
- Copy the contents of the
ds:X509Certificate elementfrom the SAML identity provider metadata file and paste it into your favorite text editor. - Add the following line at the top of the file:
-----BEGIN CERTIFICATE----- - Add the following line at the bottom of the file:
-----END CERTIFICATE----- - Save the file using a
.pemextension.
The following provides an example of the PEM file contents:
-----BEGIN CERTIFICATE-----
MIICMzCCAZygAwIBAgIJALiPnVsvq8dsMA0GCSqGSIb3DQEBBQUAMFMxCzAJBgNV
BAYTAlVTMQwwCgYDVQQIEwNmb28xDDAKBgNVBAcTA2ZvbzEMMAoGA1UEChMDZm9v
MQwwCgYDVQQLEwNmb28xDDAKBgNVBAMTA2ZvbzAeFw0xMzAzMTkxNTQwMTlaFw0x
ODAzMTgxNTQwMTlaMFMxCzAJBgNVBAYTAlVTMQwwCgYDVQQIEwNmb28xDDAKBgNV
BAcTA2ZvbzEMMAoGA1UEChMDZm9vMQwwCgYDVQQLEwNmb28xDDAKBgNVBAMTA2Zv
bzCBnzANBgkqhkiG9w0BAQEFAAOBjQAwgYkCgYEAzdGfxi9CNbMf1UUcvDQh7MYB
OveIHyc0E0KIbhjK5FkCBU4CiZrbfHagaW7ZEcN0tt3EvpbOMxxc/ZQU2WN/s/wP
xph0pSfsfFsTKM4RhTWD2v4fgk+xZiKd1p0+L4hTtpwnEw0uXRVd0ki6muwV5y/P
+5FHUeldq+pgTcgzuK8CAwEAAaMPMA0wCwYDVR0PBAQDAgLkMA0GCSqGSIb3DQEB
BQUAA4GBAJiDAAtY0mQQeuxWdzLRzXmjvdSuL9GoyT3BF/jSnpxz5/58dba8pWen
v3pj4P3w5DoOso0rzkZy2jEsEitlVM2mLSbQpMM+MUVQCQoiG6W9xuCFuxSrwPIS
pAqEAuV4DNoxQKKWmhVv+J0ptMWD25Pnpxeq5sXzghfJnslJlQND
-----END CERTIFICATE-----
Connect an Edge organization to an identity zone
To connect an Edge organization to an identity zone:
- Access the Edge SSO Zone Administration page.
- In the Organization mapping section, select an identity zone in the Identity zone drop-down menu associated with the organization you want to assign to a zone.
Select None (Apigee default) to enable basic authentication for the organization. - Click Confirm to confirm the change.
Access your organization using the identity zone
The URL that you use to access the Edge UI is defined by the name of your identity zone:
https://zonename.apigee.com
Similarly, the URL that you use to access the Classic Edge UI is as follows:
https://zonename.enterprise.apigee.com
For example, Acme Inc. wants to use SAML and chooses "acme" as its zone name. Acme Inc. customers then access the Edge UI with the following URL:
https://acme.apigee.com
The zone identifies the Edge organizations that support SAML. For example, Acme Inc. has three orgs: OrgA, OrgB and OrgC. Acme can decide to add all organizations to the SAML zone, or only a subset. The remaining organizations continue to use Basic Auth or OAuth2 tokens generated from Basic Auth credentials.
You can define multiple identity zones. All zones can then be configured to use the same identity provider.
For example, Acme might want to define a production zone, "acme-prod", containing OrgAProd and OrgBProd, and a test zone, "acme-test", containing OrgATest, OrgBTest, OrgADev, and OrgBDev.
You then use the following URLs to access the different zones:
https://acme-prod.apigee.com
https://acme-test.apigee.com
Register Edge users with SAML authentication
After you enable SAML for an organization, you need to register the SAML users that are not already registered with your organization. For more information, see Manage organization users.
Update scripts to pass OAuth2 access tokens
After you enable SAML, Basic Auth is disabled for the Edge API. All
scripts (Maven scripts, shell scripts, apigeetool, and so on) that rely on Edge
API calls supporting Basic Auth will no longer work. You must update API calls and
scripts that use Basic Auth to pass OAuth2 access tokens in the Bearer header. See Using SAML with the Edge API.
Delete an identity zone
To delete a identity zone:
- Access the Edge SSO Zone Administration page.
- Position your cursor over the row associated with the identity zone you want to delete to display the actions menu.
- Click
 .
. - Click Delete to confirm the delete operation.
Sign out of the Edge SSO Zone Administration page
Because you manage Edge identity zones outside of your organization, you will need to sign out of the Edge SSO Zone Administration page and then sign-in to your organization to be able to access other features of Apigee Edge.
