You're viewing Apigee Edge documentation.
Go to the
Apigee X documentation. info
Introduction
In some cases, you may need transaction counters to be based on a variable or custom value. For example, you may need to:
- Charge developers a variable amount based on a value provided in the message of an API call. For example, you may want to charge app developers based on the number of bytes transmitted in the API request.
- Bundle multiple API calls into a single transaction.
Using rate plans with custom attributes, you can identify a value in the message of an API call that acts as counter, and that is used to calculate transaction counts and charges.
The following rate plans with custom attributes are supported:
- Rate card with custom attribute
- Adjustable notification with custom attribute
You can set a maximum of ten custom attributes per rate plan.
Understanding custom attribute calculations
How the custom attribute value gets factored into the rate plan transaction counts and charges depends on the charging model, as summarized in the following table.
| Charging model | Custom attribute calculation |
|---|---|
| Flat Rate and Volume Banded |
For a Flat Rate, the custom attribute number becomes the number of transactions that are multiplied against the rate. For Volume Banded, the number of transactions in a band is incremented by the custom attribute number, and the developer is charged for that number of transactions. For example, If a custom attribute value in the message is 10, then the developer is charged for 10 transactions, and 10 transactions are added to the current band count. If the developer had only 6 transactions remaining in the current band, 6 is multiplied by the rate for that band. The remaining 4 go into the next band and are multiplied by that band's rate. In a Volume Banded plan, if the last volume band has a limit (is not "unlimited") and a transaction exceeds that limit, two things happen:
|
| Bundles |
Since bundles are charged by the group, not by the transaction, the following calculation occurs:
For example, if the custom attribute number in the message is 10, then 10 is added to the number of transactions used in the bundle. If the developer had only 6 transactions remaining in the current bundle, then that bundle is filled and the next bundle count is incremented by 4. The rate for that next bundle, if any, is charged. If the last bundle has a limit (is not "unlimited") and a transaction exceeds that limit, two things happen:
|
| Adjustable notifications |
For adjustable notification, the following calculation occurs:
For example, if the custom attribute number in the message is 10, then 10 is added to the total number of transactions. |
Where the rate plan gets the custom attribute value
The Transaction Recording Policy (on the API product bundle) tells monetization where to look in the message for the custom attribute value. You define the custom attribute in the Custom Attributes section of the transaction recording policy for the API product bundle.
Then, you can select that custom attribute in the rate plan—after you create an API product bundle that contains the transaction recording policy with the custom attribute defined.
Here is the high-level flow:
- Define the custom attributes when adding an API product.
- Create an API product bundle that contains the product.
In the transaction recording policy for the API product bundle, add the custom attributes that will be used to define rate plans. - Create a rate plan of type rate card or adjustable notification for the API product bundle and specify a custom rating parameter.
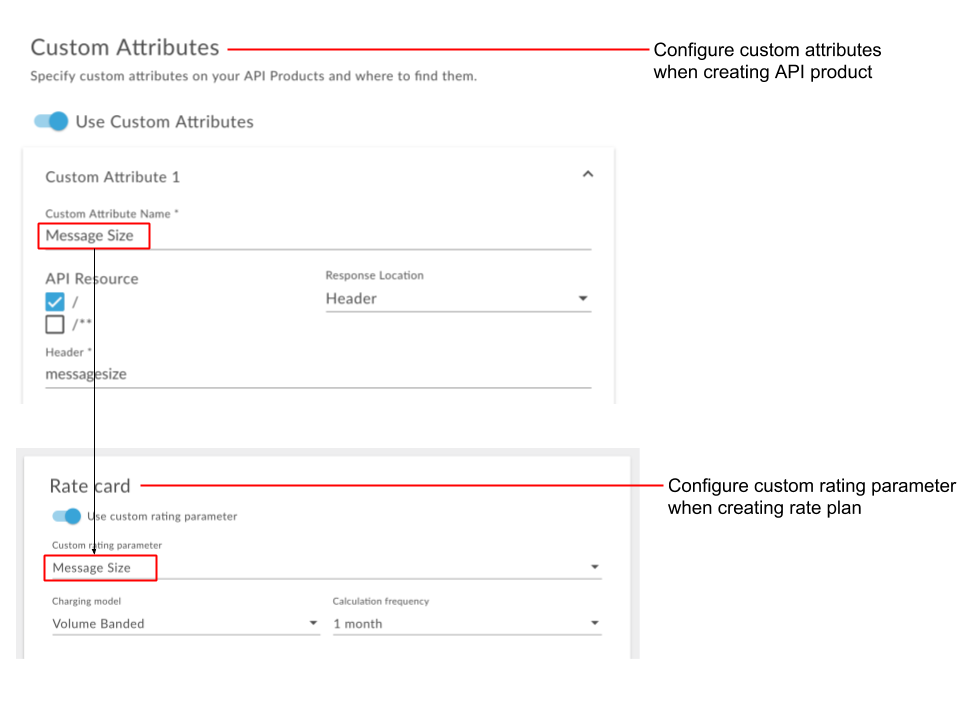
The following figure shows the relationship between the custom attribute defined in the transaction recording policy and the rate card plan configuration. The adjustable notification with custom attribute rate plan relationship is similar, though the volume-banded value is not applicable.

How to generate the custom attribute value in the message
The transaction recording policy can look for the custom attribute value in several places, such as the response header, the response body, or the predefined flow variables in the response. (The request isn't available, because a transaction isn't official until you get a successful response.) Following are examples showing you how to add a response header with its numeric value to the message. In both cases, we'll use the Assign Message policy in conjunction with variables.
Adding request payload size to the response header
In each message request, there's a client.received.content.length variable that
contains the number of bytes in the request payload. By attaching an Assign Message policy to the
Proxy Endpoint response, we can generate a response header called messageSize that
contains the length value:
<AssignMessage async="false" continueOnError="false" enabled="true" name="Assign-Message-1">
    <DisplayName>Assign Message 1</DisplayName>
    <Set>
        <Headers>
          <Header name="messageSize">{client.received.content.length}</Header>
        </Headers>
    </Set>
    <IgnoreUnresolvedVariables>true</IgnoreUnresolvedVariables>
    <AssignTo createNew="false" transport="http" type="request"/>
</AssignMessage>
Adding an app custom attribute value to the header
In much the same way, we can generate a header with the value of a custom attribute on an app.
For example, if you include a custom attribute called apprating on each developer
app, as follows:

When using the Verify API Key policy (which is required for monetization), this value is
stored in a variable called verifyapikey.{policy_name}.apprating. Using the Assign
Message policy attached to the Proxy Endpoint response, you could generate a header called
apprating that contains the app's apprating value:
<AssignMessage async="false" continueOnError="false" enabled="true" name="Assign-Message-1">
    <DisplayName>Assign Message 1</DisplayName>
    <Set>
        <Headers>
          <Header name="apprating">{verifyapikey.Verify-API-Key-1.apprating}</Header>
        </Headers>
    </Set>
    <IgnoreUnresolvedVariables>true</IgnoreUnresolvedVariables>
    <AssignTo createNew="false" transport="http" type="request"/>
</AssignMessage>
Setting up the rate plan
Other than the custom attribute setup described above, the rate plan is set up in the same way as you would normally (for rate plans without custom attributes), but must adhere to the following requirements.
Configuring rate card plan with custom attribute using the UI
Configure rate card plans with custom attributes using the Edge UI or Classic Edge UI, as described in the following sections.
Edge
To configure a rate card plan with custom attributes using the Edge UI:
- Define the custom attributes when adding an API product.
- Create an API product bundle that contains the product. See Create API product bundles.
In the transaction recording policy for the API product bundle, add the custom attributes that will be used to define rate plans. For details, see the introduction in this topic, as well as Create a transaction recording policy. - Create a rate plan for the API product bundle and specify a custom rating parameter.
For more information, see Configure rate card plan details using the UI.
Classic Edge (Private Cloud)
Use the following steps to create a Rate Card with Custom Attribute plan using the Classic Edge UI:
- In an API product's transaction recording policy, add the custom attributes that will be used to define rate plans. For details, see the introduction in this topic, as well as Create a transaction recording policy. Do this for each API product you want to include in the API package.
- Once the API products and transaction recording policies are configured exactly the way you want them, create an API package that contains the product. See Create API packages.
- Create a rate plan for the API package, selecting the rate plan type of Rate Card with Custom Attribute.
-
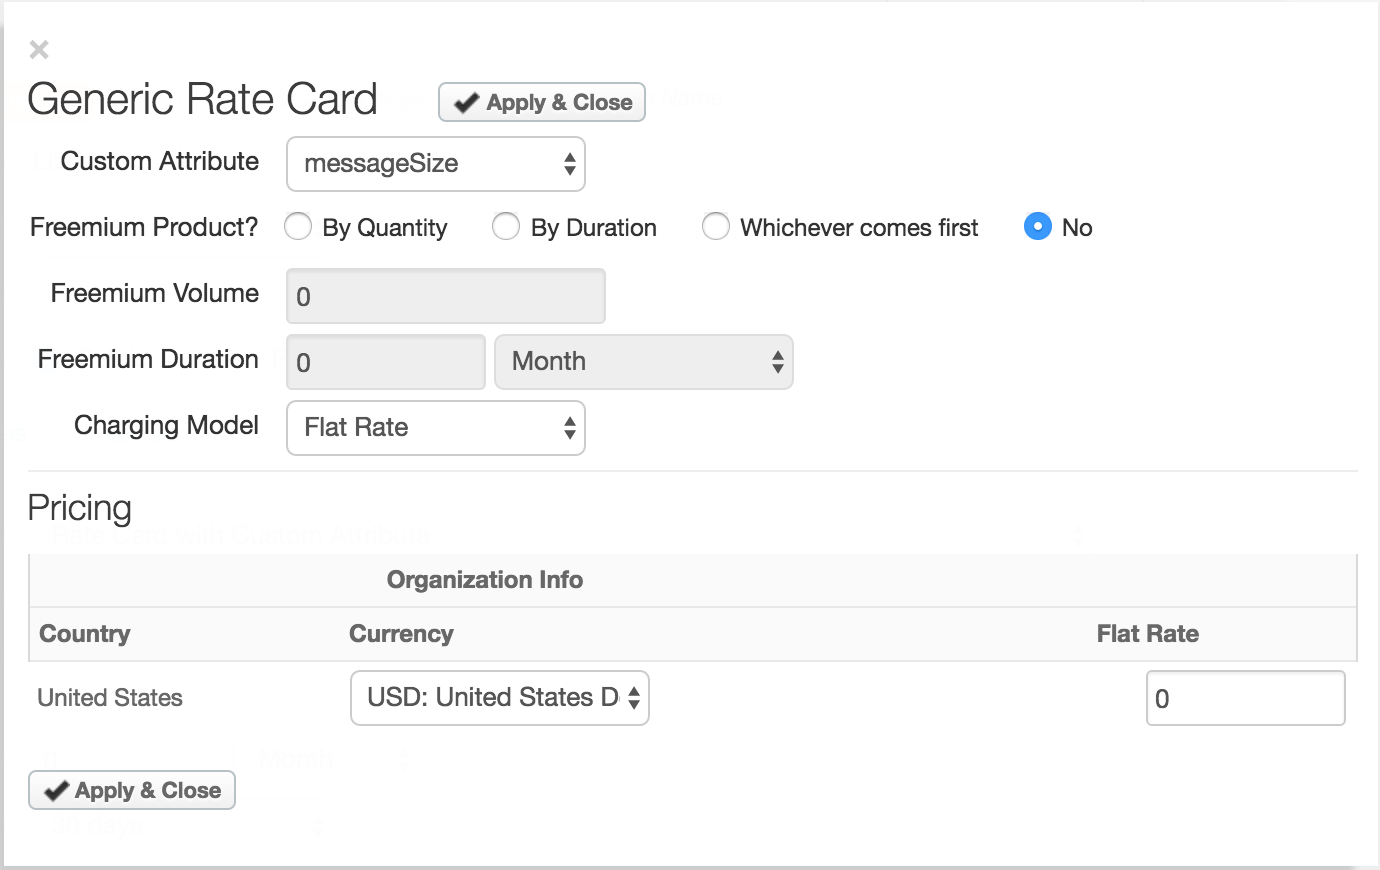
Click the Rate Card link. This opens the Rate Card window.

- Select a custom attribute in the Custom Attribute drop-down menu. The menu lists custom
attributes created for the product in a transaction recording policy. The developer is charged
based on the value of the selected custom attribute within each transaction.
(Attribute value * rate = charge to developer) - Optionally, set up a freemium plan as described in Specify rate card plan details.
- Set up a charging model as described in Specify rate card plan details. Note, however, that for the Rate Card with Custom Attribute rate plan type, the charging model is based on the custom attribute you select. For example, if you choose Flat Rate as the charging model, the developer is charged a fixed rate based on the custom attribute, such as the number of bytes transmitted in each transaction (not a fixed rate for each transaction). See Calculations for more.
-
Click Save
Draft.
Publish the plan only when you're absolutely sure it's final. See Publish rate plans for information about setting the Publish Date and publishing the plan.
For more information, see Specifying rate card plan details using the UI.
Configuring an adjustable notification plan with custom attributes using the UI
Configure adjustable notification plans with custom attributes, as described below.Edge
To configure a rate card plan with custom attributes using the Edge UI:
- Define the custom attributes when adding an API product.
- Create an API product bundle that contains the product. See Create API product bundles.
In the transaction recording policy for the API product bundle, add the custom attributes that will be used to define rate plans. For details, see the introduction in this topic, as well as Create a transaction recording policy. - Create a rate plan for the API product bundle and specify a custom rating parameter.
For more information, see Configure an adjustable notification plan using the UI.
Classic Edge (Private Cloud)
To configure a rate card plan with custom attributes using the Classic Edge UI:
- In an API product's transaction recording policy, add the custom attributes that will be used to define rate plans. For details, see the introduction in this topic, as well as Create a transaction recording policy. Do this for each API product you want to include in the API package.
- Once the API products and transaction recording policies are configured exactly the way you want them, create an API package that contains the product. See Create API packages.
- Create a rate plan for the API package, selecting the rate plan type of Adjustable Notification with Custom Attribute.
-
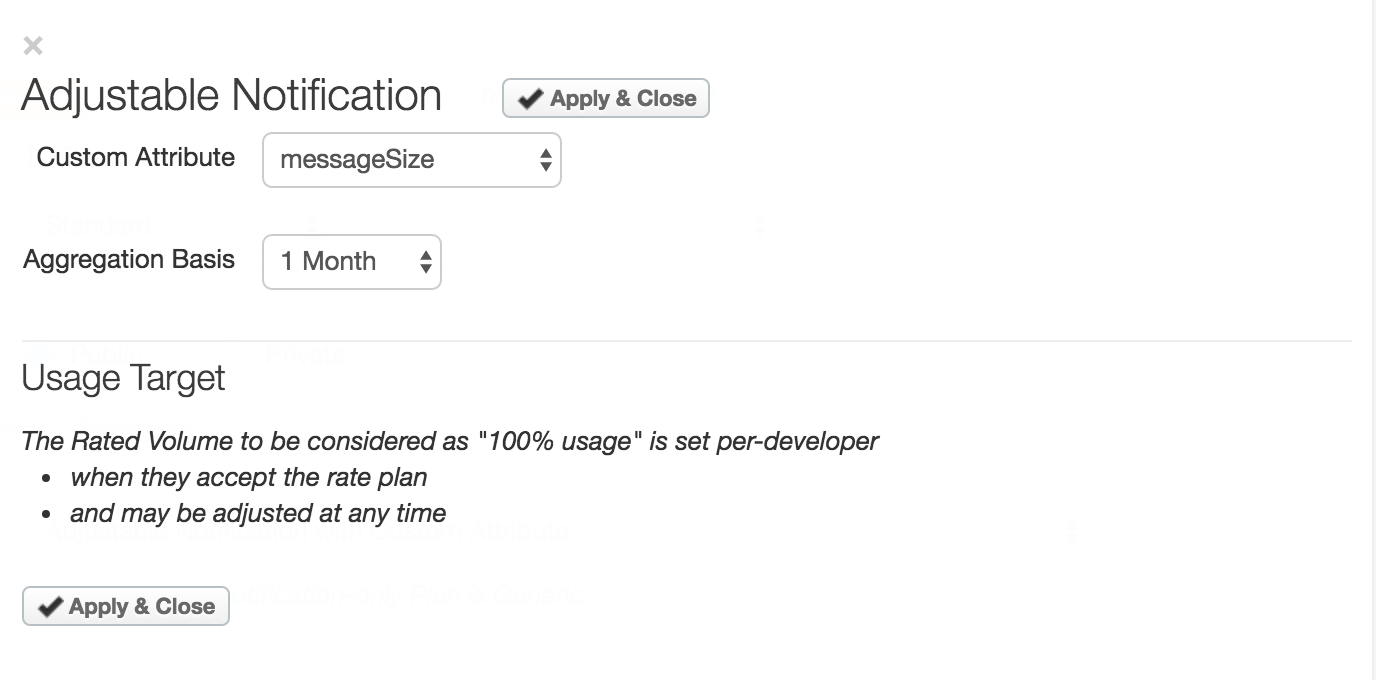
Click the Details link. This opens the Adjustable Notification window.

- Select a custom attribute in the Custom Attribute drop-down menu. The menu lists custom attributes created for the product in a transaction recording policy. The developer’s total number of transactions is calculated on the value of the selected custom attribute within each transaction.
- Set the Aggregation Basis to the period of time over which the volume of transactions is aggregated. Select a number between 1 and 24 months. This value defaults to 1 month.
- Click Apply and Close.
-
Click Save
Draft.
Publish the plan only when you're absolutely sure it's final. See Publish rate plans for information about setting the Publish Date and publishing the plan.
For more information, see Specifying Adjustable notification plan details using the UI.
Specifying details for a rate plan with custom attributes using the API
Perform the following prerequisite steps:
- In an API product's transaction recording policy, add the custom attributes that will be used to define rate plans. For details, see the introduction in this topic, as well as Create a transaction recording policy. Do this for each API product you want to include in the API package.
- Once the API products and transaction recording policies are configured exactly the way you want them, create an API package that contains the product. See Create API packages.
Next, you use the API to create the rate plan.
You specify details for a rate plan with custom attributes when you create the rate plan. You
specify the details in the ratePlanDetails property within the request body in a
call to /organizations/{org_name}/monetization-packages/{package_id}/rate-plans. In
the details, you specify a rating parameter value that identifies the name of the custom
attribute. You can also specify a rating parameter value that aggregates the custom attribute
over a specified time interval.
See Rate plan details configuration settings for a complete list of rate plan detail options.
For example, the following creates a Rate Card with Custom Attribute plan based on a custom
attribute named messageSize (see items in bold).
$ curl -H "Content-Type:application/json" -X POST -d \
'{
   "name": "Custom attribute-based rate card plan",
   "developer":null,
   "developerCategory":null,
   "currency": {
     "id" : "usd"
     },
   "description": "Custom attribute-based rate card plan",
   "displayName" : "Custom attribute-based rate card plan",
   "frequencyDuration": "1",
   "frequencyDurationType": "MONTH",
   "earlyTerminationFee": "10",
   "monetizationPackage": {
      "id": "location"
        },
      "organization": {
       "id": "{org_name}"
      },
   "paymentDueDays": "30",
   "prorate": "false",
   "published": "false",
   "ratePlanDetails":[
      {
        "currency":{
           "id":"usd"
        },
      "duration":1,
      "durationType":"MONTH",
      "meteringType":"VOLUME",
      "paymentDueDays":"30",
      "ratingParameter":"messageSize",
      "ratingParameterUnit":"MB",
      "organization":{
         "id":"{org_name}"
      },
      "ratePlanRates":[
         {
           "rate":0.15,
           "startUnit":0,
           "type":"RATECARD",
           "endUnit":1000
         },
         {
           "rate":0.1,
           "startUnit":1000,
           "type":"RATECARD",
           "endUnit":null
         }
      ],
      "freemiumUnit":0,
      "freemiumDuration":0,
      "freemiumDurationType":"MONTH",
      "type":"RATECARD",
      "customPaymentTerm":false
      }
    ],
    "freemiumUnit":0,
    "freemiumDuration":0,
    "freemiumDurationType":"MONTH",
    "contractDuration":"1",
    "contractDurationType":"YEAR",
    "recurringStartUnit": 1,
    "recurringType": "CALENDAR",
    "recurringFee": "10",
    "setUpFee": "10",
    "startDate": "2013-09-15 00:00:00",
    "type": "STANDARD"
}' \
"https://api.enterprise.apigee.com/v1/mint/organizations/{org_name}/monetization-packages/location/rate-plans" \
-u email:password
The following creates an Adjustable Notification with Custom Attribute rate plan based on a
custom attribute named messageSize (see item in bold).
$ curl -H "Content-Type:application/json" -X POST -d \
'{
     "name": "AdjustableNotification",
     "displayName": "Custom attribute-based adjustable notification plan",
     "description": "Custom attribute-based adjustable notification plan",
     "published": "true",
     "organization": {
      "id": "myorg"
     },
     "startDate": "2016-04-15 00:00:00",
     "type": "STANDARD",
     "monetizationPackage": {
        "id": "p1",
        "name": "test"
     },
     "currency": {
        "id" : "usd",
        "name" : "USD"
     },
     "ratePlanDetails": [
        {
           "type": "USAGE_TARGET",
           "meteringType": "DEV_SPECIFIC",
           "duration": 1,
           "durationType": "MONTH",
           "ratingParameter": "messageSize",
           "ratingParameterUnit": "MB",
           "organization": {
             "id": "myorg"
           },
           "currency": {
             "id": "usd",
             "name": "USD"
           }
        }
     ]
}' \
"https://api.enterprise.apigee.com/v1/mint/organizations/myorg/monetization-packages/p1/rate-plans"  \
-u email:password
