
You're viewing Apigee Edge documentation.
Go to the
Apigee X documentation. info
Manage API products using the Apigee Edge management UI, as described in this section. To manage API product using the API, see Using the Edge management API to Publish APIs.
Watch the following video to learn how to create an API product.
For an overview of API products, see What is an API product?.
Explore the API products page
Access the API products page, as described below.
Edge
To access the API products page using the Edge UI:
- Sign in to https://apigee.com/edge.
- Select Publish > API Products.
The API Products page is displayed.
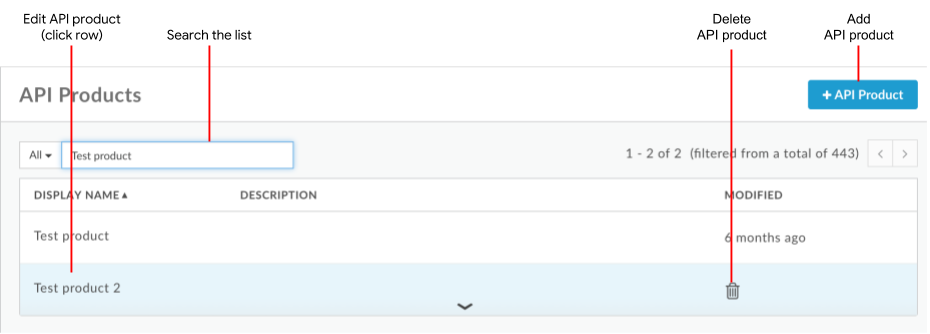
As shown in the previous figure, the API products page enables you to perform the following tasks, described later in this section:
- Add an API product
- Edit and delete an API product
- Search the list of API products
Classic Edge (Private Cloud)
To access the API products page using the Classic Edge UI:
- Sign in to
http://ms-ip:9000, where ms-ip is the IP address or DNS name of the Management Server node. - Select Publish > Products.
The API products page enables you to perform the following tasks, described later in this section:
- Add an API product
- Edit and delete an API product
- Search the list of API products
Adding an API product
Add an API product using the UI, as described below. To use the Edge API, see Configuring API products using the API.
To add an API product using the Edge UI:
- Access the API products page, as described previously in this section.
- Click +API Product.
- Enter the Product Details for your API product.
Field Description Name Internal name of the API product. You cannot edit the name once the API product is created. Do not specify special characters in the name.
Display name Display name for the API product. The display name is used in the UI and you can edit it at anytime. If not specified, the Name value will be used. This field is auto-filled using the Name value; you can edit or delete its contents. The display name can include special characters. Description Description of the API product. Environment Environments to which the API product will allow access. For example, testorprod.Access Access level. For details, see Access level. Automatically approve access requests Enable automatic approval of key requests for this API product from any app. To require manual approval of keys, disable this option. See Registering apps and managing API keys (UI) and Developer App Keys (API). Quota Quota limit that you want to reference from quota policies. Entering a quota value does not automatically enforce restrictions on the number of calls that can be made through the product. API proxies referenced by the product must include the Quota policy to enforce the quota. For more information, see Quotas. Allowed OAuth Scopes If you are using OAuth with the API product, allowed OAuth scopes that you want the API product to allow (such as Read or other scopes that apps will send with their API calls). Specify multiple scopes as a comma-separated list. See OAuth scopes. Add the API Resources that are available in the API product, including the API proxies and resource paths.
For example, if you add a "music" API proxy to the product with a base path of
/music, the API product allows calls to/music. However, if you want the API product to allow access to only thevenuesresource path, which has a URI of/music/venues, add the/venuesresource path to the product. In this case, calls to/music/venues?name=paramountare allowed, but calls to/music/artists?name=Jack%Johnsonwill be blocked.Set a specific resource path or set the base path and all possible subpaths by specifying the resource path as
/. The resource path can include wildcards/**and/*. The double asterisk wildcard indicates that all subpaths of the base path are supported (but not the base path). A single asterisk indicates that only URIs one level down from the base path are supported. See Configuring the behavior of the resource path of '/', '/*', and '/**', as described later in this section.To add API resources:
- Click Add a proxy or Add a path in the API resources section.
- Choose whether you want to add an API proxy, Path, or both API proxy and path.
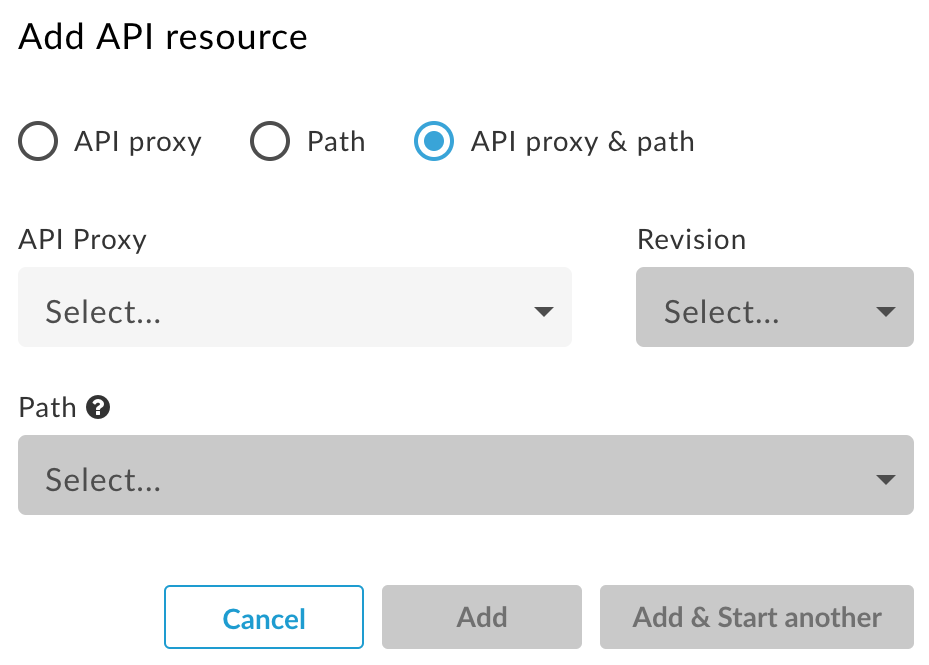
Add one or more API proxies and resource paths.
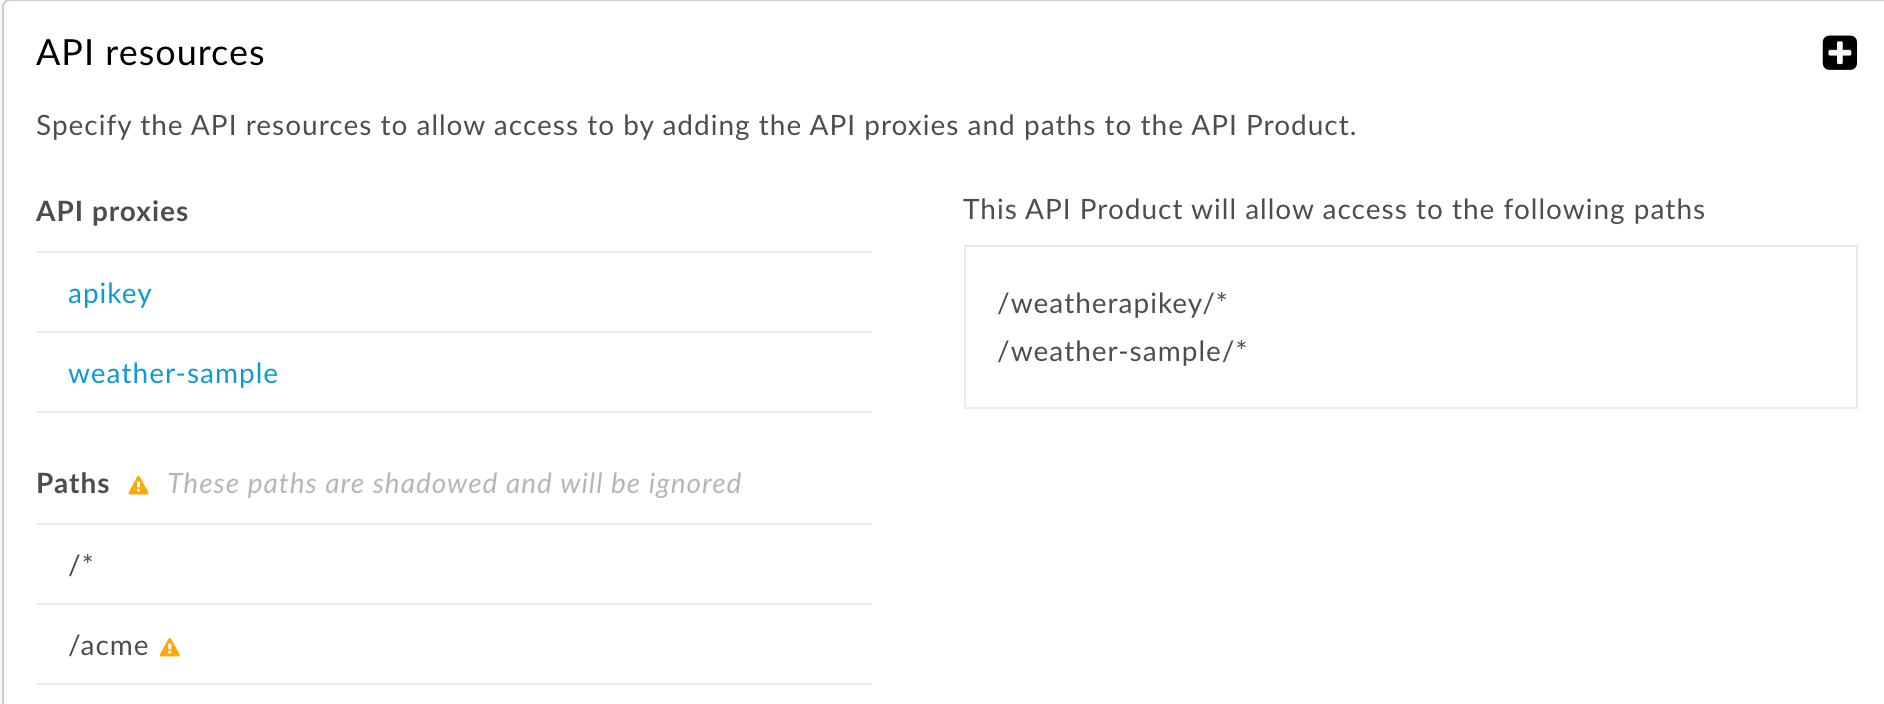
Note the following:
- The resource paths that you define apply to all API proxies added to the API product.
- More inclusive, less specific resource paths take predence over those that are more specific. For example, if you add
/and/**, the/resource path takes precedence; the/**resource path will be ignored.
For example:
- Click Add or Add and Start another (to specify additional API resources).
- (Optional) Use the Apigee remote service targets section to bind the product to one or more remote service targets. Unless you are using the Apigee Envoy Adapter, you can ignore this setting. For more information, see the Operations guide for the Apigee Envoy Adapter.
(Optional) Use the Custom attributes section to add up to 18 custom attributes to an API product.
Custom attributes are key/value pairs that can be used in many ways, including helping control API proxy execution. For example, you could create a custom attribute called
deprecatedwith a value of true or false. In your API proxy flow, you could check the value of the API product'sdeprecatedattribute (for example, using theverifyapikey.{policy_name}.apiproduct.deprecatedvariable that is automatically available after you create the custom attribute). If its value is true (deprecated), you can throw an error with the Raise Fault policy.- Click Save.
Configuring the behavior of a resource path of '/', '/*', and '/**'
The following table describes the default behavior of an API product for
different resource paths. In this example, the API proxy has a base path of
/v1/weatherapikey. The API product resource path applies to the path suffix after
the base path.
| Request URI | Allowed for / | Allowed for /* | Allowed for /** | Allowed for /*/2/** | Allowed for /*/2/* |
|---|---|---|---|---|---|
|
/v1/weatherapikey |
Y |
N |
N |
N |
N |
|
/v1/weatherapikey/ |
Y |
N |
N |
N |
N |
|
/v1/weatherapikey/1 |
Y |
Y |
Y |
N |
N |
|
/v1/weatherapikey/1/ |
Y |
Y |
Y |
N |
N |
|
/v1/weatherapikey/1/2 |
Y |
N |
Y |
N |
N |
|
/v1/weatherapikey/1/2/ |
Y |
N |
Y |
Y |
N |
|
/v1/weatherapikey/1/2/3/ |
Y |
N |
Y |
Y |
Y |
|
/v1/weatherapikey/1/a/2/3/ |
Y |
N |
Y |
N |
N |
By default, a resource path of / in an API product
supports the base path and all subpaths. For example, if the Base Path of
the API proxy is /v1/weatherapikey, then the API product supports requests to
/v1/weatherapikey and to any subpaths, such as
/v1/weatherapikey/forecastrss, /v1/weatherapikey/region/CA, and so on.
You can change this default so that a resource path of / corresponds only to the Base Path of the API proxy, meaning the API product will not allow access to a URI that has anything after the /. If you make this change, then in the table above, only the first two rows under "Allowed for /" would contain "Y".
To change the default, a system administrator must set the value of the
features.isSingleForwardSlashBlockingEnabled
property on your organization to true. Cloud customers can make that request
to Apigee Edge Support.
Editing an API product
To edit an API product:
- Access the API products page, as described previously in this section.
- Click in the row of the API product that you want to edit.
- Click Edit on the API product page.
- Edit the fields, as required.
You can delete resources that you've added to an API product. You might want to do this if a resource is malfunctioning or requires more development. When deleted, that resource is no longer part of the API product. Any app that uses the API product can no longer access the deleted resource. Deleted resources are removed from the product but are not deleted from the system, so they can still be used by other products.
- Click Save.
With Apigee Edge for Public Cloud, Edge keeps the following entities in cache for a minimum of 180 seconds after the entities are accessed.
- OAuth access tokens. This means that a revoked token may still succeed for up to three minutes, until its cache limit expires.
- Key Management Service (KMS) entities (Apps, Developers, API Products).
- Custom attributes on OAuth tokens and KMS entities.
Deleting an API product
Before you can delete an API product, you must unregister/unassociate any developer apps associated with the product. You can do so by either deleting the apps or revoking the app API keys.
To delete an API product:
- Access the API products page, as described previously in this section.
- Position the cursor over the API product in the list.
- Click
 .
. - Click Delete to confirm the delete operation.