You're viewing Apigee Edge documentation.
Go to the
Apigee X documentation. info
As a service provider, you develop APIs for consumption by client apps. To create, configure, and maintain API proxies and API products, you can use the UI or make HTTP requests to the APIs to access RESTful services, as described in the following sections.
Use the Edge UI
The Apigee Edge UI is a browser-based tool you can use to create, configure, and manage API proxies and API products. A subset of tasks can only be accomplished using the API, too.
The following table describes how to access the Edge UI:
| Product | UI Name | Access URL |
|---|---|---|
| Edge | Edge UI | To access the Edge UI, use the following URL: https://apigee.com/edge For a tutorial on using the Edge UI, see Build your first API proxy. |
| Edge for Private Cloud | Classic Edge UI | To access the Edge UI for Edge for Private Cloud, use the following URL: http://ms-ip:9000 Where ms-ip is the IP address or DNS name of the Management Server node. |
Using the Edge UI, you can:
- Create API proxies by editing code and tracing request flows through your proxies.
- Create API products that bundle proxies for exposure to client requests.
- Manage developers and developer apps.
- Configure your test and production environments.
- Implement JavaScript and Node.js applications.
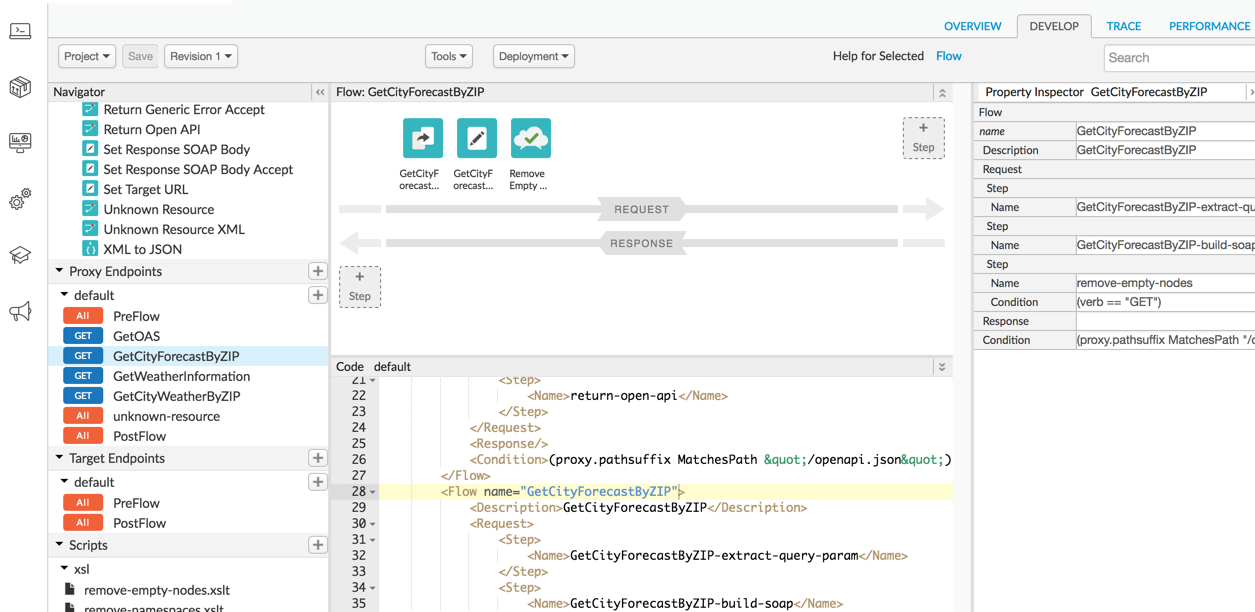
The following image shows the API proxy editor in the UI that you can use to create and configure an API proxy:

Use the Edge API
You can use Edge API to manage your API resources. The APIs also provide access to low-level capabilities that are not exposed by the UI.
The API endpoints often take data containing configuration information and require you to
pass authentication information, such as username and password, to access them. Following RESTful
principles, you can call HTTP GET, POST, PUT, and
DELETE methods on any of the API resources.
For a complete list of Apigee Edge APIs, see the Apigee Edge API Reference.
Understand the Edge API base path
The path you'll use in API requests concatenates the following:
- A base path that includes your organization name. For example:
https://api.enterprise.apigee.com/v1/organizations/org_name - An endpoint that points to the Edge resource you're accessing.
For example, if your organization name is apibuilders, then every call you make to the
API will use the following base path:
https://api.enterprise.apigee.com/v1/organizations/apibuilders
To retrieve a list of API proxies in your organization, you would call GET on:
https://api.enterprise.apigee.com/v1/organizations/apibuilders/apis
Many resources are scoped by environment. Two environments are provided by default: test and prod. For example, caches are scoped by environment. A shared cache called "mycache" is included by default in every environment.
You can list caches by calling GET on the cache resource as follows:
https://api.enterprise.apigee.com/v1/organizations/apibuilders/environments/test/caches
https://api.enterprise.apigee.com/v1/organizations/apibuilders/environments/prod/caches
Authenticate access
You must authenticate yourself to the API server when you call the APIs. You can do this in one of the following ways:
- OAuth2
- SAML
- Basic Auth (not recommended)
In addition, Apigee recommends that you use two-factor authentication, as described in Enable two-factor auth for your Apigee account.
Edge API limits
Each organization is limited to the following Edge API call rates:
- 10,000 calls per minute for organizations on paid plans
- 600 calls per minute for trial organizations
HTTP status codes 401 and 403 do not count against this limit. Any calls that exceed these
limits return a 429 Too Many Requests status code.
Tips for working with Edge APIs
This section describes some techniques that make working with the Edge APIs easier.
Abbreviating request URLs
When you build your request URL to the Edge APIs, you can use the following abbreviations:
/e = /environments/o = /organizations/r = /revisions
If you use abbreviations, you must use them consistently. That is, abbreviate all elements in the path, as noted above and illustrated in the following example, or none. Using both full and abbreviated elements in the same path will result in an error.
For example:
THIS:
https://api.enterprise.apigee.com/v1/organizations/ahamilton-eval/environments/prod/apis/helloworld/revisions/1/deployments
CAN BE MUCH SHORTER:
https://api.enterprise.apigee.com/v1/o/ahamilton-eval/e/prod/apis/helloworld/r/1/deployments
Execute curl commands
Use an HTTP client to make requests to the API. Many examples in the documentation
provide sample API requests using curl, a widely-used HTTP client. If you need to
install curl, you can download it from
http://curl.haxx.se.
Calls to the API support gzip compression on
responses. If you set 'Accept-Encoding: gzip, deflate' in your API calls, any
response greater than 1024 bytes gets returned in gzip format.
Formatting XML and JSON requests and responses
The Edge API returns data as JSON by default. For many requests, you can get the response
sent back as XML instead. To do this, set the Accept request header to
application/xml, as the following example shows:
curl -H "Authorization: Bearer `get_token`" \
  -H "Accept: application/xml" \
  https://api.enterprise.apigee.com/v1/organizations/ahamilton-eval/apis/helloworld/revisions/1/policies/ \
  | xmllint --format -
The response should look like the following:
<List>
  <Item>SOAP-Message-Validation-1</Item>
  <Item>Spike-Arrest-1</Item>
  <Item>XML-to-JSON-1</Item>
</List>
Note that this example uses prettyprint to display the results by piping the response through
xmllint.
The acurl utility does not support the Accept header. As a result, you can
only get JSON-formatted responses with acurl.
To use prettyprint for a JSON response, you can use the json.tool Python library:
curl https://api.enterprise.apigee.com/v1/organizations/ahamilton-eval/apis/helloworld/revisions/1/policies/ \
  -H "Accept: application/json" \
  -H "Authorization: Bearer `get_token`" \
  | python -m json.tool
The following provides an example of the response:
[
  "SOAP-Message-Validation-1",
  "Spike-Arrest-1",
  "XML-to-JSON-1"
]
For XML, you can use xmllint:
curl https://ahamilton-eval-test.apigee.net/getstarted -u email_address | xmllint --format -
When POSTing or PUTting payloads in XML, use the Content-type HTTP header:
acurl -H "Content-type:text/xml" -X POST -d \
'<XMLPayload>
 </XMLPayload> ' \
https://api.enterprise.apigee.com/v1/organizations/apifactory/apis -u email_address
Deployment environments
Every organization using Apigee Edge by default has at least two environments they can use to develop, test, and deploy APIs: "test" and "prod". Use the "test" environment to develop and test your APIs before making them publicly available. Only your internal developers can access APIs deployed to the test environment. Deploy your APIs to the "prod" environment to make them publicly available to app developers.
Debugging and testing
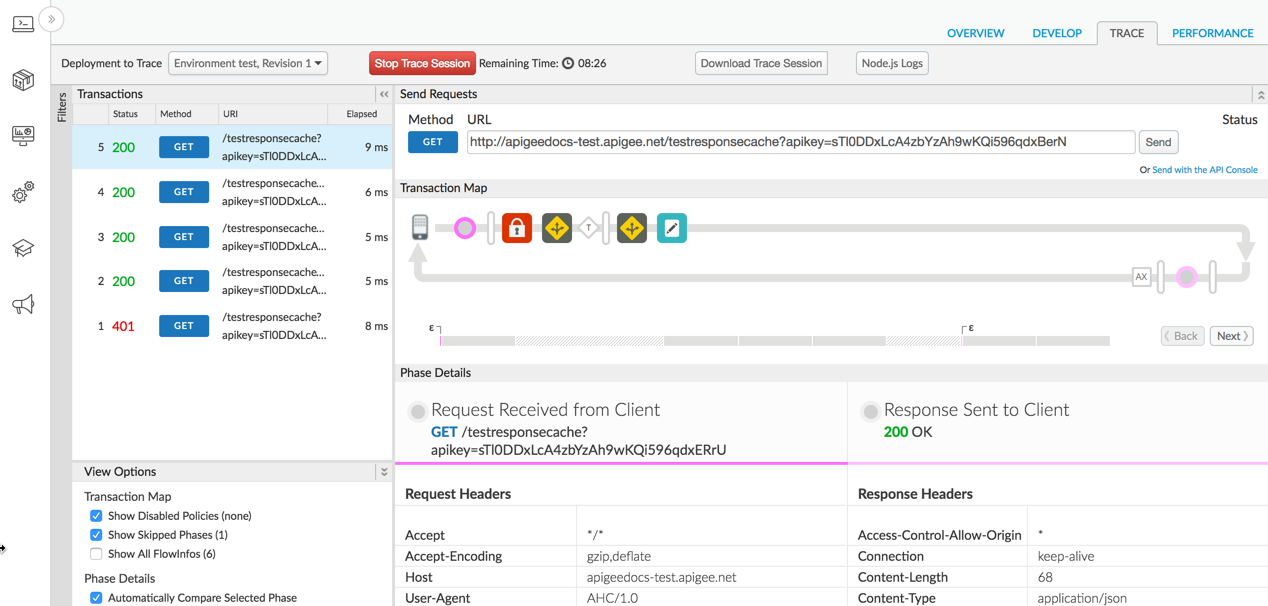
Apigee provides a trace tool that lets you debug end-to-end request and response flows. The trace results display request and response headers and payloads, policy execution, variable values, and any errors that may have occurred during the flow.
Key data points for use in troubleshooting:
- Timestamps: Use timestamps to see how long each step takes to execute. Comparing timestamps helps you isolate the policies that are taking the longest to execute that are slowing down your API calls.
- Base path: By verifying the base path, you can ensure that a policy is routing the message to correct server.
- Results of policy execution: These results let you see if the message is being altered as expected, such as if the message is being transformed from XML to JSON, or if the message is being cached.
The following figure shows trace results:

Each Trace session is broken down into the following major steps:
- Original request received from client: Displays the verb and URI path of the request from the client app, headers, body data, and query parameters.
- Request sent to your backend service: Displays the request message sent to the backend service by the API proxy.
- Response returned by the backend service: Displays the response headers and payload returned by the backend service.
- Final response sent to client: The response message returned to the requesting client app once the response flow has executed.
