
You're viewing Apigee Edge documentation.
Go to the
Apigee X documentation. info
Now that you've changed your target endpoint, you're ready to add a policy to your proxy.
A policy is an Edge component that you can attach to different points in the message flow through your API proxies. Policies can transform message formats, enforce access control, call remote services, authorize users, examine message content for potential threats, and do much more.
In this tutorial, you're going to add the XMLtoJSON policy to your proxy. This policy
converts the payload of an XML message to JSON. It also changes the response's
Content-Type header.
To add the XML to JSON policy to your proxy:
- Open the Edge UI in a browser and log in.
- Click API Proxies in the main window and select a proxy. For this example, select the proxy that you created in Step 1: Create an API proxy.
Click the Develop tab:

Edge displays the API Proxy Editor.
In the Navigator pane, click Proxy Endpoints > default > PreFlow:

Edge displays the Flow editor:
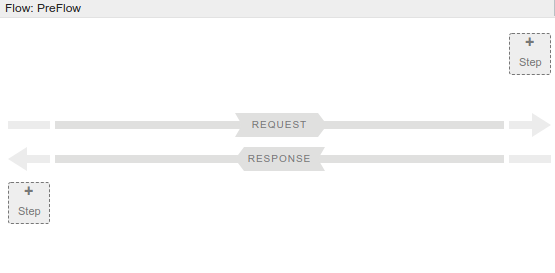
In addition, Edge displays the default Proxy Endpoint configuration in the Code pane:
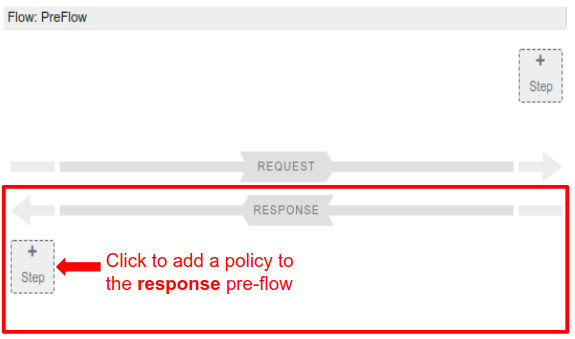
<?xml version="1.0" encoding="UTF-8" standalone="yes"?> <ProxyEndpoint name="default"> <Description/> <FaultRules/> <PreFlow name="PreFlow"> <Request/> <Response/> </PreFlow> <PostFlow name="PostFlow"> <Request/> <Response/> </PostFlow> <Flows/> <HTTPProxyConnection> <BasePath>/getstarted</BasePath> <Properties/> <VirtualHost>default</VirtualHost> <VirtualHost>secure</VirtualHost> </HTTPProxyConnection> <RouteRule name="default"> <TargetEndpoint>default</TargetEndpoint> </RouteRule> </ProxyEndpoint>- To add a policy to your proxy, click the + Step button in
the response PreFlow (the bottom half of the Flow editor):
Edge displays a categorized list of policies in the Add dialog box that you can add to your flow:
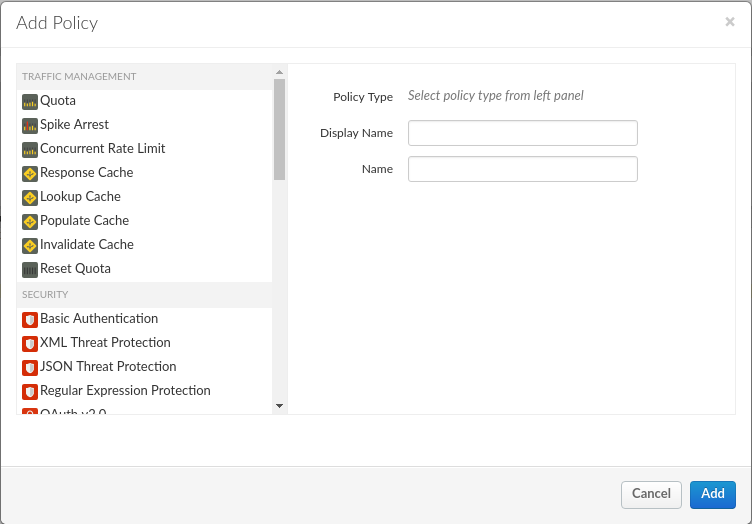
- Scroll down and select the XML to JSON policy in the Mediation category.
Leave the default names, and click Add.
Edge attaches the new policy to the PreFlow of the response:
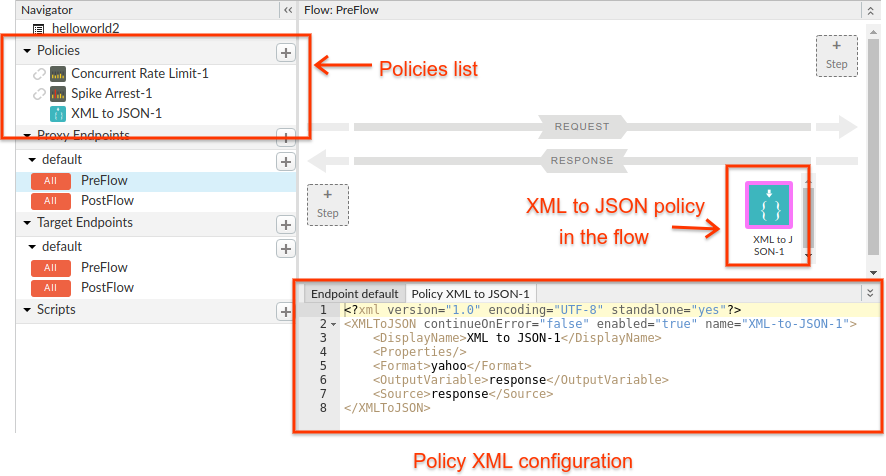
Note that when you click Add, Edge does the following:
- Adds the new policy under Policies in the Navigator pane.
- Adds the XML to JSON policy in the Flow pane.
- Displays the policy's configuration XML in the Code pane.
- Click Save to save the current revision with your changes.
Now try it out! In a terminal window, execute the following curl command:
curl https://org_name-test.apigee.net/getstarted
Where:
- org_name is the organization name that Apigee assigned to you when you created your Apigee account.
-testis the environment. You deployed your new proxy to the "test" environment in Step 1: Create an API proxy./getstartedis the Proxy Base Path.
Alternatively, you can open the same URL in a browser.
You should receive the following response:
{
  "root": {
    "city": "San Jose",
    "firstName": "John",
    "lastName": "Doe",
    "state": "CA"
  }
}If the body of the response doesn't look like this, check that:
- Your target endpoint is "https://mocktarget.apigee.net/xml", as described in
Step 3: Change your target endpoint:
- If you get "Hello, Guest!" as a response, then you need to append "/xml" to the end of the target endpoint.
- If you get a 404, then check that you are accessing "apigee.net" and not "apigee.com".
- The latest revision of your proxy is deployed. Try re-deploying your API proxy as described in Deploying and undeploying an API proxy.
To see the HTTP request and response headers, enable verbosity in curl with the
-vs option (v makes the response verbose, but s suppresses
some of the less interesting details). For example:
curl -vs https://ahamilton-eval-test.apigee.net/getstarted | python -m json.tool
You should get a response that looks like the following. Note that the
Content-Type header in the response is "application/json". The XML to JSON policy
changes the header before sending the response back.
*   Trying 10.20.30.40...
* TCP_NODELAY set
* Connected to ahamilton-eval-test.apigee.net (10.20.30.40) port 443 (#0)
...
> GET /getstarted HTTP/1.1
> Host: ahamilton-eval-test.apigee.net
> User-Agent: curl/7.58.0
> Accept: */*
>
< HTTP/1.1 200 OK
< Date: Fri, 25 May 2018 16:20:00 GMT
< Content-Type: application/json;charset=UTF-8
< Content-Length: 77
< Connection: keep-alive
< X-Powered-By: Apigee
< Access-Control-Allow-Origin: *
...
{ [77 bytes data]
{
  "root": {
    "city": "San Jose",
    "firstName": "John",
    "lastName": "Doe",
    "state": "CA"
  }
}