You're viewing Apigee Edge documentation.
Go to the
Apigee X documentation. info
Now that you've tested your new proxy, you're almost ready to add a policy to it. Before you do that, though, you should change your proxy's target endpoint to one that returns some data.
Recall that in Step 1: Create an API proxy, you set the target endpoint (in the Existing API field) to "https://mocktarget.apigee.net". Well, that endpoint doesn't return any data, so now you'll change the endpoint to one that returns some XML.
To change your proxy's target endpoint:
- Sign in to the Edge UI.
- Select Develop > API Proxies.
- Select your getstarted proxy from the list to display the API proxy details. If you don't see your proxy in the list, be sure that you selected the right organization, as described in Switching between organizations.
Click the Develop tab:

This takes you to the API Proxy Editor. The Proxy Editor lets you see the structure of your API proxy and configure its flow. (Don't panic. Other tutorials will cover the concept of flows.)
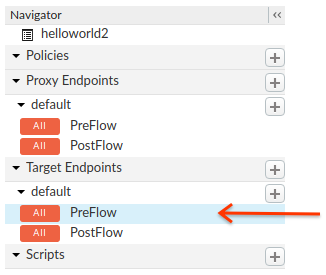
- In the Navigator pane, select Target Endpoints >
default:

Edge displays the endpoint settings in the Code pane:
<TargetEndpoint name="default">
  <Description/>
  <FaultRules/>
  <PreFlow name="PreFlow">
    <Request/>
    <Response/>
  </PreFlow>
  <PostFlow name="PostFlow">
    <Request/>
    <Response/>
  </PostFlow>
  <Flows/>
  <HTTPTargetConnection>
    <Properties/>
    <URL>https://mocktarget.apigee.net</URL>
  </HTTPTargetConnection>
</TargetEndpoint>
The target endpoint is defined by the
<HTTPTargetConnection>element. Change the URL to "https://mocktarget.apigee.net/xml". (Append "/xml" to the existing URL.)
The new URL returns a small block of XML in the body of the response.
Your endpoint configuration should now look like the following:
...
<HTTPTargetConnection>
  <Properties/>
  <URL>https://mocktarget.apigee.net/xml</URL>
</HTTPTargetConnection>
...
To save your changes to the proxy configuration, click the Save button.
Edge saves your changes and automatically deploys them.
If there is an error, Edge will save your changes but not deploy the proxy. In this case:
- Fix your proxy configuration. Edge may provide syntax guidance as a pop-up.
- Manually deploy your changes to the
testenvironment by clicking Deployment > test if Edge does not automatically deploy it.
You can check if your proxy was deployed successfully by selecting the Deployment drop-down above the Flow editor. A green button indicates that the proxy was deployed to that environment successfully:

Test your changes by sending a request to your proxy, just like you did in Step 2: Test your new proxy. For example:
curl https://org_name-test.apigee.net/getstarted
This time, the mocktarget endpoint returns XML in the body of the response:
<?xml version="1.0" encoding="UTF-8"?>
<root>
  <city>San Jose</city>
  <firstName>John</firstName>
  <lastName>Doe</lastName>
  <state>CA</state>
</root>
