
You're viewing Apigee Edge documentation.
Go to the
Apigee X documentation. info
Enroll in the beta release of the developer teams feature
To manage developer teams, you must enroll in the beta release of the developer team feature. From the landing page of your portal, in the beta enrollment banner click Enroll.
Understand teams
Teams allow developers (portal users) to share responsibility for an app with other developers. Apps that are owned by a team are accessible to all members of the team based on their developer team role.

As shown in the figure, Developer A is able to access the developer apps that they have created. In addition, as a member of Team A, Developer A shares responsibility for the apps owned by the team. As an Owner, Developer A has full read and write privileges for developer team members, developer team details, and apps.
How do I create a team?
As an API provider, you do not create a team. Portal users create and manage teams on your portal, as described in Share responsibility for an app using developer teams (beta).
You can view team details and membership, assign a team to an audience, and approve or revoke team access to an app, as described in the following sections.
Explore the Teams page
The Teams page lists the developer teams created by portal users for a developer program.
To access the developer Teams page:
- Select Publish > Portals in the side navigation bar to display the list of portals.
- Click the row of the portal for which you want to view teams.
- Click Accounts on the portal landing page. Alternatively, you can select Accounts in the drop-down menu in the top navigation bar.
- Click the Teams tab.
The Teams page lists the following details for each team:
- Team name
- Team description
- When the team was created
- List of team members
- Apps to which the team is assigned
- Audiences to which the team is assigned
View developer team details
To view developer team details:
- Access the Teams page.
- Click the team for which you want to view details.
The Teams page is displayed.
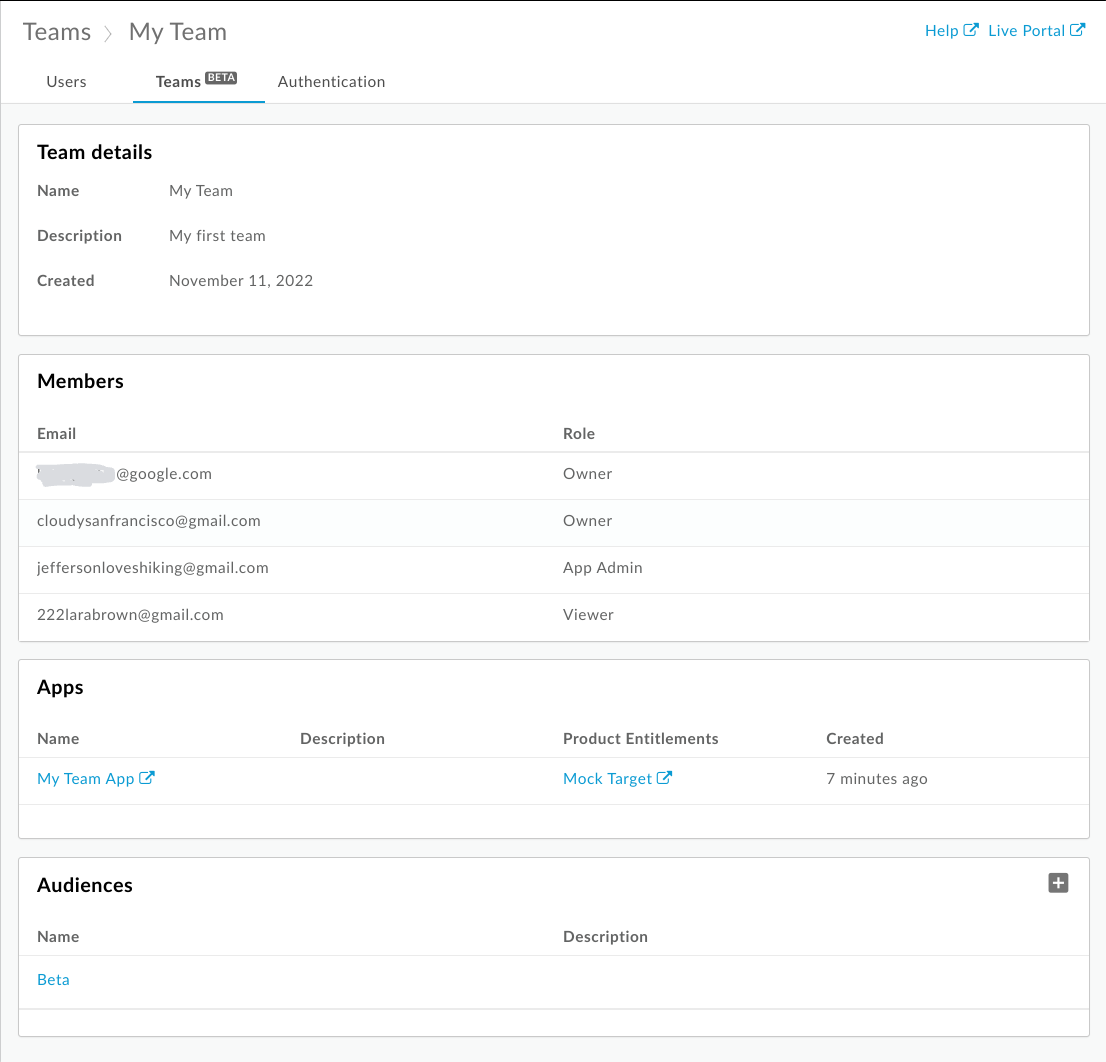
As shown in the previous figure, the Teams page lists the following details for the team:
- Team details including name, description, and date created
- Members, including their email and role
- Apps assigned to the team, including name, description, product entitlements, and date created
- Audiences to which the team is assigned
Assign a team to an audience
After a portal user creates a team on your portal, you may want to assign the team to an audience to enable access to a set of specific resources. For example, you may want to allow access by the team to a set of beta features.
To assign a team to an audience:
- Access the Teams page.
- Click the team for which you want to view details.
To assign the team to an audience:
- Click + Audience.
- Select one or more audiences in the Add audiences dialog. Enter a string in the Search box to filter the list. Click All to select all items on the list or None to deselect all items.
- Click Add.
To remove a team from an audience, click Remove.
Approve or revoke team access to an app
To approve or revoke an app:
- Access the Teams page.
- Click the app name that you want to view and edit.
- Click Edit.
- Select Approved or Revoked in the App Status field to approve or revoke the app, respectively.
- Click Save.
See also: Approving or revoking an app