
You're viewing Apigee Edge documentation.
Go to the
Apigee X documentation. info
Create and manage your portals, as described in the following sections.
About the portal roles
You need one of the following roles to manage your portals. To assign roles to a user, see Assigning roles.
| Role | Description |
|---|---|
| Portal Administrator | Full CRUD access to the portals in your organization. Before you can assign this role, you need to create a custom role named portaladmin. To create the portaladmin role:
|
| Organization Administrator | Super user. Has full CRUD access to resources in the organization. This is a built-in-role. |
| Read-only Organization Administrator | Has read-only access to resources in the organization. This is a built-in-role. |
Explore the Portals page
To access the Portals page, use one of the following methods:
- Select Publish > Portals in the side navigation bar.
- When editing a portal, click Portals in the top navigation bar.
The portals page opens and lists the current portals.
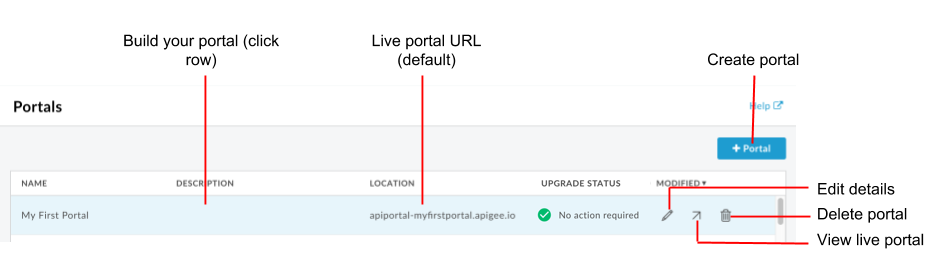
As highlighted in the previous figure, the Portals page enables you to:
- Quickly determine which portals are using the new portal front-end
- Create a portal
- Build your portal and its contents
- View the live portal
- Edit portal details
- Delete a portal
Create a portal
Create multiple portals for your organization, as required.
When you create a new portal, a set of starter pages is provided for you to use as a jump-off point. See About the sample portal and Quick tips for customizing the sample portal.
To create a new portal:
- Access the Portals page.
- Click + Portal.
Enter the following information in the Create a Portal dialog:
Field Description Name Name of portal. The name can contain only letters, numbers, spaces, and the following special characters: period (.), comma (,), dash (-), or underscore (_). Must be unique across all organizations.
Note: If you delete a portal, you cannot immediately create a portal with the same name as the deleted portal will be stored temporarily in the Trash folder.Domain (Read only) As you enter the portal name, the default domain for the portal is displayed. For example: 'orgname-portalname.apigee.io', where 'orgname' is the organization name and 'portalname' is defined using the portal name converted to all lowercase and with spaces removed.
Note: You can customize the domain name, as described in Customize your domain.Description Description of your portal. This information is for internal use only. It will not be displayed on your live portal. Click Create.
Build your portal
To build your portal and its contents:
- Access the Portals page.
- Click the name of the portal you want to build. The portal landing page is displayed.
- Build the portal and its contents, as described in steps to build your portal.
Edit portal name and description
To edit portal details, including name and description:
- Access the Portals page.
- Position your cursor over an existing portal to display the actions menu.
- Click
 .
. - Edit the portal name and description.
- Click Update.
View the live portal
To view the live portal:
- Access the Portals page.
- Position your cursor over an existing portal to display the actions menu.
- Click
 .
.
The live portal opens in a new browser tab.
Delete a portal
There are times when you may need to delete a portal. For example, if you have created a test portal to try out features in your local environment, you may wish to delete it after the testing phase is complete.
To delete a portal:
- Access the Portals page.
- Position your cursor over an existing portal to display the actions menu.
- Click
 .
. - To confirm the delete operation:
a. Type DELETE in the text field.
b. Click Delete.