
You're viewing Apigee Edge documentation.
Go to the
Apigee X documentation. info
Publish APIs to your portal to make them available for consumption by app developers, as described in the following sections.
Overview of API publishing
The process of publishing APIs to your portal is a two-step process:
- Select the API product that you want to publish to your portal.
- Auto-generate API reference documentation from a snapshot of your OpenAPI Specification to enable app developers to learn about your APIs. (For more information about snapshots, see What is a snapshot of an OpenAPI Specification?
When you publish an API to your portal, the following updates are made to your portal automatically:
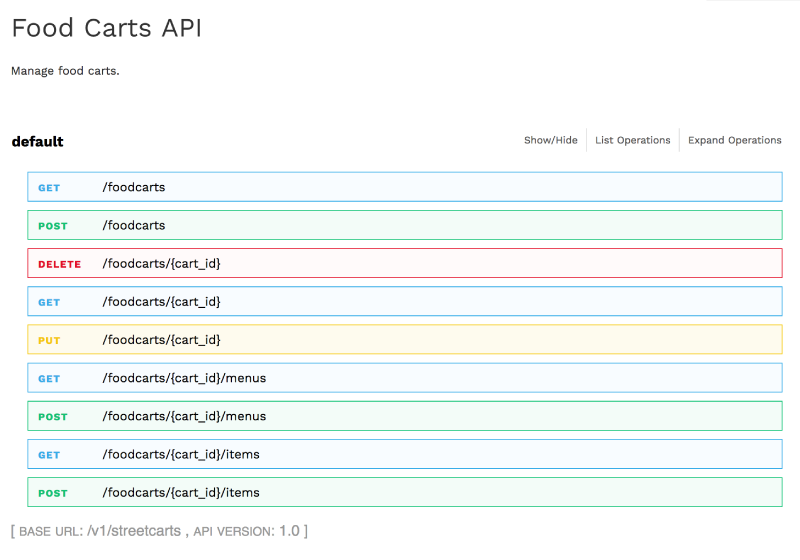
An API Reference page is added to your portal
The API Reference page displays the API reference documentation that you auto-generate from a snapshot of your OpenAPI Specification. Developers can review your API documentation and click Try It to make an API request and view the output.Note: You cannot edit the contents of this page directly; it does not appear in the list of pages in your portal.
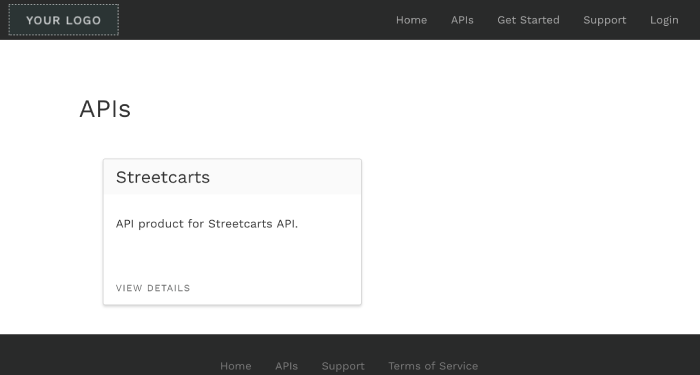
A link to the API Reference page is added to the APIs page
The APIs page (included with the sample portal) provides a list of all APIs published to your portal with links to the respective API reference documentation for more information.Note: You cannot edit the contents of this page directly; it does not appear in the list of pages in your portal.
What is a snapshot of an OpenAPI Specification?
Each OpenAPI Specification serves as the source of truth throughout the lifecycle of an API. The same specification is used at each phase in the API lifecycle, from development to publishing to monitoring. When you modify a specification, you need to be cognizant of the impact the changes have on your API through other lifecycle phases, as described in What happens if I modify a specification?
When you publish your API, you take a snapshot of the OpenAPI Specification to generate API reference documentation. That snapshot represents a specific version of the specification in the spec store. If you modiffy the OpenAPI Specification using the spec editor, you may decide to take another snapshot of the specification in order to reflect the latest changes in the API reference documentation.
Adding CORS support to your API proxies
Before publishing your APIs, you'll need to add CORS support to your API proxies to support client-side cross-origin requests.
CORS (Cross-origin resource sharing) is a standard mechanism that allows JavaScript XMLHttpRequest (XHR) calls executed in a web page to interact with resources from non-origin domains. CORS is a commonly implemented solution to the same-origin policy that is enforced by all browsers. For example, if you make an XHR call to the Twitter API from JavaScript code executing in your browser, the call will fail. This is because the domain serving the page to your browser is not the same as the domain serving the Twitter API. CORS provides a solution to this problem by allowing servers to "opt-in" if they wish to provide cross-origin resource sharing.
For information about adding CORS support to your API proxies before publishing the APIs, see Adding CORS support to an API proxy.
Note: Most modern browsers enforce CORS. Review the comprehensive list of supported browsers. For an in-depth description of CORS, see the Cross-Origin Resource Sharing W3C Recommendation.
Explore the APIs page
To access the APIs page:
- Select Publish > Portals and select your portal.
- Click APIs on the portal home page.
Alternatively, you can select APIs in the portal drop-down menu in the top navigation bar.
The list of APIs is displayed.
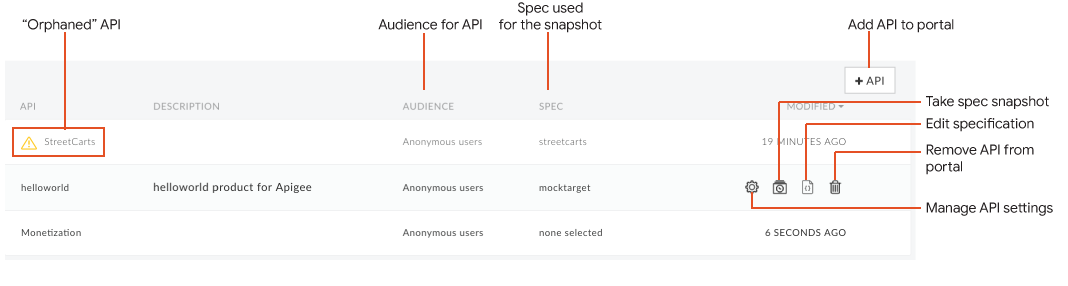
As highlighted in the previous figure, the APIs page enables you to:
- View the details of the APIs available on your portal
- Add an API to your portal
- Take a snapshot of the OpenAPI Specification associated with an API product to update the API reference documentation
- Publish or unpublish an API on your portal
- Manage the audience for an API on your portal
- Edit the associated specification (see Create specifications using the spec editor)
- Remove an API from your portal
- Quickly identify "orphaned" APIs whose associated API product has been removed from Edge, and re-create the API product or delete the API from your portal
Add an API to your portal
Note: You can add a maximum of 100 APIs to your portal.
To add an API to your portal:
- Select Publish > Portals and select your portal.
- Click APIs on the portal home page.
Alternatively, you can select APIs in the portal drop-down menu in the top navigation bar. - Click + API.
The Add API Product to Portal dialog displays. On the API Product tab in the dialog, select the API product that you want to add to your portal.
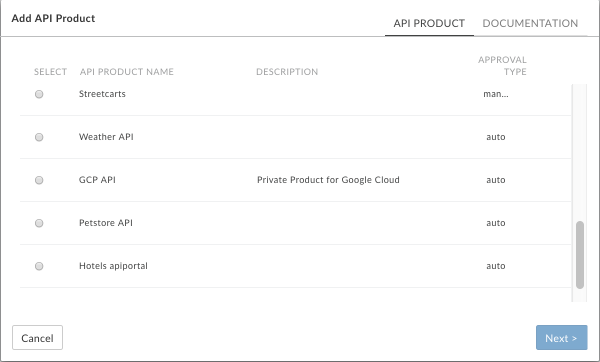
Click Next.
Select the source to use for the snapshot.
If you created the API proxy included in the API product using an OpenAPI Specification, select the spec from the drop-down list.
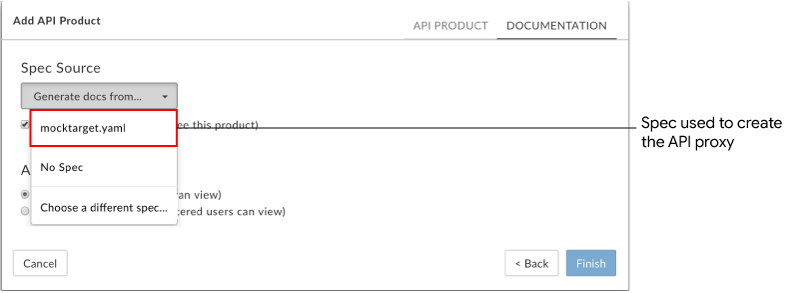
Alternatively, you can select:
- No spec and add one later after the API has been published, as described in Taking a snapshot of the specification.
- Choose a different spec to select or upload a new specification.
Select the Published checkbox to publish the API to your portal. Deselect Published if you are not ready to publish the API.
You can change the setting later, as described in Publishing or unpublishing an API on your portal.Under Audience, select one of the following options to manage the audience for your API by allowing access to:
- Anonymous users to allow all users to view the page.
- Registered users to allow only registered users to view the page.
You can change the setting later, as described in Managing the audience for an API on your portal.
Click Finish.
Take a snapshot of the specification
After you publish your API, at any time you can take a new snapsot of the OpenAPI Specification to update the API reference documentation that is published on your portal.
To take a snapshot of the OpenAPI Specification:
- Select Publish > Portals and select your portal.
- Click APIs on the portal home page.
Alternatively, you can select APIs in the portal drop-down menu in the top navigation bar. - Position the cursor over the API for which you want to take a snapshot to display the actions.
Click
 .
. Note: A message is displayed if your snapshot is current with the source specification selected.
Select an existing specification from the Snapshot Source drop-down or select Choose a different spec to select or upload a new specification to use for generating documentation for the API. Alternatively, you can select No spec to remove the current specification.
Click Update Snapshot (or Remove Snapshot, if you have selected No Spec).
API reference documentation is generated from the specification and added to the API Reference page.
Publish or unpublish an API on your portal
To publish or unpublish an API on your portal:
- Select Publish > Portals and select your portal.
- Click APIs on the portal home page.
Alternatively, you can select APIs in the portal drop-down menu in the top navigation bar. - Position the cursor over the API that you want to publish or unpublish.
- Click
 .
. - Select the Enabled checkbox to publish the API on your portal. Deselect Enabled to unpublish the API.
- Click Save.
Manage the audience for an API on your portal
Manage the audience for your API on your portal by allowing access to:
- All users
- Registered users only
To manage the audience for an API on your portal:
- Select Publish > Portals and select your portal.
- Click APIs on the portal home page.
Alternatively, you can select APIs in the portal drop-down menu in the top navigation bar. - Position the cursor over the API for which you want to take a manage the audience to display the actions.
- Click .
- Under Audience, select one of the following options:
- Anonymous users to allow all users to view the API product.
- Registered users to allow only registered users to view the API product.
- Click Save.
Remove an API from your portal
To remove an API from your portal:
- Select Publish > Portals and select your portal.
- Click APIs on the portal home page.
Alternatively, you can select APIs in the portal drop-down menu in the top navigation bar. - Position your cursor over the API in the list to display the actions menu.
- Click
 .
.
Troubleshoot issues with your published APIs
When using Try It, if the TypeError: Failed to fetch error is returned, consider the following possible causes and resolutions:
For mixed content errors, the error may be caused by a known swagger-ui issue. One possible workaround is to make sure that you specify HTTPS before HTTP in the
schemesdefinition in your OpenAPI Specification. For example:schemes: - https - httpFor CORS (Cross-origin resource sharing) restriction errors, ensure that CORS is supported for your API proxies. CORS is a standard mechanism that enables client-side cross-origin requests. See Adding CORS support for an API proxy. Ensure CORS in enabled in your browser, as well.