You're viewing Apigee Edge documentation.
Go to the
Apigee X documentation. info
A theme consists of a global cascading style sheet (CSS) that provides a uniform look and feel for all of the pages in your portal. The goal of a theme is to let you change the look and feel across all of your portal pages at one time.
A majority of the default styles provided with the sample portal are based on Bootstrap. You can customize, preview, and publish your theme, as described in the following sections.
Watch the following video to learn how to customize the portal theme.
Access the theme editor
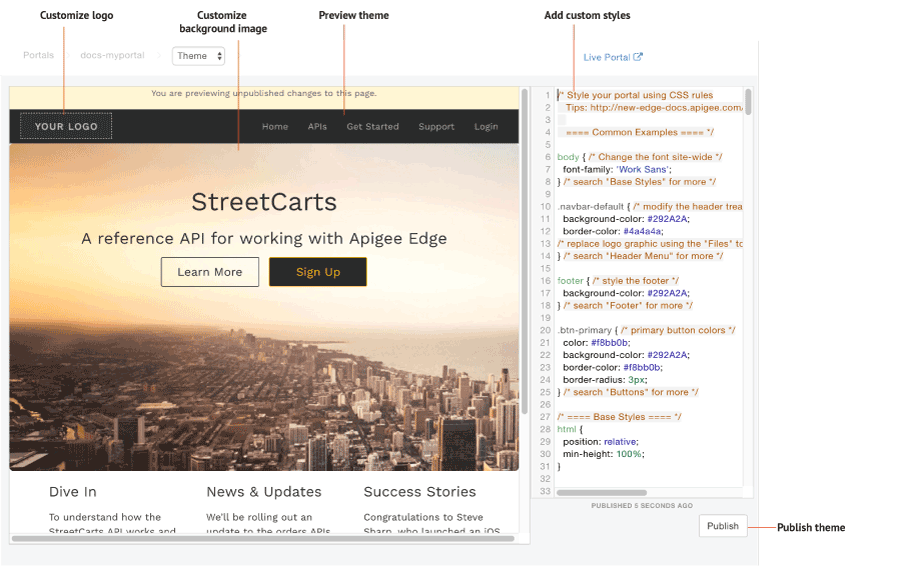
Customize, preview, and publish the theme for your portal in the theme editor. To open the theme editor, select Theme in the drop-down menu in the top navigation bar.

As highlighted in the previous figure, the theme editor enables you to:
- Add custom styles to customize your theme using the style editor pane
- Preview your theme in the preview area by clicking reload the preview
- Customize your logo
- Customize the background image
- Publish your theme to your live portal
Add custom styles
Customize your theme by adding your own CSS code in the style editor pane. All CSS style elements are supported.
To customize your theme:
- Select Theme in the drop-down menu in the top navigation bar.
- Add your custom CSS code in the style editor pane on the right side of the page.
- Preview your changes in the preview pane by clicking reload the preview.
> Note: You can click through your portal navigation to preview content on all pages. - Click Publish to publish your theme changes.
- Click Publish to confirm the update.
Customize your logo
Customize the "Your Logo" image with your company's logo, replace the following image files in the file manager by uploading your logo using the same names and relative file sizes:
logo.png(140 pixels by 40 pixels)mobile-logo.png(140 pixels by 40 pixels)
In addition, modify the following content in the CSS style sheet, as required:
/* ==== Header Menu ==== */
...
body .navbar-brand {
  padding: 5px 15px;
}

.navbar-brand img {
  max-height: 50px;
  margin: 0;
  padding: 0;
}
For more information, see Manage your assets.
Customize the background image on the home page
Customize the background image on the home page by modifying the following content in the CSS style sheet.
Modify the background image file and its placement.
You can upload your own version of theportal-hero.jpgimage to the file manager using the same name and relative file size (1440 pixels x 540 pixels). If you want to use a different filename, be sure and edit thebackground-imagevalue in the CSS below./* ==== Jumbotron ==== a billboard for drawing attention, from Bootstrap */ home-page-jumbotron-bg { background-image: url('/files/portal-hero.jpg'); }Modify the format of the text that overlays the background image.
.jumbotron {
 text-align: center;
 height: 500px;
 background-size: cover;
 margin: -50px -30px 0 -30px;
 border-radius: 0;
}

.jumbotron h1 {
 font-size: 40px;
 font-weight: 400;
}

.jumbotron h2 {
 font-size: 25px;
 font-weight: 400;
}

.jumbotron a, .jumbotron a:hover {
 font-size: 18px;
}

.jumbotron p {
 max-width: none;
}
Understand CSS specificity rules
CSS specificity describes the method used by a browser to determine precedence for CSS style element declarations when conflicts arise. CSS specificity is calculated by applying a weight to a specific CSS style element declaration based on its selector type. The more specific the CSS selector, the higher the weight. An ID attribute, for example, will be given a higher weight in the calculation than a type selector.
For example, if you define the following style elements in your CSS code, the paragraph element will be colored red because the p style element declaration within a div element is more specific than the p style element declaration.
div p { color: red }  ← More specific
p { color: blue }
Similarly, if you define the following style element declarations in your CSS code, then any text enclosed in <div class="test"></div> tags will be colored blue because the id attribute style declaration within a div element is more specific than the div style element declaration.
div#test { background-color: blue; }  ← More specific
div { background-color: red; }
For style element declarations with the same specificity, the last style element declaration defined will take precedence. For example, given the order of the following style element declarations, the paragraph element will be colored blue.
p { color: red }
p { color: blue }  ← Last specified
Publish your theme
To publish to the live portal the theme and style customizations that you have added:
- Select Theme in the drop-down menu in the top navigation menu.
- Click Publish.
To view your published content in the live portal, click Live Portal in the top navigation bar.
