
You're viewing Apigee Edge documentation.
Go to the
Apigee X documentation. info
Manage the pages in your portal, as described in the following sections.
About the reserved URL paths
The following URL paths are reserved for use by the developer portal and cannot be specified as the page path when creating pages:
aaccounts/createapiscreatedocsloginlogoutmy-appssitesteams
The reserved path /create can be used as the target URL of a MenuItem or be linked to from a Page.
The /create reserved path will redirect to the accounts creation page.
Explore the Pages page
To access the Pages page:
- Select Publish > Portals in the side navigation bar, select your portal, and click Pages on the landing page.
- When editing a portal, select Pages in the drop-down menu in the top navigation bar.
The list of pages in your portal is displayed.
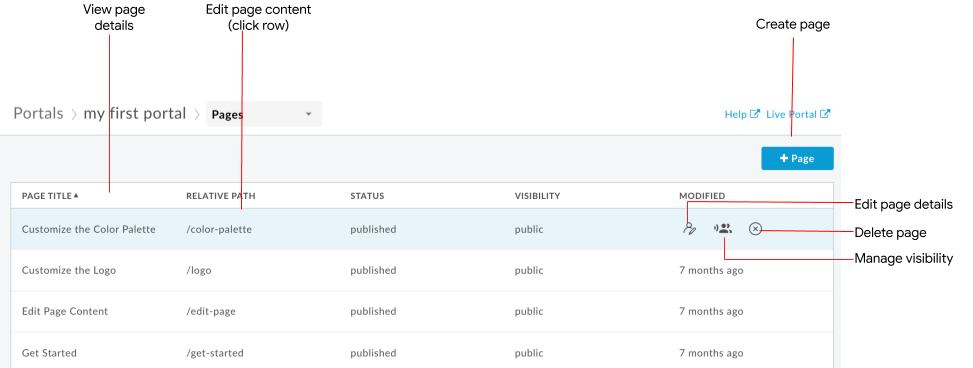
As highlighted in the previous figure, the Pages page enables you to:
- Create a page
- View page details, including name, relative path, status, visibility, and amount of time since the page was last modified
- Edit page content and details
- Manage the visibility of a page in your portal
- Delete pages in your portal
- Sort the list of pages by column (the arrow indicates the active column and direction of the sorted content)
Create a page
To create a new page:
- Access the Pages page.
- Click +Page.
In the Create a Page dialog, enter the following details:
Field Description Required? Name Name of the page. The page name must be unique within the portal. The name is used in the portal page header and browser tab. Yes Path User-friendly relative URL to use for the page. For best practices, see Implement search engine optimization (SEO). Use alphanumeric characters and dashes only. Spaces and special characters are not allowed. Defaults to the page name with spaces converted to dashes.
Note: Avoid specifying a reserved URL path when creating a portal. For a list of reserved URL paths, see About the reserved URL paths.Yes Click Create to create the new page.
Edit the contents of a page
To edit the contents of a page:
- Access the Pages page.
- Click the name of the page that you want to edit.
- Edit the contents of the page. See Develop portal content using the page editor.
Changes that you make to the page are saved automatically.
Edit the page details
To edit the details for a page, including the name, description, and relative path:
- Access the Pages page.
- Position the cursor over the page you want to edit and click
 in the actions menu.
 - Edit the page details.
- Click Update.
Manage the visibility of a page in your portal (beta)
To manage the visibility of a page in your portal:
- Access the Pages page.
- Position the cursor over the page for which you want to manage visibility and click
 in the actions menu.
The Visibility dialog opens.
in the actions menu.
The Visibility dialog opens. Select one of the following options:
- Public (visible to anyone) to allow all users to view the page.
- Authenticated users to allow only registered users to view the page.
- Selected audiences to select the specific audiences that you want to be able to view the page. For information about managing the audiences defined for your portal, see Manage the audiences for your portal.
Click Save.
Delete pages from your portal
To delete a page from your portal:
- Access the Pages page.
- Position the cursor over the page you want to edit and click
 in the actions menu.
 - Click Delete to confirm the operation.