
You're viewing Apigee Edge documentation.
Go to the
Apigee X documentation. info
This topic explains how to create API proxies for SOAP-based web services. You can create two kinds of SOAP proxies in Edge. One generates a RESTful interface to the backend SOAP service and the other performs a "pass through" of the SOAP message to the backend. Both techniques are described in this topic.
This video provides an end-to-end demo of turning a SOAP service into a REST service with Apigee Edge using the API proxy wizard. However, if you want more control over the SOAP-to-REST transformation, you can build a proxy using policies. For more information, see Tutorial: Manual construction of a SOAP-to-REST API proxy in Apigee Edge.
Creating a RESTful API proxy to a SOAP-based service
This section explains how to create a RESTful SOAP API proxy with the REST to SOAP to REST option in the Build a Proxy wizard.
Overview
The REST to SOAP to REST option processes the WSDL to generate a RESTful API proxy. Edge determines from the WSDL the service's supported operations, input parameters, and so on. Edge "guesses" which HTTP method to use for each operation. Typically, Edge translates operations into GET requests, which have the advantage of being cacheable. Edge also sets up the backend target endpoint, which can vary per SOAP operation.
For this type of proxy, Edge auto-generates an OpenAPI Specification, which you can use to create API documentation.
Basic steps
Edge
To create a RESTful API proxy to SOAP-based service using the Edge UI:
- Sign in to apigee.com/edge.
- Select Develop > API Proxies in the left navigation bar.
- Click +Proxy.
- Click SOAP service.
- On the Proxy details page, provide the WSDL file.
Field Description Provide WSDL file Select the source of the WSDL.
- From web address (URL) - Enter or paste the URL of the WSDL.
- From my computer - Upload a WSDL file from your local directory. You can upload multiple files if there are dependencies.
- Click Validate to validate the WSDL.
- Enter the following proxy details:
Field Description Name Name displayed for your API. Specify alphanumeric characters, dash (-), or underscore (_). Base path URI fragment that appears after the http(s)://[host] address of your API proxy. Edge uses the base path URI to match and route incoming request messages to the proper API proxy.
NOTE: The API proxy base path defaults to the value specified for the
Namefield converted to all lower case.Following the base path are any additional resource URLs. Here's the full URL structure that clients will use to call your API proxy:
https://[host]/base_path/conditional_flow_pathNOTE: The base path must be unique; you cannot deploy two API proxies with the same base path. If you edit a deployed API proxy and set the base path to the same value as the base path of another API proxy, Edge automatically undeploys the API proxy when you save it. Before you can redeploy the API proxy, you must edit the base path so that it is unique.
Use wildcards in base paths
Use one or more
/*/wildcards in API proxy base paths to future-proof your API proxies. For example, a base path of/team/*/membersallows clients to callhttps://[host]/team/blue/membersandhttps://[host]/team/green/memberswithout you needing to create new API proxies to support new teams. Note that/**/is not supported.Description (Optional) Description of the API. - Click Next.
- On the Common policies page of the wizard, configure the following:
- Security authorization requirements under Security: Authorization. See Adding security.
- Support for Cross-origin resource sharing (CORS) under Security: Browser. See Adding support for CORS.
- Quotas to protect your backend service from high traffic under Quota. See Quotas. (Not available if Pass-through authorization is selected.)
- On the WSDL operations page, select the API proxy type REST to SOAP to
REST.
A table appears listing the operations that Edge "discovered" in the WSDL file. You can select and configure which operations you wish to incorporate into your API proxy. The table is shown in the following figure.
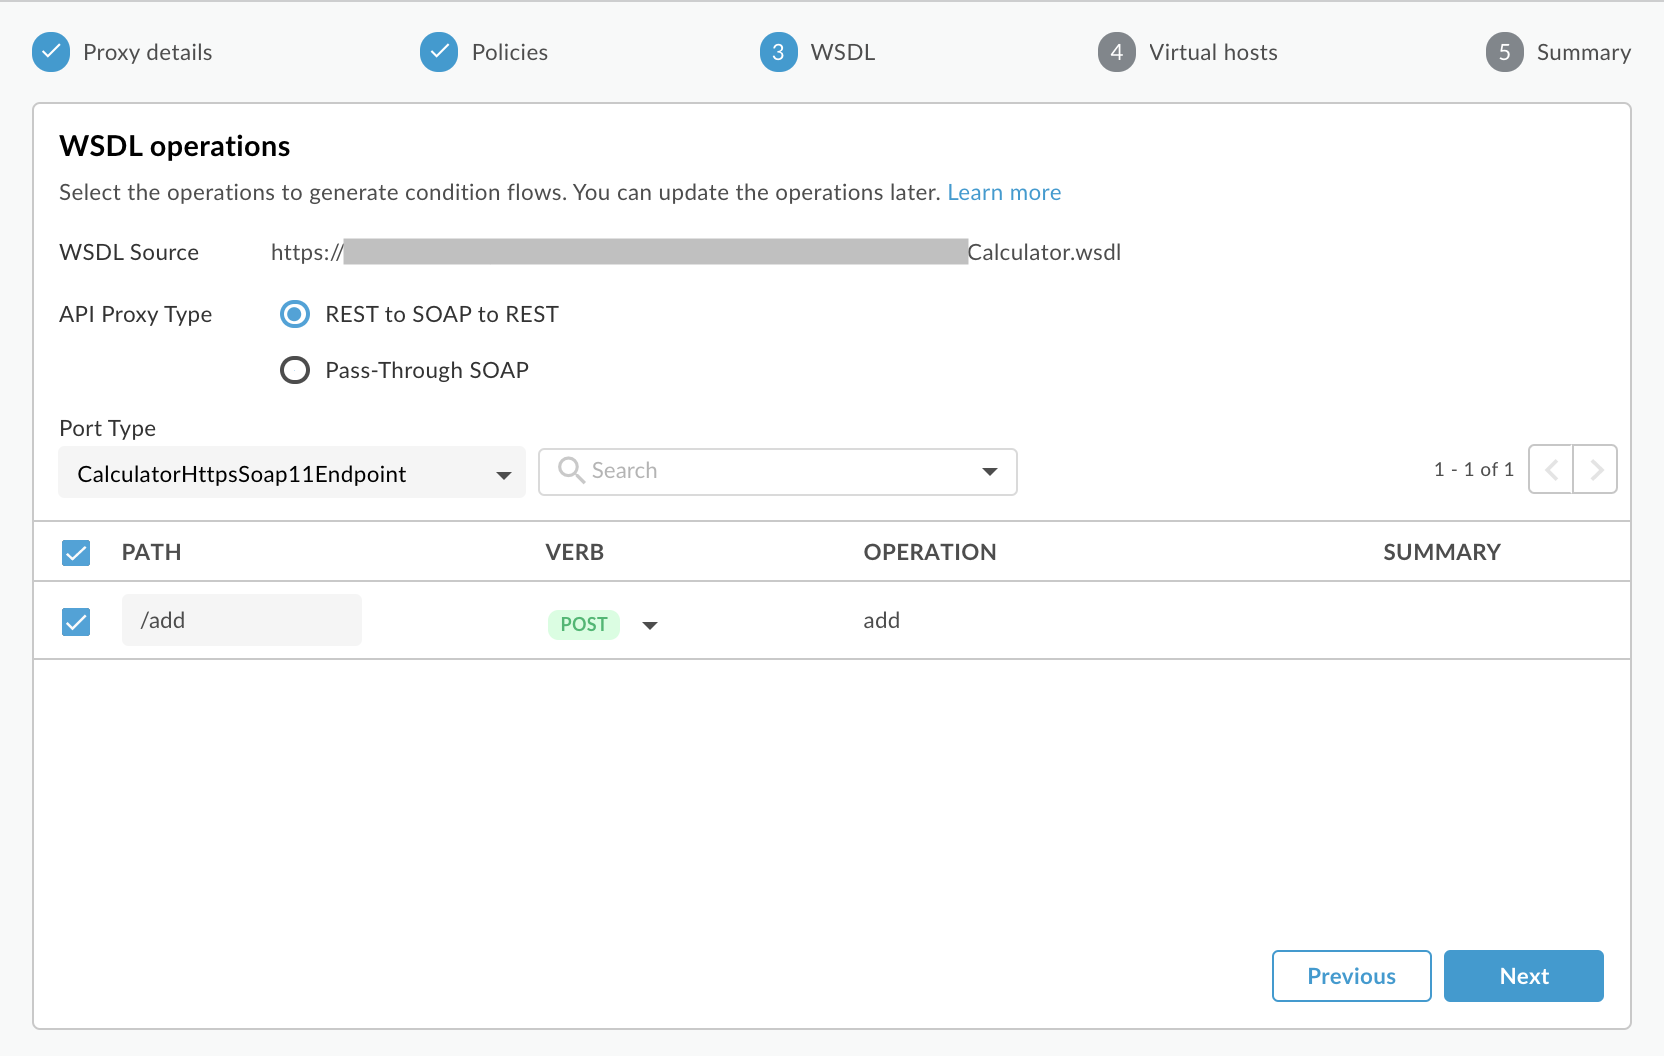
- Select a Port Type from the drop-down to specify which set of operations you wish to use. In WSDL, port type elements define the operations that you can call on a web service.
- Optionally change the REST API Path for an operation. The path will be used as the resource name in the API proxy URL.
- Optionally change the Verb (HTTP method) associated with the operation.
- Click Next.
- On the Virtual hosts page of the wizard, select the virtual hosts the API proxy will bind to when deployed. For more information, see About virtual hosts.
- Click Next.
- Select the deployment environment(s) and click Create and deploy
Your new API proxy is created and deployed to the selected environment. - Click Edit proxy to display the details page for the API proxy.
Classic Edge (Private Cloud)
To create a RESTful API proxy to SOAP-based service using the Classic Edge UI:
- Sign in to
http://ms-ip:9000, where ms-ip is the IP address or DNS name of the Management Server node. - Select APIs > API Proxies in the top navigation bar.
- Click + API Proxy.
- In the Build a Proxy wizard, select SOAP service.
- Click Next.
- In the Details page, make these selections. You must click Validate after
selecting a WSDL.
In this field do this WSDL Select the source of the WSDL.
- URL - Enter the URL of the WSDL you wish to use.
- File - Choose a WSDL file on your file system. In cases where there are additional dependent files, you can select all of them.
- Example URL - Select from a list of WSDLs for publicly available web services. These are handy for trying out the SOAP/API proxy features of Edge.
Proxy Name This is name for the proxy you're creating.
Proxy Base Path URI fragment that appears after the http(s)://[host] address of your API proxy. Edge uses the base path URI to match and route incoming request messages to the proper API proxy.
Note: The API proxy base path defaults to the value specified for the
Namefield converted to all lower case.Following the base path are any additional resource URLs. Here's the full URL structure that clients will use to call your API proxy:
https://[host]/base_path/conditional_flow_pathNote: The base path must be unique; you cannot deploy two API proxies with the same base path. If you edit a deployed API proxy and set the base path to the same value as the base path of another API proxy, Edge automatically undeploys the API proxy when you save it. Before you can redeploy the API proxy, you must edit the base path so that it is unique.
Use wildcards in base paths
Use one or more
/*/wildcards in API proxy base paths to future-proof your API proxies. For example, a base path of/team/*/membersallows clients to callhttps://[host]/team/blue/membersandhttps://[host]/team/green/memberswithout you needing to create new API proxies to support new teams. Note that/**/is not supported.Description A brief description of the proxy. - Click Next.
- In the WSDL page, select the API proxy type REST to SOAP to
REST.
A table appears listing the operations that Edge "discovered" in the WSDL file. You can select and configure which operations you wish to incorporate into your API proxy. The table is shown in the following figure.
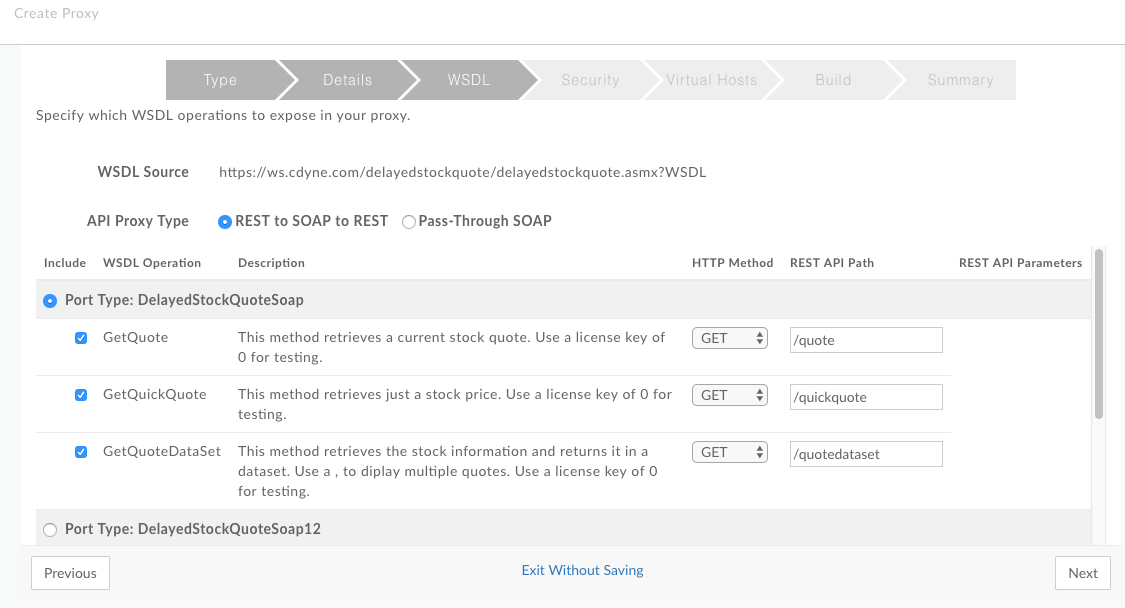
- Select from the Port Type column which set of operations you wish to use. In WSDL, port type elements define the operations that you can call on a web service.
- Optionally change the HTTP Method associated with the operation.
Note: Edge makes a "best guess" in determining the HTTP method to use for each operation. GET is generally preferred because GET requests can be cached.
- Optionally change the REST API path for an operation. The path will be used as the resource name in the API proxy URL.
- Click through the rest of the wizard to add security, select virtual hosts, and deployment environment.
- In the Build page, click Build and Deploy. Edge generates and deploys the new API proxy based on the WSDL.
- Go to the summary page for the new API proxy. Note that a set of resources have been
constructed based on the operations discovered in the WSDL file.
On the proxy's Overview page, the Resources list provides a detailed description of the new API, its operations, and parameters. You can think of this representation as the API's reference documentation. Edge generates this view of the API model automatically for you. Simply expand a resource to see its description and path information.
About the final proxy
When Edge generates an API proxy based on a WSDL, the resulting proxy is actually a complex flow that includes policies for transforming data, extracting and setting variables, manipulating messages, and more. After you generate a proxy based on a WSDL, take a look at the resulting flow in the Develop view of the API management UI. There, you can see exactly which policies have been added.
For example, on the request side, an AssignMessage policy is used to set the target URL. On the response side, policies execute to transform the response from XML to JSON, extract the SOAP body part of the response into a variable, and set the response message. These policies (and others) are added automatically when you create the proxy.
OpenAPI Spec: To view the auto-generated OpenAPI Spec for this proxy,
visit http(s)://[proxy_domain]/[proxy_base_path]/openapi.json. However,
the conversion is not always accurate, since not all the rules of an XML schema can be
represented in an OpenAPI Spec.
Creating a pass-through proxy to a SOAP-based service
This section explains how to create a pass-through proxy with the Pass-Through Proxy option in the Create New Proxy dialog.
Overview
The Pass-Through Proxy option lets you to create a proxy that passes the SOAP message in a request to the backend service "untouched", making it very easy to create a proxy for a SOAP-based web service. Behind the scenes, Edge handles any transformations and other flow activities for you automatically. For example, if the request happens to be in JSON format, Edge takes steps to convert it to a valid XML SOAP message with correct namespaces before POSTing it to the service. Similarly, when the service returns an XML-based SOAP response, Edge translates it back to JSON before returning it to the client. In addition, Edge sets up the backend target endpoint, which can vary per SOAP operation.
For this type of proxy, Edge hosts the WSDL and creates a flow in the proxy to let you
access it. The address to this Edge-hosted WSDL,
http(s)://[proxy_domain]/[proxy_base_path]?wsdl, becomes the new service endpoint
URL for clients calling the SOAP service through the proxy.
Basic steps
Edge
To create a pass-through proxy to a SOAP-based service using the Edge UI:
- Sign in to apigee.com/edge.
- Select Develop > API Proxies in the left navigation bar.
- Click +Proxy.
- Click SOAP service.
- On the Proxy details page, provide the WSDL details.
Field Description WSDL Select the source of the WSDL.
- From web address (URL) - Enter or paste the URL of the WSDL.
- From my computer - Upload a WSDL file from your local directory. You can upload multiple files if there are dependencies.
Name Name of the API proxy.
Base path URI fragment after the http(s)://[host] address of your API proxy. Edge uses the base path URI to match and route incoming request messages to the proper API proxy.
Note: For Apigee's recommendations on API versioning, see Versioning in the Web API Design: The Missing Link e-book.
After the base path are any additional resource URLs. Here's the full URL structure that clients will use to call your API proxy:
https://[host]/base_path/conditional_flow_pathNote: The base path must be unique. If you later edit this proxy and set its base path to be the same as another API proxy, this API proxy is automatically undeployed when you save it. You must edit the base path before you can redeploy it.
Using a wildcard in base paths
You can use one or more
/*/wildcards in API proxy base paths to future-proof your proxies. For example, a base path of/team/*/membersallows clients to callhttps://[host]/team/blue/membersandhttps://[host]/team/green/memberswithout you needing to create new API proxies to support new teams. Note that /**/ is not supported.Note: The API proxy base path defaults to the value specified for the Name field converted to all lower case unless you explicitly edit the content in the Base Path field.
Description (Optional) Description of the API. - Click Next.
- On the Common policies page of the wizard, configure the following:
- Security authorization requirements. See Adding security.
- Support for Cross-origin resource sharing (CORS). See Adding support for CORS.
- Quotas to protect your backend service from high traffic. See Quotas. (Not available if Pass-through authorization is selected.)
- Monetization limit enforcement for monetization-enabled organizations. See Enforce monetization limits on API proxies.
- On the WSDL page, select the API proxy type Pass-Through SOAP.
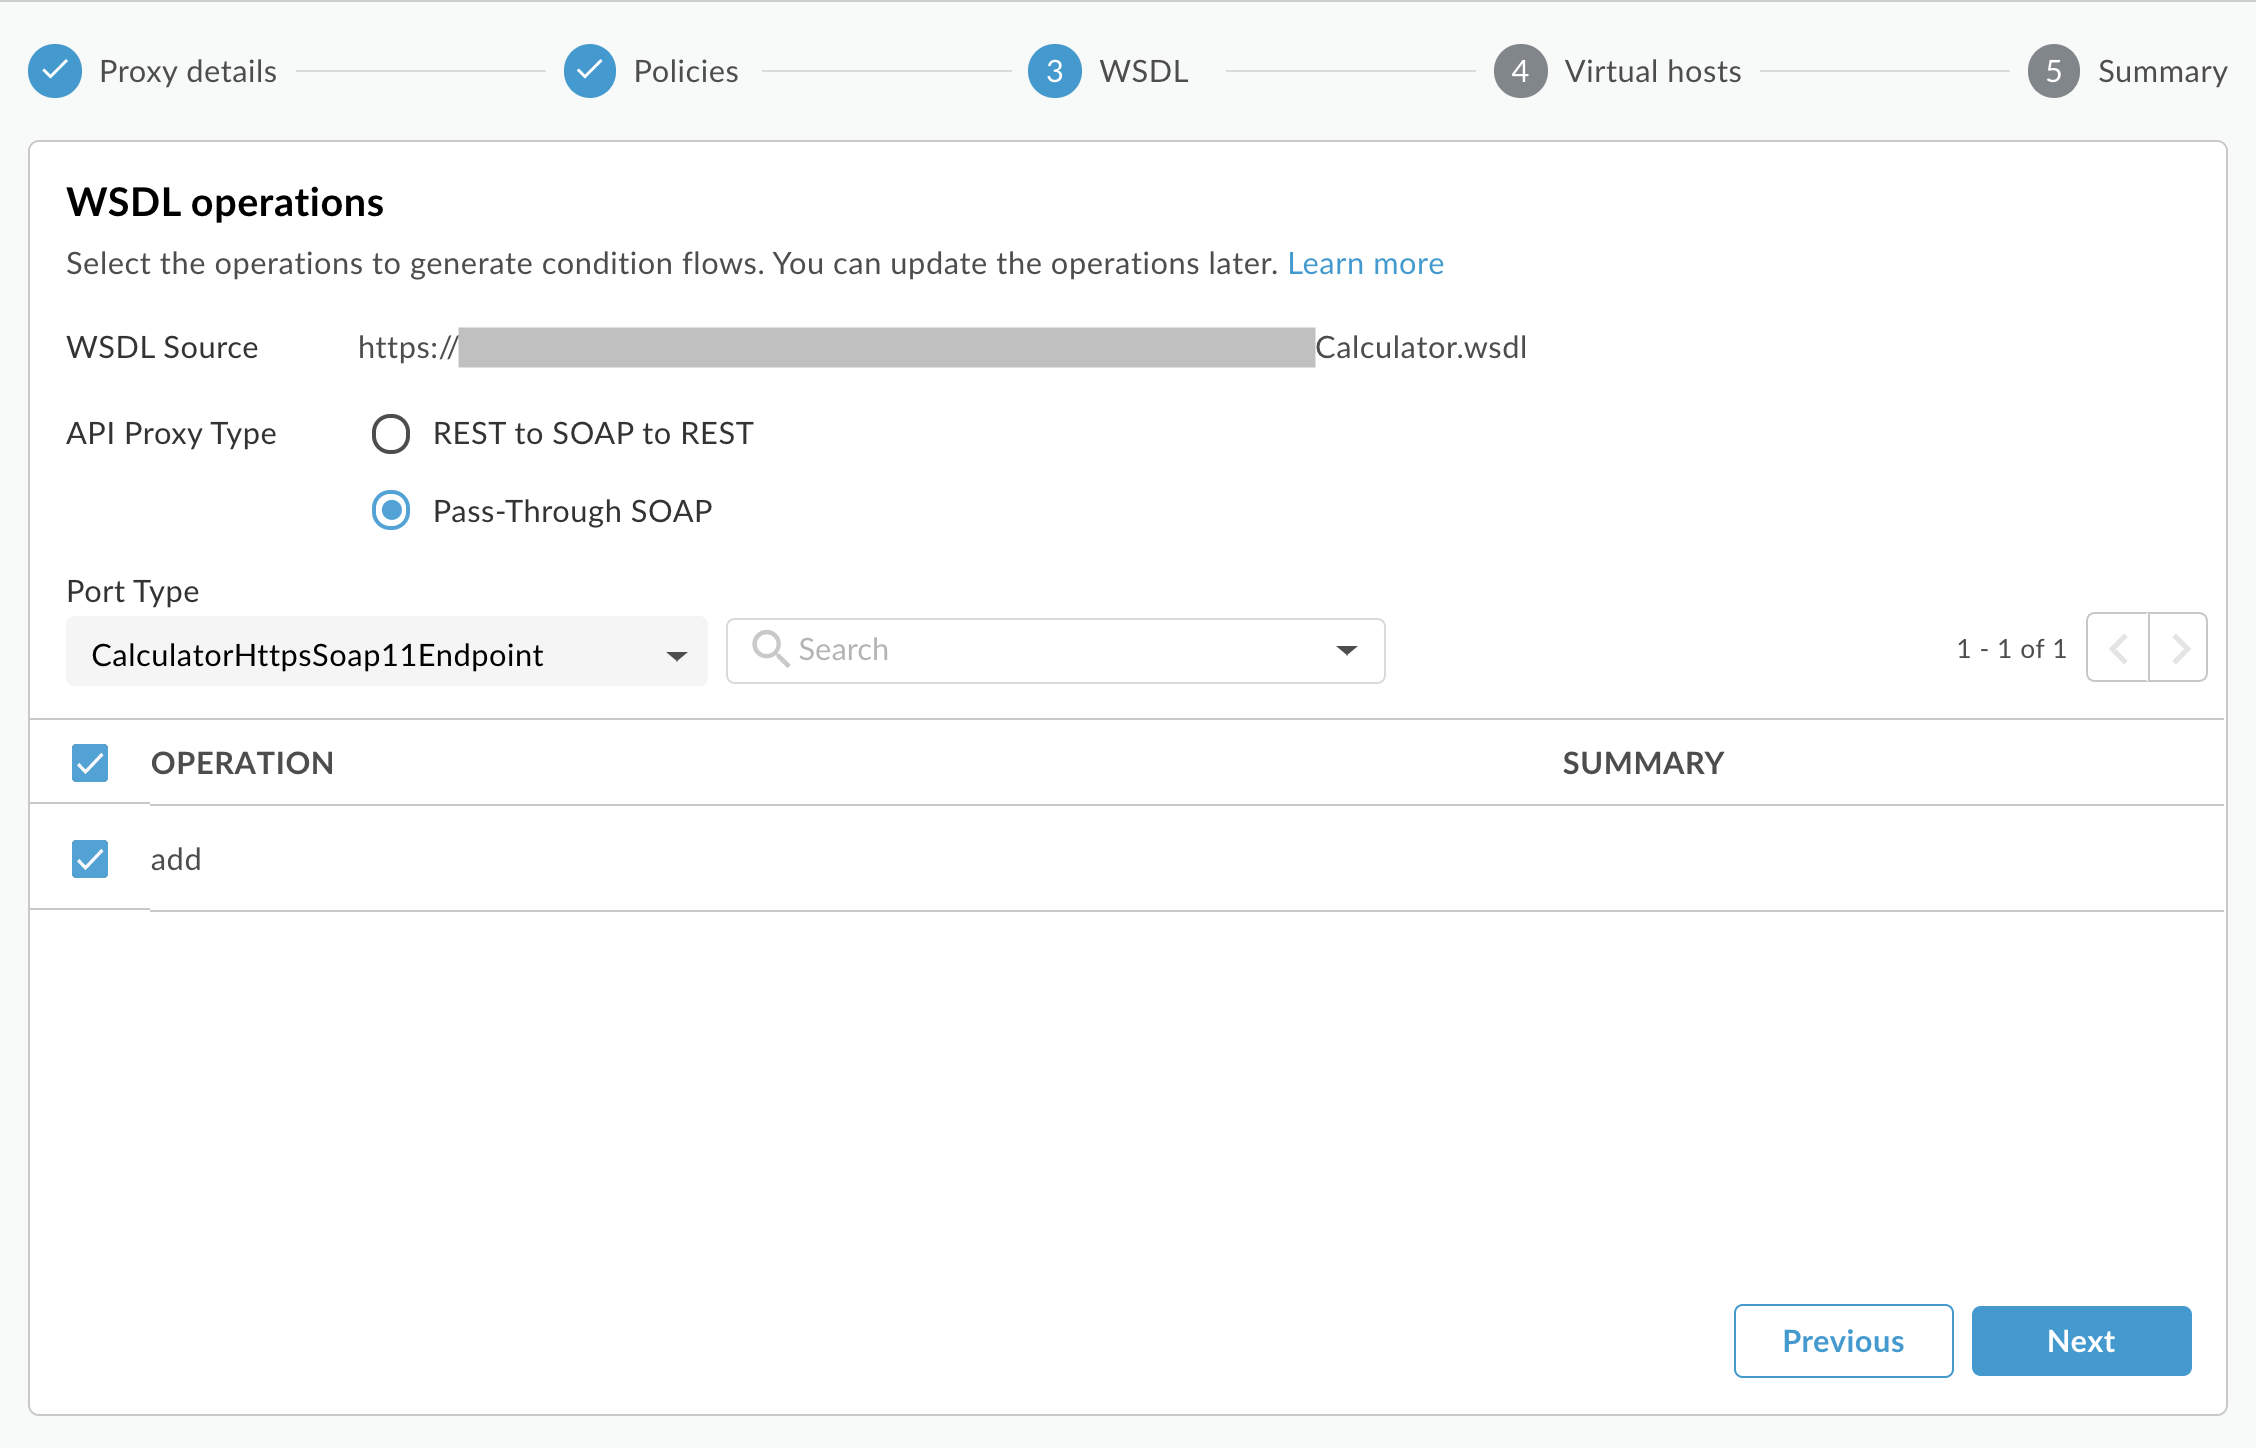
- Select a Port Type from the drop-down to specify which set of operations you wish to use. In WSDL, port type elements define the operations that you can call on a web service.
- Click Next.
- On the Virtual hosts page of the wizard, select the virtual hosts the API proxy will bind to when deployed. For more information, see About virtual hosts.
- Select the deployment environment(s) and click Create and deploy
Your new API proxy is created and deployed in the selected environment. - Click Edit proxy to display the details page for the API proxy.
Classic Edge (Private Cloud)
To create a pass-through proxy to a SOAP-based service using the Classic Edge UI:
- Sign in to
http://ms-ip:9000, where ms-ip is the IP address or DNS name of the Management Server node. - Select APIs > API Proxies in the top navigation bar.
- Click + API Proxy.
- In the Build a Proxy wizard, select SOAP service.
- Click Next.
- In the Details page, make these selections. You must click Validate after
selecting a WSDL.
In this field do this WSDL Select the source of the WSDL.
- URL - Enter the URL of the WSDL you wish to use.
- File - Choose a WSDL file on your file system. In cases where there are additional dependent files, you can select all of them.
- Example URL - Select from a list of WSDLs for publicly available web services. These are handy for trying out the SOAP/API proxy features of Edge.
Proxy Name This is name for the proxy you're creating.
Proxy Base Path The Proxy Base Path is a URI fragment that uniquely identifies the API that is exposed by this API proxy. API Services uses the Base Path URI to match and route incoming request messages to the proper API proxy. (The Base Path is appended to the domain of the API, which is automatically generated based on your organization name and the environment where the API proxy is deployed.) It's a best practice to include a version number in the project name, for example, /v1/delayedstockquote. This will determine how your API is invoked by consumer apps.Note: The Proxy Base Path defaults to the value specified for Proxy Name converted to all lower case unless you explicitly edit the content in the Proxy Base Path field.
Description A brief description of the proxy. - Click Next.
- In the WSDL page, select the API proxy type Pass-Through SOAP.
Note: A table appears listing each WSDL operation and its corresponding SOAP payload. This is the payload that is "passed through" to the backend SOAP service.
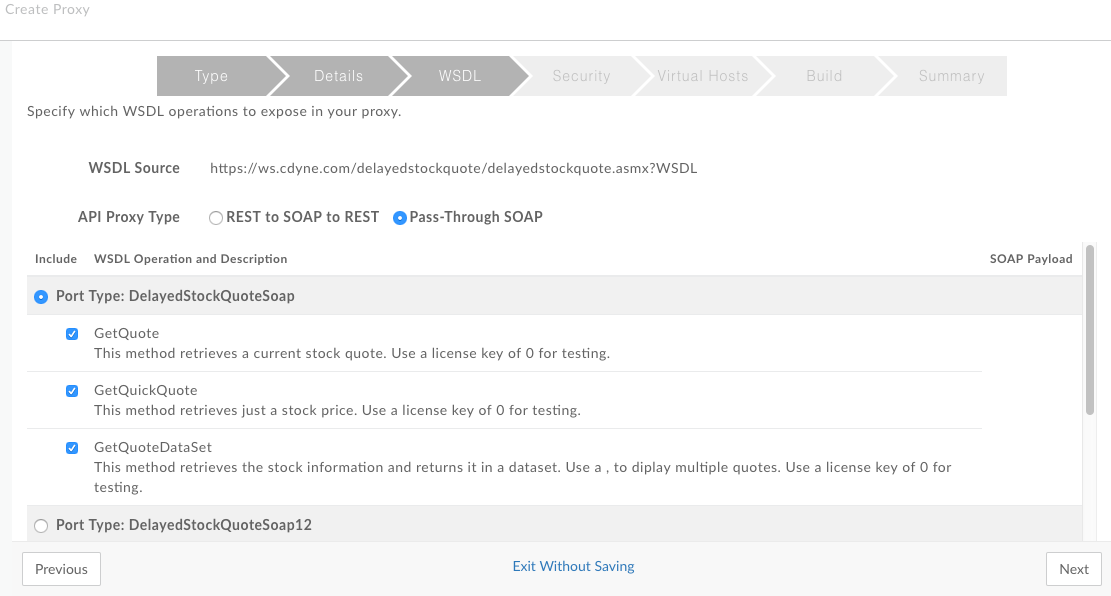
- Select from the Port Type column which set of operations you wish to use. In WSDL, port type elements define the operations that you can call on a web service.
- Click through the rest of the wizard to add security, select virtual hosts, and deployment environment.
- In the Build page, click Build and Deploy. Edge generates and deploys the new API proxy based on the WSDL.
About the final proxy
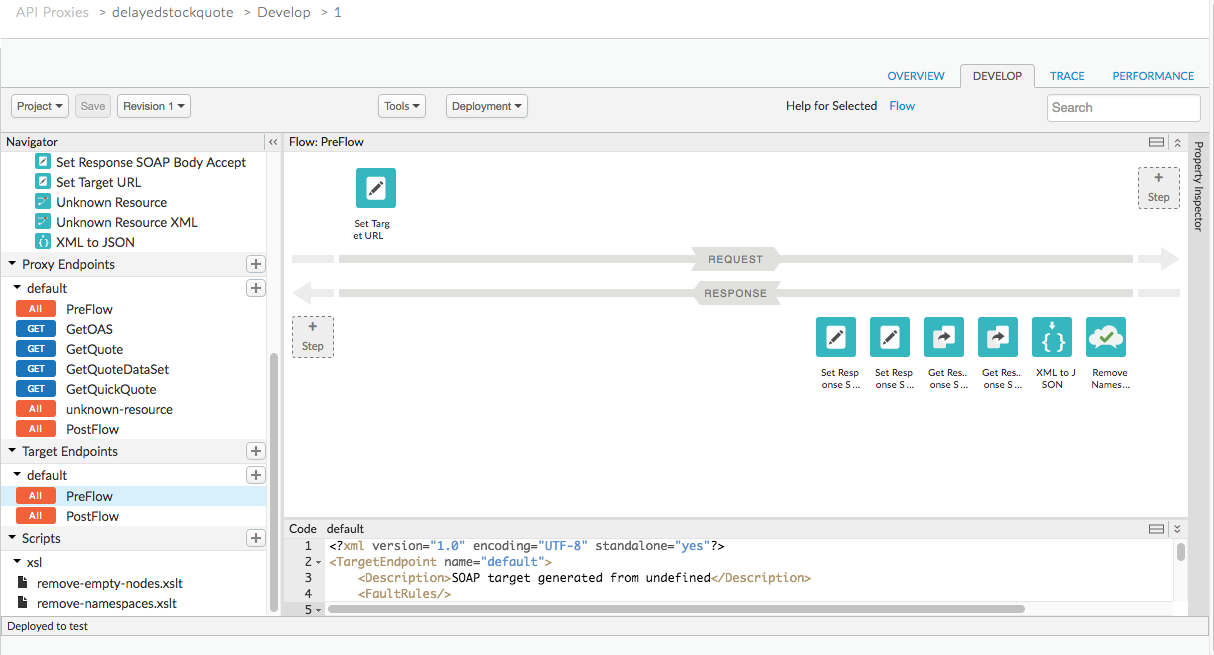
When Edge generates a pass-through proxy, the resulting proxy is actually a complex flow that includes policies for transforming data, extracting and setting variables, manipulating messages, and more. After you generate the pass-through proxy, take a look at the resulting flow in the Develop view of the API management UI. There, you can see exactly which policies have been added.
For example, the following figure shows the Target Endpoint Preflow part of a pass-through proxy. On the request side, an AssignMessage policy is used to set the target URL. On the response side, policies execute to transform the response from XML to JSON, extract the SOAP body part of the response into a variable, and set the response message. These policies (and others) are added automatically when you create the proxy.
Edge-hosted WSDL: To see the Edge-hosted WSDL generated for this type of
proxy, go to http(s)://[proxy_domain]/[proxy_base_path]?wsdl.
Advanced SOAP-to-REST proxy development
The previous sections covered the creation of a SOAP-to-REST API proxy using the API proxy wizard in Edge. However, if you want more fine-grained control over the SOAP-to-REST transformation, you can bypass the automation provided by the wizard and build a proxy by manually adding and configuring policies to get the behavior you want. For more information, see Tutorial: Manual construction of a SOAP-to-REST API proxy in Apigee Edge.