
You're viewing Apigee Edge documentation.
Go to the
Apigee X documentation. info
With the client credentials grant type, an app sends its own credentials (the Client ID and Client Secret) to an endpoint on Apigee Edge that is set up to generate an access token. If the credentials are valid, Edge returns an access token to the client app.
About this topic
This topic offers a general description of the OAuth 2.0 client credentials grant type and discusses how to implement this flow on Apigee Edge.
Use cases
Most typically, this grant type is used when the app is also the resource owner. For example, an app may need to access a backend cloud-based storage service to store and retrieve data that it uses to perform its work, rather than data specifically owned by the end user. This grant type flow occurs strictly between a client app and the authorization server. An end user does not participate in this grant type flow.
Roles
Roles specify the "actors" that participate in the OAuth flow. Let's do a quick overview of the client credentials roles to help illustrate where Apigee Edge fits in. For a complete discussion of OAuth 2.0 roles, see the IETF OAuth 2.0 specification.
- Client App -- The app that needs access to the user's protected resources. Typically, with this flow, the app runs on server rather than locally on the user's laptop or device.
- Apigee Edge -- In this flow, Apigee Edge is the OAuth authorization server. Its role is to generate access tokens, validate access tokens, and pass authorized requests for protected resources on to the resource server.
- Resource Server -- The backend service that stores the protected data that the client app needs permission to access. If you are protecting API proxies hosted on Apigee Edge, then Apigee Edge is also the resource server.
Code sample
You can find a complete, working sample implementation of the client credentials grant type on GitHub. See Additional resources below for links to more examples.
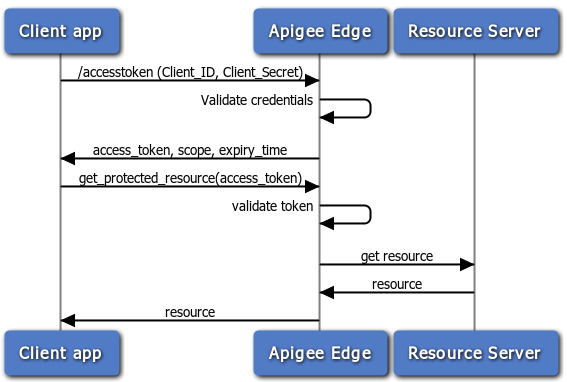
Flow diagram
The following flow diagram illustrates the client credentials flow with Apigee Edge serving as the authorization server. In general, Edge is also the resource server in this flow -- that is, API proxies are the protected resources.
Steps in the client credentials flow
Here is a summary of the steps required to implement the client credentials code grant type where Apigee Edge serves as the authorization server. Remember, with this flow, the client app simply presents its client ID and client secret, and if they are valid, Apigee Edge returns an access token.
Prerequisite: The client app must be registered with Apigee Edge to obtain the client ID and client secret keys. See Registering client apps for details.
1. Client requests an access token
To receive an access token, the client POSTs an API call to Edge with the values for client ID and client secret obtained from a registered developer app. In addition, the parameter grant_type=client_credentials must be passed as a query parameter. (However, you can configure the OAuthV2 policy to accept this parameter in the request header or body -- see OAuthV2 policy for details).
For example:
$ curl -i -H 'Content-Type: application/x-www-form-urlencoded' -X POST 'https://docs-test.apigee.net/oauth/accesstoken' -d 'grant_type=client_credentials&client_id=ns4fQc14Zg4hKFCNaSzArVuwszX95X&client_secret=ZIjFyTsNgQNyxI'
Note: Although you can pass the client_id and client_secret values as query parameters as shown above, it's a good practice to pass them as a base64 URL encoded string in the Authorization header. To do this, you need to use a base64 encoding tool or utility to encode the two values together with colon separating them. Like this: aBase64EncodeFunction(clientidvalue:clientsecret). So, the example above would be encoded like this:
result = aBase64EncodeFunction(ns4fQc14Zg4hKFCNaSzArVuwszX95X:ZIjFyTsNgQNyxI) // Note the colon separating the two values.
The result of base64 encoding the above string is: bnM0ZlFjMTRaZzRoS0ZDTmFTekFyVnV3c3pYOTVYOlpJakZ5VHNOZ1FOeXhJOg==
Then, make the token request like this:
$ curl -i -H 'Content-Type: application/x-www-form-urlencoded' -X POST 'https://docs-test.apigee.net/oauth/accesstoken' -d 'grant_type=client_credentials' -H 'Authorization: Basic bnM0ZlFjMTRaZzRoS0ZDTmFTekFyVnV3c3pYOTVYOlpJakZ5VHNOZ1FOeXhJOg=='
2. Edge validates the credentials
Note that the API call is sent to the /accesstoken endpoint. This endpoint has a policy attached to it that validates the app's credentials. That is, the policy compares the submitted keys with the ones that Apigee Edge created when the app was registered. If you'd like to learn more about OAuth endpoints on Edge, see Configuring OAuth endpoints and policies.
3. Edge returns a response
If the credentials are okay, Edge returns an access token to the client. If not, an error is returned.
4. The client calls the protected API
Now, with a valid access token, the client can make calls to the protected API. In this scenario, requests are made to Apigee Edge (the proxy), and Edge is responsible for validating the access token before passing the API call along to the target resource server. For an example, see Calling the protected API below.
Configuring flows and policies
As the authorization server, Edge processes requests for access tokens. As the API developer, you need to create a proxy with a custom flow to handle token requests and add and configure an OAuthV2 policy. This section explains how to configure that endpoint.
Custom flow configuration
The easiest way to show how the API proxy flow is configured is to show the XML flow definition. Here's an example API proxy flow designed to process an access token request. For example, when a request comes in and the path suffix matches /accesstoken, the GetAccessToken policy is triggered. See Configuring OAuth endpoints and policies for a quick overview of the steps needed to create a custom flow like this.
<Flows>
  <Flow name="GetAccessToken">
         <!-- This policy flow is triggered when the URI path suffix
         matches /oauth/accesstoken. Publish this URL to app developers
         to use when obtaining an access token using an auth code
         -->
    <Condition>proxy.pathsuffix == "/oauth/accesstoken"</Condition>
    <Request>
        <Step><Name>GetAccessToken</Name></Step>
    </Request>
  </Flow>
</Flows>
Configure the flow with a policy
You need to attach a policy to the endpoint, as follows. See Configuring OAuth endpoints and policies for a quick overview of the steps needed to add an OAuthV2 policy to a proxy endpoint.
Get access token
This policy is attached to the /accesstoken path. It uses the OAuthV2
policy with the GenerateAccessToken operation specified.
<OAuthV2 name="GetAccessToken">
  <Operation>GenerateAccessToken</Operation>
  <ExpiresIn>3600000</ExpiresIn>
  <SupportedGrantTypes>
    <GrantType>client_credentials</GrantType>
  </SupportedGrantTypes>
  <GenerateResponse/>
</OAuthV2>
The API call to obtain the access token is a POST and includes an Authorization header with the base64 encoded client_id + client+secret and the query parameter grant_type=client_credentials. It can also include optional parameters for scope and state. For example:
$ curl -i -H 'Content-Type: application/x-www-form-urlencoded' -X POST 'https://docs-test.apigee.net/oauth/accesstoken' -d 'grant_type=client_credentials' -H 'Authorization: Basic c3FIOG9vSGV4VHo4QzAySVgT1JvNnJoZ3ExaVNyQWw6WjRsanRKZG5lQk9qUE1BVQ'
Attaching the verify access token policy
To protect your API with OAuth 2.0 security, you need to add an OAuthV2 policy with the VerifyAccessToken operation. This policy checks that incoming requests have a valid access token. If the token is valid, Edge processes the request. If it is not valid, Edge returns an error. For the basic steps, see Verifying access tokens.
<OAuthV2 async="false" continueOnError="false" enabled="true" name="VerifyAccessToken">
    <DisplayName>VerifyAccessToken</DisplayName>
    <ExternalAuthorization>false</ExternalAuthorization>
    <Operation>VerifyAccessToken</Operation>
    <SupportedGrantTypes/>
    <GenerateResponse enabled="true"/>
    <Tokens/>
</OAuthV2>
Calling the protected API
To call an API that is protected with OAuth 2.0 security, you need to present a valid access token. The correct pattern is to include the token in an Authorization header, as follows: Note that the access token is also referred to as a "bearer token".
$ curl -H "Authorization: Bearer UAj2yiGAcMZGxfN2DhcUbl9v8WsR" \
  http://myorg-test.apigee.net/v0/weather/forecastrss?w=12797282
See also Sending an access token.
Additional resources
- Apigee offers online training for API developers, including a course on API security, which includes OAuth.
- OAuthV2 policy -- Has lots of examples showing how to make requests to the authorization server and how to configure the OAuthV2 policy.