
You're viewing Apigee Edge documentation.
Go to the
Apigee X documentation. info
A Cloud customer with a paid account can create a virtual host in an organization.
Who can create and modify virtual hosts in the Cloud
Virtual host creation and modification is available to paid accounts only in Edge Cloud. The user creating the virtual host must be in the role of organization administrator, or in a custom role with permissions to modify a virtual host. Users in other roles do not have authorization to create virtual hosts.
For example, paid customers can:
- Enable one-way and two-way TLS
- Specify the keystore/truststore used by the virtual host
Free and trial accounts cannot create or modify virtual hosts and are limited to the virtual hosts created for them at Edge registration time. For more information on Edge pricing plans, see https://apigee.com/api-management/#/pricing.
Requirements for configuring a virtual host for the Cloud
The following table summarizes the requirements for creating a virtual host:
| Category | Requirement | Description |
|---|---|---|
| Account type | Paid | Free and trial accounts cannot create or modify virtual hosts. |
| User role | organization admin | Only an org admin can create a virtual host, or a user in a custom role that has permissions to modify a virtual host. |
| Number of virtual hosts | 20 maximum |
You are limited to a maximum of 20 virtual hosts per organization/environment in the Cloud. Note: There is no limit to the number of virtual hosts in the Private Cloud. Most organizations/environments use two virtual hosts: one for HTTP and one for HTTPS access. You might need additional virtual hosts if your organization/environment allows access using different domain names. |
| Base URL | Includes the protocol | When defining the base URL for the virtual host, either in the UI or with the API, you must specify the protocol (ie, "http://" or "https://") as part of the URL. |
| Port | 443 |
You can only create a virtual host on port 443. Note that you can create multiple virtual hosts on port 443 as long as they have unique host aliases and all support TLS. |
| TLS | Required |
You can only create a virtual host that supports TLS over HTTPS. You must have already created a keystore, and optionally a truststore, containing your TLS cert and key. You must have a cert signed by a trusted entity, such as Symantec or VeriSign. You cannot use a self-signed cert.
If you require HTTP access, contact Apigee Edge Support. |
| TLS protocol | TLS 1.2 |
Edge in the Cloud supports TLS version 1.2 only. |
| Host alias | Unique in the organization and environment | The host alias does not exist for another organization/environment combination. |
| Domain name | Owned by customer |
You must own the domain name specified in the virtual host. Edge checks to make sure that the domain name, as defined by the host alias, matches the metadata in the TLS cert. Specifically, Edge checks the following information in the cert:
Wildcards are allowed in the SAN or CN, for example, Edge also validates that the cert has not expired. |
| Client app SNI support | All client apps accessing the virtual host must support SNI. |
SNI support is required by all apps. |
Create a virtual host using a browser
Most of the examples in this section use the Edge API to create or modify virtual hosts, but you can create a virtual host in the Edge UI.
To create a virtual host using the Edge UI:
- Sign in to apigee.com/edge.
- Select Admin > Virtual Hosts.
- Select the environment, such as prod or test.
- Select + Virtual Host to create a virtual host or select the name of an existing virtual host to edit it.
- See the table above for detailed information on populating the virtual host fields.
Defining a virtual host for one-way TLS
An XML object that defines the virtual host. For example, the following XML object defines a virtual host for one-way TLS:
<VirtualHost name="myTLSVHost">
    <HostAliases>
        <HostAlias>api.myCompany.com</HostAlias>
    </HostAliases>
    <Port>443</Port>
    <SSLInfo>
        <Enabled>true</Enabled>
        <ClientAuthEnabled>false</ClientAuthEnabled>
        <KeyStore>ref://myTestKeystoreRef</KeyStore>
        <KeyAlias>myKeyAlias</KeyAlias>
    </SSLInfo>
</VirtualHost>
In this definition you:
- Specify the name as myTLSVHost. Use the name to reference the virtual host in an API proxy or in an API call.
- Specify the host alias as api.myCompany.com. This is the publicly facing domain used to access your APIs as defined by a DNS definition and CNAME record.
- Specify the port number as 443. If omitted, by default the port is set to 443.
- Enable TLS as required.
The<Enable>element is set to true to enable one-way TLS, and the and<KeyStore>elements specify the keystore and key alias used by the TLS connection.
To enable two-way TLS, set<ClientAuthEnabled>to true, and specify a truststore using the<TrustStore>element. The truststore holds the client's certificate issuer and the certificate's CA chain, which is required.
Note: Because Edge originally supported SSL, the tag that you use to configure TLS is named<SSLInfo>.
Note that there are additional properties that you can set in the virtual host. For a reference for all properties, see Virtual host property reference.
Deciding how to specify the keystore and truststore name in the virtual host
When configuring a virtual host to support TLS, you specify a keystore by using a reference. A reference is a variable that contains the name of the keystore or truststore, rather than specifying the keystore or truststore name directly, as shown below:
    <SSLInfo>
        <Enabled>true</Enabled>
        <ClientAuthEnabled>false</ClientAuthEnabled>
        <KeyStore>ref://myTestKeystoreRef</KeyStore>
        <KeyAlias>myKeyAlias</KeyAlias>
    </SSLInfo>
The advantage to using a reference is that you can change the value of the reference to change the keystore used by the virtual host, usually because the cert in the current keystore is expiring in the near future. Changing the value of the reference does not require you to restart the Edge Router. See Working with references for more on creating and modifying references.
You can only use a reference to the keystore and truststore; you cannot use a reference to the alias. When you change the reference to a keystore, ensure that the alias name of the cert is the same as in the old keystore.
Restrictions in using references to keystores and truststore
You must take into account the following restriction when using references to keystores and truststores:
- You can only use keystore and truststore references in virtual hosts if you support SNI and you terminate SSL on the Apigee Routers.
- If you have a load balancer in front of the Apigee Routers, and you terminate TLS on the load balancer, then you cannot use keystore and truststore references in virtual hosts.
Defining a virtual host for two-way TLS
To enable two-way TLS, set the <ClientAuthEnabled> element to
true, and specify a truststore by
using a reference with the <TrustStore> element. The truststore
holds the client's certificate issuer and the certificate's CA chain, which is required. The client must also be
configured correctly for two-way TLS.
To create a virtual host for two-way TLS, create an XML object that defines the virtual host:
<VirtualHost name="myTLSVHost">
    <HostAliases>
        <HostAlias>api.myCompany.com</HostAlias>
    </HostAliases>
    <Port>443</Port>
    <SSLInfo>
        <Enabled>true</Enabled>
        <ClientAuthEnabled>true</ClientAuthEnabled>
        <KeyStore>ref://myTestKeystoreRef</KeyStore>
        <KeyAlias>myKeyAlias</KeyAlias>
        <TrustStore>ref://myTestTruststoreRef</TrustStore>
    </SSLInfo>
</VirtualHost>
In this definition you:
- Enable two-way TLS by setting
<ClientAuthEnabled>to true. - Specify the reference to the truststore using the
<TrustStore>element. The truststore holds the client's certificate issuer and the certificate's CA chain, which is required.
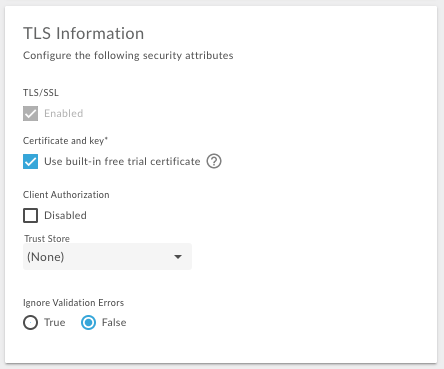
Defining a virtual host that uses the Apigee free trial cert and key
If you have a paid Edge for Cloud account and do not yet have a TLS cert and key, you can create a virtual host that uses the Apigee free trial cert and key. That means you can create the virtual host without first creating a keystore.
The Apigee free trial cert is defined for a domain of *.apigee.net. Therefore, the
<HostAlias> of the virtual host must also be in the form *.apigee.net.
If you are performing two-way TLS, you must still set the <ClientAuthEnabled> element to
true, and specify a truststore by using a reference with the <TrustStore> element
as described above in Defining a virtual host for two-way TLS.
An XML object that defines the virtual host using the Apigee free trial cert and key omits the
<KeyStore> and <KeyAlias> elements, and replaces them with the
<UseBuiltInFreeTrialCert> element, as shown below:
<VirtualHost name="myTLSVHost">
    <HostAliases>
        <HostAlias>myapi.apigee.net</HostAlias>
    </HostAliases>
    <Port>443</Port>
    <SSLInfo>
        <Enabled>true</Enabled>
        <ClientAuthEnabled>false</ClientAuthEnabled>
    </SSLInfo>
    <UseBuiltInFreeTrialCert>true</UseBuiltInFreeTrialCert>
</VirtualHost>
The default value of the <UseBuiltInFreeTrialCert> element is false.
For two-way TLS, define the virtual host as:
<VirtualHost name="myTLSVHost">
    <HostAliases>
        <HostAlias>myapi.apigee.net</HostAlias>
    </HostAliases>
    <Port>443</Port>
    <SSLInfo>
        <Enabled>true</Enabled>
        <ClientAuthEnabled>true</ClientAuthEnabled>
        <TrustStore>ref://myTestTruststoreRef</TrustStore>
    </SSLInfo>
    <UseBuiltInFreeTrialCert>true</UseBuiltInFreeTrialCert>
</VirtualHost>
In the Edge UI, select the Use built-in free trial certificate option when creating the virtual host to use the free Apigee cert and key:
Creating a virtual host
Use the following procedure to create the virtual host:
- Create a DNS entry and CNAME record for your publicly facing domain,
api.myCompany.comfor this example, that points to[org]-[environment].apigee.net. - Create and configure a keystore, named myTestKeystore in this example, by using the procedure described here: Creating keystores and truststore using the Edge UI. For this example, ensure that the keystore uses an alias name of myKeyAlias for the cert and private key.
- Upload your cert and key to the keystore. Ensure that the domain name specified by your cert matches the host alias that you want to use for the virtual host.
-
Create a reference to the keystore by using the Edge UI or API. The reference specifies the name of the keystore and the reference type as
KeyStore. See Working with references for more on creating and modifying references. - Create the virtual host by using the Create a
Virtual Host API. Make sure to specify the correct keystore reference and key alias.
To use the API, use the following POST API call to create the keystore
named myTLSVHost:
curl -X POST -H "Content-Type:application/xml" \
  https://api.enterprise.apigee.com/v1/o/{org_name}/e/{env_name}/virtualhosts \
  -d '<VirtualHost name="myTLSVHost">
    <HostAliases>
      <HostAlias>api.myCompany.com</HostAlias>
    </HostAliases>
    <Port>443</Port>
    <SSLInfo>
      <Enabled>true</Enabled>
      <ClientAuthEnabled>false</ClientAuthEnabled>
      <KeyStore>ref://myTestKeystoreRef</KeyStore>
      <KeyAlias>myKeyAlias</KeyAlias>
    </SSLInfo>
  </VirtualHost>' \
  -u orgAdminEmail:password
If you are performing two-way TLS with the client, then set
<ClientAuthEnabled>to true and specify the truststore using the<TrustStore>element. The client must be configured correctly for two-way TLS, meaning Edge has a truststore containing the client's cert issuer and certificate chain. Create the truststore by using the procedure described here: Creating keystores and truststore using the Edge UI. If you have any existing API proxies, add the virtual host to the
<HTTPConnection>element in the ProxyEndpoint. The virtual host is added automatically to all new API proxies. See Configuring an API proxy to use a virtual host.
After updating an API proxy to use the virtual host, and creating the DNS entry and CNAME record for the host alias, you can access the API proxy as shown below:
https://api.myCompany.com/v1/{project-base-path}/{resource-path}For example:
https://api.myCompany.com/v1/weather/forecastrss?w=12797282
Modifying a virtual host
There are two main tasks paid Cloud customers perform to modify an existing virtual host:
- Modifying the value of a reference to a keystore or truststore.
Note: Once you set a<KeyStore>or<TrustStore>to use a reference, you can change the value of the reference at any time. However, if you ever want to change<KeyStore>or<TrustStore>to use a different reference, or change<KeyAlias>to use a different alias, you must contact Apigee Edge Support. - Modifying the TLS properties of the virtual host.
Modifying the value of a reference
You can modify the value of a reference to change the keystore or truststore used by a virtual host.
Before you modify the value of the reference:
- Create a new keystore and upload a cert and key as described in Creating keystores and truststore using the Edge UI. In the new keystore, ensure that you use the same name for the key alias as was used in the existing key store.
- If necessary, create a new truststore and upload a cert as described in Creating keystores and truststore using the Edge UI.
- Modify the reference as described in Working with references.
Modifying the TLS properties of the virtual host
Paid customers can use the Update a Virtual Host API to update a virtual host. This API lets you set all of the properties for the virtual host described at Virtual host property reference.
When you modify the virtual host, Edge performs a validation similar to when you create a virtual host. That is, on a modify, Edge validates that:
- The domain as specified by the host alias is not used in another organization and environment.
- You own the domain name. Specifically, Edge checks that the following information in the
cert matches the host alias:
- CN - Common Name
- SAN - Subject Alternative Name
- Edge validates that the cert has not expired.
To modify a virtual host by using the Edge API, perform the following:
Update the virtual host by using the Update a Virtual Host API. When using the API, you must specify the complete definition of the virtual host in the request body, not just the elements that you want to change. In this example, you set the value of the
proxy_read_timeoutproperty:curl -X PUT -H "Content-Type:application/xml" \ https://api.enterprise.apigee.com/v1/o/{org_name}/e/{env_name}/virtualhosts/{vhost_name} \ -d '<VirtualHost name="myTLSVHost"> <HostAliases> <HostAlias>api.myCompany.com</HostAlias> </HostAliases> <Port>443</Port> <SSLInfo> <Enabled>true</Enabled> <ClientAuthEnabled>false</ClientAuthEnabled> <KeyStore>ref://myTestKeystoreRef</KeyStore> <KeyAlias>myKeyAlias</KeyAlias> </SSLInfo> <Properties> <Property name="proxy_read_timeout">50</Property> </Properties> </VirtualHost>' \ -u orgAdminEmail:password
Modifying a virtual host to use references to the keystore and truststore
All new virtual hosts for Edge in the Cloud use reference to the keystore and truststore. References let you change the keystore and truststore without contacting Apigee Edge Support.
Older virtual hosts on Apigee Edge might not be configured to use references for keystores and truststores. In this case, you can update the virtual host to use a reference.
Updating a virtual host to use a reference
Use the following procedure to update the virtual host:
- If required, create a new keystore and upload a cert as described in Creating keystores and truststore using the Edge UI. If you already have a keystore, then you can configure a reference to point to it.
- Create a new reference to the keystore.
- If required, create a new truststore and upload a cert. If you already have a truststore, then you can configure a reference to point to it.
- Create a new reference to the truststore.
- Update the virtual host to set the keystore, alias, truststore, and any other TLS
properties. The payload for the call is:
curl -X PUT -H "Content-Type:application/xml" \ https://api.enterprise.apigee.com/v1/o/{org_name}/e/{env_name}/virtualhosts/{vhost_name} \ -d '<VirtualHost name="myTLSVHost"> <HostAliases> <HostAlias>api.myCompany.com</HostAlias> </HostAliases> <Port>443</Port> <OCSPStapling>off</OCSPStapling> <SSLInfo> <Enabled>true</Enabled> <ClientAuthEnabled>true</ClientAuthEnabled> <KeyStore>ref://myKeyStore2Way</KeyStore> <KeyAlias>keyAlias</KeyAlias> <TrustStore>ref://myTrustStore2Way</TrustStore> <IgnoreValidationErrors>false</IgnoreValidationErrors> </SSLInfo> </VirtualHost>' \ -u orgAdminEmail:pWord - Contact Apigee Support to restart the Edge Routers to complete the process.