
You're viewing Apigee Edge documentation.
Go to the
Apigee X documentation. info
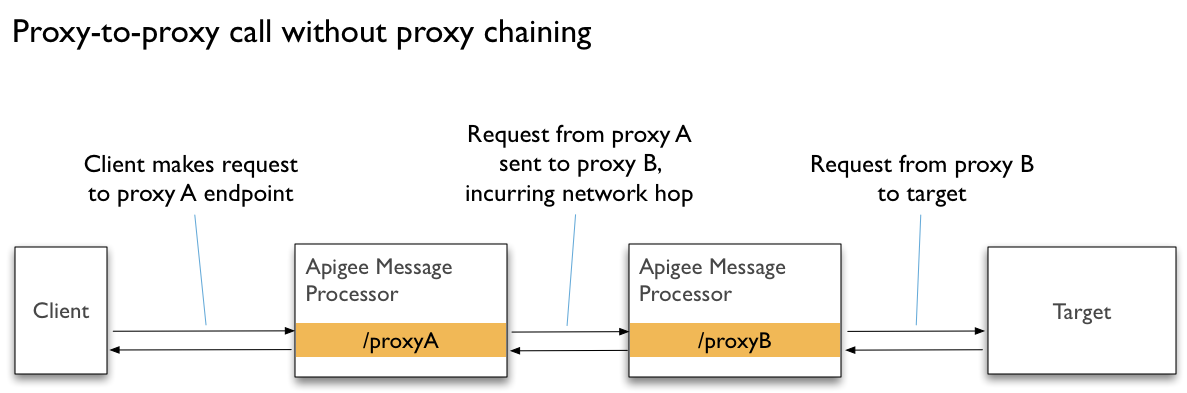
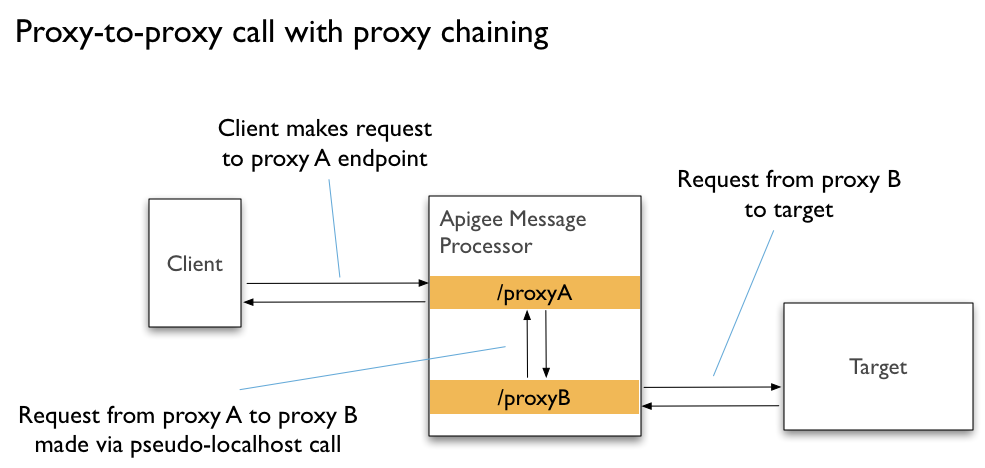
You can specify that one proxy is the target endpoint of another, effectively connecting the two proxies in a proxy chain. Chaining proxies in this way can help you avoid a network hop, and so improve overall performance.
With proxy chaining, you specify that one proxy is the local target endpoint of the other.
Rather than using the HTTPTargetConnection element to make a call to the second
proxy, you use the LocalTargetConnection element.
<LocalTargetConnection>
    <APIProxy>myproxy2</APIProxy>
    <ProxyEndpoint>default</ProxyEndpoint>
</LocalTargetConnection>
You might find proxy chaining useful when you have a proxy that offers some discrete low-level functionality that other proxies will consume. For example, a proxy that exposes create/read/update/delete operations with a backend data store could be the target proxy for multiple other proxies that expose the data to clients.
Video: Watch a short video to learn more about API proxy chaining.
How proxy chaining works
Proxy chaining uses a local connection to minimize network overhead when calling one proxy from another. This local connection is more efficient because it bypasses network features such as load balancers, routers, and message processors.
The following illustrates the difference between connecting proxies using HTTPTargetConnection
and LocalTargetConnection (proxy chaining):
You connect proxies by specifying that one is a local target endpoint of the other. You can create a local connection between proxies in two ways:
- By specifying the name of the target proxy and a
ProxyEndpointname - By specifying a path to the target proxy endpoint
You connect target proxies within a TargetEndpoint configuration, using a
LocalTargetConnection element, as described below.
Connecting proxies by proxy name
You can specify the target proxy by name. You might find that this is most useful when you're creating the connection from the start and developing the proxies together. If you don't know the name (or the name might change), consider connecting with the target proxy's endpoint path, as described below.
When you connect to a target proxy by name, you specify the proxy's name and the name of its
ProxyEndpoint.
The following example specifies a target proxy called data-manager, along with
the ProxyEndpoint name exposed by data-manager. For reference
information, see API proxy configuration reference.
<TargetEndpoint name="datamanager">
    <PreFlow name="PreFlow">
        <!-- PreFlow policies -->
    </PreFlow>
    <PostFlow name="PostFlow">
        <!-- PostFlow policies -->
    </PostFlow>
    <LocalTargetConnection>
        <APIProxy>data-manager</APIProxy>
        <ProxyEndpoint>default</ProxyEndpoint>
    </LocalTargetConnection>
</TargetEndpoint>
Connecting proxies by path
You can specify the target proxy by its endpoint path. You might want to do it this way when you don't know the proxy name, or when the name might change.
If your proxy is simply the consumer of the target proxy—such as when you're not developing both—the path might be the most reliable way to connect. For example, if the proxy you're connecting to is developed and maintained by another team, you might want to connect using a reliable endpoint path.
The following example specifies a target proxy at
/v1/streetcarts/foodcarts/data-manager, where the host is assumed to be the same as
the current proxy. For reference information, see API proxy configuration reference.
<TargetEndpoint name="datamanager">
    <PreFlow name="PreFlow">
        <!-- PreFlow policies -->
    </PreFlow>
    <PostFlow name="PostFlow">
        <!-- PostFlow policies -->
    </PostFlow>
    <LocalTargetConnection>
        <Path>/v1/streetcarts/foodcarts/data-manager</Path>
    </LocalTargetConnection>
</TargetEndpoint>
Connecting proxies with the management console
You can create proxy chaining connections using the Edge management console.
- Open the proxy that will be consuming the target proxy.
- In the Navigator, click the plus sign next to Target Endpoints.
- In the New Target Endpoint dialog, enter the name of the target endpoint.
- Beneath the Target Endpoint Name box, select one of the following:
-
Proxy Chaining to select from a list of proxies already in the organization and
environment.
- In the Proxy Name dropdown, select the target proxy.
- In the Proxy Endpoint box, enter the target proxy endpoint path you want to connect to.
- Path Chaining to enter the target proxy base path, such a
/mypath/myproxy/myendpoint.
-
Proxy Chaining to select from a list of proxies already in the organization and
environment.
- Click Add.
Chained proxies, API products, and security
Proxy chaining is best for cases where both proxies are in the same API product. By default, both are available to clients. Apigee currently doesn't support bundling the second proxy in a separate API product that clients shouldn't have access to.
If your second proxy must be secured against direct client requests, consider adding logic to have your second proxy examine the IP address of the client. In the case of a call made via chaining, the IP address will be local. Your code can validate that it is local before allowing processing to continue. See the Access Control policy for one way to do this.