You're viewing Apigee Edge documentation.
Go to the
Apigee X documentation. info
This example demonstrates how to use Apigee Adapter for Envoy with Apigee Edge.
Prerequisites
| Before you begin: |
|---|
|
|
Overview
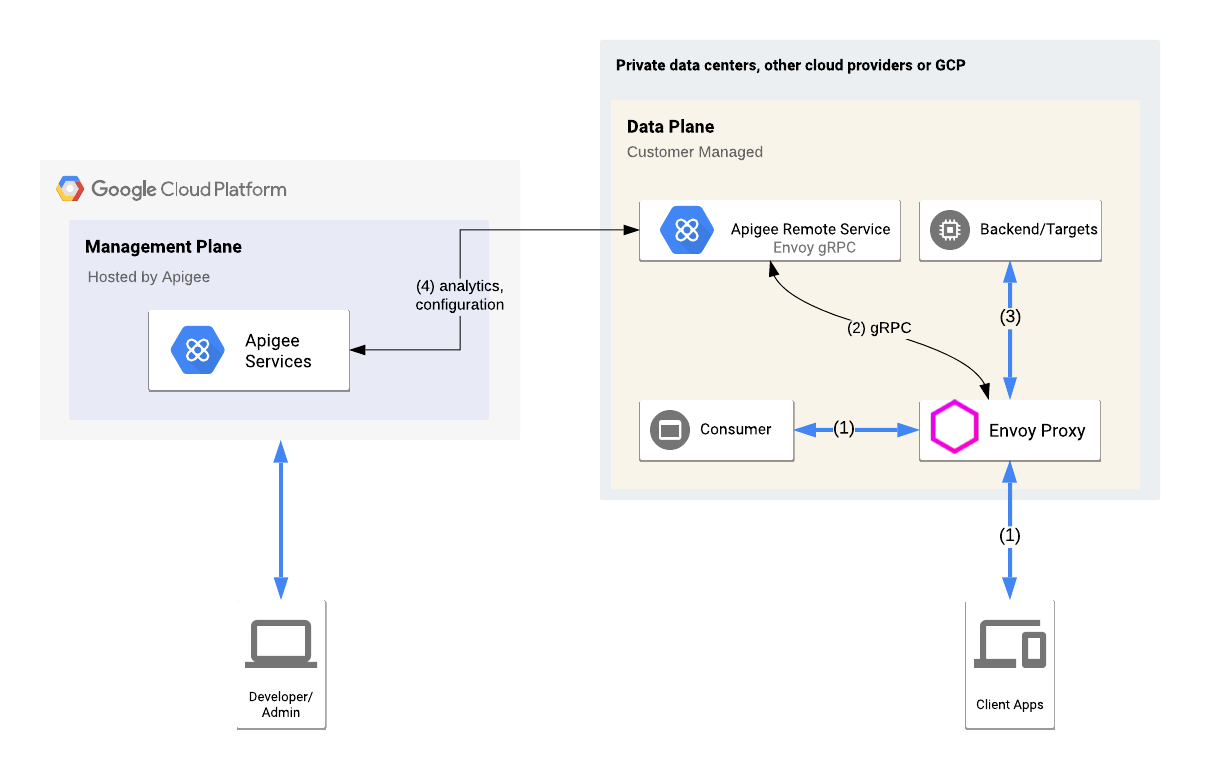
This example explains how to use Apigee Adapter for Envoy with Apigee Edge for Public Cloud. API proxy calls flow through Envoy running as a native application with Edge providing API management services through the Apigee Remote Service for Envoy.
The following figure shows the basic architecture for the Apigee Edge integration:

An Envoy proxy and Remote Service are running locally. Envoy handles API traffic to and from the target service and communicates with the Remote Service. The Remote Service also communicates with Apigee Edge Cloud to retrieve API product and proxy information.
Provision Apigee Edge
In this step, you will use the Remote Service CLI to provision Apigee Adapter for Envoy assets to Apigee Edge. The provisioning command deploys an API proxy to Apigee Edge, and also sets up a certificate on Apigee and generates credentials the Remote Service will use to securely connect from your system to Apigee.
- Go to the
$CLI_HOMEdirectory:cd $CLI_HOME
- Create the following environment variables. These variables will be used as
parameters to the provisioning script:
export ORG=organization_nameexport ENV=environment_nameexport USER=your_apigee_usernameexport PASSWORD=your_apigee_passwordWhere:
Variable Description organization_name The name of your Apigee organization. environment_name The name of an environment in your organization. your_apigee_username Your Apigee account username. Typically the username is an email address. your_apigee_password Your Apigee password. - Execute the following command to provision the remote service proxy on Apigee Edge:
./apigee-remote-service-cli provision --legacy --mfa $MFA --username $USER --password $PASSWORD \
    --organization $ORG --environment $ENV > config.yaml
Where
$MFAis an Apigee multi-factor authorization token. - Check the contents of the
config.yamlfile. It should look something like this:# Configuration for apigee-remote-service-envoy (platform: SaaS) # generated by apigee-remote-service-cli provision on 2020-08-26 09:43:41 apiVersion: v1 kind: ConfigMap metadata: name: apigee-remote-service-envoy namespace: apigee data: config.yaml: | tenant: internal_api: https://istioservices.apigee.net/edgemicro remote_service_api: https://my-username-test.apigee.net/remote-service org_name: my-org env_name: my-env key: f7e09c32f827cab87b8ce43842ed8467ffd2c58e6f795241e38fe7b1aec7664 secret: 1cb5cca00dfb433cb80b32837451fce4bf694633cddbb73d704517e12b35e75
The key and secret values are used to validate the requests from the Remote Service Proxy to Apigee Edge.
Run the Apigee Remote Service for Envoy service
You can run the Remote Service either as a native binary or on Docker.
Run the service natively
Execute the service binary with the config file that was output by the provisioning command:
$REMOTE_SERVICE_HOME/apigee-remote-service-envoy -c config_file_path/config.yaml
Run the service on Docker
Docker images are published with release tags. For this install, use the latest version. There are three image variations to choose from:
| Variation | Image |
|---|---|
| Google distroless | gcr.io/distroless/base |
| Ubuntu | google/apigee-envoy-adapter:v1.1.0-ubuntu |
| Ubuntu with Boring Crypto | google/apigee-envoy-adapter:v1.1.0-boring |
For example, to run the scratch image with your local config.yaml available as /config.yaml
via a volume mount, use this command:
docker run -v ./config.yaml:/config.yaml google/apigee-envoy-adapter:v1.1.0
Create sample configuration files
Use the apigee-remote-service-cli samples create command to generate
sample configuration files.
For this example, you need these generated files:
envoy-config.yaml- A deployment configuration for an HTTP service.
To generate the samples:
- Go to the
$CLI_HOMEdirectory. Execute this command to generate the files:
./apigee-remote-service-cli samples create --template native -c ./config.yaml
The following files are output the
./samplesdirectory:ls samples envoy-config.yaml
For more information, see Samples command.
Install and run the Envoy proxy
Follow these steps to install and run the Envoy proxy:
- Download an Envoy binary or build it, or use Docker.
- Run Envoy using a sample configuration file that you generated previously for the
httpbin.orgservice:envoy -c $CLI_HOME/samples/envoy-config.yaml
Test the installation
- Call the
httpbinservice:curl -i http://localhost:8080/httpbin/headers
The service is now being managed by Apigee, and because you did not supply an API key, the call returns the following error.
curl -i http://localhost:8080/httpbin/headers
HTTP/1.1 403 Forbidden
date: Tue, 12 May 2020 17:51:36 GMT
server: envoy
content-length: 0
x-envoy-upstream-service-time: 11
- Configure an API product and get an API key as explained in How to obtain an API key.
- Make an API call using the key:
export APIKEY=YOUR_API_KEYcurl -i http://localhost:8080/httpbin/headers -H "x-api-key: $APIKEY"The call should succeed with a 200 status and returning a list of headers in the response. For example:
curl -i httpbin.default.svc.cluster.local/headers -H "x-api-key: kyOTalNNLMPfOSy6rnVeclmVSL6pA2zS"
HTTP/1.1 200 OK
server: envoy
date: Tue, 12 May 2020 17:55:34 GMT
content-type: application/json
content-length: 828
access-control-allow-origin: *
access-control-allow-credentials: true
x-envoy-upstream-service-time: 301

{
  "headers": {
    "Accept": "*/*",
    "Content-Length": "0",
    "Host": "httpbin.default.svc.cluster.local",
    "User-Agent": "curl/7.70.0-DEV",
    "X-Api-Key": "kyOTalNNLMPfOSy6rneclmVSL6pA2zS",
    "X-Apigee-Accesstoken": "",
    "X-Apigee-Api": "httpbin.default.svc.cluster.local",
    "X-Apigee-Apiproducts": "httpbin",
    "X-Apigee-Application": "httpbin",
    "X-Apigee-Authorized": "true",
    "X-Apigee-Clientid": "kyOTalNNLMPfOSy6rVeclmVSL6pA2zS",
    "X-Apigee-Developeremail": "user@example.com",
    "X-Apigee-Environment": "test",
    "X-Apigee-Organization": "my-org",
    "X-Apigee-Scope": "",
    "X-B3-Parentspanid": "1476f9a2329bbdfa",
    "X-B3-Sampled": "0",
    "X-B3-Spanid": "1ad5c19bfb4bc96f",
    "X-B3-Traceid": "6f329a34e8ca07811476f9a2329bbdfa"
  }
}
Next steps
API traffic to the httpbin service is now managed by Apigee. Here are
some features you can explore and try:
- If you configured your API product as explained in
How to obtain an API key,
the quota limit was set to 5 requests per minute. Try calling the
httpbinservice a few more times to trigger the quota. When the quota is depleted, an HTTP status 403 error is returned. - Access Apigee Analytics in the Edge UI. Go to Analyze > API Metrics > API Proxy Performance.
- Generate and use JWT tokens to authenticate API calls.
- Use the CLI to manage, create tokens, and control bindings. For CLI details, see the Reference.
