
You're viewing Apigee Edge documentation.
Go to the
Apigee X documentation. info
A Cloud customer with a paid account and all Edge for Private Cloud customers can create a virtual host in an organization. The user creating the virtual host must be in the role of organization administrator, or in a custom role with permissions to modify a virtual host. Users in other roles do not have authorization to create virtual hosts.
Watch a video introduction to virtual hosts.
Creating a virtual host
Use the following basic procedure to create the virtual host. The actual procedure you use is based on whether you are a Cloud or Private Cloud customer, and whether you are enabling TLS:
- Create a DNS entry and CNAME record for your publicly facing domain.
- If enabling TLS on the virtual host:
- Create and configure a keystore by using the procedure described here: Keystores and Truststores.
- Upload your cert and key to the keystore. Ensure that the domain name specified by your cert matches the host alias that you want to use for the virtual host.
- Create a reference to the keystore by using the Edge UI or API. The reference
specifies the name of the keystore and the reference type as
KeyStore. See Working with references for more on creating and modifying references. - If you are performing two-way TLS, create a truststore, upload the cert, and create a reference to the truststore. Create the truststore by using the procedure described here: Keystores and Truststores.
- Create the virtual host by using the Create a Virtual Host API. If enabling TLS, make sure to specify the correct keystore reference, truststore reference, and key alias.
- If you have any existing API proxies, add the virtual host to the ProxyEndpoint.
The virtual host is added automatically to all new API proxies. See
Configuring an API proxy to use a virtual host.
After updating an API proxy to use the virtual host, and creating the DNS entry and CNAME record for the host alias, you can access the API proxy as shown below:
https://api.myCompany.com/v1/project-base-path/resource-path
For example:
https://api.myCompany.com/v1/weather/forecastrss?w=12797282
Creating a virtual host using the API or UI
You can create a virtual host by using the Edge API or the Edge UI.
Most of the examples below use the Edge API. To access the UI to create, modify, and delete virtual hosts in the Edge UI:
- Sign in to apigee.com/edge
Edge for Private Cloud customers use
http://ms-ip:9000(on-premises), where ms-ip is the IP address or DNS name of the Management Server node. - Select Admin >Virtual Hosts in the left navigation bar.
- Select the environment, such as prod or test.
The virtual hosts defined for the environment are displayed. - Select + Virtual Host to create a virtual host or select the name of an existing virtual host to edit it.
Creating a virtual host for HTTP
Edge for Private Cloud customers can create a virtual host using HTTP.
To create a virtual host that does not support TLS, create an XML object that defines the virtual host. For example, the following XML object defines a virtual host that uses the HTTP protocol:
<VirtualHost name="myVHost">
   <HostAliases>
     <HostAlias>api.myCompany.com</HostAlias>
   </HostAliases>
   <Interfaces/>
   <Port>80</Port>
</VirtualHost>
In this definition you:
- Specify the name as myVHost. Use the name to reference the virtual host in an API proxy or in an API call.
- Specify the host alias as api.myCompany.com. This is the publicly facing domain used to access your APIs as defined by a DNS definition and CNAME record.
- Specify the port number as 80. If omitted, by default the port is set to 443.
There are additional properties that you can set in the virtual host. For a reference for all properties, see Virtual host property reference.
If you have any existing API proxies, add the virtual host to the <HTTPConnection> element
in the Proxy Endpoint. The virtual host is added automatically to all new API proxies.
See Configuring an API proxy to use a virtual host.
If you create a new API proxy that should not be accessible over a particular virtual host,
then you must edit the API proxy to remove that virtual host from its ProxyEndpoint.
You can then access an API proxy through this virtual host by making a request to:
http://api.myCompany.com/proxy-base-path/resource-path
https://api.myCompany.com/proxy-base-path/resource-path
Create the virtual host by using the Create a Virtual Host API:
curl -X POST -H "Content-Type:application/xml" \
  http://ms-IP:8080/v1/o/org_name/environments/env_name/virtualhosts \
  -d '<VirtualHost name="myVHost">
        <HostAliases>
            <HostAlias>api.myCompany.com</HostAlias>
        </HostAliases>
        <Interfaces/>
        <Port>80</Port>
    </VirtualHost>' \
-u sysAdminEmail:passwordCreating a virtual host for one-way TLS
The following XML object defines a virtual host for one-way TLS:
<VirtualHost name="myTLSVHost">
    <HostAliases>
        <HostAlias>api.myCompany.com</HostAlias>
    </HostAliases>
    <Port>443</Port>
    <SSLInfo>
        <Enabled>true</Enabled>
        <ClientAuthEnabled>false</ClientAuthEnabled>
        <KeyStore>ref://myTestKeystoreRef</KeyStore>
        <KeyAlias>myKeyAlias</KeyAlias>
    </SSLInfo>
</VirtualHost>
In this definition you enable TLS by setting the <Enable> element
to true, and use the <KeyStore> and <KeyAliase> elements
to specify the keystore and key alias used by the TLS connection.
See TLS/SSL for more information on using TLS.
Deciding how to specify the keystore and truststore name in the virtual host
When configuring a virtual host to support TLS, you specify a keystore by using a reference. A reference is a variable that contains the name of the keystore or truststore, rather than specifying the keystore or truststore name directly, as shown below:
    <SSLInfo>
        <Enabled>true</Enabled>
        <ClientAuthEnabled>false</ClientAuthEnabled>
        <KeyStore>ref://myTestKeystoreRef</KeyStore>
        <KeyAlias>myKeyAlias</KeyAlias>
    </SSLInfo>
The advantage to using a reference is that you can change the value of the reference to change the keystore used by the virtual host, usually because the cert in the current keystore is expiring in the near future. Changing the value of the reference does not require you to restart the Edge Router. See Working with references for more on creating and modifying references.
You can only use a reference to the keystore and truststore; you cannot use a reference to the alias. When you change the reference to a keystore, ensure that the alias name of the cert is the same as in the old keystore.
Restrictions in using references to keystores and truststore
You must take into account the following restriction when using references to keystores and truststores:
- You can only use keystore and truststore references in virtual hosts if you support SNI and you terminate SSL on the Apigee Routers.
- If you have a load balancer in front of the Apigee Routers, and you terminate TLS on the load balancer, then you cannot use keystore and truststore references in virtual hosts.
Creating a virtual host for two-way TLS
To enable two-way TLS, set the <ClientAuthEnabled> element to
true, and specify a truststore by
using a reference with the <TrustStore> element. The truststore
holds the client's certificate issuer and the certificate's CA chain, which is required. The client
must also be configured correctly for two-way TLS.
To create a virtual host for two-way TLS, create an XML object that defines the virtual host:
<VirtualHost name="myTLSVHost">
    <HostAliases>
        <HostAlias>api.myCompany.com</HostAlias>
    </HostAliases>
    <Port>443</Port>
    <SSLInfo>
        <Enabled>true</Enabled>
        <ClientAuthEnabled>true</ClientAuthEnabled>
        <KeyStore>ref://myTestKeystoreRef</KeyStore>
        <KeyAlias>myKeyAlias</KeyAlias>
        <TrustStore>ref://myTestTruststoreRef</TrustStore>
    </SSLInfo>
</VirtualHost>
In this definition you:
- Enable two-way TLS by setting
<ClientAuthEnabled>to true. - Specify the reference to the truststore using the
<TrustStore>element. The truststore holds the client's certificate issuer and the certificate's CA chain, which is required.
See TLS/SSL for more information on using TLS.
Modifying a virtual host
A Cloud customer with a paid account and all Edge for Private Cloud customers can use the Update a Virtual Host API to update a virtual host. This API lets you set all of the properties for the virtual host described at Virtual host property reference.
Update the virtual host by using the Update a Virtual Host API. When using the API, you must specify the complete definition of the virtual host in the request body, not just the elements that you want to change.
In this example, you set the value of the proxy_read_timeout property:
curl -X PUT -H "Content-Type:application/xml" \
    https://api.enterprise.apigee.com/v1/o/org_name/e/env_name/virtualhosts/vhost_name \
    -d '<VirtualHost  name="myTLSVHost">
         <HostAliases>
           <HostAlias>api.myCompany.com</HostAlias>
         </HostAliases>
         <Port>443</Port>
         <SSLInfo>
           <Enabled>true</Enabled>
           <ClientAuthEnabled>false</ClientAuthEnabled>
           <KeyStore>ref://myTestKeystoreRef</KeyStore>
           <KeyAlias>myKeyAlias</KeyAlias>
         </SSLInfo>
         <Properties>
           <Property name="proxy_read_timeout">50</Property>
         </Properties>
     </VirtualHost>' \
    -u orgAdminEmail:password
Deleting a virtual host
Before you can delete a virtual host from an environment, you must update any API proxies that reference the virtual host to remove the reference. See Configuring an API proxy to use a virtual host.
Delete the virtual host by using the Delete a Virtual Host API:
curl -X DELETE \
  https://api.enterprise.apigee.com/v1/o/org_name/e/env_name/virtualhosts/vhost_name \
  -u orgAdminEmail:password
Viewing information about a virtual host
View information about the virtual hosts defined in an environment, as described below.
Edge
To view information about a virtual host using the Edge UI:
- Sign in to apigee.com/edge.
Edge for Private Cloud customers use
http://ms-ip:9000(on-premises), where ms-ip is the IP address or DNS name of the Management Server node. - Select Admin > Virtual Hosts in the left navigation bar.
- Select the environment, such as prod or test.
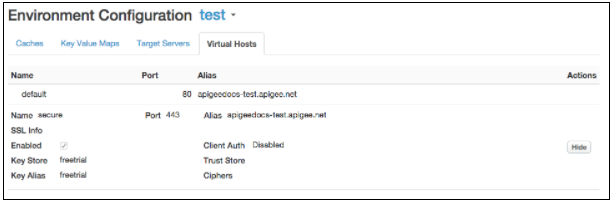
The virtual hosts defined for the environment appear. If the virtual host is configured to use a keystore or truststore, click Show to see more information.
If the virtual host is configured to use TLS/SSL, a lock icon appears next to the name of the virtual host. That means a TLS/SSL certificate, key, and certificate chain has been uploaded to Edge and associated with the virtual host. To see information about the available certificates:
- Select Admin > Environment > TLS Keystores in the left navigation bar.
- Select the Environment (typically
prodortest). - Expand the keystores to view the certificate.
Classic Edge (Private Cloud)
To view information about a virtual host using the Classic Edge UI:
- Sign in to
http://ms-ip:9000, where ms-ip is the IP address or DNS name of the Management Server node. - Select Admin > Virtual Hosts in the left navigation bar.
- Select the environment, such as prod or test.
- Click the Virtual Hosts tab.
The virtual hosts defined for the environment appear. If the virtual host is configured to use a keystore or truststore, click Show to see more information.
If the virtual host is configured to use TLS/SSL, a lock icon appears next to the name of the virtual host. That means a TLS/SSL certificate, key, and certificate chain has been uploaded to Edge and associated with the virtual host. To see information about the available certificates:
- Select Admin > TLS Certificates in the top navigation bar.
- Select the Environment (typically
prodortest). - Expand the keystores to view the certificate.
Viewing a virtual host with the Edge API
You can also use the Edge APIs to view information about virtual hosts. For example, the List Virtual Hosts API returns a list of all virtual hosts:
curl -X GET -H "accept:application/xml" \
    https://api.enterprise.apigee.com/v1/o/org_name/environments/env_name/virtualhosts \
    -u orgAdminEmail:pWord
Where orgAdminEmail:pWord is the username and password of the org admin, and org_name/env_name specify the organization and environment containing the virtual host. Sample response:
[
 "default",
 "secure"
]
To see information about a specific virtual host, use the Get Virtual Host API:
curl -X GET -H "accept:application/xml" \
    https://api.enterprise.apigee.com/v1/o/org_name/environments/env_name/virtualhosts/vhost_name \
    -u orgAdminEmail:pWord
Where vhost_name is the name of the virtual host. For example, you can specify the vhost_name as "secure" to see the configuration of the default secure virtual host created by Apigee:
<VirtualHost name="secure">
    <HostAliases>
        <HostAlias>api.myCompany.com</HostAlias>
    </HostAliases>
    <Port>443</Port>
    <Properties/>
    <Interfaces/>
    <RetryOptions/>
    <SSLInfo>
        <ClientAuthEnabled>false</ClientAuthEnabled>
        <Enabled>true</Enabled>
        <KeyAlias>freetrial</KeyAlias>
        <KeyStore>ref://freetrial</KeyStore>
        <IgnoreValidationErrors>false</IgnoreValidationErrors>
    </SSLInfo>
</VirtualHost>Configuring an API proxy to use a virtual host
When you create a new API proxy, Edge automatically configures it to use all available virtual hosts in the organization. A request to an API proxy through a virtual host uses the form:
https://host-alias/proxy-base-path/resource-path
Where:
- host-alias is typically the DNS name of the virtual host.
- proxy-base-path is defined when you create an API proxy and is unique for each API proxy.
- resource-path the path to a resource accessible through the API proxy.
Controlling the virtual hosts used by an API proxy
In the XML configuration of an API proxy, you use the virtualhost tag to specify the
name of the virtual host associated with the API proxy:
<HTTPProxyConnection>
  <BasePath>/v1/my/proxy/basepath</BasePath>
  <VirtualHost>secure</VirtualHost>
  <VirtualHost>default</VirtualHost>
</HTTPProxyConnection>
For example, <VirtualHost>secure</VirtualHost> means
a client can call the API proxy using the host alias of the "secure" virtual host.
You typically modify the virtual hosts associated with an API proxy when:
- You create a new virtual host and have existing API proxies. You must edit any existing API proxies to add the new virtual host.
- You create a new API proxy that should not be accessible over a particular virtual host. You must edit the API proxy to remove that virtual host from its definition.
To modify the virtual hosts associated with an API proxy:
-
Access the API proxy editor, as described below.
Edge
To access the API proxy editor using the Edge UI:
- Sign in to apigee.com/edge.
Edge for Private Cloud customers use
http://ms-ip:9000(on-premises), where ms-ip is the IP address or DNS name of the Management Server node. - Select Develop > API proxies in the left navigation bar.
- Select the API proxy that you want to edit in the list.
Classic Edge (Private Cloud)
To access the API proxy editor using the Classic Edge UI:
- Sign in to
http://ms-ip:9000, where ms-ip is the IP address or DNS name of the Management Server node. - Select APIs > API proxies in the top navigation bar.
- Select the API proxy that you want to edit in the list.
- Sign in to apigee.com/edge.
- Click the Develop tab.
- Under Proxy Endpoints, select default.
- In the code area:
- Remove any
<VirtualHost>elements for virtual hosts not supported by the API proxy. - Add a new
<VirtualHost>element with the name of the new virtual host. For example, if the new virtual host is named MyVirtualHost, add the following tag:
<HTTPProxyConnection>
  <BasePath>/v1/my/proxy/basepath</BasePath>
  <VirtualHost>default</VirtualHost>
  <VirtualHost>secure</VirtualHost>
  <VirtualHost>MyVirtualHost</VirtualHost>
</HTTPProxyConnection>
- Remove any
- Save the API proxy. If the API proxy has been deployed, saving it redeploys it with the new setting.
Setting the base URL displayed by the Edge UI for an API proxy
The Edge UI displays the URL of an API proxy based on settings in the virtual host corresponding to where the proxy is deployed. This display can include the Router port number of the virtual host.
In most cases, the URL displayed in the Edge UI is the correct URL for making external requests to the proxy. However, for some configurations, the displayed URL is not correct. For example, any one of the following configurations can cause the displayed URL displayed to not correspond to the actual URL used to make external requests to the proxy:
- SSL termination occurs at a load balancer
- Port mapping occurs between a load balancer and Apigee Routers
- A load balancer configured with path rewriting
Edge supports an attribute on the virtual host called <BaseUrl> that lets
you override the URL displayed by the Edge UI. Here's an example showing the virtual host object
with the <BaseUrl> attribute.
In this example, the value "http://myCo.com" appears in the Edge UI:
<VirtualHost name="myTLSVHost">
  <HostAliases>
    <HostAlias>api.myCompany.com</HostAlias>
  </HostAliases>
  <BaseUrl>http://myCo.com</BaseUrl>
  <Port>443</Port>
  <SSLInfo>
    <Enabled>true</Enabled>
    <ClientAuthEnabled>false</ClientAuthEnabled>
    <KeyStore>ref://myTestKeystoreRef</KeyStore>
    <KeyAlias>myKeyAlias</KeyAlias>
  </SSLInfo>
</VirtualHost>
Note that the value of <BaseUrl> must include the protocol (ie, "http://" or
"https://").
If <BaseUrl> is not set, then the default URL rendered by the Edge UI will
appear as: "api.myCompany.com", whereas the actual host alias is "http://myCo.com".