
You're viewing Apigee Edge documentation.
Go to the
Apigee X documentation. info
The following tutorials explain how to deploy Node.js applications to Edge using Hosted Targets, a native Node.js runtime environment hosted by Apigee.
The tutorials walk through the following tasks:
- Deploying a Node.js app to Hosted Targets using the Edge UI.
- Deploying a Node.js app to Hosted Targets from your local development machine.
- Migrating an existing proxy with a traditional Edge Node.js target implementation to Hosted Targets.
Deploy a Node.js app to Hosted Targets using the Edge UI
In this tutorial, you will deploy a simple Node.js app to Hosted Targets using the Edge UI. When you complete the tutorial, you will understand the basic structure and contents of a Hosted Targets proxy and how to access deployment and build log files.
Sign in
- Go to: apigee.com/edge
- Enter your Apigee login credentials to sign in.
Create a new proxy
- In the side navigation menu, select Develop > API Proxies.
- Click + Proxy.
- In the Create Proxy page, select Hosted Target.
- Click Next.
- In the Proxy Name field, enter
hello-hosted-targets. - Be sure "Hello World" Sample is selected.
- Click Next.
- In the Security page, select Pass through (none) for the Authorization.
- Click Next.
- Click Next.
- In the Build page, be sure the test environment is selected. Notice that the Proxy Type is Hosted Targets.
- Click Build and Deploy. It may take a few moments for the proxy deployment to complete.
- After the proxy is successfully deployed, click View hello-hosted-targets proxy at the bottom of the page.
- Call the API proxy. The easiest way to do this is to go to the Trace
tab, start a Trace
session, and click Send. You should receive a 200 status with the following
response:
{"date":"2018-09-26T14:23:04.550Z","msg":"Hello, World!"}
Examine the proxy
- In the Edge UI, click the Develop tab.
- In the Navigator, select default under Target Endpoints.
- In the code editor, notice that there is an empty
<HostedTarget/>child element under the<TargetEndpoint>element. This empty tag is required. It tells Edge that the target of the proxy is an application that is deployed to the Hosted Targets environment.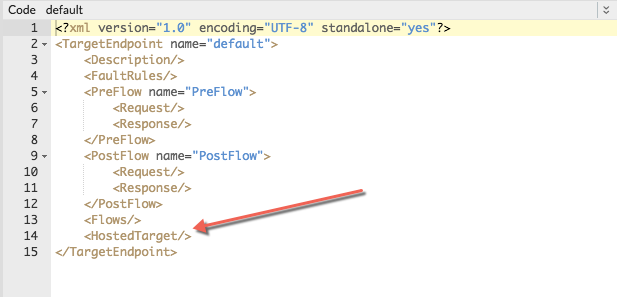
- In the Navigator, notice the contents under the Scripts section. The
Node.js app files are listed under the hosted label.
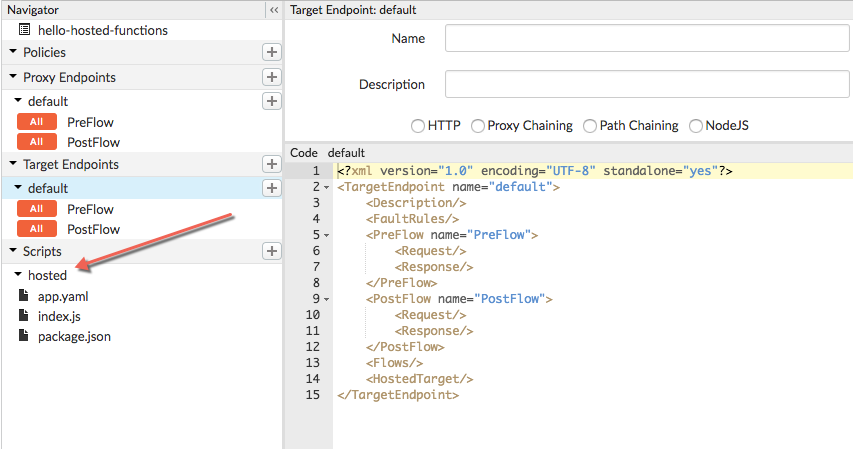
- In the Edge UI, examine the files listed under hosted in the Scripts:
- The app.yaml file contains configuration information. For example, you can add environment variables that will be available to the Node.js application at runtime. You do not need to modify this file for this example.
- The index.js file is the Node.js app's main file.
- If your app has any module dependencies, they must be listed in package.json.
View log files
Application log files can be useful for debugging problems that occur during the build phase and also at runtime.
- In the Edge UI, click the Develop tab.
- To see the build log, click Build Logs.
- To see the deployment log, click Runtime Logs.
See also Accessing log files.
Summary
- You deployed a simple Node.js application to the Hosted Targets environment and tested it in the Edge UI.
- You learned that a Hosted Targets proxy requires a special empty tag in the Target
Endpoint called
<HostedTarget/>. - You learned that Edge loads module dependencies for you automatically, and that dependencies
must be listed in the
package.jsonfile. - You also learned how to check build and runtime log files.
Deploy Node.js from your system to Edge
This section explains how to deploy a standalone Node.js application from your local system to
Hosted Targets using apigeetool. The apigeetool
utility bundles the Node.js app into a new Hosted Targets proxy and deploys it to Edge.
Install apigeetool
Using apigeetool is the recommended way for developers to deploy proxy code to Edge. To install apigeetool run the following NPM command:
npm install -g apigeetool
Create the Node.js app
To make things easy, the code for a simple Node.js app is provided for you.
- Create a directory for the Node.js app. Call the directory node-hosted-express.
- cd to the new directory.
- Create a file called index.js and copy this code into it.
- Create a file called package.json, and copy this code into it. Notice that the express module is listed as a dependency.
- Create a file called app.yaml, and copy this code into it:
- Make sure your directory looks like this:
ls app.yaml index.js package.json
var express = require('express')
var app = express()

app.get('/', function(req, res) {
    res.json({
        hello: "Hello World!"
    })
})

app.get('/hello/:name', function(req, res) {
    var name = req.params.name
    res.json({
        hello: "hello " + name
    })
})

var server = app.listen(process.env.PORT || 9000, function() {
    console.log('Listening on port %d', server.address().port)
})
{
    "name": "hello-world",
    "version": "1.0.0",
    "main": "index.js",
    "scripts": {
        "start": "node index.js --use_strict"
    },
    "author": "",
    "license": "",
    "dependencies": {
        "express": "^4.16.0"
    }
}runtime: node runtimeVersion: 8 application: my-express-app env: - name: NODE_ENV value: production - name: LOG_LEVEL value: 3
Review of the required directory structure for the app code
Your Node.js app must have the
same structure as a standard Node.js app. However, be sure that you have followed these
requirements before deploying with apigeetool to Edge:
- The app.yaml manifest file is required and must exist in the root directory of your app. To learn more about this file, see manifest file.
- A package.json file is required. It must list any dependencies that your app requires.
- A node_modules folder is not required. Edge runs npm install for you when the Node.js app is deployed. It gets the dependencies from package.json. The only time you would need to explicitly provide node_modules is if you have custom modules that are not available through npm.
Deploying the proxy
- In a terminal, cd to the root directory of your Node.js application.
- Execute apigeetool with the deployhostedtarget command:
apigeetool deployhostedtarget -o org -e env -n proxy-name -b /node-hosted-express -u username
where -n is the name you want to give to the new proxy. It must be unique
within the organization. The characters you are allowed to use in the name are restricted to
the following: a-z0-9._\-$%
For example:
apigeetool deployhostedtarget -o myorg -e test -n node-hosted-express -b /node-hosted-express -u jdoe@apigee.com
For more information on using apigeetool see https://github.com/apigee/apigeetool-node.
Testing the proxy
You can test the proxy with a cURL command, with a REST client like Postman, or in the Edge UI in the Trace tool. Here's an example cURL command.
curl http://myorg-test.apigee.net/node-hosted-express
     {"date":1506992197427,"msg":"hello-world"}
Getting the Build Logs
Build logs show you output related to deploying and building the Node.js app. See also Log files.
apigeetool getlogs -u username -o org -e env --hosted-build -n proxy-name
For example:
apigeetool getlogs -u jdoe@apigee.com -o myorg -e test --hosted-build -n node-hosted-express
Getting the Runtime Logs
Runtime logs show output related to the running app. Runtime logs are scoped to the environment and return logs for the currently deployed proxy revision. See also Log files.
apigeetool getlogs -u username -o org -e env --hosted-runtime -n proxy-name
For example:
apigeetool getlogs -u jdoe@apigee.com -o myorg -e test --hosted-runtime -n node-hosted-express
Viewing the proxy in the Edge UI
After a successful deployment, you can view and edit your proxy in the API Proxies part of the Edge UI.
Migrating an existing Node.js proxy to a Hosted Targets proxy
This section explains how to manually migrate an existing Edge API proxy that employs the traditional Node.js target implementation to Hosted Targets. It also explains how to deploy the proxy after you've performed the migration steps.
The migration steps preserve the API proxy structure, policies, flows, and other configuration elements. You can perform the migration in four steps, as outlined below, and then deploy the migrated proxy with apigeetool.
Step 1: Adjust the proxy file structure
To adjust the file structure, the API proxy must be on your local filesystem. If the proxy is
deployed on Edge, you must download it
before continuing. In the traditional configuration, and Edge proxy "bundle" that includes Node.js code follows this file structure.
The Node.js application code is placed in the resources/node directory:
apiproxy/
    policies/
    proxies/
    targets/
    resources/
      node/
        Your application code
For Hosted Targets, you must place the root directory of your Node.js app under a
directory called resources/hosted. Simply create a new directory called
resources/hosted and move the contents of resources/node
into it. Then, you can delete the resources/node directory.
apiproxy/
     policies/
     proxies/
     targets/
     resources/
       hosted/
         Your application code
Step 2: Add the manifest file
Create a manifest file called app.yaml and place it in the
apiproxy/resources/hosted directory.
Following is an example app.yaml file. It specifies that the runtime is
Node.js (required). It also creates an environment variable in the execution environment
(a variable that could be accessed by the Node.js app). The environment variable is optional
and is only shown here as an example. For more details and examples, see The manifest file.
runtime: node
  env:
    - name: NODE_ENV
      value: production
The following example shows a Node.js project structure that is in the correct location in the
proxy for Hosted Targets deployment:
apiproxy/
   resources/
      hosted/
        index.js
        node_modules/
        app.yaml
package.jsonStep 3: Make sure you have a package.json file
In traditional Edge Node.js proxies, the package.json was
optional. However, for Hosted Targets, you must supply one in the apiproxy/resources/hosted directory. Be sure
to specify any required dependencies for your app in this file.
Step 4: Modify the target endpoint of the proxy
A traditional Node.js proxy requires that a tag called <ScriptTarget>
be present in the target endpoint file (typically /apiproxy/targets/default.xml).
For Hosted Targets, you need to add an empty tag called <HostedTarget/>.
If there's a ScriptTarget tag in the file, you can simply remove it.
For example:
    <?xml version="1.0" encoding="UTF-8"?>
    <TargetEndpoint name="default">
       <Description />
       <FaultRules />
       <PreFlow name="PreFlow">
          <Request />
          <Response />
       </PreFlow>
       <PostFlow name="PostFlow">
          <Request />
          <Response />
       </PostFlow>
       <Flows />
       <HostedTarget />
    </TargetEndpoint>
Deploying the proxy
You can now deploy the proxy using the apigeetool deployproxy command.
- cd to the root directory of your proxy: /apiproxy
- Use this command to deploy the proxy:
apigeetool deployproxy -u username -o org -e env -n proxy-name -d .
For example:
apigeetool deployproxy -u jdoe -o docs -e test -n hello-world -d .
For more information on using apigeetool see:
https://github.com/apigee/apigeetool-node/blob/master/README.md.
Testing the proxy
You can test the proxy with a cURL command, with a REST client like Postman, or in the Edge UI in the Trace tool. Here's an example cURL command:
curl http://myorg-test.apigee.net/hello-world
Hello,World!