

আপনি Apigee Edge-এর ডকুমেন্টেশন দেখছেন।
Apigee X ডকুমেন্টেশন .info- তে যান।
Edge Microgateway v. 3.3.x
এই অংশে এজ মাইক্রোগেটওয়ে কীভাবে পরিচালনা ও কনফিগার করতে হয়, তা আলোচনা করা হয়েছে।
ইন্টারনেট সংযোগ থাকলে Edge Microgateway আপগ্রেড করা
এই বিভাগে Edge Microgateway-এর একটি বিদ্যমান ইনস্টলেশন কীভাবে আপগ্রেড করতে হয় তা ব্যাখ্যা করা হয়েছে। আপনি যদি ইন্টারনেট সংযোগ ছাড়াই কাজ করেন, তাহলে ‘আমি কি ইন্টারনেট সংযোগ ছাড়া Edge Microgateway ইনস্টল করতে পারি?’ অংশটি দেখুন।
Apigee পরামর্শ দেয় যে, আপনার প্রোডাকশন এনভায়রনমেন্ট আপগ্রেড করার আগে নতুন ভার্সন দিয়ে আপনার বিদ্যমান কনফিগারেশনটি পরীক্ষা করে নিন।
- Edge Microgateway-এর সর্বশেষ সংস্করণে আপগ্রেড করতে নিম্নলিখিত
npmকমান্ডটি চালান:npm upgrade edgemicro -g
Edge Microgateway-এর একটি নির্দিষ্ট সংস্করণ ইনস্টল করতে, আপনাকে ইনস্টল কমান্ডে সংস্করণ নম্বরটি উল্লেখ করতে হবে। উদাহরণস্বরূপ, সংস্করণ 3.2.3 ইনস্টল করতে, নিম্নলিখিত কমান্ডটি ব্যবহার করুন:
npm install edgemicro@3.2.3 -g
- ভার্সন নম্বরটি যাচাই করুন। উদাহরণস্বরূপ, যদি আপনি ভার্সন ৩.২.৩ ইনস্টল করে থাকেন:
edgemicro --version current nodejs version is v12.5.0 current edgemicro version is 3.2.3 - অবশেষে, edgemicro-auth প্রক্সির সর্বশেষ সংস্করণে আপগ্রেড করুন:
edgemicro upgradeauth -o $ORG -e $ENV -u $USERNAME
কনফিগারেশন পরিবর্তন করা
যেসব কনফিগারেশন ফাইল সম্পর্কে আপনার জানা প্রয়োজন, সেগুলো হলো:
- ডিফল্ট সিস্টেম কনফিগারেশন ফাইল
- নতুনভাবে চালু করা এজ মাইক্রোগেটওয়ে ইনস্ট্যান্সের জন্য ডিফল্ট কনফিগারেশন ফাইল
- চলমান ইনস্ট্যান্সগুলির জন্য ডায়নামিক কনফিগারেশন ফাইল
এই অংশে এই ফাইলগুলো এবং সেগুলো পরিবর্তন করার জন্য আপনার যা জানা প্রয়োজন, তা আলোচনা করা হয়েছে।
ডিফল্ট সিস্টেম কনফিগারেশন ফাইল
আপনি যখন Edge Microgateway ইনস্টল করেন, তখন একটি ডিফল্ট সিস্টেম কনফিগারেশন ফাইল এখানে রাখা হয়:
prefix/lib/node_modules/edgemicro/config/default.yaml
যেখানে prefix হলো npm প্রিফিক্স ডিরেক্টরি। আপনি যদি এই ডিরেক্টরিটি খুঁজে না পান, তাহলে “Where is Edge Microgateway installed” দেখুন।
আপনি যদি সিস্টেম কনফিগারেশন ফাইল পরিবর্তন করেন, তাহলে আপনাকে অবশ্যই Edge Microgateway পুনরায় ইনিশিয়ালাইজ, রিকনফিগার এবং রিস্টার্ট করতে হবে:
edgemicro initedgemicro configure [params]edgemicro start [params]
নতুনভাবে চালু করা এজ মাইক্রোগেটওয়ে ইনস্ট্যান্সগুলির জন্য ডিফল্ট কনফিগারেশন ফাইল
যখন আপনি edgemicro init চালান, তখন উপরে বর্ণিত সিস্টেম কনফিগারেশন ফাইল default.yaml ~/.edgemicro ডিরেক্টরিতে রাখা হয়।
যদি আপনি ~/.edgemicro তে থাকা কনফিগারেশন ফাইলটি পরিবর্তন করেন, তাহলে আপনাকে অবশ্যই Edge Microgateway পুনরায় কনফিগার করে রিস্টার্ট করতে হবে:
edgemicro stopedgemicro configure [params]edgemicro start [params]
চলমান ইনস্ট্যান্সগুলির জন্য ডায়নামিক কনফিগারেশন ফাইল
যখন আপনি edgemicro configure [params] চালান, তখন ~/.edgemicro ফোল্ডারে একটি ডাইনামিক কনফিগারেশন ফাইল তৈরি হয়। ফাইলটির নামকরণ এই প্যাটার্ন অনুযায়ী করা হয়: org - env -config.yaml , যেখানে org এবং env হলো আপনার `Apigee Edge` অর্গানাইজেশন এবং এনভায়রনমেন্টের নাম। আপনি এই ফাইলটি ব্যবহার করে কনফিগারেশনে পরিবর্তন আনতে পারেন এবং তারপর কোনো ডাউনটাইম ছাড়াই তা রিলোড করতে পারেন। উদাহরণস্বরূপ, যদি আপনি একটি প্লাগইন যোগ এবং কনফিগার করেন, তাহলে আপনি কোনো ডাউনটাইম ছাড়াই কনফিগারেশনটি রিলোড করতে পারেন, যেমনটি নিচে ব্যাখ্যা করা হয়েছে।
যদি Edge Microgateway চালু থাকে (জিরো-ডাউনটাইম বিকল্প):
- Edge Microgateway কনফিগারেশন পুনরায় লোড করুন:
edgemicro reload -o $ORG -e $ENV -k $KEY -s $SECRET
কোথায়:
- $ORG হলো আপনার Edge অর্গানাইজেশনের নাম (আপনাকে অবশ্যই অর্গানাইজেশন অ্যাডমিনিস্ট্রেটর হতে হবে)।
- $ENV হলো আপনার অর্গের একটি এনভায়রনমেন্ট (যেমন "test" বা "prod")।
- $KEY হলো সেই কী, যা পূর্বে configure কমান্ডের মাধ্যমে ফেরত দেওয়া হয়েছিল।
- $SECRET হলো সেই কী, যা পূর্বে configure কমান্ডের মাধ্যমে ফেরত দেওয়া হয়েছিল।
উদাহরণস্বরূপ
edgemicro reload -o docs -e test -k 701e70ee718ce6dc188...78b6181d000723 \
  -s 05c14356e42ed1...4e34ab0cc824
যদি Edge Microgateway বন্ধ করা হয়:
- Edge মাইক্রোগেটওয়ে পুনরায় চালু করুন:
edgemicro start -o $ORG -e $ENV -k $KEY -s $SECRET
কোথায়:
- $ORG হলো আপনার Edge অর্গানাইজেশনের নাম (আপনাকে অবশ্যই অর্গানাইজেশন অ্যাডমিনিস্ট্রেটর হতে হবে)।
- $ENV হলো আপনার প্রতিষ্ঠানের একটি পরিবেশ (যেমন "test" বা "prod")।
- $KEY হলো সেই কী, যা পূর্বে configure কমান্ডের মাধ্যমে ফেরত দেওয়া হয়েছিল।
- $SECRET হলো সেই কী, যা পূর্বে configure কমান্ডের মাধ্যমে ফেরত দেওয়া হয়েছিল।
উদাহরণস্বরূপ:
edgemicro start -o docs -e test -k 701e70ee718ce...b6181d000723 \
  -s 05c1435...e34ab0cc824
এখানে একটি নমুনা কনফিগারেশন ফাইল দেওয়া হলো। কনফিগারেশন ফাইলের সেটিংস সম্পর্কে বিস্তারিত জানতে, এজ মাইক্রোগেটওয়ে কনফিগারেশন রেফারেন্স দেখুন।
edge_config:
  bootstrap: >-
    https://edgemicroservices-us-east-1.apigee.net/edgemicro/bootstrap/organization/docs/environment/test
  jwt_public_key: 'https://docs-test.apigee.net/edgemicro-auth/publicKey'
  managementUri: 'https://api.enterprise.apigee.com'
  vaultName: microgateway
  authUri: 'https://%s-%s.apigee.net/edgemicro-auth'
  baseUri: >-
    https://edgemicroservices.apigee.net/edgemicro/%s/organization/%s/environment/%s
  bootstrapMessage: Please copy the following property to the edge micro agent config
  keySecretMessage: The following credentials are required to start edge micro
  products: 'https://docs-test.apigee.net/edgemicro-auth/products'
edgemicro:
  port: 8000
  max_connections: 1000
  max_connections_hard: 5000
  config_change_poll_interval: 600
  logging:
    level: error
    dir: /var/tmp
    stats_log_interval: 60
    rotate_interval: 24
  plugins:
    sequence:
      - oauth
headers:
  x-forwarded-for: true
  x-forwarded-host: true
  x-request-id: true
  x-response-time: true
  via: true
oauth:
  allowNoAuthorization: false
  allowInvalidAuthorization: false
  verify_api_key_url: 'https://docs-test.apigee.net/edgemicro-auth/verifyApiKey'
analytics:
  uri: >-
    https://edgemicroservices-us-east-1.apigee.net/edgemicro/axpublisher/organization/docs/environment/test
পরিবেশ ভেরিয়েবল সেট করা
যেসব কমান্ড-লাইন ইন্টারফেস কমান্ডের জন্য আপনার Edge অর্গানাইজেশন ও এনভায়রনমেন্টের ভ্যালু প্রয়োজন, এবং Edge Microgateway চালু করার জন্য প্রয়োজনীয় কী (key) ও সিক্রেট (secret) এই এনভায়রনমেন্ট ভেরিয়েবলগুলোতে সংরক্ষণ করা যেতে পারে:
-
EDGEMICRO_ORG -
EDGEMICRO_ENV -
EDGEMICRO_KEY -
EDGEMICRO_SECRET
এই ভেরিয়েবলগুলো সেট করা ঐচ্ছিক। যদি আপনি এগুলো সেট করেন, তাহলে কমান্ড-লাইন ইন্টারফেস (CLI) ব্যবহার করে এজ মাইক্রোগেটওয়ে কনফিগার ও চালু করার সময় এগুলোর মান উল্লেখ করার প্রয়োজন নেই।
এজ মাইক্রোগেটওয়ে সার্ভারে SSL কনফিগার করা
Apigee Edge Microgateway-তে TLS কনফিগার করার বিষয়ে জানতে নিম্নলিখিত ভিডিওগুলো দেখুন:
| ভিডিও | বর্ণনা |
|---|---|
| একমুখী উত্তরমুখী টিএলএস কনফিগার করুন | Apigee Edge Microgateway-তে TLS কনফিগার করা সম্পর্কে জানুন। এই ভিডিওটিতে TLS ও এর গুরুত্ব সম্পর্কে একটি সংক্ষিপ্ত বিবরণ দেওয়া হয়েছে, Edge Microgateway-তে TLS-এর পরিচিতি তুলে ধরা হয়েছে এবং Northbound One-Way TLS কীভাবে কনফিগার করতে হয় তা দেখানো হয়েছে। |
| দ্বিমুখী উত্তরমুখী টিএলএস কনফিগার করুন | Apigee Edge Microgateway-তে TLS কনফিগার করার উপর এটি দ্বিতীয় ভিডিও। এই ভিডিওতে নর্থবাউন্ড ২-ওয়ে TLS কীভাবে কনফিগার করতে হয় তা ব্যাখ্যা করা হয়েছে। |
| একমুখী এবং দ্বিমুখী দক্ষিণমুখী টিএলএস কনফিগার করুন | Apigee Edge Microgateway-তে TLS কনফিগার করার উপর এই তৃতীয় ভিডিওটিতে সাউথবাউন্ড ১-ওয়ে এবং ২-ওয়ে TLS কীভাবে কনফিগার করতে হয় তা ব্যাখ্যা করা হয়েছে। |
আপনি SSL ব্যবহার করার জন্য মাইক্রোগেটওয়ে সার্ভারটি কনফিগার করতে পারেন। উদাহরণস্বরূপ, SSL কনফিগার করা থাকলে, আপনি এজ মাইক্রোগেটওয়ের মাধ্যমে "https" প্রোটোকল ব্যবহার করে API কল করতে পারেন, যেমন:
https://localhost:8000/myapi
মাইক্রোগেটওয়ে সার্ভারে SSL কনফিগার করতে, এই ধাপগুলো অনুসরণ করুন:
- openssl ইউটিলিটি ব্যবহার করে অথবা আপনার পছন্দের যেকোনো পদ্ধতি অবলম্বন করে একটি SSL সার্টিফিকেট ও কী তৈরি বা সংগ্রহ করুন।
- Edge Microgateway কনফিগারেশন ফাইলে
edgemicro:sslঅ্যাট্রিবিউটটি যোগ করুন। অপশনগুলোর সম্পূর্ণ তালিকার জন্য নিচের টেবিলটি দেখুন। উদাহরণস্বরূপ:edgemicro: ssl: key: <absolute path to the SSL key file> cert: <absolute path to the SSL cert file> passphrase: admin123 #option added in v2.2.2 rejectUnauthorized: true #option added in v2.2.2 requestCert: true
- Edge Microgateway পুনরায় চালু করুন। আপনি কোন কনফিগারেশন ফাইলটি সম্পাদনা করেছেন (ডিফল্ট ফাইল নাকি রানটাইম কনফিগারেশন ফাইল), তার উপর নির্ভর করে 'কনফিগারেশন পরিবর্তন করা' অংশে বর্ণিত পদক্ষেপগুলি অনুসরণ করুন।
এখানে কনফিগারেশন ফাইলের edgemicro অংশের একটি উদাহরণ দেওয়া হলো, যেখানে SSL কনফিগার করা আছে:
edgemicro:
  port: 8000
  max_connections: 1000
  max_connections_hard: 5000
  logging:
    level: error
    dir: /var/tmp
    stats_log_interval: 60
    rotate_interval: 24
  plugins:
    sequence:
      - oauth
  ssl:
    key: /MyHome/SSL/em-ssl-keys/server.key
    cert: /MyHome/SSL/em-ssl-keys/server.crt
    passphrase: admin123 #option added in v2.2.2
    rejectUnauthorized: true #option added in v2.2.2
এখানে সকল সমর্থিত সার্ভার বিকল্পগুলির একটি তালিকা দেওয়া হল:
| বিকল্প | বর্ণনা |
|---|---|
key | একটি ca.key ফাইলের পাথ (PEM ফরম্যাটে)। |
cert | একটি ca.cert ফাইলের পাথ (PEM ফরম্যাটে)। |
pfx | PFX ফরম্যাটে ক্লায়েন্টের প্রাইভেট কী, সার্টিফিকেট এবং CA সার্টিফিকেট সম্বলিত একটি pfx ফাইলের পাথ। |
passphrase | প্রাইভেট কী বা PFX-এর পাসফ্রেজ সম্বলিত একটি স্ট্রিং। |
ca | PEM ফরম্যাটে বিশ্বস্ত সার্টিফিকেটগুলোর তালিকা সম্বলিত ফাইলের পাথ। |
ciphers | ব্যবহারযোগ্য সাইফারগুলোর বর্ণনা সম্বলিত একটি স্ট্রিং, যা একটি কোলন (:) দ্বারা পৃথক করা থাকবে। |
rejectUnauthorized | যদি সত্য হয়, তাহলে সরবরাহকৃত CA-এর তালিকার সাথে সার্ভার সার্টিফিকেটটি যাচাই করা হয়। যাচাইকরণ ব্যর্থ হলে, একটি ত্রুটি বার্তা দেখানো হয়। |
secureProtocol | ব্যবহার করার জন্য SSL পদ্ধতি। উদাহরণস্বরূপ, SSL-কে সংস্করণ ৩-এ বাধ্যতামূলক করতে SSLv3_method ব্যবহার করা যেতে পারে। |
servername | SNI (সার্ভার নেম ইন্ডিকেশন) TLS এক্সটেনশনের জন্য সার্ভারের নাম। |
requestCert | দ্বিমুখী SSL এর জন্য true; একমুখী SSL এর জন্য false |
ক্লায়েন্ট SSL/TLS বিকল্প ব্যবহার করে
টার্গেট এন্ডপয়েন্টগুলিতে সংযোগ করার সময় আপনি Edge Microgateway-কে একটি TLS বা SSL ক্লায়েন্ট হিসেবে কনফিগার করতে পারেন। Microgateway কনফিগারেশন ফাইলে, SSL/TLS অপশন সেট করার জন্য targets এলিমেন্টটি ব্যবহার করুন। মনে রাখবেন যে আপনি একাধিক নির্দিষ্ট টার্গেট উল্লেখ করতে পারেন। একাধিক টার্গেটের একটি উদাহরণ নিচে দেওয়া হলো।
এই উদাহরণটিতে এমন সেটিংস দেওয়া হয়েছে যা সকল হোস্টের ক্ষেত্রে প্রযোজ্য হবে:
edgemicro:
...
targets:
  ssl:
    client:
      key: /Users/jdoe/nodecellar/twowayssl/ssl/client.key
      cert: /Users/jdoe/nodecellar/twowayssl/ssl/ca.crt
      passphrase: admin123
      rejectUnauthorized: true
এই উদাহরণে, সেটিংসগুলো শুধুমাত্র নির্দিষ্ট হোস্টের ক্ষেত্রেই প্রয়োগ করা হয়:
edgemicro:
...
targets:
  - host: 'myserver.example.com'
    ssl:
      client:
        key: /Users/myname/twowayssl/ssl/client.key
        cert: /Users/myname/twowayssl/ssl/ca.crt
        passphrase: admin123
        rejectUnauthorized: true
এখানে TLS-এর একটি উদাহরণ দেওয়া হলো:
edgemicro:
...
targets:
  - host: 'myserver.example.com'
    tls:
      client:
        pfx: /Users/myname/twowayssl/ssl/client.pfx
        passphrase: admin123
        rejectUnauthorized: true
যে ক্ষেত্রে আপনি একাধিক নির্দিষ্ট টার্গেটে TLS/SSL সেটিংস প্রয়োগ করতে চান, সেক্ষেত্রে আপনাকে কনফিগারেশনের প্রথম হোস্টটিকে "খালি" (empty) হিসেবে উল্লেখ করতে হবে, যা সার্বজনীন অনুরোধ (universal requests) সক্ষম করে, এবং তারপর যেকোনো ক্রমে নির্দিষ্ট হোস্টগুলো উল্লেখ করতে হবে। এই উদাহরণে, সেটিংসগুলো একাধিক নির্দিষ্ট হোস্টে প্রয়োগ করা হয়েছে:
targets:
 - host:   ## Note that this value must be "empty"
   ssl:
     client:
       key: /Users/myname/twowayssl/ssl/client.key
       cert: /Users/myname/twowayssl/ssl/ca.crt
       passphrase: admin123
       rejectUnauthorized: true
 - host: 'myserver1.example.com'
   ssl:
     client:
       key: /Users/myname/twowayssl/ssl/client.key
       cert: /Users/myname/twowayssl/ssl/ca.crt
       rejectUnauthorized: true
 - host: 'myserver2.example.com'
   ssl:
     client:
       key: /Users/myname/twowayssl/ssl/client.key
       cert: /Users/myname/twowayssl/ssl/ca.crt
       rejectUnauthorized: true
এখানে সকল সমর্থিত ক্লায়েন্ট অপশনগুলোর একটি তালিকা দেওয়া হলো:
| বিকল্প | বর্ণনা |
|---|---|
pfx | PFX ফরম্যাটে ক্লায়েন্টের প্রাইভেট কী, সার্টিফিকেট এবং CA সার্টিফিকেট সম্বলিত একটি pfx ফাইলের পাথ। |
key | একটি ca.key ফাইলের পাথ (PEM ফরম্যাটে)। |
passphrase | প্রাইভেট কী বা PFX-এর পাসফ্রেজ সম্বলিত একটি স্ট্রিং। |
cert | একটি ca.cert ফাইলের পাথ (PEM ফরম্যাটে)। |
ca | PEM ফরম্যাটে বিশ্বস্ত সার্টিফিকেটগুলোর তালিকা সম্বলিত ফাইলের পাথ। |
ciphers | ব্যবহারযোগ্য সাইফারগুলোর বর্ণনা সম্বলিত একটি স্ট্রিং, যা একটি কোলন (:) দ্বারা পৃথক করা থাকবে। |
rejectUnauthorized | যদি সত্য হয়, তাহলে সরবরাহকৃত CA-এর তালিকার সাথে সার্ভার সার্টিফিকেটটি যাচাই করা হয়। যাচাইকরণ ব্যর্থ হলে, একটি ত্রুটি বার্তা দেখানো হয়। |
secureProtocol | ব্যবহার করার জন্য SSL পদ্ধতি। উদাহরণস্বরূপ, SSL-কে সংস্করণ ৩-এ বাধ্যতামূলক করতে SSLv3_method ব্যবহার করা যেতে পারে। |
servername | SNI (সার্ভার নেম ইন্ডিকেশন) TLS এক্সটেনশনের জন্য সার্ভারের নাম। |
edgemicro-auth প্রক্সি কাস্টমাইজ করা
ডিফল্টরূপে, Edge Microgateway, OAuth2 অথেনটিকেশনের জন্য Apigee Edge-এ ডেপ্লয় করা একটি প্রক্সি ব্যবহার করে। আপনি যখন প্রথমবার edgemicro configure চালান, তখন এই প্রক্সিটি ডেপ্লয় করা হয়। আপনি এই প্রক্সির ডিফল্ট কনফিগারেশন পরিবর্তন করে একটি JSON Web Token (JWT)-এ কাস্টম ক্লেইমের জন্য সাপোর্ট যোগ করতে, টোকেনের মেয়াদ শেষ হওয়ার সময় নির্ধারণ করতে এবং রিফ্রেশ টোকেন তৈরি করতে পারেন। বিস্তারিত জানতে, GitHub-এ ` edgemicro-auth` পেজটি দেখুন।
কাস্টম অথেন্টিকেশন পরিষেবা ব্যবহার করে
ডিফল্টরূপে, Edge Microgateway OAuth2 অথেনটিকেশনের জন্য Apigee Edge-এ ডেপ্লয় করা একটি প্রক্সি ব্যবহার করে। আপনি যখন প্রথমবার edgemicro configure চালান, তখন এই প্রক্সিটি ডেপ্লয় করা হয়। ডিফল্টরূপে, এই প্রক্সির URL-টি Edge Microgateway কনফিগারেশন ফাইলে নিম্নরূপভাবে নির্দিষ্ট করা থাকে:
authUri: https://myorg-myenv.apigee.net/edgemicro-auth
আপনি যদি প্রমাণীকরণের জন্য আপনার নিজস্ব কাস্টম পরিষেবা ব্যবহার করতে চান, তাহলে আপনার পরিষেবাটিকে নির্দেশ করার জন্য কনফিগ ফাইলে থাকা authUri ভ্যালুটি পরিবর্তন করুন। উদাহরণস্বরূপ, আপনার এমন একটি পরিষেবা থাকতে পারে যা পরিচয় যাচাই করার জন্য LDAP ব্যবহার করে।
লগ ফাইল পরিচালনা করা
Edge Microgateway প্রতিটি অনুরোধ এবং প্রতিক্রিয়া সম্পর্কে তথ্য লগ করে। লগ ফাইলগুলি ডিবাগিং এবং সমস্যা সমাধানের জন্য দরকারী তথ্য প্রদান করে।
লগ ফাইলগুলি কোথায় সংরক্ষণ করা হয়
ডিফল্টরূপে, লগ ফাইলগুলো /var/tmp তে সংরক্ষিত হয়।
ডিফল্ট লগ ফাইল ডিরেক্টরি কীভাবে পরিবর্তন করবেন
যে ডিরেক্টরিতে লগ ফাইলগুলো সংরক্ষিত হয়, তা এজ মাইক্রোগেটওয়ে কনফিগারেশন ফাইলে নির্দিষ্ট করা থাকে। আরও দেখুন ‘কনফিগারেশন পরিবর্তন করা’ ।
edgemicro:
  home: ../gateway
  port: 8000
  max_connections: -1
  max_connections_hard: -1
  logging:
    level: info
    dir: /var/tmp
    stats_log_interval: 60
    rotate_interval: 24
ভিন্ন লগ ফাইল ডিরেক্টরি নির্দিষ্ট করতে dir মানটি পরিবর্তন করুন।
কনসোলে লগ পাঠান
আপনি লগিং এমনভাবে কনফিগার করতে পারেন যাতে লগ তথ্য কোনো লগ ফাইলের পরিবর্তে স্ট্যান্ডার্ড আউটপুটে পাঠানো হয়। এর জন্য to_console ফ্ল্যাগটি true-তে সেট করুন, যেভাবে নিচে দেখানো হয়েছে:
edgemicro:
  logging:
    to_console: true
এই সেটিংটির মাধ্যমে লগগুলো স্ট্যান্ডার্ড আউটপুটে পাঠানো হবে। বর্তমানে, আপনি একই সাথে স্ট্যান্ডার্ড আউটপুট (stdout) এবং একটি লগ ফাইলে লগ পাঠাতে পারবেন না।
লগিং লেভেল কীভাবে সেট করবেন
আপনি edgemicro কনফিগারেশনে ব্যবহার করার জন্য লগ লেভেল নির্দিষ্ট করে দেন। লগ লেভেল এবং তাদের বিবরণের সম্পূর্ণ তালিকার জন্য, edgemicro অ্যাট্রিবিউটস দেখুন।
উদাহরণস্বরূপ, নিম্নলিখিত কনফিগারেশনটি লগিং লেভেলকে debug এ সেট করে:
edgemicro:
  home: ../gateway
  port: 8000
  max_connections: -1
  max_connections_hard: -1
  logging:
    level: debug
    dir: /var/tmp
    stats_log_interval: 60
    rotate_interval: 24
লগ ব্যবধান কীভাবে পরিবর্তন করবেন
আপনি Edge Microgateway কনফিগারেশন ফাইলে এই ব্যবধানগুলো নির্ধারণ করতে পারেন। আরও দেখুন ‘কনফিগারেশন পরিবর্তন করা’ ।
পরিবর্তনযোগ্য বৈশিষ্ট্যগুলো হলো:
- stats_log_interval : (ডিফল্ট: ৬০) ব্যবধান, সেকেন্ডে, যখন পরিসংখ্যান রেকর্ডটি এপিআই লগ ফাইলে লেখা হয়।
- rotate_interval : (ডিফল্ট: ২৪) লগ ফাইল ঘোরানোর ব্যবধান, ঘণ্টায়। উদাহরণস্বরূপ:
edgemicro:
  home: ../gateway
  port: 8000
  max_connections: -1
  max_connections_hard: -1
  logging:
    level: info
    dir: /var/tmp
    stats_log_interval: 60
    rotate_interval: 24
লগ ফাইলের কঠোর অনুমতি কীভাবে শিথিল করবেন
ডিফল্টরূপে, Edge Microgateway অ্যাপ্লিকেশন লগ ফাইল ( api-log.log ) তৈরি করে যার ফাইল পারমিশন লেভেল 0600 সেট করা থাকে। এই পারমিশন লেভেলের কারণে বাইরের কোনো অ্যাপ্লিকেশন বা ব্যবহারকারী লগ ফাইলটি পড়তে পারে না। এই কঠোর পারমিশন লেভেল শিথিল করতে, logging:disableStrictLogFile অ্যাট্রিবিউটটিকে true তে সেট করুন। যখন এই অ্যাট্রিবিউটটি true হয়, তখন লগ ফাইলটি 0755 ফাইল পারমিশন সহ তৈরি হয়। যদি false বা অ্যাট্রিবিউটটি প্রদান করা না হয়, তাহলে ডিফল্ট পারমিশন 0600 সেট হয়ে যায়।
v3.2.3-এ যোগ করা হয়েছে।
উদাহরণস্বরূপ:
edgemicro:
 logging:
   disableStrictLogFile: true
লগ ফাইল রক্ষণাবেক্ষণের ভালো অভ্যাস
সময়ের সাথে সাথে লগ ফাইলের ডেটা জমা হতে থাকায়, Apigee আপনাকে নিম্নলিখিত পদ্ধতিগুলো অবলম্বন করার পরামর্শ দেয়:
- যেহেতু লগ ফাইলগুলো বেশ বড় হয়ে যেতে পারে, তাই নিশ্চিত করুন যে লগ ফাইল ডিরেক্টরিতে পর্যাপ্ত জায়গা আছে। নিম্নলিখিত বিভাগগুলো দেখুন: লগ ফাইলগুলো কোথায় সংরক্ষিত হয় এবং কীভাবে ডিফল্ট লগ ফাইল ডিরেক্টরি পরিবর্তন করবেন ।
- সপ্তাহে অন্তত একবার লগ ফাইলগুলো মুছে ফেলুন অথবা একটি আলাদা আর্কাইভ ডিরেক্টরিতে সরিয়ে নিন।
- আপনার নীতি যদি লগ মুছে ফেলা হয়, তাহলে আপনি পুরোনো লগগুলো সরিয়ে (পরিষ্কার করতে)
edgemicro log -cCLI কমান্ডটি ব্যবহার করতে পারেন।
লগ ফাইলের নামকরণের নিয়ম
প্রতিটি Edge Microgateway ইনস্ট্যান্স .log এক্সটেনশন সহ একটি লগ ফাইল তৈরি করে। লগ ফাইলের নামকরণের নিয়মটি নিম্নরূপ:
edgemicro- HOST_NAME - INSTANCE_ID -api.log
উদাহরণস্বরূপ:
edgemicro-mymachine-local-MTQzNTgNDMxODAyMQ-api.log
লগ ফাইলের বিষয়বস্তু সম্পর্কে
যোগ করা হয়েছে: v2.3.3
ডিফল্টরূপে, লগিং পরিষেবা ডাউনলোড করা প্রক্সি, প্রোডাক্ট এবং JSON ওয়েব টোকেন (JWT)-এর JSON বাদ দেয়। আপনি যদি এই অবজেক্টগুলো কনসোলে আউটপুট করতে চান, তাহলে Edge Microgateway চালু করার সময় কমান্ড-লাইন ফ্ল্যাগ DEBUG=* সেট করুন। উদাহরণস্বরূপ:
DEBUG=* edgemicro start -o docs -e test -k abc123 -s xyz456
'api' লগ ফাইলের বিষয়বস্তু
'api' লগ ফাইলে Edge Microgateway-এর মাধ্যমে অনুরোধ এবং প্রতিক্রিয়ার প্রবাহ সম্পর্কে বিস্তারিত তথ্য থাকে। 'api' লগ ফাইলগুলোর নামকরণ এইভাবে করা হয়:
edgemicro-mymachine-local-MTQzNjIxOTk0NzY0Nw-api.log
Edge Microgateway-তে করা প্রতিটি অনুরোধের জন্য, 'api' লগ ফাইলে চারটি ইভেন্ট রেকর্ড করা হয়:
- ক্লায়েন্টের কাছ থেকে আগত অনুরোধ
- লক্ষ্যবস্তুর কাছে বহির্গামী অনুরোধ করা হয়েছে
- লক্ষ্যবস্তু থেকে আগত প্রতিক্রিয়া
- ক্লায়েন্টের কাছে বহির্গামী প্রতিক্রিয়া
লগ ফাইলগুলোকে আরও সংক্ষিপ্ত করার জন্য এই প্রতিটি আলাদা এন্ট্রিকে একটি সংক্ষিপ্ত সংকেতে উপস্থাপন করা হয়। এখানে চারটি ইভেন্টের প্রত্যেকটির প্রতিনিধিত্বকারী চারটি নমুনা এন্ট্রি দেওয়া হলো। লগ ফাইলে, এগুলো দেখতে এইরকম (লাইন নম্বরগুলো শুধুমাত্র ডকে রেফারেন্সের জন্য, এগুলো লগ ফাইলে দেখা যায় না)।
(1) 1436403888651 info req m=GET, u=/, h=localhost:8000, r=::1:59715, i=0
(2) 1436403888665 info treq m=GET, u=/, h=127.0.0.18080, i=0
(3) 1436403888672 info tres s=200, d=7, i=0
(4) 1436403888676 info res s=200, d=11, i=0
চলুন, এক এক করে সেগুলো দেখা যাক:
১. ক্লায়েন্টের কাছ থেকে আসা অনুরোধের নমুনা:
1436403888651 info req m=GET, u=/, h=localhost:8000, r=::1:59715, i=0
- 1436403888651 - ইউনিক্স তারিখ স্ট্যাম্প
- তথ্য - লগিং লেভেল। এই মানটি ট্রানজ্যাকশনের প্রেক্ষাপট এবং
edgemicroকনফিগারেশনে সেট করা লগিং লেভেলের উপর নির্ভর করে। লগিং লেভেল কীভাবে সেট করবেন তা দেখুন। স্ট্যাটস রেকর্ডের জন্য, লেভেলটিstatsএ সেট করা হয়।stats_log_intervalকনফিগারেশনের মাধ্যমে সেট করা একটি নির্দিষ্ট বিরতিতে স্ট্যাটস রেকর্ডগুলো রিপোর্ট করা হয়। লগ ইন্টারভ্যাল কীভাবে পরিবর্তন করবেন তাও দেখুন। - req - ঘটনাটিকে শনাক্ত করে। এক্ষেত্রে, ক্লায়েন্টের পক্ষ থেকে করা অনুরোধ।
- m - অনুরোধে ব্যবহৃত HTTP ভার্ব।
- u - URL-এর বেসপ্যাথের পরবর্তী অংশ।
- h - যে হোস্ট এবং পোর্ট নম্বরে Edge Microgateway শুনছে।
- r - দূরবর্তী হোস্ট এবং পোর্ট যেখান থেকে ক্লায়েন্টের অনুরোধটি পাঠানো হয়েছিল।
- i - অনুরোধ আইডি। চারটি ইভেন্ট এন্ট্রিই এই আইডিটি ব্যবহার করবে। প্রতিটি অনুরোধকে একটি অনন্য অনুরোধ আইডি দেওয়া হয়। অনুরোধ আইডি দ্বারা লগ রেকর্ডগুলোর মধ্যে সম্পর্ক স্থাপন করলে টার্গেটের লেটেন্সি সম্পর্কে মূল্যবান ধারণা পাওয়া যেতে পারে।
- d - এজ মাইক্রোগেটওয়ে দ্বারা অনুরোধটি গৃহীত হওয়ার পর থেকে অতিবাহিত সময় (মিলিসেকেন্ডে)। উপরের উদাহরণে, অনুরোধ ০-এর জন্য টার্গেটের প্রতিক্রিয়া ৭ মিলিসেকেন্ড পরে গৃহীত হয়েছিল (লাইন ৩), এবং অতিরিক্ত ৪ মিলিসেকেন্ড পরে প্রতিক্রিয়াটি ক্লায়েন্টের কাছে পাঠানো হয়েছিল (লাইন ৪)। অন্য কথায়, মোট অনুরোধ লেটেন্সি ছিল ১১ মিলিসেকেন্ড, যার মধ্যে ৭ মিলিসেকেন্ড সময় নিয়েছিল টার্গেট এবং ৪ মিলিসেকেন্ড সময় নিয়েছিল এজ মাইক্রোগেটওয়ে নিজে।
২. লক্ষ্যবস্তুর কাছে পাঠানো বহির্গামী অনুরোধের নমুনা:
1436403888665 info treq m=GET, u=/, h=127.0.0.1:8080, i=0
- 1436403888651 - ইউনিক্স তারিখ স্ট্যাম্প
- তথ্য - লগিং লেভেল। এই মানটি ট্রানজ্যাকশনের প্রেক্ষাপট এবং
edgemicroকনফিগারেশনে সেট করা লগিং লেভেলের উপর নির্ভর করে। লগিং লেভেল কীভাবে সেট করবেন তা দেখুন। স্ট্যাটস রেকর্ডের জন্য, লেভেলটিstatsএ সেট করা হয়।stats_log_intervalকনফিগারেশনের মাধ্যমে সেট করা একটি নির্দিষ্ট বিরতিতে স্ট্যাটস রেকর্ডগুলো রিপোর্ট করা হয়। লগ ইন্টারভ্যাল কীভাবে পরিবর্তন করবেন তাও দেখুন। - treq - ইভেন্টটি শনাক্ত করে। এক্ষেত্রে, এটি হলো টার্গেট রিকোয়েস্ট।
- m - লক্ষ্য অনুরোধে ব্যবহৃত HTTP ভার্ব।
- u - URL-এর বেসপ্যাথের পরবর্তী অংশ।
- h - ব্যাকএন্ড টার্গেটের হোস্ট এবং পোর্ট নম্বর।
- i - লগ এন্ট্রির আইডি। চারটি ইভেন্ট এন্ট্রিই এই আইডিটি ব্যবহার করবে।
৩. লক্ষ্যবস্তু থেকে আগত প্রতিক্রিয়ার নমুনা
1436403888672 info tres s=200, d=7, i=0
1436403888651 - ইউনিক্স তারিখ স্ট্যাম্প
- তথ্য - লগিং লেভেল। এই মানটি ট্রানজ্যাকশনের প্রেক্ষাপট এবং
edgemicroকনফিগারেশনে সেট করা লগিং লেভেলের উপর নির্ভর করে। লগিং লেভেল কীভাবে সেট করবেন তা দেখুন। স্ট্যাটস রেকর্ডের জন্য, লেভেলটিstatsএ সেট করা হয়।stats_log_intervalকনফিগারেশনের মাধ্যমে সেট করা একটি নির্দিষ্ট বিরতিতে স্ট্যাটস রেকর্ডগুলো রিপোর্ট করা হয়। লগ ইন্টারভ্যাল কীভাবে পরিবর্তন করবেন তাও দেখুন। - tres - ঘটনাটিকে চিহ্নিত করে। এক্ষেত্রে, লক্ষ্য প্রতিক্রিয়া।
- s - HTTP প্রতিক্রিয়ার স্থিতি।
- d - সময়কাল (মিলিসেকেন্ডে)। টার্গেট কর্তৃক এপিআই কলটি সম্পন্ন হতে যে সময় লাগে।
- i - লগ এন্ট্রির আইডি। চারটি ইভেন্ট এন্ট্রিই এই আইডিটি ব্যবহার করবে।
৪. ক্লায়েন্টের প্রতি বহির্গামী প্রতিক্রিয়ার নমুনা
1436403888676 info res s=200, d=11, i=0
1436403888651 - ইউনিক্স তারিখ স্ট্যাম্প
- তথ্য - লগিং লেভেল। এই মানটি ট্রানজ্যাকশনের প্রেক্ষাপট এবং
edgemicroকনফিগারেশনে সেট করা লগিং লেভেলের উপর নির্ভর করে। লগিং লেভেল কীভাবে সেট করবেন তা দেখুন। স্ট্যাটস রেকর্ডের জন্য, লেভেলটিstatsএ সেট করা হয়।stats_log_intervalকনফিগারেশনের মাধ্যমে সেট করা একটি নির্দিষ্ট বিরতিতে স্ট্যাটস রেকর্ডগুলো রিপোর্ট করা হয়। লগ ইন্টারভ্যাল কীভাবে পরিবর্তন করবেন তাও দেখুন। - res - ঘটনাটিকে শনাক্ত করে। এক্ষেত্রে, ক্লায়েন্টের প্রতি প্রতিক্রিয়া।
- s - HTTP প্রতিক্রিয়ার স্থিতি।
- d - সময়কাল, মিলিসেকেন্ডে। এটি হলো এপিআই কলটির মোট সময়, যার মধ্যে টার্গেট এপিআই এবং এজ মাইক্রোগেটওয়ের নিজস্ব সময় অন্তর্ভুক্ত।
- i - লগ এন্ট্রির আইডি। চারটি ইভেন্ট এন্ট্রিই এই আইডিটি ব্যবহার করবে।
লগ ফাইল সময়সূচী
`rotate_interval` কনফিগারেশন অ্যাট্রিবিউট দ্বারা নির্দিষ্ট বিরতিতে লগ ফাইলগুলি ঘোরানো হয়। ঘূর্ণন বিরতির মেয়াদ শেষ না হওয়া পর্যন্ত একই লগ ফাইলে এন্ট্রি যুক্ত হতে থাকবে। তবে, প্রতিবার Edge Microgateway পুনরায় চালু হলে এটি একটি নতুন UID পায় এবং এই UID দিয়ে নতুন এক সেট লগ ফাইল তৈরি করে। আরও দেখুন ‘লগ ফাইল রক্ষণাবেক্ষণের উত্তম অভ্যাস’ ।
ত্রুটির বার্তা
কিছু লগ এন্ট্রিতে ত্রুটির বার্তা থাকবে। ত্রুটিগুলো কোথায় এবং কেন ঘটছে তা শনাক্ত করতে, এজ মাইক্রোগেটওয়ে ত্রুটি রেফারেন্সটি দেখুন।
এজ মাইক্রোগেটওয়ে কনফিগারেশন রেফারেন্স
কনফিগারেশন ফাইলের অবস্থান
এই বিভাগে বর্ণিত কনফিগারেশন অ্যাট্রিবিউটগুলো এজ মাইক্রোগেটওয়ে কনফিগারেশন ফাইলে অবস্থিত। আরও দেখুন ‘কনফিগারেশন পরিবর্তন করা’ ।
edge_config অ্যাট্রিবিউট
এই সেটিংসগুলো Edge Microgateway ইনস্ট্যান্স এবং Apigee Edge-এর মধ্যেকার মিথস্ক্রিয়া কনফিগার করতে ব্যবহৃত হয়।
- বুটস্ট্র্যাপ : (ডিফল্ট: কোনোটি নয়) একটি ইউআরএল যা Apigee Edge-এ চলমান একটি Edge Microgateway-নির্দিষ্ট পরিষেবাকে নির্দেশ করে। Edge Microgateway, Apigee Edge-এর সাথে যোগাযোগের জন্য এই পরিষেবাটি ব্যবহার করে। আপনি যখন পাবলিক/প্রাইভেট কী পেয়ার তৈরি করার জন্য `
edgemicro genkeysকমান্ডটি চালান, তখন এই ইউআরএলটি ফেরত আসে। বিস্তারিত জানার জন্য “ Setting up and configuring Edge Microgateway” দেখুন। - jwt_public_key : (ডিফল্ট: কোনোটি নয়) একটি URL যা Apigee Edge-এ ডেপ্লয় করা Edge Microgateway প্রক্সিকে নির্দেশ করে। এই প্রক্সিটি ক্লায়েন্টদের স্বাক্ষরিত অ্যাক্সেস টোকেন দেওয়ার জন্য একটি অথেনটিকেশন এন্ডপয়েন্ট হিসেবে কাজ করে। প্রক্সি ডেপ্লয় করার জন্য ` edgemicro configure` কমান্ডটি চালালে এই URL-টি ফেরত আসে। বিস্তারিত জানতে “ Setting up and configuring Edge Microgateway” দেখুন।
- quotaUri : আপনি যদি আপনার অর্গে ডেপ্লয় করা
edgemicro-authপ্রক্সির মাধ্যমে কোটা পরিচালনা করতে চান, তাহলে এই কনফিগ প্রপার্টিটি সেট করুন। এই প্রপার্টিটি সেট করা না থাকলে, কোটা এন্ডপয়েন্ট ডিফল্টভাবে অভ্যন্তরীণ Edge Microgateway এন্ডপয়েন্ট ব্যবহার করবে।edge_config: quotaUri: https://your_org-your_env.apigee.net/edgemicro-auth
এজমাইক্রো বৈশিষ্ট্য
এই সেটিংগুলো এজ মাইক্রোগেটওয়ে প্রসেসকে কনফিগার করে।
- পোর্ট : (ডিফল্ট: ৮০০০) যে পোর্ট নম্বরে এজ মাইক্রোগেটওয়ে প্রসেসটি শোনে।
- max_connections : (ডিফল্ট: -1) এটি নির্দিষ্ট করে যে Edge Microgateway একই সাথে সর্বোচ্চ কতগুলো ইনকামিং কানেকশন গ্রহণ করতে পারবে। এই সংখ্যা অতিক্রম করা হলে, নিম্নলিখিত স্ট্যাটাসটি ফেরত দেওয়া হয়:
res.statusCode = 429; // Too many requests - max_connections_hard : (ডিফল্ট: -1) সংযোগটি বন্ধ করে দেওয়ার আগে Edge Microgateway একযোগে সর্বাধিক যতগুলো অনুরোধ গ্রহণ করতে পারে। এই সেটিংটি ডিনায়াল অফ সার্ভিস আক্রমণ প্রতিরোধ করার জন্য তৈরি করা হয়েছে। সাধারণত, এটিকে max_connections-এর চেয়ে বড় কোনো সংখ্যায় সেট করুন।
- লগিং :
- স্তর : (ডিফল্ট: ত্রুটি)
- তথ্য - (প্রস্তাবিত) একটি এজ মাইক্রোগেটওয়ে ইনস্ট্যান্সের মধ্য দিয়ে প্রবাহিত সমস্ত অনুরোধ এবং প্রতিক্রিয়া লগ করে।
- সতর্ক - শুধুমাত্র সতর্কতামূলক বার্তা লগ করে।
- ত্রুটি - শুধুমাত্র ত্রুটির বার্তা লগ করে।
- ডিবাগ - তথ্য, সতর্কতা এবং ত্রুটি বার্তার পাশাপাশি ডিবাগ বার্তাও লগ করে।
- ট্রেস - ত্রুটির ট্রেস তথ্য লগ করে, সাথে তথ্য, সতর্কতা এবং ত্রুটির বার্তাও থাকে।
- কোনো লগ ফাইল তৈরি করা হবে না।
- ডিরেক্টরি : (ডিফল্ট: /var/tmp) যে ডিরেক্টরিতে লগ ফাইলগুলো সংরক্ষিত হয়।
- stats_log_interval : (ডিফল্ট: ৬০) ব্যবধান, সেকেন্ডে, যখন পরিসংখ্যান রেকর্ডটি এপিআই লগ ফাইলে লেখা হয়।
- rotate_interval : (ডিফল্ট: ২৪) লগ ফাইল ঘোরানোর ব্যবধান, ঘণ্টায়।
- স্তর : (ডিফল্ট: ত্রুটি)
- প্লাগইন : প্লাগইনগুলি এজ মাইক্রোগেটওয়েতে কার্যকারিতা যোগ করে। প্লাগইন তৈরি করার বিষয়ে বিস্তারিত জানতে, কাস্টম প্লাগইন তৈরি করুন দেখুন।
- dir : ./gateway ডিরেক্টরি থেকে ./plugins ডিরেক্টরি পর্যন্ত একটি আপেক্ষিক পথ, অথবা একটি পরম পথ।
- ক্রম : আপনার এজ মাইক্রোগেটওয়ে ইনস্ট্যান্সে যোগ করার জন্য প্লাগইন মডিউলগুলির একটি তালিকা। মডিউলগুলি এখানে নির্দিষ্ট করা ক্রমেই কার্যকর হবে।
- ডিবাগ: এজ মাইক্রোগেটওয়ে প্রসেসে রিমোট ডিবাগিং যোগ করে।
- পোর্ট : যে পোর্ট নম্বরে লিসেন করতে হবে। উদাহরণস্বরূপ, আপনার IDE ডিবাগারকে এই পোর্টে লিসেন করার জন্য সেট করুন।
- args : ডিবাগ প্রক্রিয়ার জন্য আর্গুমেন্ট। উদাহরণস্বরূপ:
args --nolazy
- config_change_poll_interval: (ডিফল্ট: ৬০০ সেকেন্ড) Edge Microgateway পর্যায়ক্রমে একটি নতুন কনফিগারেশন লোড করে এবং কোনো পরিবর্তন হলে রিলোড করে। এই পোলিং Edge-এ করা যেকোনো পরিবর্তন (যেমন প্রোডাক্ট, মাইক্রোগেটওয়ে-অ্যাওয়্যার প্রক্সি ইত্যাদির পরিবর্তন) এবং সেইসাথে স্থানীয় কনফিগারেশন ফাইলে করা পরিবর্তনগুলোও শনাক্ত করে।
- disable_config_poll_interval: (ডিফল্ট: false) স্বয়ংক্রিয় পরিবর্তন পোলিং বন্ধ করতে এটিকে true- তে সেট করুন।
- request_timeout : নির্দিষ্ট অনুরোধগুলির জন্য একটি টাইমআউট নির্ধারণ করে। টাইমআউটটি সেকেন্ডে সেট করা হয়। টাইমআউট হলে, Edge Microgateway একটি 504 স্ট্যাটাস কোড দিয়ে সাড়া দেয়। (v2.4.x-এ যোগ করা হয়েছে)
- keep_alive_timeout : এই প্রপার্টিটি আপনাকে Edge Microgateway-এর টাইমআউট (মিলিসেকেন্ডে) সেট করতে সক্ষম করে। (ডিফল্ট: ৫ সেকেন্ড) (v3.0.6-এ যোগ করা হয়েছে)
- headers_timeout : এই অ্যাট্রিবিউটটি নির্ধারণ করে দেয় যে, সম্পূর্ণ HTTP হেডারগুলো পাওয়ার জন্য HTTP পার্সার কতক্ষণ (মিলিসেকেন্ডে) অপেক্ষা করবে।
উদাহরণস্বরূপ:
edgemicro:
  keep_alive_timeout: 6000
  headers_timeout: 12000
অভ্যন্তরীণভাবে, এই প্যারামিটারটি রিকোয়েস্টের জন্য Node.js
Server.headersTimeoutঅ্যাট্রিবিউট সেট করে। (ডিফল্ট:edgemicro.keep_alive_timeoutদিয়ে সেট করা সময়ের চেয়ে ৫ সেকেন্ড বেশি। এই ডিফল্ট সেটিং লোড ব্যালেন্সার বা প্রক্সিকে ভুলবশত কানেকশন ড্রপ করা থেকে বিরত রাখে।) (v3.1.1-এ যোগ করা হয়েছে) - noRuleMatchAction: (স্ট্রিং)
accesscontrolপ্লাগইনে নির্দিষ্ট করা ম্যাচ রুলটি সমাধান না হলে (অমিল থাকলে) যে পদক্ষেপটি নেওয়া হবে (অ্যাক্সেস অনুমোদন বা প্রত্যাখ্যান)। বৈধ মান:ALLOWবাDENYডিফল্ট:ALLOW(সংযোজিত: v3.1.7) - enableAnalytics: (ডিফল্ট: true) অ্যানালিটিক্স প্লাগইন লোড হওয়া আটকাতে অ্যাট্রিবিউটটি false- এ সেট করুন। এক্ষেত্রে, Apigee Edge অ্যানালিটিক্সে কোনো কল করা হবে না। যদি true- তে সেট করা হয়, অথবা যখন এই অ্যাট্রিবিউটটি প্রদান করা হয় না, তখন অ্যানালিটিক্স প্লাগইন স্বাভাবিকভাবে কাজ করবে। বিস্তারিত জানতে edgemicro অ্যাট্রিবিউটস দেখুন। (v3.1.8-এ যোগ করা হয়েছে)।
উদাহরণ:
edgemicro
  enableAnalytics=false|true
- on_target_response_abort : ক্লায়েন্ট (এজ মাইক্রোগেটওয়ে) এবং টার্গেট সার্ভারের মধ্যে সংযোগ সময়ের আগেই বিচ্ছিন্ন হয়ে গেলে এজ মাইক্রোগেটওয়ে কীভাবে আচরণ করবে, তা এই অ্যাট্রিবিউটের মাধ্যমে আপনি নিয়ন্ত্রণ করতে পারেন।
মূল্য বর্ণনা ডিফল্ট যদি on_target_response_abortনির্দিষ্ট করা না থাকে, তাহলে ডিফল্ট আচরণ হলো কোনো ত্রুটি না দেখিয়ে রেসপন্সটি সংক্ষিপ্ত করে ফেলা। লগ ফাইলে,targetResponse abortedএবং একটি 502 রেসপন্স কোডসহ একটি সতর্কীকরণ বার্তা দেখানো হয়।appendErrorToClientResponseBodyক্লায়েন্টের কাছে কাস্টম এরর TargetResponseAbortedফেরত পাঠানো হয়। লগ ফাইলে,targetResponse abortedএবং একটি 502 রেসপন্স কোড সহ একটি সতর্কীকরণ বার্তা দেখানো হয়। এছাড়াও,Target response ended prematurely.বার্তা সহTargetResponseAbortedএররটি লগ করা হয়।abortClientRequestEdge Microgateway অনুরোধটি বাতিল করে দেয় এবং লগ ফাইলে একটি সতর্কবার্তা লেখা হয়: TargetResponseAbortedসাথে অনুরোধের স্ট্যাটাস কোড থাকে 502।
উদাহরণ:
edgemicro:
 on_target_response_abort: appendErrorToClientResponseBody | abortClientRequest
হেডার অ্যাট্রিবিউট
এই সেটিংসগুলো নির্ধারণ করে যে নির্দিষ্ট HTTP হেডারগুলোকে কীভাবে বিবেচনা করা হবে।
- x-forwarded-for : (ডিফল্ট: true) টার্গেটে x-forwarded-for হেডার পাঠানো আটকাতে এটিকে false-এ সেট করুন। মনে রাখবেন, যদি রিকোয়েস্টে কোনো x-forwarded-for হেডার থাকে, তাহলে Edge Analytics-এ এর ভ্যালু client-ip ভ্যালুতে সেট করা হবে।
- x-forwarded-host : (ডিফল্ট: true) টার্গেটে x-forwarded-host হেডার পাঠানো আটকাতে এটিকে false সেট করুন।
- x-request-id : (ডিফল্ট: true) টার্গেটে x-request-id হেডার পাঠানো আটকাতে এটিকে false সেট করুন।
- x-response-time : (ডিফল্ট: true) টার্গেটে x-response-time হেডার পাঠানো আটকাতে এটিকে false সেট করুন।
- via : (ডিফল্ট: true) টার্গেটে via হেডার পাঠানো আটকাতে এটিকে false সেট করুন।
ওঅথ অ্যাট্রিবিউট
এই সেটিংগুলো নির্ধারণ করে যে এজ মাইক্রোগেটওয়ে কীভাবে ক্লায়েন্ট প্রমাণীকরণ প্রয়োগ করবে।
- allowNoAuthorization : (ডিফল্ট: false) যদি এটি true সেট করা হয়, তাহলে API কলগুলো কোনো Authorization হেডার ছাড়াই Edge Microgateway-এর মধ্য দিয়ে যেতে পারবে। Authorization হেডার আবশ্যক করতে এটি false সেট করুন (ডিফল্ট)।
- allowInvalidAuthorization : (ডিফল্ট: false) যদি এটি true সেট করা হয়, তাহলে Authorization হেডারে দেওয়া টোকেনটি অবৈধ বা মেয়াদোত্তীর্ণ হলেও API কলগুলোকে পাস করার অনুমতি দেওয়া হবে। বৈধ টোকেন আবশ্যক করতে এটি false সেট করুন (ডিফল্ট)।
- অথরাইজেশন-হেডার : (ডিফল্ট: Authorization: Bearer) এজ মাইক্রোগেটওয়েতে অ্যাক্সেস টোকেন পাঠানোর জন্য ব্যবহৃত হেডার। যদি টার্গেটের অন্য কোনো উদ্দেশ্যে Authorization হেডারটি ব্যবহার করার প্রয়োজন হয়, তবে আপনি ডিফল্টটি পরিবর্তন করতে চাইতে পারেন।
- api-key-header : (ডিফল্ট: x-api-key) Edge Microgateway-তে একটি API কী পাঠানোর জন্য ব্যবহৃত হেডার বা কোয়েরি প্যারামিটারের নাম। আরও দেখুন একটি API কী ব্যবহার করা ।
- keep-authorization-header : (ডিফল্ট: false) যদি এটি true সেট করা হয়, তাহলে অনুরোধে পাঠানো Authorization হেডারটি টার্গেটে পাঠানো হয় (এটি সংরক্ষিত থাকে)।
- allowOAuthOnly -- যদি এটি 'true' সেট করা হয়, তাহলে প্রতিটি API-কে অবশ্যই একটি Bearer Access Token সহ Authorization হেডার বহন করতে হবে। এটি আপনাকে শুধুমাত্র OAuth নিরাপত্তা মডেল ব্যবহারের অনুমতি দেয় (পূর্ববর্তী সংস্করণের সাথে সামঞ্জস্যতা বজায় রেখে)। (২.৪.x সংস্করণে যুক্ত করা হয়েছে)
- allowAPIKeyOnly -- যদি এটি 'true' সেট করা হয়, তাহলে প্রতিটি API-কে অবশ্যই একটি x-api-key হেডার (অথবা একটি কাস্টম লোকেশন) এবং একটি API Key বহন করতে হবে। এটি আপনাকে শুধুমাত্র API key নিরাপত্তা মডেলকে অনুমতি দেওয়ার সুযোগ দেয় (ব্যাকওয়ার্ড কম্প্যাটিবিলিটি বজায় রেখে)। (২.৪.x সংস্করণে যোগ করা হয়েছে)
- gracePeriod -- এই প্যারামিটারটি আপনার সিস্টেম ক্লক এবং JWT অথরাইজেশন টোকেনে উল্লেখিত Not Before (nbf) বা Issued At (iat) সময়ের মধ্যে সামান্য অমিলের কারণে সৃষ্ট ত্রুটি প্রতিরোধ করতে সাহায্য করে। এই ধরনের অমিলের জন্য প্রয়োজনীয় সেকেন্ডের সংখ্যা অনুযায়ী এই প্যারামিটারটি সেট করুন। (সংযোজিত: 2.5.7)
প্লাগইন-নির্দিষ্ট বৈশিষ্ট্য
প্রতিটি প্লাগইনের কনফিগারযোগ্য অ্যাট্রিবিউটগুলোর বিশদ বিবরণের জন্য ‘প্লাগইন ব্যবহার’ দেখুন।
প্রক্সি ফিল্টার করা
একটি Edge Microgateway ইনস্ট্যান্স কোন কোন মাইক্রোগেটওয়ে-অ্যাওয়ার প্রক্সি প্রসেস করবে, তা আপনি ফিল্টার করতে পারেন। Edge Microgateway চালু হওয়ার সময়, এটি যে অর্গানাইজেশনের সাথে যুক্ত, সেখানকার সমস্ত মাইক্রোগেটওয়ে-অ্যাওয়ার প্রক্সি ডাউনলোড করে। মাইক্রোগেটওয়ে কোন কোন প্রক্সি প্রসেস করবে তা সীমিত করতে নিম্নলিখিত কনফিগারেশনটি ব্যবহার করুন। উদাহরণস্বরূপ, এই কনফিগারেশনটি মাইক্রোগেটওয়ের প্রসেস করার জন্য প্রক্সিগুলোকে তিনটিতে সীমিত করে: edgemicro_proxy-1 , edgemicro_proxy-2 , এবং edgemicro_proxy-3 ।
edgemicro:
  proxies:
  - edgemicro_proxy-1
  - edgemicro_proxy-2
  - edgemicro_proxy-3
নাম অনুসারে পণ্য ফিল্টার করা
Edge Microgateway যে API প্রোডাক্টগুলো ডাউনলোড ও প্রসেস করে, তার সংখ্যা সীমিত করতে নিম্নলিখিত কনফিগারেশনটি ব্যবহার করুন। ডাউনলোড করা প্রোডাক্টগুলো ফিল্টার করতে, Edge Microgateway-এর *.config.yaml ফাইলে তালিকাভুক্ত /products API-তে productnamefilter কোয়েরি প্যারামিটারটি যোগ করুন। উদাহরণস্বরূপ:
edge_config:
  bootstrap: >-
    https://edgemicroservices.apigee.net/edgemicro/bootstrap/organization/willwitman/environment/test
  jwt_public_key: 'https://myorg-test.apigee.net/edgemicro-auth/publicKey'
  managementUri: 'https://api.enterprise.apigee.com'
  vaultName: microgateway
  authUri: 'https://%s-%s.apigee.net/edgemicro-auth'
  baseUri: >-
    https://edgemicroservices.apigee.net/edgemicro/%s/organization/%s/environment/%s
  bootstrapMessage: Please copy the following property to the edge micro agent config
  keySecretMessage: The following credentials are required to start edge micro
  products: 'https://myorg-test.apigee.net/edgemicro-auth/products?productnamefilter=%5E%5BEe%5Ddgemicro.%2A%24'
মনে রাখবেন যে কোয়েরি প্যারামিটারের মান অবশ্যই রেগুলার এক্সপ্রেশন ফরম্যাটে নির্দিষ্ট করতে হবে এবং URL এনকোড করতে হবে। উদাহরণস্বরূপ, ^[Ee]dgemicro.*$ রেজেক্সটি "edgemicro-test-1", "edgemicro_demo" এবং "Edgemicro_New_Demo"-এর মতো নামগুলো শনাক্ত করে। কোয়েরি প্যারামিটারে ব্যবহারের জন্য উপযুক্ত URL এনকোড করা মানটি হলো: %5E%5BEe%5Ddgemicro.%2A%24 ।
নিম্নলিখিত ডিবাগ আউটপুট থেকে দেখা যায় যে, শুধুমাত্র ফিল্টার করা পণ্যগুলোই ডাউনলোড করা হয়েছে:
...
2020-05-27T03:13:50.087Z [76060] [microgateway-config network] products download from https://gsc-demo-prod.apigee.net/edgemicro-auth/products?productnamefilter=%5E%5BEe%5Ddgemicro.%2A%24 returned 200 OK
...
....
....
{
   "apiProduct":[
      {
         "apiResources":[

         ],
         "approvalType":"auto",
         "attributes":[
            {
               "name":"access",
               "value":"public"
            }
         ],
         "createdAt":1590549037549,
         "createdBy":"k***@g********m",
         "displayName":"test upper case in name",
         "environments":[
            "prod",
            "test"
         ],
         "lastModifiedAt":1590549037549,
         "lastModifiedBy":"k***@g********m",
         "name":"Edgemicro_New_Demo",
         "proxies":[
            "catchall"
         ],
         "quota":"null",
         "quotaInterval":"null",
         "quotaTimeUnit":"null",
         "scopes":[

         ]
      },
      {
         "apiResources":[

         ],
         "approvalType":"auto",
         "attributes":[
            {
               "name":"access",
               "value":"public"
            }
         ],
         "createdAt":1590548328998,
         "createdBy":"k***@g********m",
         "displayName":"edgemicro test 1",
         "environments":[
            "prod",
            "test"
         ],
         "lastModifiedAt":1590548328998,
         "lastModifiedBy":"k***@g********m",
         "name":"edgemicro-test-1",
         "proxies":[
            "Lets-Encrypt-Validation-DoNotDelete"
         ],
         "quota":"null",
         "quotaInterval":"null",
         "quotaTimeUnit":"null",
         "scopes":[

         ]
      },
      {
         "apiResources":[
            "/",
            "/**"
         ],
         "approvalType":"auto",
         "attributes":[
            {
               "name":"access",
               "value":"public"
            }
         ],
         "createdAt":1558182193472,
         "createdBy":"m*********@g********m",
         "displayName":"Edge microgateway demo product",
         "environments":[
            "prod",
            "test"
         ],
         "lastModifiedAt":1569077897465,
         "lastModifiedBy":"m*********@g********m",
         "name":"edgemicro_demo",
         "proxies":[
            "edgemicro-auth",
            "edgemicro_hello"
         ],
         "quota":"600",
         "quotaInterval":"1",
         "quotaTimeUnit":"minute",
         "scopes":[

         ]
      }
   ]
}
কাস্টম অ্যাট্রিবিউট দ্বারা পণ্য ফিল্টার করা
কাস্টম অ্যাট্রিবিউটের উপর ভিত্তি করে পণ্য ফিল্টার করতে:
- Edge UI-তে, সেই সংস্থা/পরিবেশে edgemicro_auth প্রক্সিটি নির্বাচন করুন যেখানে আপনি Edge Microgateway কনফিগার করেছেন।
- Develop ট্যাবে, এডিটরে JavaCallout পলিসিটি খুলুন।
-
products.filter.attributesকী-সহ একটি কাস্টম অ্যাট্রিবিউট যোগ করুন এবং অ্যাট্রিবিউটের নামগুলো কমা দিয়ে আলাদা করে একটি তালিকা তৈরি করুন। শুধুমাত্র সেইসব প্রোডাক্টই এজ মাইক্রোগেটওয়েতে ফেরত পাঠানো হবে, যেগুলোতে উল্লিখিত কাস্টম অ্যাট্রিবিউটের নামগুলোর যেকোনো একটি থাকবে। - আপনি চাইলে, কাস্টম অ্যাট্রিবিউট
products.filter.env.enableকেfalseসেট করে পণ্যটি বর্তমান এনভায়রনমেন্টের জন্য সক্রিয় আছে কিনা তা যাচাই করার প্রক্রিয়াটি নিষ্ক্রিয় করতে পারেন। (এর ডিফল্ট মান হলো true।) - (শুধুমাত্র প্রাইভেট ক্লাউডের জন্য) আপনি যদি প্রাইভেট ক্লাউডের জন্য Edge ব্যবহার করেন, তাহলে নন-সিপিএস এনভায়রনমেন্টের জন্য প্রোডাক্ট পুল করতে
org.noncpsপ্রপার্টিটিtrueতে সেট করুন।
উদাহরণস্বরূপ:
<?xml version="1.0" encoding="UTF-8" standalone="yes"?>
<JavaCallout async="false" continueOnError="false" enabled="true" name="JavaCallout">
    <DisplayName>JavaCallout</DisplayName>
    <FaultRules/>
    <Properties>
        <Property name="products.filter.attributes">attrib.one, attrib.two</Property>
        <Property name="products.filter.env.enable">false</Property>
        <Property name="org.noncps">true</Property>
    </Properties>
    <ClassName>io.apigee.microgateway.javacallout.Callout</ClassName>
    <ResourceURL>java://micro-gateway-products-javacallout-2.0.0.jar</ResourceURL>
</JavaCallout>বাতিলকরণ স্থিতি অনুসারে পণ্য ফিল্টার করা
এপিআই প্রোডাক্টের তিনটি স্ট্যাটাস কোড আছে - পেন্ডিং, অ্যাপ্রুভড এবং রিভোকড। edgemicro-auth প্রক্সির Set JWT Variables পলিসিতে allowProductStatus নামে একটি নতুন প্রপার্টি যোগ করা হয়েছে। JWT-তে তালিকাভুক্ত এপিআই প্রোডাক্ট ফিল্টার করতে এই প্রপার্টিটি ব্যবহার করুন:
- Apigee প্রক্সি এডিটরে edgemicro-auth প্রক্সিটি খুলুন।
- SetJWTVariables পলিসির XML-এ
allowProductStatusপ্রপার্টিটি যোগ করুন এবং ফিল্টার করার জন্য স্ট্যাটাস কোডগুলির একটি কমা-বিভক্ত তালিকা নির্দিষ্ট করুন। উদাহরণস্বরূপ, Pending এবং Revoked স্ট্যাটাসে ফিল্টার করতে:<?xml version="1.0" encoding="UTF-8" standalone="yes"?> <Javascript timeLimit="20000" async="false" continueOnError="false" enabled="true" name="Set-JWT-Variables"> <DisplayName>Set JWT Variables</DisplayName> <FaultRules/> <Properties> <Property name="allowProductStatus">Pending,Revoked</Property> </Properties> <ResourceURL>jsc://set-jwt-variables.js</ResourceURL> </Javascript>
আপনি যদি শুধুমাত্র অনুমোদিত পণ্যগুলো তালিকাভুক্ত করতে চান, তাহলে প্রপার্টিটি নিম্নরূপভাবে সেট করুন:
<Property name="allowProductStatus">Approved</Property>
- প্রক্সিটি সংরক্ষণ করুন।
যদি প্রপার্টি ট্যাগটি উপস্থিত না থাকে, তাহলে সমস্ত স্ট্যাটাস কোড সহ পণ্যগুলি JWT-তে তালিকাভুক্ত হবে।
এই নতুন বৈশিষ্ট্যটি ব্যবহার করতে হলে, আপনাকে edgemicro-auth প্রক্সিটি আপগ্রেড করতে হবে।
অ্যানালিটিক্স পুশ ফ্রিকোয়েন্সি কনফিগার করা
Edge Microgateway কত ঘন ঘন Apigee-তে অ্যানালিটিক্স ডেটা পাঠাবে তা নিয়ন্ত্রণ করতে এই কনফিগারেশন প্যারামিটারগুলি ব্যবহার করুন:
- বাফারসাইজ (ঐচ্ছিক): সবচেয়ে পুরোনো রেকর্ডগুলো বাদ দেওয়া শুরু করার আগে বাফারটি সর্বাধিক যতগুলো অ্যানালিটিক্স রেকর্ড ধারণ করতে পারে। ডিফল্ট: ১০০০০
- batchSize (ঐচ্ছিক): Apigee-তে পাঠানো অ্যানালিটিক্স রেকর্ডের ব্যাচের সর্বোচ্চ আকার। ডিফল্ট: ৫০০
- flushInterval (ঐচ্ছিক): Apigee-তে পাঠানো অ্যানালিটিক্স রেকর্ডের প্রতিটি ব্যাচ ফ্লাশ করার মধ্যবর্তী মিলিসেকেন্ডের সংখ্যা। ডিফল্ট: ৫০০০
উদাহরণস্বরূপ:
analytics:
  bufferSize: 15000
  batchSize: 1000
  flushInterval: 6000
মাস্কিং অ্যানালিটিক্স ডেটা
নিম্নলিখিত কনফিগারেশনটি এজ অ্যানালিটিক্সে রিকোয়েস্ট পাথের তথ্য প্রদর্শিত হওয়া থেকে বিরত রাখে। রিকোয়েস্ট URI এবং/অথবা রিকোয়েস্ট পাথ মাস্ক করতে মাইক্রোগেটওয়ে কনফিগারেশনে নিম্নলিখিতটি যোগ করুন। মনে রাখবেন যে, URI-টি রিকোয়েস্টের হোস্টনেম এবং পাথ অংশ নিয়ে গঠিত।
analytics:
  mask_request_uri: 'string_to_mask'
  mask_request_path: 'string_to_mask'
এজ অ্যানালিটিক্সে এপিআই কল পৃথকীকরণ
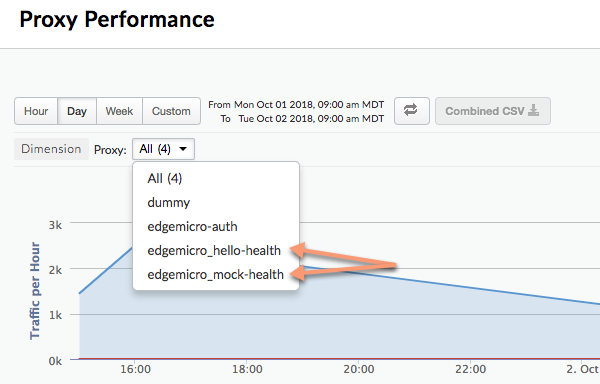
আপনি অ্যানালিটিক্স প্লাগইনটি কনফিগার করে একটি নির্দিষ্ট API পাথকে আলাদা করতে পারেন, যাতে এটি Edge Analytics ড্যাশবোর্ডগুলিতে একটি পৃথক প্রক্সি হিসাবে প্রদর্শিত হয়। উদাহরণস্বরূপ, আপনি ড্যাশবোর্ডে একটি হেলথ চেক API-কে আলাদা করতে পারেন, যাতে এটিকে আসল API প্রক্সি কলের সাথে গুলিয়ে ফেলা না হয়। অ্যানালিটিক্স ড্যাশবোর্ডে, আলাদা করা প্রক্সিগুলি এই নামকরণের ধরণ অনুসরণ করে:
edgemicro_proxyname-health
নিম্নলিখিত চিত্রটি অ্যানালিটিক্স ড্যাশবোর্ডে দুটি পৃথক প্রক্সি দেখাচ্ছে: edgemicro_hello-health এবং edgemicro_mock-health :
অ্যানালিটিক্স ড্যাশবোর্ডে রিলেটিভ এবং অ্যাবসোলিউট পাথকে আলাদা প্রক্সি হিসেবে পৃথক করতে এই প্যারামিটারগুলো ব্যবহার করুন:
- relativePath (ঐচ্ছিক): অ্যানালিটিক্স ড্যাশবোর্ডে আলাদা করার জন্য একটি আপেক্ষিক পথ নির্দিষ্ট করে। উদাহরণস্বরূপ, যদি আপনি
/healthcheckনির্দিষ্ট করেন, তাহলে/healthcheckপথযুক্ত সমস্ত API কল ড্যাশবোর্ডেedgemicro_ proxyname -healthহিসাবে প্রদর্শিত হবে। মনে রাখবেন যে এই ফ্ল্যাগটি প্রক্সি বেসপাথকে উপেক্ষা করে। বেসপাথ সহ একটি সম্পূর্ণ পথের উপর ভিত্তি করে আলাদা করতে,proxyPathফ্ল্যাগটি ব্যবহার করুন। - proxyPath (Optional): Specifies a full API proxy path, including the proxy basepath, to segregate in the analytics dashboard. For example, if you specify
/mocktarget/healthcheck, where/mocktargetis the proxy basepath, all API calls with the path/mocktarget/healthcheckwill appear in the dashboard asedgemicro_ proxyname -health.
For example, in the following configuration any API path that contains /healthcheck will be segregated by the analytics plugin. This means, /foo/healthcheck and /foo/bar/healthcheck will be segregated as a separate proxy called edgemicro_ proxyname -health in the analytics dashboard.
analytics:
  uri: >-
    https://xx/edgemicro/ax/org/docs/environment/test
  bufferSize: 100
  batchSize: 50
  flushInterval: 500
  relativePath: /healthcheck
In the following configuration any API with the proxy path /mocktarget/healthcheck will be will be segregated as a separate proxy called edgemicro_ proxyname -health in the analytics dashboard.
analytics:
  uri: >-
    https://xx/edgemicro/ax/org/docs/environment/test
  bufferSize: 100
  batchSize: 50
  flushInterval: 500
  proxyPath: /mocktarget/healthcheck
Setting up Edge Microgateway behind a company firewall
Use an HTTP proxy for communication with Apigee Edge
Added in version 3.1.2.
To use an HTTP proxy for communication between Edge Microgateway and Apigee Edge, do the following:
- Set the environment variables
HTTP_PROXY,HTTPS_PROXY, andNO_PROXY. These variables control the hosts for each HTTP proxy that you wish to use for communication with Apigee Edge, or which hosts should not handle communication with Apigee Edge. For example:export HTTP_PROXY='http://localhost:3786' export HTTPS_PROXY='https://localhost:3786' export NO_PROXY='localhost,localhost:8080'
Note that
NO_PROXYcan be a comma delimited list of domains that Edge Microgateway should not proxy to.For more information on these variables, see https://www.npmjs.com/package/request#controlling-proxy-behaviour-using-environment-variables
- Restart Edge Microgateway.
Use an HTTP proxy for target communication
Added in version 3.1.2.
To use an HTTP proxy for communication between Edge Microgateway and backend targets, do the following:
- Add the following configuration to the microgateway config file:
edgemicro:
  proxy:
    tunnel: true | false
    url: proxy_url
    bypass: target_host # target hosts to bypass the proxy.
    enabled: true | false
কোথায়:
- tunnel : (Optional) When true, Edge Microgateway uses the HTTP CONNECT method to tunnel HTTP requests over a single TCP connection. (The same is true if the environment variables, as mentioned below, for configuring the proxy are TLS enabled). Default:
false - url : The HTTP proxy URL.
- bypass : (Optional) Specifies one or more comma-separated target host URLs that should bypass the HTTP proxy. If this property is not set, then use the NO_PROXY environment variable to specify which target URLs to bypass.
- enabled : If true and
proxy.urlis set, use theproxy.urlvalue for the HTTP proxy. If true andproxy.urlis not set, use the proxies specified in the HTTP proxy environment variablesHTTP_PROXYandHTTPS_PROXY, as described in Use an HTTP proxy for communication with Apigee Edge .
উদাহরণস্বরূপ:
edgemicro: proxy: tunnel: true url: 'http://localhost:3786' bypass: 'localhost','localhost:8080' # target hosts to bypass the proxy. enabled: true - tunnel : (Optional) When true, Edge Microgateway uses the HTTP CONNECT method to tunnel HTTP requests over a single TCP connection. (The same is true if the environment variables, as mentioned below, for configuring the proxy are TLS enabled). Default:
- Restart Edge Microgateway.
Using wildcards in Microgateway-aware proxies
You can use one or more "*" wildcards in the base path of an edgemicro_* (Microgateway-aware) proxy. For example, a base path of /team/*/members allows clients to call https://[host]/team/blue/members and https://[host]/team/green/members without you needing to create new API proxies to support new teams. Note that /**/ is not supported.
Important: Apigee does NOT support using a wildcard "*" as the first element of a base path. For example, this is NOT supported: /*/ search.
Rotating JWT keys
At some time after you initially generate a JWT, you might need to change the public/private key pair stored in the Edge encrypted KVM. This process of generating a new key pair is called key rotation.
How Edge Microgateway uses JWTs
JSON Web Token (JWT) is a token standard described in RFC7519 . JWT provides a way to sign a set of claims, which can be verified reliably by the recipient of the JWT.
You can generate a JWT using the CLI and use it in the Authorization header of API calls instead of an API key. For example:
curl -i http://localhost:8000/hello -H "Authorization: Bearer eyJhbGciOiJ..dXDefZEA"
For information on generating JWTs with the CLI, see Generate a token .
What is key rotation?
At some time after you initially generate a JWT, you might need to change the public/private key pair stored in the Edge encrypted KVM. This process of generating a new key pair is called key rotation. When you rotate keys, a new private/public key pair is generated and stored in the "microgateway" KVM in your Apigee Edge organization/environment. In addition, the old public key is retained along with its original key ID value.
To generate a JWT, Edge uses information stored in the encrypted KVM. A KVM called microgateway was created and populated with keys when you initially set up (configured) Edge Microgateway. The keys in the KVM are used to sign and encrypt a JWT.
The KVM keys include:
private_key - The latest (most recently created) RSA private key used to sign JWTs.
public_key - The latest (most recently created) certificate used to verify JWTs signed with the private_key.
private_key_kid - The latest (most recently created) private key ID. This key ID is associated with the private_key value and is used to support key rotation.
public_key1_kid - The latest (most recently created) public key ID. This key is associated with the public_key1 value and is used to support key rotation. This value is the same as the private key kid.
public_key1 - The latest (most recently created) public key.
When you perform key rotation, existing key values are replaced in the map and new keys are added to retain the old public keys. For example:
public_key2_kid - The old public key ID. This key is associated with the public_key2 value and is used to support key rotation.
public_key2 - The old public key.
JWTs presented for verification will be verified using the new public key. If verification fails, then the old public key will be used, until the JWT expires (after token_expiry* interval, default 30 mins). In this way, you can "rotate" keys without immediately disrupting API traffic.
How to do key rotation
This section explains how to perform a key rotation.
- To upgrade the KVM, use the
edgemicro upgradekvmcommand. For details on running this command, see Upgrading the KVM . You only need to do this step one time. - To upgrade the edgemicro-oauth proxy, use the
edgemicro upgradeauthcommand. For details on running this command, see Ugrading the edgemicro-auth proxy . You only need to do this step one time. - Add the following line to your
~/.edgemicro/org-env-config.yamlfile, where you must specify the same organization and environment that you configured the microgateway to use:jwk_public_keys: 'https://$ORG-$ENV.apigee.net/edgemicro-auth/jwkPublicKeys'
Run the key rotation command to rotate the keys. For details on this command, see Rotating keys .
edgemicro rotatekey -o $ORG -e $ENV -k $KEY -s $SECRET
উদাহরণস্বরূপ:
edgemicro rotatekey -o docs -e test \
-k 27ee39567c75e4567a66236cbd4e86d1cc93df6481454301bd5fac4d3497fcbb \
-s 4618b0008a6185d7327ebf53bee3c50282ccf45a3cceb1ed9828bfbcf1148b47
After key rotation, Edge returns multiple keys to Edge Microgateway. Note in the following example, each key has a unique "kid" (Key ID) value. The microgateway then uses these keys to validate authorization tokens. If the token validation fails, the microgateway looks to see if there is an older key in the key set and tries that key. The format of the returned keys is JSON Web Key (JWK). You can read about this format in RFC 7517 .
{
  "keys": [
    {
      "kty": "RSA",
      "n": "nSl7R_0wKLiWi6cO3n8aOJwYGBtinq723Jgg8i7KKWTSTYoszOjgGsJf_MX4JEW1YCScwpE5o4o8ccQN09iHVTlIhk8CNiMZNPipClmRVjaL_8IWvMQp1iN66qy4ldWXzXnHfivUZZogCkBNqCz7VSC5rw2Jf57pdViULVvVDGwTgf46sYveW_6h8CAGaD0KLd3vZffxIkoJubh0yMy0mQP3aDOeIGf_akeZeZ6GzF7ltbKGd954iNTiKmdm8IKhz6Y3gLpC9iwQ-kex_j0CnO_daHl1coYxUSCIdv4ziWIeM3dmjQ5_2dEvUDIGG6_Az9hTpNgPE5J1tvrOHAmunQ",
      "e": "AQAB",
      "kid": "2"
    },
    {
      "kty": "RSA",
      "n": "8BKwzx34BMUcHwTuQtmp8LFRCMxbkKg_zsWD6eOMIUTAsORexTGJsTy7z-4aH0wJ3fT-3luAAUPLBQwGcuHo0P1JnbtPrpuYjaJKSZOeIMOnlryJCspmv-1xG4qAqQ9XaZ9C97oecuj7MMoNwuaZno5MvsY-oi5B_gqED3vIHUjaWCErd4reONyFSWn047dvpE6mwRhZbcOTkAHT8ZyKkHISzopkFg8CD-Mij12unxA3ldcTV7yaviXgxd3eFSD1_Z4L7ZRsDUukCJkJ-8qY2-GWjewzoxl-mAW9D1tLK6qAdc89yFem3JHRW6L1le3YK37-bs6b2a_AqJKsKm5bWw",
      "e": "AQAB",
      "kid": "1"
    }
  ]
}
Configuring a "not before" delay
For versions 3.1.5 and before, the new private key generated by the rotatekey command took effect immediately, and new tokens generated were signed with the new private key. However, the new public key was only made available to Edge Microgateway instances every 10 minutes (by default) when the microgateway configuration was refreshed. Because of this lag between the token signing and microgateway instance refresh, tokens signed with the latest key would be rejected until all instances received the public latest key.
In cases where multiple microgateway instances exist, the public key lag sometimes resulted in intermittent runtime errors with status 403, because token validation would pass on one instance, but fail on another instance until all instances were refreshed.
Starting in version 3.1.6, a new flag on the rotatekey command allows you to specify a delay for the new private key to become effective, allowing time for all microgateway instances to be refreshed and receive the new public key. The new flag is --nbf , which stands for "not before." This flag takes an integer value, the number of minutes to delay.
In the following example, the delay is set to 15 minutes:
edgemicro rotatekey -o docs -e test \
-k 27ee39567c75e4567a66236cbd4e86d1cc93df6481454301bd5fac4d3497fcbb \
-s 4618b0008a6185d7327ebf53bee3c50282ccf45a3cceb1ed9828bfbcf1148b47 \
--nbf 15
Note that a good practice is to set the delay to be more than the config_change_poll_internal configuration setting, which is 10 minutes by default. See also edgemicro attributes .
Filtering downloaded proxies
By default, Edge Microgateway downloads all of the proxies in your Edge organization that start with the naming prefix "edgemicro_". You can change this default to download proxies whose names match a pattern.
- Open your Edge Micro config file:
~/.edgemicro/org-env-config.yaml - Add the proxyPattern element under edge_config. For example, the following pattern will download proxies such as edgemicro_foo, edgemicro_fast, and edgemicro_first.
edge_config:
…
proxyPattern: edgemicro_f*
Specifying products without API proxies
In Apigee Edge, you can create an API product that does not contain any API proxies. This product configuration allows an API key associated with that product to work for with any proxy deployed in your organization. As of version 2.5.4, Edge Microgateway supports this product configuration.
Debugging and troubleshooting
Connecting to a debugger
You can run Edge Microgateway with a debugger, such as node-inspector . This is useful for troubleshooting and debugging custom plugins.
- Restart Edge Microgateway in debug mode. To do this, add
DEBUG=*to the beginning of thestartcommand:DEBUG=* edgemicro start -o $ORG -e $ENV -k $KEY -s $SECRET
To direct debug output to a file, you can use this command:
export DEBUG=* nohup edgemicro start \
-o $ORG -e $ENV -k $KEY -s $SECRET 2>&1 | tee /tmp/file.log
- Start your debugger and set it to listen on the port number for the debugging process.
- You can now step through the Edge Microgateway code, set breakpoints, watch expressions, and so on.
You can specify standard Node.js flags related to debug mode. For example, --nolazy helps with debugging asynchronous code.
Checking log files
If you're having problems, be sure to examine the log files for execution details and error information. For details, see Managing log files .
Using API key security
API keys provide a simple mechanism for authenticating clients making requests to Edge Microgateway. You can obtain an API key by copying the Consumer Key (also called Client ID) value from an Apigee Edge product that includes the Edge Microgateway authentication proxy.
Caching of keys
API keys are exchanged for bearer tokens, which are cached. You can disable caching by setting the Cache-Control: no-cache header on incoming requests to Edge Microgateway.
Using an API key
You can pass the API key in an API request either as a query parameter or in a header. By default, the header and query param name are both x-api-key .
Query parameter example:
curl http://localhost:8000/foobar?x-api-key=JG616Gjz7xs4t0dvpvVsGdI49G34xGsz
Header example:
curl http://localhost:8000/foobar -H "x-api-key:JG616Gjz7xs4t0dvpvVsGdI49G34xGsz"
Configuring the API key name
By default, x-api-key is the name used for both the API key header and query parameter. You can change this default in the configuration file, as explained in Making configuration changes . For example, to change the name to apiKey :
oauth:
  allowNoAuthorization: false
  allowInvalidAuthorization: false
  api-key-header: apiKey
In this example, both the query parameter and header name are changed to apiKey . The name x-api-key will no longer work in either case. See also Making configuration changes .
উদাহরণস্বরূপ:
curl http://localhost:8000/foobar -H "apiKey:JG616Gjz7xs4t0dvpvVsGdI49G34xGsz"
For more information about using API keys with proxy requests, see Secure Edge Microgateway .
Enable upstream response codes
By default, the oauth plugin returns only 4xx error status codes if the response is not a 200 status. You can change this behavior so that it always returns the exact 4xx or 5xx code, depending on the error.
To enable this feature, add the oauth.useUpstreamResponse: true property to your Edge Microgateway configuration. For example:
oauth:
  allowNoAuthorization: false
  allowInvalidAuthorization: false
  gracePeriod: 10
  useUpstreamResponse: true
Using OAuth2 token security
This section explains how to get OAuth2 access tokens and refresh tokens. Access tokens are used to make secure API calls through the microgateway. Refresh tokens are used to obtain new access tokens.
How to get an access token
This section explains how to use the edgemicro-auth proxy to get an access token.
You can also get an access token using the edgemicro token CLI command. For details on the CLI, see Managing tokens .
API 1: Send credentials as body parameters
Substitute your org and environment names in the URL, and substitute the Consumer Id and Consumer Secret values obtained from a developer app on Apigee Edge for the client_id and client_secret body parameters:
curl -i -X POST "http://<org>-<test>.apigee.net/edgemicro-auth/token" \
-d '{"grant_type": "client_credentials", "client_id": "your_client_id", \
"client_secret": "your_client_secret"}' -H "Content-Type: application/json"
API 2: Send credentials in a Basic Auth header
Send the client credentials as a Basic Authentication header and the grant_type as a form parameter. This command form is also discussed in RFC 6749: The OAuth 2.0 Authorization Framework .
http://<org>-<test>.apigee.net/edgemicro-auth/token -v -u your_client_id:your_client_secret \
-d 'grant_type=client_credentials' -H "Content-Type: application/x-www-form-urlencoded"
Sample output
The API returns a JSON response. Note that there's no difference between thetoken and access_token properties. You can use either one. Note that expires_in is an integer value specified in seconds. { "token": "eyJraWQiOiIxIiwidHlwIjoi", "access_token": "eyJraWQiOiIxIiwid", "token_type": "bearer", "expires_in": 1799 }
How to get a refresh token
To get a refresh token, make an API call to the /token endpoint of the edgemicro-auth proxy. You MUST make this API call with the password grant type. The following steps walk through the process.
- Get an access and refresh token with the
/tokenAPI. Note that the grant type ispassword:curl -X POST \ https://your_organization-your_environment.apigee.net/edgemicro-auth/token \ -H 'Content-Type: application/json' \ -d '{ "client_id":"mpK6l1Bx9oE5zLdifoDbF931TDnDtLq", "client_secret":"bUdDcFgv3nXffnU", "grant_type":"password", "username":"mpK6lBx9RoE5LiffoDbpF931TDnDtLq", "password":"bUdD2FvnMsXffnU" }'The API returns an access token and a refresh token. The response looks similar to this. Note that
expires_invalues integers and are specified in seconds.{ "token": "your-access-token", "access_token": "your-access-token", "token_type": "bearer", "expires_in": 108, "refresh_token": "your-refresh-token", "refresh_token_expires_in": 431, "refresh_token_issued_at": "1562087304302", "refresh_token_status": "approved" } - You can now use the refresh token to get a new access token by calling the
/refreshendpoint of the same API. For example:curl -X POST \ https://willwitman-test.apigee.net/edgemicro-auth/refresh \ -H 'Content-Type: application/json' \ -d '{ "client_id":"mpK6l1Bx9RoE5zLifoDbpF931TDnDtLq", "client_secret":"bUdDc2Fv3nMXffnU", "grant_type":"refresh_token", "refresh_token":"your-refresh-token" }'The API returns a new access token. The response looks similar to this:
{
    "token": "your-new-access-token"
    }
Forever monitoring
Specifying a config file endpoint
If you run multiple Edge Microgateway instances, you may wish to manage their configurations from a single location. You can do this by specifying an HTTP endpoint where Edge Micro can download its configuration file. You can specify this endpoint when you start Edge Micro using the -u flag.
উদাহরণস্বরূপ:
edgemicro start -o jdoe -e test -u http://mylocalserver/mgconfig -k public_key -s secret_key
where the mgconfig endpoint returns the contents of your configuration file. This is the file that, by default, is located in ~/.edgemicro and has the naming convention: org-env-config.yaml .
Disabling TCP connection data buffering
You can use the nodelay configuration attribute to disable data buffering for TCP connections used by Edge Microgateway.
By default TCP connections use the Nagle algorithm to buffer data before sending it off. Setting nodelay to true , disables this behavior (data will immediately fire off data each time socket.write() is called). See also the Node.js documentation for more details.
To enable nodelay , edit the Edge Micro config file as follows:
edgemicro:
  nodelay: true
  port: 8000
  max_connections: 1000
  config_change_poll_interval: 600
  logging:
    level: error
    dir: /var/tmp
    stats_log_interval: 60
    rotate_interval: 24
Running Edge Microgateway in standalone mode
You can run Edge Microgateway disconnected completely from any Apigee Edge dependency. This scenario, called standalone mode, lets you run and test Edge Microgateway without an Internet connection.
In standalone mode, the following features do not work, as they require connection to Apigee Edge:
- OAuth and API key
- কোটা
- Analytics
On the other hand, custom plugins and spike arrest work normally, because they do not require a connection to Apigee Edge. In addition, a new plugin called extauth lets you authorize API calls to the microgateway with a JWT while in standalone mode.
Configuring and starting the gateway
To run Edge Microgateway in standalone mode:
- Create a configuration file named as follows:
$HOME/.edgemicro/ $ORG-$ENV -config.yamlউদাহরণস্বরূপ:
vi $HOME/.edgemicro/foo-bar-config.yaml
- Paste the following code into the file:
edgemicro: port: 8000 max_connections: 1000 config_change_poll_interval: 600 logging: level: error dir: /var/tmp stats_log_interval: 60 rotate_interval: 24 plugins: sequence: - extauth - spikearrest headers: x-forwarded-for: true x-forwarded-host: true x-request-id: true x-response-time: true via: true extauth: publickey_url: https://www.googleapis.com/oauth2/v1/certs spikearrest: timeUnit: second allow: 10 buffersize: 0 - Export the following environment variable with the value "1":
export EDGEMICRO_LOCAL=1
- Execute the following
startcommand, where you provide values to instantiate the local proxy:edgemicro start -o $ORG -e $ENV -a $LOCAL_PROXY_NAME \ -v $LOCAL_PROXY_VERSION -t $TARGET_URL -b $BASE_PATH
কোথায়:
- $ORG is the "org" name that you used in the configuration file name.
- $ENV is the "env" name that you used in the configuration file name.
- $LOCAL_PROXY_NAME is the name of the local proxy that will be created. You can use any name you want.
- $LOCAL_PROXY_VERSION is the version number for the proxy.
- $TARGET_URL is the URL for the target of the proxy. (The target is the service that the proxy calls.)
- $BASE_PATH is the base path of the proxy. This value must start with a forward slash. For a root base path, specify just a forward slash; for example, "/".
উদাহরণস্বরূপ:
edgemicro start -o local -e test -a proxy1 -v 1 -t http://mocktarget.apigee.net -b /
- Test the configuration.
curl http://localhost:8000/echo { "error" : "missing_authorization" }Because the
extauthplugin is in thefoo-bar-config.yamlfile, you get a "missing_authorization" error. This plugin validates a JWT that must be present in the Authorization header of the API call. In the next section, you will obtain a JWT that will allow API calls to go through without the error.
Example: Obtaining an authorization token
The following example shows how to obtain a JWT from the Edge Microgateway JWT endpoint on Apigee Edge ( edgemicro-auth/jwkPublicKeys ). This endpoint is deployed when you perform a standard setup and configuration of Edge Microgateway. To obtain the JWT from the Apigee endpoint, you must first do the standard Edge Microgateway setup, and be connected to the Internet. The Apigee endpoint is used here for example purposes only and is not required. You can use another JWT token endpoint if you wish. If you do, then you'll need to obtain the JWT using the API provided for that endpoint.
The following steps explain how to get a token using the edgemicro-auth/jwkPublicKeys endpoint:.
- You must perform a standard setup and configuration of Edge Microgateway to deploy the
edgemicro-authproxy to your organization/environment on Apigee Edge. If you did this step previously, you do not need to repeat it. - If you deployed Edge Microgateway to Apigee Cloud, you must be connected to the Internet so that you can obtain a JWT from this endpoint.
- Stop Edge Microgateway:
edgemicro stop
- In the configuration file you created previously (
$HOME/.edgemicro/ org - env-config.yaml), point theextauth:publickey_urlattribute to theedgemicro-auth/jwkPublicKeysendpoint in your Apigee Edge organization/environment. For example:extauth: publickey_url: 'https://your_org-your_env.apigee.net/edgemicro-auth/jwkPublicKeys'
- Restart Edge Microgateway as you did previously, using the org/env names you used in the config file name. For example:
edgemicro start -o foo -e bar -a proxy1 -v 1 -t http://mocktarget.apigee.net -b /
- Get a JWT token from the authorization endpoint. Because you are using the
edgemicro-auth/jwkPublicKeysendpoint, you can use this CLI command:
You can generate a JWT for Edge Microgateway using the edgemicro token command or an API. For example:
edgemicro token get -o your_org -e your_env \
  -i G0IAeU864EtBo99NvUbn6Z4CBwVcS2 -s uzHTbwNWvoSmOy
কোথায়:
- your_org is the name of your Apigee organization for which you previously configured Edge Microgateway.
- your_env is an environment in the organization.
- The
ioption specifies the Consumer Key from a developer app that has a product that includes theedgemicro-authproxy. - The
soption specifies the Consumer Secret from a developer app that has a product that includes theedgemicro-authproxy.
This command asks Apigee Edge to generate a JWT that can then be used to verify API calls.
See also Generate a token .Test the standalone configuration
To test the configuration, call the API with the token added in the Authorization header as follows:
curl http://localhost:8000/echo -H "Authorization: Bearer your_token
উদাহরণ:
curl http://localhost:8000/echo -H "Authorization: Bearer eyJraWQiOiIxIiwidHlwIjo...iryF3kwcDWNv7OQ"
উদাহরণ আউটপুট:
{
   "headers":{
      "user-agent":"curl/7.54.0",
      "accept":"*/*",
      "x-api-key":"DvUdLlFwG9AvGGpEgfnNGwtvaXIlUUvP",
      "client_received_start_timestamp":"1535134472699",
      "x-authorization-claims":"eyJhdDbiO...M1OTE5MTA1NDkifQ==",
      "target_sent_start_timestamp":"1535134472702",
      "x-request-id":"678e3080-a7ae-11e8-a70f-87ae30db3896.8cc81cb0-a7c9-11e8-a70f-87ae30db3896",
      "x-forwarded-proto":"http",
      "x-forwarded-host":"localhost:8000",
      "host":"mocktarget.apigee.net",
      "x-cloud-trace-context":"e2ac4fa0112c2d76237e5473714f1c85/1746478453618419513",
      "via":"1.1 localhost, 1.1 google",
      "x-forwarded-for":"::1, 216.98.205.223, 35.227.194.212",
      "connection":"Keep-Alive"
   },
   "method":"GET",
   "url":"/",
   "body":""
}
Using local proxy mode
In local proxy mode, Edge Microgateway does not require a microgateway-aware proxy to be deployed on Apigee Edge. Instead, you configure a "local proxy" by providing a local proxy name, basepath, and target URL when you start the microgateway. API calls to the microgateway are then sent to the target URL of the local proxy. In all other respects, local proxy mode works exactly the same as running Edge Microgateway in its normal mode. Authentication works the same, as do spike arrest and quota enforcement, custom plugins, and so on.
Use case and example
Local proxy mode is useful when you only need to associate one single proxy with an Edge Microgateway instance. For example, you can inject Edge Microgateway into Kubernetes as a sidecar proxy, where a microgateway and a service each run in a single pod, and where the microgateway manages traffic to and from its companion service. The following figure illustrates this architecture where Edge Microgateway functions as a sidecar proxy in a Kubernetes cluster. Each microgateway instance talks only to a single endpoint on its companion service:
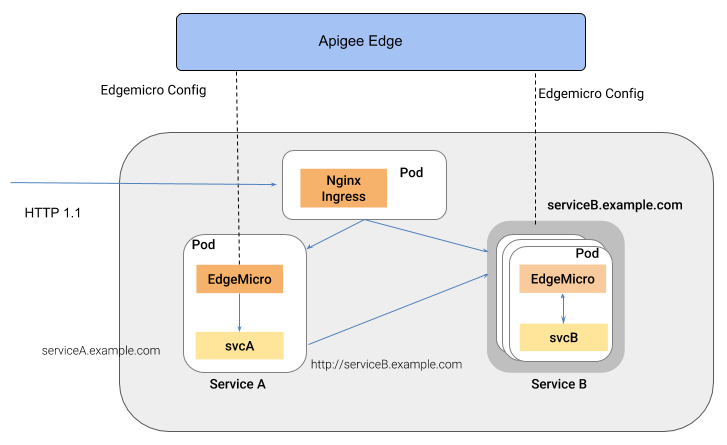
A benefit of this style of architecture is that Edge Microgateway provides API management for individual services deployed to a container environment, such as a Kubernetes cluster.
Configuring local proxy mode
To configure Edge Microgateway to run in local proxy mode, follow these steps:
- Run
edgemicro initto set up your local configuration environment, exactly as you would in a typical Edge Microgateway setup. See also Configure Edge Microgateway . - Run
edgemicro configure, as you would in a typical Edge Microgateway setup procedure. For example:edgemicro configure -o your_org -e your_env -u your_apigee_username
This command deploys the edgemicro-auth policy to Edge and returns a key and secret that you will need to start the microgateway. If you need help, see Configure Edge Microgateway .
- On Apigee Edge, create an API product and with the following mandatory configuration requirements (you can manage all other configurations as you wish):
- You must add the edgemicro-auth proxy to the product. This proxy was deployed automatically when you ran
edgemicro configure. - You must provide a resource path. Apigee recommends adding this path to the product:
/**. To learn more, see Configuring the behavior of the resource path . See also Create API products in the Edge documentation.
- You must add the edgemicro-auth proxy to the product. This proxy was deployed automatically when you ran
On Apigee Edge, create a developer, or you can use an existing developer if you wish. For help, see Adding developers using the Edge management UI .
- On Apigee Edge, create a developer app. You must add the API product you just created to the app. For help, see Registering an app in the Edge management UI .
- On the machine where Edge Microgateway is installed, export the following environment variable with the value "1".
export EDGEMICRO_LOCAL_PROXY=1
- Execute the following
startcommand:edgemicro start -o your_org -e your_environment -k your_key -s your_secret \ -a local_proxy_name -v local_proxy_version -t target_url -b base_pathকোথায়:
- your_org is your Apigee organization.
- your_environment is an environment in your organization.
- your_key is the key that was returned when you ran
edgemicro configure. - your_secret is the secret that was returned when you ran
edgemicro configure. - local_proxy_name is the name of the local proxy that will be created.
- local_proxy_version is the version number for the proxy.
- target_url is the URL for the target of the proxy (the service the proxy will call).
- base_path is the base path of the proxy. This value must start with a forward slash. For a root base path, specify just a forward slash; for example, "/".
উদাহরণস্বরূপ:
edgemicro start -o your_org -e test -k 7eb6aae644cbc09035a...d2eae46a6c095f \
  -s e16e7b1f5d5e24df...ec29d409a2df853163a -a proxy1 -v 1 \
  -t http://mocktarget.apigee.net -b /echo
Testing the configuration
You can test the local proxy configuration by calling the proxy endpoint. For example, if you specified a basepath of /echo , you can call the proxy as follows:
curl  http://localhost:8000/echo
{
  "error" : "missing_authorization",
  "error_description" : "Missing Authorization header"
}
This initial API call produced an error because you did not provide a valid API key. You can find the key in the Developer app you created previously. Open the app in the Edge UI, copy the Consumer Key, and use that key as follows:
curl http://localhost:8000/echo -H 'x-api-key:your_api_key'
উদাহরণস্বরূপ:
curl http://localhost:8000/echo -H "x-api-key:DvUdLlFwG9AvGGpEgfnNGwtvaXIlUUvP"
উদাহরণ আউটপুট:
{
  "headers":{
    "user-agent":"curl/7.54.0",
    "accept":"*/*",
    "x-api-key":"DvUdLlFwG9AvGGpEgfnNGwtvaXIlUUvP",
    "client_received_start_timestamp":"1535134472699",
    "x-authorization-claims":"eyJhdWQiOi...TQ0YmUtOWNlOS05YzM1OTE5MTA1NDkifQ==",
    "target_sent_start_timestamp":"1535134472702",
    "x-request-id":"678e3080-a7ae-11e8-a70f-87ae30db3896.8cc81cb0-a7c9-11e8-a70f-87ae30db3896",
    "x-forwarded-proto":"http",
    "x-forwarded-host":"localhost:8000",
    "host":"mocktarget.apigee.net",
    "x-cloud-trace-context":"e2ac4fa0112c2d76237e5473714f1c85/1746478453618419513",
    "via":"1.1 localhost, 1.1 google",
    "x-forwarded-for":"::1, 216.98.205.223, 35.227.194.212",
    "connection":"Keep-Alive"
  },
  "method":"GET",
  "url":"/",
  "body":""
}
Using the synchronizer
This section explains how to use the synchronizer, an optional feature that improves the resiliency of Edge Microgteway by allowing it to retrieve configuration data from Apigee Edge and write it to a local Redis database. With a synchronizer instance running, other Edge Microgateway instances running on different nodes can retrieve their configuration directly from this database.
The syncrhonizer feature is currently supported to work with Redis 5.0.x.
What is the synchronizer?
The synchronizer provides a level of resilience for Edge Microgateway. It helps ensure that every instance of Edge Microgateway uses the same configuration, and that in the event of an internet disruption, Edge Microgateway instances can start up and run properly.
By default, Edge Microgateway instances must be able to communicate with Apigee Edge to retrieve and refresh their configuration data, such as API proxy and API product configurations. If the internet connection with Edge is disrupted, microgateway instances can continue to function because the latest configuration data is cached. However, new microgateway instances cannot start up without a clear connection. Furthermore, it is possible for an internet disruption to result in one or more microgateway instances running with configuration information that is out of sync with other instances.
The Edge Microgateway synchronizer provides an alternative mechanism for Edge Microgateway instances to retrieve configuration data that they require to start up and process API proxy traffic. The configuration data retrieved from calls to Apigee Edge include: the jwk_public_keys call, the jwt_public_key call, the bootstrap call, and the API products call. The synchronizer makes it possible for all of the Edge Microgateway instances running on different nodes to start up properly and stay in sync even if the internet connection between Edge Microgateway and Apigee Edge is disrupted.
The synchronizer is a specially configured instance of Edge Microgateway. Its only purpose is to poll Apigee Edge (the timing is configurable), retrieve configuration data, and write it to a local Redis database. The synchronizer instance itself cannot process API proxy traffic. Other instances of Edge Microgateway running on different nodes can be configured to retrieve configuration data from the Redis database rather than from Apigee Edge. Because all microgateway instances pull their configuration data from the local database, they can start up and process API requests even in the event of an internet disruption.
Configuring a synchronizer instance
Add the following configuration to the org-env /config.yaml file for the Edge Microgateway installation that you wish to use as the synchronizer:
edgemicro:
  redisHost: host_IP
  redisPort: host_port
  redisDb: database_index
  redisPassword: password
edge_config:
  synchronizerMode: 1
  redisBasedConfigCache: true
উদাহরণস্বরূপ:
edgemicro:
  redisHost: 192.168.4.77
  redisPort: 6379
  redisDb: 0
  redisPassword: codemaster
edge_config:
  synchronizerMode: 1
  redisBasedConfigCache: true
| বিকল্প | বর্ণনা |
|---|---|
redisHost | The host where your Redis instance is running. Default: 127.0.0.1 |
redisPort | The port of the Redis instance. Default: 6379 |
redisDb | The Redis DB to use. Default: 0 |
redisPassword | Your database password. |
Finally, save the configuration file and start the Edge Microgateway instance. It will begin polling Apigee Edge and storing downloaded configuration data in the Redis database.
Configuring regular Edge Microgateway instances
With the synchronizer running, you can configure additional Edge Microgateway nodes to run regular microgateway instances that process API proxy traffic. However, you configure these instances to obtain their configuration data from the Redis database rather than from Apigee Edge.
Add the following configuration to each additional Edge Microgateway node's org-env /config.yaml file. Note that the synchronizerMode property is set to 0 . This property sets the instance to operate as a normal Edge Microgateway instance that processes API proxy traffic, and the instance will obtain its configuration data from the Redis database.
edgemicro:
  redisHost: host_IP
  redisPort: host_port
  redisDb: database_index
  redisPassword: password
edge_config:
  synchronizerMode: 0
  redisBasedConfigCache: true
উদাহরণস্বরূপ:
edgemicro:
  redisHost: 192.168.4.77
  redisPort: 6379
  redisDb: 0
  redisPassword: codemaster
edge_config:
  synchronizerMode: 0
  redisBasedConfigCache: true
Configuration properties
The following configuration properties have been added to support the use of the synchronizer:
| বৈশিষ্ট্য | মূল্যবোধ | বর্ণনা |
|---|---|---|
edge_config.synchronizerMode | 0 or 1 | If 0 (the default) Edge Microgateway operates in its standard mode. If 1, start the Edge Microgateway instance to operate as a synchronizer. In this mode, the instance will pull configuration data from Apigee Edge and store it in a local Redis database. This instance is not able to process API proxy requests; its only purpose is to poll Apigee Edge for configuration data and write it to the local database. You must then configure other microgateway instances to read from the database. |
edge_config.redisBasedConfigCache | সত্য বা মিথ্যা | If true, the Edge Microgateway instance fetches its configuration data from the Redis database instead of from Apigee Edge. The Redis database must be the same one that the synchronizer is configured to write to. If the Redis database is unavailable or if the database is empty, the microgateway looks for an existing cache-config.yaml file for its configuration.If false (the default), the Edge Microgateway instance fetches configuration data from Apigee Edge as usual. |
edgemicro.config_change_poll_interval | Time interval, in seconds | Specifies the polling interval for the synchronizer to pull data from Apigee Edge. |
Configuring exclude URLs for plugins
You can configure the microgateway to skip the processing of plugins for specified URLs. You can configure these "exclude" URLs globally (for all plugins) or for specific plugins.
উদাহরণস্বরূপ:
...
edgemicro:
  ...
  plugins:
    excludeUrls: '/hello,/proxy_one' # global exclude urls
    sequence:
      - oauth
      - json2xml
      - quota
json2xml:
  excludeUrls: '/hello/xml'  # plugin level exclude urls
...
In this example, plugins will not process incoming API proxy calls with the paths /hello or /proxy_one . In addition, the json2xml plugin will be skipped for APIs with /hello/xml in their path.
Setting configuration attributes with environment variable values
You can specify environment variables using tags in the configuration file. The specified environment variable tags are replaced by the actual environment variable values. Replacements are stored in memory only and not stored in the original configuration or cache files.
In this example, the attribute key is replaced by the value of the TARGETS_SSL_CLIENT_KEY environment variable, and so on.
targets:
  - ssl:
      client:
        key: <E>TARGETS_SSL_CLIENT_KEY</E>
        cert: <E>TARGETS_SSL_CLIENT_CERT</E>
        passphrase: <E>TARGETS_SSL_CLIENT_PASSPHRASE</E>
In this example, the <n> tag is used to indicate an integer value. Only positive integers are supported.
edgemicro:
  port: <E><n>EMG_PORT</n></E>
In this example, the <b> tag is used to indicate a boolean ( that is, true or false) value.
quotas:
  useRedis: <E><b>EMG_USE_REDIS</b></E>