

شما در حال مشاهده مستندات Apigee Edge هستید.
به مستندات Apigee X مراجعه کنید . اطلاعات
میکروگیتوی اج نسخه ۳.۳.x
این مبحث به نحوه مدیریت و پیکربندی Edge Microgateway میپردازد.
ارتقاء Edge Microgateway در صورت داشتن اتصال اینترنتی
این بخش نحوه ارتقاء نسخه موجود Edge Microgateway را توضیح میدهد. اگر بدون اتصال به اینترنت کار میکنید، به «آیا میتوانم Edge Microgateway را بدون اتصال به اینترنت نصب کنم؟» مراجعه کنید.
شرکت Apigee توصیه میکند قبل از ارتقاء محیط تولید، پیکربندی فعلی خود را با نسخه جدید آزمایش کنید.
- برای ارتقاء به آخرین نسخه Edge Microgateway، دستور
npmزیر را اجرا کنید:npm upgrade edgemicro -g
برای نصب یک نسخه خاص از Edge Microgateway، باید شماره نسخه را در دستور نصب مشخص کنید. به عنوان مثال، برای نصب نسخه ۳.۲.۳، از دستور زیر استفاده کنید:
npm install edgemicro@3.2.3 -g
- شماره نسخه را بررسی کنید. برای مثال، اگر نسخه ۳.۲.۳ را نصب کردهاید:
edgemicro --version current nodejs version is v12.5.0 current edgemicro version is 3.2.3 - در نهایت، به آخرین نسخه از پروکسی edgemicro-auth ارتقا دهید:
edgemicro upgradeauth -o $ORG -e $ENV -u $USERNAME
ایجاد تغییرات پیکربندی
فایلهای پیکربندی که باید در مورد آنها بدانید عبارتند از:
- فایل پیکربندی پیشفرض سیستم
- فایل پیکربندی پیشفرض برای نمونهی Edge Microgateway که به تازگی مقداردهی اولیه شده است
- فایل پیکربندی پویا برای نمونههای در حال اجرا
این بخش در مورد این فایلها و آنچه که باید در مورد تغییر آنها بدانید، بحث میکند.
فایل پیکربندی پیشفرض سیستم
وقتی Edge Microgateway را نصب میکنید، یک فایل پیکربندی سیستم پیشفرض در اینجا قرار میگیرد:
prefix/lib/node_modules/edgemicro/config/default.yaml
که prefix دایرکتوری پیشوند npm است. اگر نمیتوانید این دایرکتوری را پیدا کنید ، به «محل نصب Edge Microgateway» مراجعه کنید.
اگر فایل پیکربندی سیستم را تغییر دهید، باید Edge Microgateway را مجدداً مقداردهی اولیه، پیکربندی و مجدداً راهاندازی کنید:
edgemicro initedgemicro configure [params]edgemicro start [params]
فایل پیکربندی پیشفرض برای نمونههای Edge Microgateway که به تازگی مقداردهی اولیه شدهاند
وقتی edgemicro init اجرا میکنید، فایل پیکربندی سیستم (که در بالا توضیح داده شد)، default.yaml ، در دایرکتوری ~/.edgemicro قرار میگیرد.
اگر فایل پیکربندی را در ~/.edgemicro تغییر دهید، باید Edge Microgateway را دوباره پیکربندی و مجدداً راهاندازی کنید:
edgemicro stopedgemicro configure [params]edgemicro start [params]
فایل پیکربندی پویا برای نمونههای در حال اجرا
وقتی edgemicro configure [params] اجرا میکنید، یک فایل پیکربندی پویا در مسیر ~/.edgemicro ایجاد میشود. نام فایل طبق این الگو است: org - env -config.yaml ، که در آن org و env نامهای سازمان و محیط Apigee Edge شما هستند. میتوانید از این فایل برای ایجاد تغییرات پیکربندی استفاده کنید و سپس آنها را بدون هیچ گونه خرابی (downtime) مجدداً بارگذاری کنید. به عنوان مثال، اگر افزونهای را اضافه و پیکربندی کنید، میتوانید پیکربندی را بدون هیچ گونه خرابی، همانطور که در زیر توضیح داده شده است، مجدداً بارگذاری کنید.
اگر Edge Microgateway در حال اجرا باشد (گزینه بدون قطعی):
- پیکربندی Edge Microgateway را مجدداً بارگذاری کنید:
edgemicro reload -o $ORG -e $ENV -k $KEY -s $SECRET
کجا:
- $ORG نام سازمان Edge شما است (شما باید مدیر سازمان باشید).
- $ENV یک محیط در سازمان شما است (مانند "test" یا "prod").
- $KEY کلیدی است که قبلاً توسط دستور configure برگردانده شده است.
- $SECRET کلیدی است که قبلاً توسط دستور configure برگردانده شده است.
برای مثال
edgemicro reload -o docs -e test -k 701e70ee718ce6dc188...78b6181d000723 \
  -s 05c14356e42ed1...4e34ab0cc824
اگر Edge Microgateway متوقف شود:
- میکروگیتوی اج را مجدداً راهاندازی کنید:
edgemicro start -o $ORG -e $ENV -k $KEY -s $SECRET
کجا:
- $ORG نام سازمان Edge شما است (شما باید مدیر سازمان باشید).
- $ENV محیطی در سازمان شماست (مانند "test" یا "prod").
- $KEY کلیدی است که قبلاً توسط دستور configure برگردانده شده است.
- $SECRET کلیدی است که قبلاً توسط دستور configure برگردانده شده است.
برای مثال:
edgemicro start -o docs -e test -k 701e70ee718ce...b6181d000723 \
  -s 05c1435...e34ab0cc824
در اینجا یک نمونه فایل پیکربندی وجود دارد. برای جزئیات بیشتر در مورد تنظیمات فایل پیکربندی، به مرجع پیکربندی Edge Microgateway مراجعه کنید.
edge_config:
  bootstrap: >-
    https://edgemicroservices-us-east-1.apigee.net/edgemicro/bootstrap/organization/docs/environment/test
  jwt_public_key: 'https://docs-test.apigee.net/edgemicro-auth/publicKey'
  managementUri: 'https://api.enterprise.apigee.com'
  vaultName: microgateway
  authUri: 'https://%s-%s.apigee.net/edgemicro-auth'
  baseUri: >-
    https://edgemicroservices.apigee.net/edgemicro/%s/organization/%s/environment/%s
  bootstrapMessage: Please copy the following property to the edge micro agent config
  keySecretMessage: The following credentials are required to start edge micro
  products: 'https://docs-test.apigee.net/edgemicro-auth/products'
edgemicro:
  port: 8000
  max_connections: 1000
  max_connections_hard: 5000
  config_change_poll_interval: 600
  logging:
    level: error
    dir: /var/tmp
    stats_log_interval: 60
    rotate_interval: 24
  plugins:
    sequence:
      - oauth
headers:
  x-forwarded-for: true
  x-forwarded-host: true
  x-request-id: true
  x-response-time: true
  via: true
oauth:
  allowNoAuthorization: false
  allowInvalidAuthorization: false
  verify_api_key_url: 'https://docs-test.apigee.net/edgemicro-auth/verifyApiKey'
analytics:
  uri: >-
    https://edgemicroservices-us-east-1.apigee.net/edgemicro/axpublisher/organization/docs/environment/test
تنظیم متغیرهای محیطی
دستورات رابط خط فرمان که به مقادیری برای سازمان و محیط Edge شما نیاز دارند، و کلید و رمز مورد نیاز برای شروع Edge Microgateway را میتوان در این متغیرهای محیطی ذخیره کرد:
-
EDGEMICRO_ORG -
EDGEMICRO_ENV -
EDGEMICRO_KEY -
EDGEMICRO_SECRET
تنظیم این متغیرها اختیاری است. اگر آنها را تنظیم کنید، هنگام استفاده از رابط خط فرمان (CLI) برای پیکربندی و شروع Edge Microgateway نیازی به مشخص کردن مقادیر آنها ندارید.
پیکربندی SSL روی سرور Edge Microgateway
برای آشنایی با پیکربندی TLS در Apigee Edge Microgateway، ویدیوهای زیر را تماشا کنید:
| ویدئو | توضیحات |
|---|---|
| پیکربندی TLS یک طرفه به سمت شمال | در مورد پیکربندی TLS در Apigee Edge Microgateway اطلاعات کسب کنید. این ویدیو مروری بر TLS و اهمیت آن ارائه میدهد، TLS را در Edge Microgateway معرفی میکند و نحوه پیکربندی Northbound One-Way TLS را نشان میدهد. |
| پیکربندی TLS دوطرفه Northbound | این دومین ویدیو در مورد پیکربندی TLS در Apigee Edge Microgateway است. در این ویدیو نحوه پیکربندی TLS دو طرفه northbound توضیح داده شده است. |
| پیکربندی TLS یک طرفه و دو طرفه Southbound | این سومین ویدیو در مورد پیکربندی TLS در Apigee Edge Microgateway نحوه پیکربندی TLS یک طرفه و دو طرفه به سمت جنوب را توضیح میدهد. |
شما میتوانید سرور Microgateway را طوری پیکربندی کنید که از SSL استفاده کند. برای مثال، با پیکربندی SSL، میتوانید APIها را از طریق Edge Microgateway با پروتکل "https" فراخوانی کنید، مانند این:
https://localhost:8000/myapi
برای پیکربندی SSL روی سرور Microgateway، مراحل زیر را دنبال کنید:
- با استفاده از ابزار openssl یا هر روش دیگری که ترجیح میدهید، یک گواهی SSL و کلید ایجاد یا دریافت کنید.
- ویژگی
edgemicro:sslرا به فایل پیکربندی Edge Microgateway اضافه کنید. برای لیست کامل گزینهها، به جدول زیر مراجعه کنید. به عنوان مثال:edgemicro: ssl: key: <absolute path to the SSL key file> cert: <absolute path to the SSL cert file> passphrase: admin123 #option added in v2.2.2 rejectUnauthorized: true #option added in v2.2.2 requestCert: true
- Edge Microgateway را مجدداً راهاندازی کنید. بسته به اینکه کدام فایل پیکربندی را ویرایش کردهاید، مراحل ذکر شده در «ایجاد تغییرات پیکربندی» را دنبال کنید: فایل پیشفرض یا فایل پیکربندی زمان اجرا.
در اینجا مثالی از بخش edgemicro از فایل پیکربندی، با پیکربندی SSL آورده شده است:
edgemicro:
  port: 8000
  max_connections: 1000
  max_connections_hard: 5000
  logging:
    level: error
    dir: /var/tmp
    stats_log_interval: 60
    rotate_interval: 24
  plugins:
    sequence:
      - oauth
  ssl:
    key: /MyHome/SSL/em-ssl-keys/server.key
    cert: /MyHome/SSL/em-ssl-keys/server.crt
    passphrase: admin123 #option added in v2.2.2
    rejectUnauthorized: true #option added in v2.2.2
در اینجا لیستی از تمام گزینههای سرور پشتیبانی شده آمده است:
| گزینه | توضیحات |
|---|---|
key | مسیر فایل ca.key (با فرمت PEM). |
cert | مسیر فایل ca.cert (با فرمت PEM). |
pfx | مسیر فایل pfx حاوی کلید خصوصی، گواهی و گواهیهای CA کلاینت با فرمت PFX. |
passphrase | رشتهای حاوی عبارت عبور برای کلید خصوصی یا PFX. |
ca | مسیر فایلی که حاوی فهرستی از گواهیهای معتبر با فرمت PEM است. |
ciphers | رشتهای که رمزهای مورد استفاده را توصیف میکند و با ":" از هم جدا شده است. |
rejectUnauthorized | اگر درست باشد، گواهی سرور با لیست CA های ارائه شده تأیید میشود. اگر تأیید ناموفق باشد، خطایی برگردانده میشود. |
secureProtocol | متد SSL مورد استفاده. برای مثال، SSLv3_method برای مجبور کردن SSL به نسخه ۳. |
servername | نام سرور برای پسوند TLS مربوط به SNI (نشانگر نام سرور). |
requestCert | برای SSL دوطرفه درست و برای SSL یکطرفه نادرست است. |
استفاده از گزینههای SSL/TLS کلاینت
شما میتوانید Edge Microgateway را طوری پیکربندی کنید که هنگام اتصال به نقاط انتهایی هدف، یک کلاینت TLS یا SSL باشد. در فایل پیکربندی Microgateway، از عنصر targets برای تنظیم گزینههای SSL/TLS استفاده کنید. توجه داشته باشید که میتوانید چندین هدف خاص را مشخص کنید. یک مثال چند هدفی در زیر آمده است.
این مثال تنظیماتی را ارائه میدهد که برای همه میزبانها اعمال خواهد شد:
edgemicro:
...
targets:
  ssl:
    client:
      key: /Users/jdoe/nodecellar/twowayssl/ssl/client.key
      cert: /Users/jdoe/nodecellar/twowayssl/ssl/ca.crt
      passphrase: admin123
      rejectUnauthorized: true
در این مثال، تنظیمات فقط روی میزبان مشخص شده اعمال میشوند:
edgemicro:
...
targets:
  - host: 'myserver.example.com'
    ssl:
      client:
        key: /Users/myname/twowayssl/ssl/client.key
        cert: /Users/myname/twowayssl/ssl/ca.crt
        passphrase: admin123
        rejectUnauthorized: true
در اینجا مثالی برای TLS آورده شده است:
edgemicro:
...
targets:
  - host: 'myserver.example.com'
    tls:
      client:
        pfx: /Users/myname/twowayssl/ssl/client.pfx
        passphrase: admin123
        rejectUnauthorized: true
در صورتی که میخواهید تنظیمات TLS/SSL را روی چندین هدف خاص اعمال کنید، باید اولین میزبان را در پیکربندی به عنوان "خالی" مشخص کنید، که درخواستهای عمومی را فعال میکند، و سپس میزبانهای خاص را به هر ترتیبی مشخص کنید. در این مثال، تنظیمات روی چندین میزبان خاص اعمال میشوند:
targets:
 - host:   ## Note that this value must be "empty"
   ssl:
     client:
       key: /Users/myname/twowayssl/ssl/client.key
       cert: /Users/myname/twowayssl/ssl/ca.crt
       passphrase: admin123
       rejectUnauthorized: true
 - host: 'myserver1.example.com'
   ssl:
     client:
       key: /Users/myname/twowayssl/ssl/client.key
       cert: /Users/myname/twowayssl/ssl/ca.crt
       rejectUnauthorized: true
 - host: 'myserver2.example.com'
   ssl:
     client:
       key: /Users/myname/twowayssl/ssl/client.key
       cert: /Users/myname/twowayssl/ssl/ca.crt
       rejectUnauthorized: true
در اینجا لیستی از تمام گزینههای کلاینت پشتیبانیشده آمده است:
| گزینه | توضیحات |
|---|---|
pfx | مسیر فایل pfx حاوی کلید خصوصی، گواهی و گواهیهای CA کلاینت با فرمت PFX. |
key | مسیر فایل ca.key (با فرمت PEM). |
passphrase | رشتهای حاوی عبارت عبور برای کلید خصوصی یا PFX. |
cert | مسیر فایل ca.cert (با فرمت PEM). |
ca | مسیر فایلی که حاوی فهرستی از گواهیهای معتبر با فرمت PEM است. |
ciphers | رشتهای که رمزهای مورد استفاده را توصیف میکند و با ":" از هم جدا شده است. |
rejectUnauthorized | اگر درست باشد، گواهی سرور با لیست CA های ارائه شده تأیید میشود. اگر تأیید ناموفق باشد، خطایی برگردانده میشود. |
secureProtocol | متد SSL مورد استفاده. برای مثال، SSLv3_method برای مجبور کردن SSL به نسخه ۳. |
servername | نام سرور برای پسوند TLS مربوط به SNI (نشانگر نام سرور). |
سفارشیسازی پروکسی edgemicro-auth
به طور پیشفرض، Edge Microgateway از یک پروکسی مستقر در Apigee Edge برای احراز هویت OAuth2 استفاده میکند. این پروکسی زمانی که برای اولین بار edgemicro configure اجرا میکنید، مستقر میشود. میتوانید پیکربندی پیشفرض این پروکسی را تغییر دهید تا پشتیبانی از ادعاهای سفارشی را به JSON Web Token (JWT) اضافه کنید، انقضای توکن را پیکربندی کنید و توکنهای تازهسازی ایجاد کنید. برای جزئیات بیشتر، به صفحه edgemicro-auth در GitHub مراجعه کنید.
استفاده از یک سرویس احراز هویت سفارشی
به طور پیشفرض، Edge Microgateway از یک پروکسی مستقر در Apigee Edge برای احراز هویت OAuth2 استفاده میکند. این پروکسی هنگام اجرای اولیه edgemicro configure مستقر میشود. به طور پیشفرض، URL این پروکسی در فایل پیکربندی Edge Microgateway به شرح زیر مشخص شده است:
authUri: https://myorg-myenv.apigee.net/edgemicro-auth
اگر میخواهید از سرویس سفارشی خودتان برای مدیریت احراز هویت استفاده کنید، مقدار authUri را در فایل پیکربندی تغییر دهید تا به سرویس شما اشاره کند. برای مثال، ممکن است سرویسی داشته باشید که از LDAP برای تأیید هویت استفاده میکند.
مدیریت فایلهای لاگ
Edge Microgateway اطلاعات مربوط به هر درخواست و پاسخ را ثبت میکند. فایلهای گزارش، اطلاعات مفیدی را برای اشکالزدایی و عیبیابی ارائه میدهند.
جایی که فایلهای لاگ ذخیره میشوند
به طور پیشفرض، فایلهای لاگ در مسیر /var/tmp ذخیره میشوند.
نحوه تغییر دایرکتوری پیشفرض فایلهای لاگ
دایرکتوری که فایلهای لاگ در آن ذخیره میشوند، در فایل پیکربندی Edge Microgateway مشخص شده است. همچنین به بخش «ایجاد تغییرات پیکربندی» مراجعه کنید.
edgemicro:
  home: ../gateway
  port: 8000
  max_connections: -1
  max_connections_hard: -1
  logging:
    level: info
    dir: /var/tmp
    stats_log_interval: 60
    rotate_interval: 24
مقدار dir را تغییر دهید تا دایرکتوری فایل لاگ متفاوتی مشخص شود.
ارسال لاگها به کنسول
شما میتوانید ثبت وقایع را طوری پیکربندی کنید که اطلاعات گزارش به جای ارسال به یک فایل گزارش، به خروجی استاندارد ارسال شود. پرچم to_console را به صورت زیر روی true تنظیم کنید:
edgemicro:
  logging:
    to_console: true
با این تنظیم، گزارشها به خروجی استاندارد ارسال میشوند. در حال حاضر، نمیتوانید گزارشها را هم به خروجی استاندارد و هم به یک فایل گزارش ارسال کنید.
نحوه تنظیم سطح ثبت وقایع
شما سطح گزارش مورد استفاده در پیکربندی edgemicro را مشخص میکنید. برای فهرست کاملی از سطوح گزارش و توضیحات آنها، به ویژگیهای edgemicro مراجعه کنید.
برای مثال، پیکربندی زیر سطح ثبت وقایع را روی debug تنظیم میکند:
edgemicro:
  home: ../gateway
  port: 8000
  max_connections: -1
  max_connections_hard: -1
  logging:
    level: debug
    dir: /var/tmp
    stats_log_interval: 60
    rotate_interval: 24
نحوه تغییر فواصل لاگ
میتوانید این فواصل را در فایل پیکربندی Edge Microgateway پیکربندی کنید. همچنین به بخش «ایجاد تغییرات پیکربندی» مراجعه کنید.
ویژگیهای قابل تنظیم عبارتند از:
- stats_log_interval : (پیشفرض: ۶۰) فاصله زمانی، بر حسب ثانیه، که رکورد آمار در فایل لاگ API نوشته میشود.
- rotate_interval : (پیشفرض: ۲۴) فاصله زمانی، بر حسب ساعت، که فایلهای لاگ چرخانده میشوند. برای مثال:
edgemicro:
  home: ../gateway
  port: 8000
  max_connections: -1
  max_connections_hard: -1
  logging:
    level: info
    dir: /var/tmp
    stats_log_interval: 60
    rotate_interval: 24
چگونه مجوزهای سختگیرانهی فایلهای لاگ را کاهش دهیم؟
به طور پیشفرض، Edge Microgateway فایل لاگ برنامه ( api-log.log ) را با سطح مجوز فایل روی 0600 تولید میکند. این سطح مجوز به برنامههای خارجی یا کاربران اجازه خواندن فایل لاگ را نمیدهد. برای کاهش این سطح مجوز سختگیرانه، logging:disableStrictLogFile را روی true تنظیم کنید. وقتی این ویژگی true باشد، فایل لاگ با مجوز فایل روی 0755 ایجاد میشود. اگر false یا اگر این ویژگی ارائه نشده باشد، مجوز به طور پیشفرض روی 0600 تنظیم میشود.
در نسخه ۳.۲.۳ اضافه شد.
برای مثال:
edgemicro:
 logging:
   disableStrictLogFile: true
شیوههای خوب نگهداری فایلهای لاگ
از آنجایی که دادههای فایل لاگ به مرور زمان انباشته میشوند، Apigee توصیه میکند که شیوههای زیر را اتخاذ کنید:
- از آنجا که فایلهای لاگ میتوانند بسیار بزرگ شوند، مطمئن شوید که دایرکتوری فایل لاگ فضای کافی دارد. به بخشهای زیر مراجعه کنید: محل ذخیره فایلهای لاگ و نحوه تغییر دایرکتوری پیشفرض فایل لاگ .
- حداقل هفتهای یک بار، فایلهای لاگ را حذف یا به یک پوشه بایگانی جداگانه منتقل کنید.
- اگر سیاست شما حذف لاگها است، میتوانید از دستور
edgemicro log -cدر CLI برای حذف (پاکسازی) لاگهای قدیمیتر استفاده کنید.
قرارداد نامگذاری فایلهای لاگ
هر نمونه Edge Microgateway یک فایل لاگ با پسوند .log تولید میکند. قرارداد نامگذاری فایلهای لاگ به شرح زیر است:
edgemicro- HOST_NAME - INSTANCE_ID -api.log
برای مثال:
edgemicro-mymachine-local-MTQzNTgNDMxODAyMQ-api.log
درباره محتویات فایل لاگ
اضافه شده در: نسخه ۲.۳.۳
به طور پیشفرض، سرویس ثبت وقایع، JSON مربوط به پروکسیهای دانلود شده، محصولات و JSON Web Token (JWT) را حذف میکند. اگر میخواهید این اشیاء را در کنسول نمایش دهید، هنگام شروع Edge Microgateway، پرچم خط فرمان DEBUG=* را تنظیم کنید. به عنوان مثال:
DEBUG=* edgemicro start -o docs -e test -k abc123 -s xyz456
محتویات فایل گزارش "api"
فایل لاگ "api" حاوی اطلاعات دقیقی در مورد جریان درخواستها و پاسخها از طریق Edge Microgateway است. فایلهای لاگ "api" به این صورت نامگذاری شدهاند:
edgemicro-mymachine-local-MTQzNjIxOTk0NzY0Nw-api.log
برای هر درخواستی که به Edge Microgateway ارسال میشود، چهار رویداد در فایل گزارش "api" ثبت میشود:
- درخواست دریافتی از مشتری
- درخواست خروجی به مقصد ارسال میشود
- پاسخ دریافتی از هدف
- پاسخ خروجی به مشتری
هر یک از این ورودیهای جداگانه با یک نمادگذاری مختصر نمایش داده شدهاند تا به فشردهتر شدن فایلهای لاگ کمک کنند. در اینجا چهار ورودی نمونه که هر یک از چهار رویداد را نشان میدهند، آورده شده است. در فایل لاگ، آنها به این شکل هستند (شماره خطوط فقط برای ارجاع در سند هستند، آنها در فایل لاگ ظاهر نمیشوند).
(1) 1436403888651 info req m=GET, u=/, h=localhost:8000, r=::1:59715, i=0
(2) 1436403888665 info treq m=GET, u=/, h=127.0.0.18080, i=0
(3) 1436403888672 info tres s=200, d=7, i=0
(4) 1436403888676 info res s=200, d=11, i=0
بیایید یکی یکی به آنها نگاه کنیم:
۱. نمونه درخواست دریافتی از مشتری:
1436403888651 info req m=GET, u=/, h=localhost:8000, r=::1:59715, i=0
- ۱۴۳۶۴۰۳۸۸۸۶۵۱ - مهر تاریخ یونیکس
- اطلاعات - سطح ثبت وقایع. این مقدار به زمینه تراکنش و سطح ثبت وقایع تنظیم شده در پیکربندی
edgemicroبستگی دارد. به نحوه تنظیم سطح ثبت وقایع مراجعه کنید. برای رکوردهای آمار، این سطح رویstatsتنظیم شده است. رکوردهای آمار در یک بازه زمانی منظم که با پیکربندیstats_log_intervalتنظیم شده است، گزارش میشوند. همچنین به نحوه تغییر فواصل ثبت وقایع مراجعه کنید. - req - رویداد را شناسایی میکند. در این مورد، از کلاینت درخواست میشود.
- m - فعل HTTP استفاده شده در درخواست.
- u - بخشی از URL که پس از مسیر پایه قرار میگیرد.
- h - شماره میزبان و پورتی که Edge Microgateway در آن مشغول گوش دادن است.
- r - میزبان و پورت راه دور که درخواست کلاینت از آنجا ارسال شده است.
- i - شناسه درخواست. هر چهار ورودی رویداد این شناسه را به اشتراک میگذارند. به هر درخواست یک شناسه درخواست منحصر به فرد اختصاص داده میشود. مرتبط کردن رکوردهای لاگ بر اساس شناسه درخواست میتواند بینش ارزشمندی در مورد تأخیر هدف ارائه دهد.
- d - مدت زمان بر حسب میلیثانیه از زمان دریافت درخواست توسط Edge Microgateway. در مثال بالا، پاسخ هدف برای درخواست 0 پس از 7 میلیثانیه (خط 3) دریافت شد و پاسخ پس از 4 میلیثانیه اضافی (خط 4) به کلاینت ارسال شد. به عبارت دیگر، کل تأخیر درخواست 11 میلیثانیه بود که از این تعداد 7 میلیثانیه توسط هدف و 4 میلیثانیه توسط خود Edge Microgateway گرفته شده است.
۲. نمونه درخواست خروجی ارسال شده به هدف:
1436403888665 info treq m=GET, u=/, h=127.0.0.1:8080, i=0
- ۱۴۳۶۴۰۳۸۸۸۶۵۱ - مهر تاریخ یونیکس
- اطلاعات - سطح ثبت وقایع. این مقدار به زمینه تراکنش و سطح ثبت وقایع تنظیم شده در پیکربندی
edgemicroبستگی دارد. به نحوه تنظیم سطح ثبت وقایع مراجعه کنید. برای رکوردهای آمار، این سطح رویstatsتنظیم شده است. رکوردهای آمار در یک بازه زمانی منظم که با پیکربندیstats_log_intervalتنظیم شده است، گزارش میشوند. همچنین به نحوه تغییر فواصل ثبت وقایع مراجعه کنید. - treq - رویداد را شناسایی میکند. در این مورد، درخواست هدف.
- m - فعل HTTP استفاده شده در درخواست هدف.
- u - بخشی از URL که پس از مسیر پایه قرار میگیرد.
- h - شماره میزبان و پورت هدف backend.
- i - شناسهی ورودی لاگ. هر چهار ورودی رویداد این شناسه را به اشتراک میگذارند.
۳. نمونهای از پاسخ دریافتی از هدف
1436403888672 info tres s=200, d=7, i=0
۱۴۳۶۴۰۳۸۸۸۶۵۱ - مهر تاریخ یونیکس
- اطلاعات - سطح ثبت وقایع. این مقدار به زمینه تراکنش و سطح ثبت وقایع تنظیم شده در پیکربندی
edgemicroبستگی دارد. به نحوه تنظیم سطح ثبت وقایع مراجعه کنید. برای رکوردهای آمار، این سطح رویstatsتنظیم شده است. رکوردهای آمار در یک بازه زمانی منظم که با پیکربندیstats_log_intervalتنظیم شده است، گزارش میشوند. همچنین به نحوه تغییر فواصل ثبت وقایع مراجعه کنید. - tres - رویداد را شناسایی میکند. در این مورد، پاسخ هدف.
- s - وضعیت پاسخ HTTP.
- d - مدت زمان بر حسب میلیثانیه. مدت زمان صرف شده برای فراخوانی API توسط هدف.
- i - شناسهی ورودی لاگ. هر چهار ورودی رویداد این شناسه را به اشتراک میگذارند.
۴. نمونه پاسخ ارسالی به مشتری
1436403888676 info res s=200, d=11, i=0
۱۴۳۶۴۰۳۸۸۸۶۵۱ - مهر تاریخ یونیکس
- اطلاعات - سطح ثبت وقایع. این مقدار به زمینه تراکنش و سطح ثبت وقایع تنظیم شده در پیکربندی
edgemicroبستگی دارد. به نحوه تنظیم سطح ثبت وقایع مراجعه کنید. برای رکوردهای آمار، این سطح رویstatsتنظیم شده است. رکوردهای آمار در یک بازه زمانی منظم که با پیکربندیstats_log_intervalتنظیم شده است، گزارش میشوند. همچنین به نحوه تغییر فواصل ثبت وقایع مراجعه کنید. - res - رویداد را شناسایی میکند. در این مورد، پاسخ به کلاینت.
- s - وضعیت پاسخ HTTP.
- d - مدت زمان بر حسب میلیثانیه. این کل زمان صرف شده برای فراخوانی API است، شامل زمان صرف شده توسط API هدف و زمان صرف شده توسط خود Edge Microgateway.
- i - شناسهی ورودی لاگ. هر چهار ورودی رویداد این شناسه را به اشتراک میگذارند.
برنامه زمانبندی فایل لاگ
فایلهای لاگ در بازه زمانی مشخص شده توسط ویژگی پیکربندی rotate_interval چرخش مییابند. ورودیها تا زمان انقضای بازه چرخش، به همان فایل لاگ اضافه میشوند. با این حال، هر بار که Edge Microgateway مجدداً راهاندازی میشود، یک UID جدید دریافت میکند و مجموعهای جدید از فایلهای لاگ را با این UID ایجاد میکند. همچنین به شیوههای خوب نگهداری فایل لاگ مراجعه کنید.
پیامهای خطا
برخی از ورودیهای لاگ حاوی پیامهای خطا هستند. برای کمک به شناسایی محل و دلیل وقوع خطاها، به مرجع خطای Edge Microgateway مراجعه کنید.
مرجع پیکربندی Edge Microgateway
محل فایل پیکربندی
ویژگیهای پیکربندی شرح داده شده در این بخش در فایل پیکربندی Edge Microgateway قرار دارند. همچنین به بخش «ایجاد تغییرات پیکربندی» مراجعه کنید.
ویژگیهای edge_config
این تنظیمات برای پیکربندی تعامل بین نمونه Edge Microgateway و Apigee Edge استفاده میشوند.
- bootstrap : (پیشفرض: هیچ) یک URL که به یک سرویس خاص Edge Microgateway که روی Apigee Edge اجرا میشود اشاره میکند. Edge Microgateway از این سرویس برای ارتباط با Apigee Edge استفاده میکند. این URL هنگام اجرای دستور تولید جفت کلید عمومی/خصوصی:
edgemicro genkeysبازگردانده میشود. برای جزئیات بیشتر به بخش راهاندازی و پیکربندی Edge Microgateway مراجعه کنید. - jwt_public_key : (پیشفرض: هیچ) یک URL که به پروکسی Edge Microgateway که روی Apigee Edge مستقر است اشاره میکند. این پروکسی به عنوان یک نقطه پایانی احراز هویت برای صدور توکنهای دسترسی امضا شده به کلاینتها عمل میکند. این URL هنگام اجرای دستور برای استقرار پروکسی برگردانده میشود: edgemicro configure . برای جزئیات بیشتر به بخش راهاندازی و پیکربندی Edge Microgateway مراجعه کنید.
- quotaUri : اگر میخواهید سهمیهها را از طریق پروکسی
edgemicro-authکه در سازمان شما مستقر شده است، مدیریت کنید، این ویژگی پیکربندی را تنظیم کنید. اگر این ویژگی تنظیم نشده باشد، نقطه پایانی سهمیه به طور پیشفرض روی نقطه پایانی داخلی Edge Microgateway قرار میگیرد.edge_config: quotaUri: https://your_org-your_env.apigee.net/edgemicro-auth
ویژگیهای edgemicro
این تنظیمات، فرآیند Edge Microgateway را پیکربندی میکنند.
- پورت : (پیشفرض: ۸۰۰۰) شماره پورتی که پردازش Edge Microgateway به آن گوش میدهد.
- max_connections : (پیشفرض: -1) حداکثر تعداد اتصالات ورودی همزمان که Edge Microgateway میتواند دریافت کند را مشخص میکند. اگر از این تعداد تجاوز شود، وضعیت زیر برگردانده میشود:
res.statusCode = 429; // Too many requests - max_connections_hard : (پیشفرض: -1) حداکثر تعداد درخواستهای همزمان که Edge Microgateway میتواند قبل از قطع اتصال دریافت کند. این تنظیم برای خنثی کردن حملات انکار سرویس در نظر گرفته شده است. معمولاً آن را روی عددی بزرگتر از max_connections تنظیم کنید.
- ثبت وقایع :
- سطح : (پیشفرض: خطا)
- اطلاعات - (توصیه میشود) تمام درخواستها و پاسخهایی را که از طریق یک نمونه Edge Microgateway جریان دارند، ثبت میکند.
- هشدار - فقط پیامهای هشدار را ثبت میکند.
- error - فقط پیامهای خطا را ثبت میکند.
- اشکالزدایی - پیامهای اشکالزدایی را به همراه پیامهای اطلاعات، هشدار و خطا ثبت میکند.
- ردیابی - اطلاعات ردیابی خطاها را به همراه اطلاعات، هشدارها و پیامهای خطا ثبت میکند.
- هیچکدام - فایل لاگ ایجاد نکنید.
- dir : (پیشفرض: /var/tmp) دایرکتوری که فایلهای لاگ در آن ذخیره میشوند.
- stats_log_interval : (پیشفرض: ۶۰) فاصله زمانی، بر حسب ثانیه، که رکورد آمار در فایل لاگ API نوشته میشود.
- rotate_interval : (پیشفرض: ۲۴) فاصله زمانی، بر حسب ساعت، که فایلهای لاگ چرخانده میشوند.
- سطح : (پیشفرض: خطا)
- افزونهها : افزونهها به Edge Microgateway قابلیت اضافه میکنند. برای جزئیات بیشتر در مورد توسعه افزونهها، به بخش توسعه افزونههای سفارشی مراجعه کنید.
- dir : یک مسیر نسبی از دایرکتوری ./gateway به دایرکتوری ./plugins، یا یک مسیر مطلق.
- sequence : فهرستی از ماژولهای افزونه برای اضافه کردن به نمونه Edge Microgateway شما. ماژولها به ترتیبی که در اینجا مشخص شدهاند، اجرا خواهند شد.
- اشکالزدایی: اشکالزدایی از راه دور را به فرآیند Edge Microgateway اضافه میکند.
- پورت : شماره پورتی که باید به آن گوش دهید. برای مثال، اشکالزدای IDE خود را طوری تنظیم کنید که به این پورت گوش دهد.
- args : آرگومانهایی برای فرآیند اشکالزدایی. برای مثال:
args --nolazy
- config_change_poll_interval: (پیشفرض: ۶۰۰ ثانیه) Edge Microgateway پیکربندی جدیدی را به صورت دورهای بارگذاری میکند و در صورت تغییر هر چیزی، بارگذاری مجدد را اجرا میکند. این نظرسنجی هرگونه تغییر ایجاد شده در Edge (تغییر در محصولات، پروکسیهای آگاه از microgateway و غیره) و همچنین تغییرات ایجاد شده در فایل پیکربندی محلی را ثبت میکند.
- disable_config_poll_interval: (پیشفرض: false) برای غیرفعال کردن نظرسنجی خودکار تغییر، روی true تنظیم کنید.
- request_timeout : برای درخواستهای هدف، مهلت زمانی تعیین میکند. این مهلت زمانی بر حسب ثانیه تنظیم میشود. در صورت وقوع مهلت زمانی، Edge Microgateway با کد وضعیت ۵۰۴ پاسخ میدهد. (نسخه ۲.۴.x اضافه شده است)
- keep_alive_timeout : این ویژگی به شما امکان میدهد تا زمان انقضای Edge Microgateway را (به میلیثانیه) تنظیم کنید. (پیشفرض: ۵ ثانیه) (اضافه شده در نسخه ۳.۰.۶)
- headers_timeout : این ویژگی مدت زمانی (برحسب میلیثانیه) را که تجزیهکننده HTTP برای دریافت کل هدرهای HTTP منتظر میماند، محدود میکند.
برای مثال:
edgemicro:
  keep_alive_timeout: 6000
  headers_timeout: 12000
این پارامتر به صورت داخلی، ویژگی
Server.headersTimeoutمربوط به Node.js را برای درخواستها تنظیم میکند. (پیشفرض: ۵ ثانیه بیشتر از زمان تعیینشده باedgemicro.keep_alive_timeout. این تنظیم پیشفرض مانع از قطع اشتباه اتصال توسط متعادلکنندههای بار یا پروکسیها میشود.) (نسخه ۳.۱.۱ اضافه شده است) - noRuleMatchAction: (رشته) اقدامی که باید انجام شود (اجازه یا رد دسترسی) اگر قانون تطبیق مشخص شده در افزونه
accesscontrolبرطرف نشود (تطبیق نیافته باشد). مقادیر معتبر:ALLOWیاDENYپیشفرض:ALLOW(اضافه شده: نسخه ۳.۱.۷) - enableAnalytics: (پیشفرض: true) برای جلوگیری از بارگذاری افزونهی Analytics، این ویژگی را روی false تنظیم کنید. در این حالت، هیچ فراخوانی برای Apigee Edge analytics انجام نخواهد شد. اگر روی true تنظیم شود یا زمانی که این ویژگی ارائه نشود، افزونهی analytics طبق معمول کار خواهد کرد. برای جزئیات بیشتر به ویژگیهای edgemicro مراجعه کنید. (نسخهی ۳.۱.۸ اضافه شد).
مثال:
edgemicro
  enableAnalytics=false|true
- on_target_response_abort : این ویژگی به شما امکان میدهد نحوه رفتار Edge Microgateway را در صورت بسته شدن زودهنگام اتصال بین کلاینت (Edge Microgateway) و سرور هدف کنترل کنید.
ارزش توضیحات پیشفرض اگر on_target_response_abortنامشخص باشد، رفتار پیشفرض، کوتاه کردن پاسخ بدون نمایش خطا است. در فایلهای لاگ، یک پیام هشدار باtargetResponse abortedو کد پاسخ ۵۰۲ نمایش داده میشود.appendErrorToClientResponseBodyخطای سفارشی TargetResponseAbortedبه کلاینت بازگردانده میشود. در فایلهای لاگ، یک پیام هشدار باtargetResponse abortedو کد پاسخ ۵۰۲ نمایش داده میشود. علاوه بر این، خطایTargetResponseAbortedبا پیامTarget response ended prematurely.abortClientRequestEdge Microgateway درخواست را لغو میکند و یک هشدار در فایلهای لاگ نوشته میشود: TargetResponseAbortedبا کد وضعیت درخواست ۵۰۲.
مثال:
edgemicro:
 on_target_response_abort: appendErrorToClientResponseBody | abortClientRequest
ویژگیهای هدرها
این تنظیمات نحوه برخورد با هدرهای HTTP خاص را پیکربندی میکنند.
- x-forwarded-for : (پیشفرض: true) برای جلوگیری از ارسال هدرهای x-forwarded-for به مقصد، روی false تنظیم شود. توجه داشته باشید که اگر هدر x-forwarded-for در درخواست باشد، مقدار آن در Edge Analytics برابر با مقدار client-ip تنظیم میشود.
- x-forwarded-host : (پیشفرض: true) برای جلوگیری از ارسال هدرهای x-forwarded-host به مقصد، روی false تنظیم شود.
- x-request-id : (پیشفرض: true) برای جلوگیری از ارسال هدرهای x-request-id به مقصد، روی false تنظیم میشود.
- x-response-time : (پیشفرض: true) برای جلوگیری از ارسال هدرهای x-response-time به مقصد، روی false تنظیم شود.
- via : (پیشفرض: true) برای جلوگیری از ارسال هدرهای via به مقصد، روی false تنظیم میشود.
ویژگیهای oauth
این تنظیمات نحوهی اعمال احراز هویت کلاینت توسط Edge Microgateway را پیکربندی میکنند.
- allowNoAuthorization : (پیشفرض: false) اگر روی true تنظیم شود، فراخوانیهای API اجازه دارند بدون هیچ سربرگ Authorization از Edge Microgateway عبور کنند. برای نیاز به سربرگ Authorization (پیشفرض)، این مقدار را روی false تنظیم کنید.
- allowInvalidAuthorization : (پیشفرض: false) اگر روی true تنظیم شود، در صورتی که توکن ارسالی در هدر Authorization نامعتبر یا منقضی شده باشد، فراخوانیهای API مجاز به عبور هستند. برای درخواست توکنهای معتبر، این مقدار را روی false تنظیم کنید (پیشفرض).
- authorization-header : (پیشفرض: Authorization: Bearer) هدری که برای ارسال توکن دسترسی به Edge Microgateway استفاده میشود. در مواردی که هدف نیاز به استفاده از هدر Authorization برای هدف دیگری دارد، میتوانید پیشفرض را تغییر دهید.
- api-key-header : (پیشفرض: x-api-key) نام هدر یا پارامتر پرسوجو که برای ارسال کلید API به Edge Microgateway استفاده میشود. همچنین به بخش استفاده از کلید API مراجعه کنید.
- keep-authorization-header : (پیشفرض: false) اگر روی true تنظیم شود، هدر Authorization ارسالشده در درخواست به مقصد منتقل میشود (حفظ میشود).
- allowOAuthOnly -- اگر روی true تنظیم شود، هر API باید یک هدر مجوز با یک Bearer Access Token داشته باشد. به شما امکان میدهد فقط مدل امنیتی OAuth را مجاز کنید (ضمن حفظ سازگاری با نسخههای قبلی). (اضافه شده در نسخه ۲.۴.x)
- allowAPIKeyOnly -- اگر روی true تنظیم شود، هر API باید یک هدر x-api-key (یا یک مکان سفارشی) با یک کلید API داشته باشد. به شما امکان میدهد فقط مدل امنیتی کلید API را مجاز کنید (ضمن حفظ سازگاری با نسخههای قبلی). (اضافه شده در نسخه ۲.۴.x)
- gracePeriod -- این پارامتر به جلوگیری از خطاهای ناشی از اختلافات جزئی بین ساعت سیستم شما و زمانهای Not Before (nbf) یا Issued At (iat) مشخص شده در توکن مجوز JWT کمک میکند. این پارامتر را روی تعداد ثانیهها تنظیم کنید تا چنین اختلافاتی در نظر گرفته شود. (اضافه شده در 2.5.7)
ویژگیهای خاص افزونه
برای جزئیات بیشتر در مورد ویژگیهای قابل تنظیم برای هر افزونه، به بخش «استفاده از افزونهها» مراجعه کنید.
فیلتر کردن پروکسیها
شما میتوانید پروکسیهای آگاه از microgateway که یک نمونه Edge Microgateway پردازش میکند را فیلتر کنید. وقتی Edge Microgateway شروع به کار میکند، تمام پروکسیهای آگاه از microgateway را در سازمانی که با آن مرتبط است دانلود میکند. از پیکربندی زیر برای محدود کردن پروکسیهایی که microgateway پردازش خواهد کرد استفاده کنید. به عنوان مثال، این پیکربندی پروکسیهایی را که microgateway پردازش خواهد کرد به سه عدد محدود میکند: edgemicro_proxy-1 ، edgemicro_proxy-2 و edgemicro_proxy-3 :
edgemicro:
  proxies:
  - edgemicro_proxy-1
  - edgemicro_proxy-2
  - edgemicro_proxy-3
فیلتر کردن محصولات بر اساس نام
از پیکربندی زیر برای محدود کردن تعداد محصولات API که Edge Microgateway دانلود و پردازش میکند، استفاده کنید. برای فیلتر کردن محصولات دانلود شده، پارامتر query productnamefilter به API /products که در فایل *.config.yaml Edge Microgateway فهرست شده است، اضافه کنید. به عنوان مثال:
edge_config:
  bootstrap: >-
    https://edgemicroservices.apigee.net/edgemicro/bootstrap/organization/willwitman/environment/test
  jwt_public_key: 'https://myorg-test.apigee.net/edgemicro-auth/publicKey'
  managementUri: 'https://api.enterprise.apigee.com'
  vaultName: microgateway
  authUri: 'https://%s-%s.apigee.net/edgemicro-auth'
  baseUri: >-
    https://edgemicroservices.apigee.net/edgemicro/%s/organization/%s/environment/%s
  bootstrapMessage: Please copy the following property to the edge micro agent config
  keySecretMessage: The following credentials are required to start edge micro
  products: 'https://myorg-test.apigee.net/edgemicro-auth/products?productnamefilter=%5E%5BEe%5Ddgemicro.%2A%24'
توجه داشته باشید که مقدار پارامتر پرسوجو باید در قالب عبارت منظم مشخص شده و به صورت URL کدگذاری شود. برای مثال، عبارت منظم ^[Ee]dgemicro.*$ نامهایی مانند: "edgemicro-test-1"، "edgemicro_demo" و "Edgemicro_New_Demo" را دریافت میکند. مقدار کدگذاری شده URL که برای استفاده در پارامتر پرسوجو مناسب است، عبارت است از: %5E%5BEe%5Ddgemicro.%2A%24 .
خروجی اشکالزدایی زیر نشان میدهد که فقط محصولات فیلتر شده دانلود شدهاند:
...
2020-05-27T03:13:50.087Z [76060] [microgateway-config network] products download from https://gsc-demo-prod.apigee.net/edgemicro-auth/products?productnamefilter=%5E%5BEe%5Ddgemicro.%2A%24 returned 200 OK
...
....
....
{
   "apiProduct":[
      {
         "apiResources":[

         ],
         "approvalType":"auto",
         "attributes":[
            {
               "name":"access",
               "value":"public"
            }
         ],
         "createdAt":1590549037549,
         "createdBy":"k***@g********m",
         "displayName":"test upper case in name",
         "environments":[
            "prod",
            "test"
         ],
         "lastModifiedAt":1590549037549,
         "lastModifiedBy":"k***@g********m",
         "name":"Edgemicro_New_Demo",
         "proxies":[
            "catchall"
         ],
         "quota":"null",
         "quotaInterval":"null",
         "quotaTimeUnit":"null",
         "scopes":[

         ]
      },
      {
         "apiResources":[

         ],
         "approvalType":"auto",
         "attributes":[
            {
               "name":"access",
               "value":"public"
            }
         ],
         "createdAt":1590548328998,
         "createdBy":"k***@g********m",
         "displayName":"edgemicro test 1",
         "environments":[
            "prod",
            "test"
         ],
         "lastModifiedAt":1590548328998,
         "lastModifiedBy":"k***@g********m",
         "name":"edgemicro-test-1",
         "proxies":[
            "Lets-Encrypt-Validation-DoNotDelete"
         ],
         "quota":"null",
         "quotaInterval":"null",
         "quotaTimeUnit":"null",
         "scopes":[

         ]
      },
      {
         "apiResources":[
            "/",
            "/**"
         ],
         "approvalType":"auto",
         "attributes":[
            {
               "name":"access",
               "value":"public"
            }
         ],
         "createdAt":1558182193472,
         "createdBy":"m*********@g********m",
         "displayName":"Edge microgateway demo product",
         "environments":[
            "prod",
            "test"
         ],
         "lastModifiedAt":1569077897465,
         "lastModifiedBy":"m*********@g********m",
         "name":"edgemicro_demo",
         "proxies":[
            "edgemicro-auth",
            "edgemicro_hello"
         ],
         "quota":"600",
         "quotaInterval":"1",
         "quotaTimeUnit":"minute",
         "scopes":[

         ]
      }
   ]
}
فیلتر کردن محصولات بر اساس ویژگیهای سفارشی
برای فیلتر کردن محصولات بر اساس ویژگیهای سفارشی:
- در رابط کاربری Edge، پروکسی edgemicro_auth را در سازمان/محیطی که Edge Microgateway را پیکربندی کردهاید، انتخاب کنید.
- در تب Develop، پالیسی JavaCallout را در ویرایشگر باز کنید.
- یک ویژگی سفارشی با کلید
products.filter.attributesبه همراه لیستی از نام ویژگیها که با کاما از هم جدا شدهاند، اضافه کنید. فقط محصولاتی که حاوی هر یک از نامهای ویژگی سفارشی باشند، به Edge Microgateway بازگردانده میشوند. - شما میتوانید به صورت اختیاری بررسی فعال بودن محصول برای محیط فعلی را با تنظیم ویژگی سفارشی
products.filter.env.enableبهfalseغیرفعال کنید (پیشفرض true است). - (فقط ابر خصوصی) اگر از Edge برای ابر خصوصی استفاده میکنید، ویژگی
org.noncpsرا رویtrueتنظیم کنید تا محصولات را برای محیطهای غیر CPS دریافت کنید.
برای مثال:
<?xml version="1.0" encoding="UTF-8" standalone="yes"?>
<JavaCallout async="false" continueOnError="false" enabled="true" name="JavaCallout">
    <DisplayName>JavaCallout</DisplayName>
    <FaultRules/>
    <Properties>
        <Property name="products.filter.attributes">attrib.one, attrib.two</Property>
        <Property name="products.filter.env.enable">false</Property>
        <Property name="org.noncps">true</Property>
    </Properties>
    <ClassName>io.apigee.microgateway.javacallout.Callout</ClassName>
    <ResourceURL>java://micro-gateway-products-javacallout-2.0.0.jar</ResourceURL>
</JavaCallout>فیلتر کردن محصولات بر اساس وضعیت ابطال
محصولات API سه کد وضعیت دارند - در انتظار، تأیید شده و لغو شده. یک ویژگی جدید به نام allowProductStatus به سیاست Set JWT Variables در edgemicro-auth proxy اضافه شده است. برای استفاده از این ویژگی برای فیلتر کردن محصولات API فهرست شده در JWT:
- پروکسی edgemicro-auth را در ویرایشگر پروکسی Apigee باز کنید.
- ویژگی
allowProductStatusبه XML مربوط به سیاست SetJWTVariables اضافه کنید و لیستی از کدهای وضعیت را که با کاما از هم جدا شدهاند، برای فیلتر کردن مشخص کنید. برای مثال، برای فیلتر کردن وضعیتهای Pending و Revoked :<?xml version="1.0" encoding="UTF-8" standalone="yes"?> <Javascript timeLimit="20000" async="false" continueOnError="false" enabled="true" name="Set-JWT-Variables"> <DisplayName>Set JWT Variables</DisplayName> <FaultRules/> <Properties> <Property name="allowProductStatus">Pending,Revoked</Property> </Properties> <ResourceURL>jsc://set-jwt-variables.js</ResourceURL> </Javascript>
اگر میخواهید فقط محصولات تأیید شده فهرست شوند، ویژگی را به صورت زیر تنظیم کنید:
<Property name="allowProductStatus">Approved</Property>
- پروکسی را ذخیره کنید.
اگر تگ Property وجود نداشته باشد، محصولاتی که تمام کدهای وضعیت را دارند در JWT فهرست میشوند.
برای استفاده از این ویژگی جدید، باید پروکسی edgemicro-auth را ارتقا دهید.
پیکربندی فرکانس ارسال گزارشهای تحلیلی
از این پارامترهای پیکربندی برای کنترل فرکانس ارسال دادههای تحلیلی توسط Edge Microgateway به Apigee استفاده کنید:
- bufferSize (اختیاری): حداکثر تعداد رکوردهای تحلیلی که بافر میتواند قبل از شروع حذف قدیمیترین رکوردها در خود نگه دارد. پیشفرض: ۱۰۰۰۰
- batchSize (اختیاری): حداکثر اندازه یک دسته از رکوردهای تحلیلی ارسال شده به Apigee. پیشفرض: ۵۰۰
- flushInterval (اختیاری): تعداد میلیثانیهها بین هر بار خالی کردن دستهای از رکوردهای تحلیلی ارسال شده به Apigee. پیشفرض: ۵۰۰۰
برای مثال:
analytics:
  bufferSize: 15000
  batchSize: 1000
  flushInterval: 6000
پنهان کردن دادههای تحلیلی
پیکربندی زیر از نمایش اطلاعات مسیر درخواست در Edge analytics جلوگیری میکند. برای پنهان کردن URI درخواست و/یا مسیر درخواست، موارد زیر را به پیکربندی microgateway اضافه کنید. توجه داشته باشید که URI شامل نام میزبان و بخشهای مسیر درخواست است.
analytics:
  mask_request_uri: 'string_to_mask'
  mask_request_path: 'string_to_mask'
جداسازی فراخوانیهای API در Edge Analytics
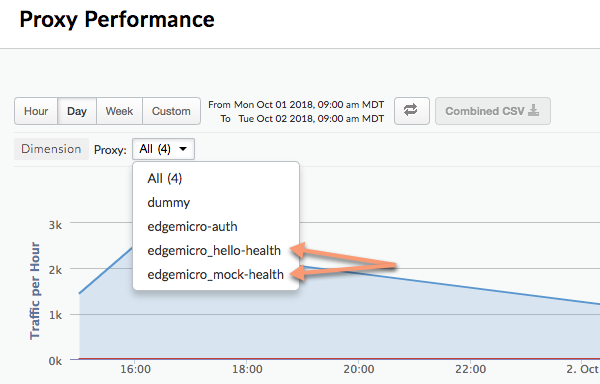
شما میتوانید افزونهی آنالیتیکس را طوری پیکربندی کنید که یک مسیر API خاص را جدا کند تا به عنوان یک پروکسی جداگانه در داشبوردهای Edge Analytics ظاهر شود. به عنوان مثال، میتوانید یک API بررسی سلامت را در داشبورد جدا کنید تا از اشتباه گرفته شدن آن با فراخوانیهای پروکسی API واقعی جلوگیری شود. در داشبورد آنالیتیکس، پروکسیهای جدا شده از این الگوی نامگذاری پیروی میکنند:
edgemicro_proxyname-health
تصویر زیر دو پروکسی مجزا را در داشبورد آنالیتیکس نشان میدهد: edgemicro_hello-health و edgemicro_mock-health :
از این پارامترها برای جداسازی مسیرهای نسبی و مطلق در داشبورد آنالیتیکس به عنوان پروکسیهای جداگانه استفاده کنید:
- relativePath (اختیاری): یک مسیر نسبی برای جداسازی در داشبورد Analytics مشخص میکند. برای مثال، اگر
/healthcheckرا مشخص کنید، تمام فراخوانیهای API که شامل مسیر/healthcheckهستند، در داشبورد به صورتedgemicro_ proxyname -healthظاهر میشوند. توجه داشته باشید که این پرچم، مسیر پایه پروکسی را نادیده میگیرد. برای جداسازی بر اساس یک مسیر کامل، از جمله مسیر پایه، از پرچمproxyPathاستفاده کنید. - proxyPath (Optional): Specifies a full API proxy path, including the proxy basepath, to segregate in the analytics dashboard. For example, if you specify
/mocktarget/healthcheck, where/mocktargetis the proxy basepath, all API calls with the path/mocktarget/healthcheckwill appear in the dashboard asedgemicro_ proxyname -health.
For example, in the following configuration any API path that contains /healthcheck will be segregated by the analytics plugin. This means, /foo/healthcheck and /foo/bar/healthcheck will be segregated as a separate proxy called edgemicro_ proxyname -health in the analytics dashboard.
analytics:
  uri: >-
    https://xx/edgemicro/ax/org/docs/environment/test
  bufferSize: 100
  batchSize: 50
  flushInterval: 500
  relativePath: /healthcheck
In the following configuration any API with the proxy path /mocktarget/healthcheck will be will be segregated as a separate proxy called edgemicro_ proxyname -health in the analytics dashboard.
analytics:
  uri: >-
    https://xx/edgemicro/ax/org/docs/environment/test
  bufferSize: 100
  batchSize: 50
  flushInterval: 500
  proxyPath: /mocktarget/healthcheck
Setting up Edge Microgateway behind a company firewall
Use an HTTP proxy for communication with Apigee Edge
Added in version 3.1.2.
To use an HTTP proxy for communication between Edge Microgateway and Apigee Edge, do the following:
- Set the environment variables
HTTP_PROXY,HTTPS_PROXY, andNO_PROXY. These variables control the hosts for each HTTP proxy that you wish to use for communication with Apigee Edge, or which hosts should not handle communication with Apigee Edge. For example:export HTTP_PROXY='http://localhost:3786' export HTTPS_PROXY='https://localhost:3786' export NO_PROXY='localhost,localhost:8080'
Note that
NO_PROXYcan be a comma delimited list of domains that Edge Microgateway should not proxy to.For more information on these variables, see https://www.npmjs.com/package/request#controlling-proxy-behaviour-using-environment-variables
- Restart Edge Microgateway.
Use an HTTP proxy for target communication
Added in version 3.1.2.
To use an HTTP proxy for communication between Edge Microgateway and backend targets, do the following:
- Add the following configuration to the microgateway config file:
edgemicro:
  proxy:
    tunnel: true | false
    url: proxy_url
    bypass: target_host # target hosts to bypass the proxy.
    enabled: true | false
کجا:
- tunnel : (Optional) When true, Edge Microgateway uses the HTTP CONNECT method to tunnel HTTP requests over a single TCP connection. (The same is true if the environment variables, as mentioned below, for configuring the proxy are TLS enabled). Default:
false - url : The HTTP proxy URL.
- bypass : (Optional) Specifies one or more comma-separated target host URLs that should bypass the HTTP proxy. If this property is not set, then use the NO_PROXY environment variable to specify which target URLs to bypass.
- enabled : If true and
proxy.urlis set, use theproxy.urlvalue for the HTTP proxy. If true andproxy.urlis not set, use the proxies specified in the HTTP proxy environment variablesHTTP_PROXYandHTTPS_PROXY, as described in Use an HTTP proxy for communication with Apigee Edge .
برای مثال:
edgemicro: proxy: tunnel: true url: 'http://localhost:3786' bypass: 'localhost','localhost:8080' # target hosts to bypass the proxy. enabled: true - tunnel : (Optional) When true, Edge Microgateway uses the HTTP CONNECT method to tunnel HTTP requests over a single TCP connection. (The same is true if the environment variables, as mentioned below, for configuring the proxy are TLS enabled). Default:
- Restart Edge Microgateway.
Using wildcards in Microgateway-aware proxies
You can use one or more "*" wildcards in the base path of an edgemicro_* (Microgateway-aware) proxy. For example, a base path of /team/*/members allows clients to call https://[host]/team/blue/members and https://[host]/team/green/members without you needing to create new API proxies to support new teams. Note that /**/ is not supported.
Important: Apigee does NOT support using a wildcard "*" as the first element of a base path. For example, this is NOT supported: /*/ search.
Rotating JWT keys
At some time after you initially generate a JWT, you might need to change the public/private key pair stored in the Edge encrypted KVM. This process of generating a new key pair is called key rotation.
How Edge Microgateway uses JWTs
JSON Web Token (JWT) is a token standard described in RFC7519 . JWT provides a way to sign a set of claims, which can be verified reliably by the recipient of the JWT.
You can generate a JWT using the CLI and use it in the Authorization header of API calls instead of an API key. For example:
curl -i http://localhost:8000/hello -H "Authorization: Bearer eyJhbGciOiJ..dXDefZEA"
For information on generating JWTs with the CLI, see Generate a token .
What is key rotation?
At some time after you initially generate a JWT, you might need to change the public/private key pair stored in the Edge encrypted KVM. This process of generating a new key pair is called key rotation. When you rotate keys, a new private/public key pair is generated and stored in the "microgateway" KVM in your Apigee Edge organization/environment. In addition, the old public key is retained along with its original key ID value.
To generate a JWT, Edge uses information stored in the encrypted KVM. A KVM called microgateway was created and populated with keys when you initially set up (configured) Edge Microgateway. The keys in the KVM are used to sign and encrypt a JWT.
The KVM keys include:
private_key - The latest (most recently created) RSA private key used to sign JWTs.
public_key - The latest (most recently created) certificate used to verify JWTs signed with the private_key.
private_key_kid - The latest (most recently created) private key ID. This key ID is associated with the private_key value and is used to support key rotation.
public_key1_kid - The latest (most recently created) public key ID. This key is associated with the public_key1 value and is used to support key rotation. This value is the same as the private key kid.
public_key1 - The latest (most recently created) public key.
When you perform key rotation, existing key values are replaced in the map and new keys are added to retain the old public keys. For example:
public_key2_kid - The old public key ID. This key is associated with the public_key2 value and is used to support key rotation.
public_key2 - The old public key.
JWTs presented for verification will be verified using the new public key. If verification fails, then the old public key will be used, until the JWT expires (after token_expiry* interval, default 30 mins). In this way, you can "rotate" keys without immediately disrupting API traffic.
How to do key rotation
This section explains how to perform a key rotation.
- To upgrade the KVM, use the
edgemicro upgradekvmcommand. For details on running this command, see Upgrading the KVM . You only need to do this step one time. - To upgrade the edgemicro-oauth proxy, use the
edgemicro upgradeauthcommand. For details on running this command, see Ugrading the edgemicro-auth proxy . You only need to do this step one time. - Add the following line to your
~/.edgemicro/org-env-config.yamlfile, where you must specify the same organization and environment that you configured the microgateway to use:jwk_public_keys: 'https://$ORG-$ENV.apigee.net/edgemicro-auth/jwkPublicKeys'
Run the key rotation command to rotate the keys. For details on this command, see Rotating keys .
edgemicro rotatekey -o $ORG -e $ENV -k $KEY -s $SECRET
برای مثال:
edgemicro rotatekey -o docs -e test \
-k 27ee39567c75e4567a66236cbd4e86d1cc93df6481454301bd5fac4d3497fcbb \
-s 4618b0008a6185d7327ebf53bee3c50282ccf45a3cceb1ed9828bfbcf1148b47
After key rotation, Edge returns multiple keys to Edge Microgateway. Note in the following example, each key has a unique "kid" (Key ID) value. The microgateway then uses these keys to validate authorization tokens. If the token validation fails, the microgateway looks to see if there is an older key in the key set and tries that key. The format of the returned keys is JSON Web Key (JWK). You can read about this format in RFC 7517 .
{
  "keys": [
    {
      "kty": "RSA",
      "n": "nSl7R_0wKLiWi6cO3n8aOJwYGBtinq723Jgg8i7KKWTSTYoszOjgGsJf_MX4JEW1YCScwpE5o4o8ccQN09iHVTlIhk8CNiMZNPipClmRVjaL_8IWvMQp1iN66qy4ldWXzXnHfivUZZogCkBNqCz7VSC5rw2Jf57pdViULVvVDGwTgf46sYveW_6h8CAGaD0KLd3vZffxIkoJubh0yMy0mQP3aDOeIGf_akeZeZ6GzF7ltbKGd954iNTiKmdm8IKhz6Y3gLpC9iwQ-kex_j0CnO_daHl1coYxUSCIdv4ziWIeM3dmjQ5_2dEvUDIGG6_Az9hTpNgPE5J1tvrOHAmunQ",
      "e": "AQAB",
      "kid": "2"
    },
    {
      "kty": "RSA",
      "n": "8BKwzx34BMUcHwTuQtmp8LFRCMxbkKg_zsWD6eOMIUTAsORexTGJsTy7z-4aH0wJ3fT-3luAAUPLBQwGcuHo0P1JnbtPrpuYjaJKSZOeIMOnlryJCspmv-1xG4qAqQ9XaZ9C97oecuj7MMoNwuaZno5MvsY-oi5B_gqED3vIHUjaWCErd4reONyFSWn047dvpE6mwRhZbcOTkAHT8ZyKkHISzopkFg8CD-Mij12unxA3ldcTV7yaviXgxd3eFSD1_Z4L7ZRsDUukCJkJ-8qY2-GWjewzoxl-mAW9D1tLK6qAdc89yFem3JHRW6L1le3YK37-bs6b2a_AqJKsKm5bWw",
      "e": "AQAB",
      "kid": "1"
    }
  ]
}
Configuring a "not before" delay
For versions 3.1.5 and before, the new private key generated by the rotatekey command took effect immediately, and new tokens generated were signed with the new private key. However, the new public key was only made available to Edge Microgateway instances every 10 minutes (by default) when the microgateway configuration was refreshed. Because of this lag between the token signing and microgateway instance refresh, tokens signed with the latest key would be rejected until all instances received the public latest key.
In cases where multiple microgateway instances exist, the public key lag sometimes resulted in intermittent runtime errors with status 403, because token validation would pass on one instance, but fail on another instance until all instances were refreshed.
Starting in version 3.1.6, a new flag on the rotatekey command allows you to specify a delay for the new private key to become effective, allowing time for all microgateway instances to be refreshed and receive the new public key. The new flag is --nbf , which stands for "not before." This flag takes an integer value, the number of minutes to delay.
In the following example, the delay is set to 15 minutes:
edgemicro rotatekey -o docs -e test \
-k 27ee39567c75e4567a66236cbd4e86d1cc93df6481454301bd5fac4d3497fcbb \
-s 4618b0008a6185d7327ebf53bee3c50282ccf45a3cceb1ed9828bfbcf1148b47 \
--nbf 15
Note that a good practice is to set the delay to be more than the config_change_poll_internal configuration setting, which is 10 minutes by default. See also edgemicro attributes .
Filtering downloaded proxies
By default, Edge Microgateway downloads all of the proxies in your Edge organization that start with the naming prefix "edgemicro_". You can change this default to download proxies whose names match a pattern.
- Open your Edge Micro config file:
~/.edgemicro/org-env-config.yaml - Add the proxyPattern element under edge_config. For example, the following pattern will download proxies such as edgemicro_foo, edgemicro_fast, and edgemicro_first.
edge_config:
…
proxyPattern: edgemicro_f*
Specifying products without API proxies
In Apigee Edge, you can create an API product that does not contain any API proxies. This product configuration allows an API key associated with that product to work for with any proxy deployed in your organization. As of version 2.5.4, Edge Microgateway supports this product configuration.
اشکالزدایی و عیبیابی
Connecting to a debugger
You can run Edge Microgateway with a debugger, such as node-inspector . This is useful for troubleshooting and debugging custom plugins.
- Restart Edge Microgateway in debug mode. To do this, add
DEBUG=*to the beginning of thestartcommand:DEBUG=* edgemicro start -o $ORG -e $ENV -k $KEY -s $SECRET
To direct debug output to a file, you can use this command:
export DEBUG=* nohup edgemicro start \
-o $ORG -e $ENV -k $KEY -s $SECRET 2>&1 | tee /tmp/file.log
- Start your debugger and set it to listen on the port number for the debugging process.
- You can now step through the Edge Microgateway code, set breakpoints, watch expressions, and so on.
You can specify standard Node.js flags related to debug mode. For example, --nolazy helps with debugging asynchronous code.
Checking log files
If you're having problems, be sure to examine the log files for execution details and error information. For details, see Managing log files .
Using API key security
API keys provide a simple mechanism for authenticating clients making requests to Edge Microgateway. You can obtain an API key by copying the Consumer Key (also called Client ID) value from an Apigee Edge product that includes the Edge Microgateway authentication proxy.
Caching of keys
API keys are exchanged for bearer tokens, which are cached. You can disable caching by setting the Cache-Control: no-cache header on incoming requests to Edge Microgateway.
Using an API key
You can pass the API key in an API request either as a query parameter or in a header. By default, the header and query param name are both x-api-key .
Query parameter example:
curl http://localhost:8000/foobar?x-api-key=JG616Gjz7xs4t0dvpvVsGdI49G34xGsz
Header example:
curl http://localhost:8000/foobar -H "x-api-key:JG616Gjz7xs4t0dvpvVsGdI49G34xGsz"
Configuring the API key name
By default, x-api-key is the name used for both the API key header and query parameter. You can change this default in the configuration file, as explained in Making configuration changes . For example, to change the name to apiKey :
oauth:
  allowNoAuthorization: false
  allowInvalidAuthorization: false
  api-key-header: apiKey
In this example, both the query parameter and header name are changed to apiKey . The name x-api-key will no longer work in either case. See also Making configuration changes .
برای مثال:
curl http://localhost:8000/foobar -H "apiKey:JG616Gjz7xs4t0dvpvVsGdI49G34xGsz"
For more information about using API keys with proxy requests, see Secure Edge Microgateway .
Enable upstream response codes
By default, the oauth plugin returns only 4xx error status codes if the response is not a 200 status. You can change this behavior so that it always returns the exact 4xx or 5xx code, depending on the error.
To enable this feature, add the oauth.useUpstreamResponse: true property to your Edge Microgateway configuration. For example:
oauth:
  allowNoAuthorization: false
  allowInvalidAuthorization: false
  gracePeriod: 10
  useUpstreamResponse: true
Using OAuth2 token security
This section explains how to get OAuth2 access tokens and refresh tokens. Access tokens are used to make secure API calls through the microgateway. Refresh tokens are used to obtain new access tokens.
How to get an access token
This section explains how to use the edgemicro-auth proxy to get an access token.
You can also get an access token using the edgemicro token CLI command. For details on the CLI, see Managing tokens .
API 1: Send credentials as body parameters
Substitute your org and environment names in the URL, and substitute the Consumer Id and Consumer Secret values obtained from a developer app on Apigee Edge for the client_id and client_secret body parameters:
curl -i -X POST "http://<org>-<test>.apigee.net/edgemicro-auth/token" \
-d '{"grant_type": "client_credentials", "client_id": "your_client_id", \
"client_secret": "your_client_secret"}' -H "Content-Type: application/json"
API 2: Send credentials in a Basic Auth header
Send the client credentials as a Basic Authentication header and the grant_type as a form parameter. This command form is also discussed in RFC 6749: The OAuth 2.0 Authorization Framework .
http://<org>-<test>.apigee.net/edgemicro-auth/token -v -u your_client_id:your_client_secret \
-d 'grant_type=client_credentials' -H "Content-Type: application/x-www-form-urlencoded"
خروجی نمونه
The API returns a JSON response. Note that there's no difference between thetoken and access_token properties. You can use either one. Note that expires_in is an integer value specified in seconds. { "token": "eyJraWQiOiIxIiwidHlwIjoi", "access_token": "eyJraWQiOiIxIiwid", "token_type": "bearer", "expires_in": 1799 }
How to get a refresh token
To get a refresh token, make an API call to the /token endpoint of the edgemicro-auth proxy. You MUST make this API call with the password grant type. The following steps walk through the process.
- Get an access and refresh token with the
/tokenAPI. Note that the grant type ispassword:curl -X POST \ https://your_organization-your_environment.apigee.net/edgemicro-auth/token \ -H 'Content-Type: application/json' \ -d '{ "client_id":"mpK6l1Bx9oE5zLdifoDbF931TDnDtLq", "client_secret":"bUdDcFgv3nXffnU", "grant_type":"password", "username":"mpK6lBx9RoE5LiffoDbpF931TDnDtLq", "password":"bUdD2FvnMsXffnU" }'The API returns an access token and a refresh token. The response looks similar to this. Note that
expires_invalues integers and are specified in seconds.{ "token": "your-access-token", "access_token": "your-access-token", "token_type": "bearer", "expires_in": 108, "refresh_token": "your-refresh-token", "refresh_token_expires_in": 431, "refresh_token_issued_at": "1562087304302", "refresh_token_status": "approved" } - You can now use the refresh token to get a new access token by calling the
/refreshendpoint of the same API. For example:curl -X POST \ https://willwitman-test.apigee.net/edgemicro-auth/refresh \ -H 'Content-Type: application/json' \ -d '{ "client_id":"mpK6l1Bx9RoE5zLifoDbpF931TDnDtLq", "client_secret":"bUdDc2Fv3nMXffnU", "grant_type":"refresh_token", "refresh_token":"your-refresh-token" }'The API returns a new access token. The response looks similar to this:
{
    "token": "your-new-access-token"
    }
نظارت همیشگی
Specifying a config file endpoint
If you run multiple Edge Microgateway instances, you may wish to manage their configurations from a single location. You can do this by specifying an HTTP endpoint where Edge Micro can download its configuration file. You can specify this endpoint when you start Edge Micro using the -u flag.
برای مثال:
edgemicro start -o jdoe -e test -u http://mylocalserver/mgconfig -k public_key -s secret_key
where the mgconfig endpoint returns the contents of your configuration file. This is the file that, by default, is located in ~/.edgemicro and has the naming convention: org-env-config.yaml .
Disabling TCP connection data buffering
You can use the nodelay configuration attribute to disable data buffering for TCP connections used by Edge Microgateway.
By default TCP connections use the Nagle algorithm to buffer data before sending it off. Setting nodelay to true , disables this behavior (data will immediately fire off data each time socket.write() is called). See also the Node.js documentation for more details.
To enable nodelay , edit the Edge Micro config file as follows:
edgemicro:
  nodelay: true
  port: 8000
  max_connections: 1000
  config_change_poll_interval: 600
  logging:
    level: error
    dir: /var/tmp
    stats_log_interval: 60
    rotate_interval: 24
Running Edge Microgateway in standalone mode
You can run Edge Microgateway disconnected completely from any Apigee Edge dependency. This scenario, called standalone mode, lets you run and test Edge Microgateway without an Internet connection.
In standalone mode, the following features do not work, as they require connection to Apigee Edge:
- OAuth and API key
- سهمیه
- تجزیه و تحلیل
On the other hand, custom plugins and spike arrest work normally, because they do not require a connection to Apigee Edge. In addition, a new plugin called extauth lets you authorize API calls to the microgateway with a JWT while in standalone mode.
Configuring and starting the gateway
To run Edge Microgateway in standalone mode:
- Create a configuration file named as follows:
$HOME/.edgemicro/ $ORG-$ENV -config.yamlبرای مثال:
vi $HOME/.edgemicro/foo-bar-config.yaml
- Paste the following code into the file:
edgemicro: port: 8000 max_connections: 1000 config_change_poll_interval: 600 logging: level: error dir: /var/tmp stats_log_interval: 60 rotate_interval: 24 plugins: sequence: - extauth - spikearrest headers: x-forwarded-for: true x-forwarded-host: true x-request-id: true x-response-time: true via: true extauth: publickey_url: https://www.googleapis.com/oauth2/v1/certs spikearrest: timeUnit: second allow: 10 buffersize: 0 - Export the following environment variable with the value "1":
export EDGEMICRO_LOCAL=1
- Execute the following
startcommand, where you provide values to instantiate the local proxy:edgemicro start -o $ORG -e $ENV -a $LOCAL_PROXY_NAME \ -v $LOCAL_PROXY_VERSION -t $TARGET_URL -b $BASE_PATH
کجا:
- $ORG is the "org" name that you used in the configuration file name.
- $ENV is the "env" name that you used in the configuration file name.
- $LOCAL_PROXY_NAME is the name of the local proxy that will be created. You can use any name you want.
- $LOCAL_PROXY_VERSION is the version number for the proxy.
- $TARGET_URL is the URL for the target of the proxy. (The target is the service that the proxy calls.)
- $BASE_PATH is the base path of the proxy. This value must start with a forward slash. For a root base path, specify just a forward slash; for example, "/".
برای مثال:
edgemicro start -o local -e test -a proxy1 -v 1 -t http://mocktarget.apigee.net -b /
- Test the configuration.
curl http://localhost:8000/echo { "error" : "missing_authorization" }Because the
extauthplugin is in thefoo-bar-config.yamlfile, you get a "missing_authorization" error. This plugin validates a JWT that must be present in the Authorization header of the API call. In the next section, you will obtain a JWT that will allow API calls to go through without the error.
Example: Obtaining an authorization token
The following example shows how to obtain a JWT from the Edge Microgateway JWT endpoint on Apigee Edge ( edgemicro-auth/jwkPublicKeys ). This endpoint is deployed when you perform a standard setup and configuration of Edge Microgateway. To obtain the JWT from the Apigee endpoint, you must first do the standard Edge Microgateway setup, and be connected to the Internet. The Apigee endpoint is used here for example purposes only and is not required. You can use another JWT token endpoint if you wish. If you do, then you'll need to obtain the JWT using the API provided for that endpoint.
The following steps explain how to get a token using the edgemicro-auth/jwkPublicKeys endpoint:.
- You must perform a standard setup and configuration of Edge Microgateway to deploy the
edgemicro-authproxy to your organization/environment on Apigee Edge. If you did this step previously, you do not need to repeat it. - If you deployed Edge Microgateway to Apigee Cloud, you must be connected to the Internet so that you can obtain a JWT from this endpoint.
- میکروگیتوی لبه را متوقف کنید:
edgemicro stop
- In the configuration file you created previously (
$HOME/.edgemicro/ org - env-config.yaml), point theextauth:publickey_urlattribute to theedgemicro-auth/jwkPublicKeysendpoint in your Apigee Edge organization/environment. For example:extauth: publickey_url: 'https://your_org-your_env.apigee.net/edgemicro-auth/jwkPublicKeys'
- Restart Edge Microgateway as you did previously, using the org/env names you used in the config file name. For example:
edgemicro start -o foo -e bar -a proxy1 -v 1 -t http://mocktarget.apigee.net -b /
- Get a JWT token from the authorization endpoint. Because you are using the
edgemicro-auth/jwkPublicKeysendpoint, you can use this CLI command:
You can generate a JWT for Edge Microgateway using the edgemicro token command or an API. For example:
edgemicro token get -o your_org -e your_env \
  -i G0IAeU864EtBo99NvUbn6Z4CBwVcS2 -s uzHTbwNWvoSmOy
کجا:
- your_org is the name of your Apigee organization for which you previously configured Edge Microgateway.
- your_env is an environment in the organization.
- The
ioption specifies the Consumer Key from a developer app that has a product that includes theedgemicro-authproxy. - The
soption specifies the Consumer Secret from a developer app that has a product that includes theedgemicro-authproxy.
This command asks Apigee Edge to generate a JWT that can then be used to verify API calls.
See also Generate a token .Test the standalone configuration
To test the configuration, call the API with the token added in the Authorization header as follows:
curl http://localhost:8000/echo -H "Authorization: Bearer your_token
مثال:
curl http://localhost:8000/echo -H "Authorization: Bearer eyJraWQiOiIxIiwidHlwIjo...iryF3kwcDWNv7OQ"
خروجی مثال:
{
   "headers":{
      "user-agent":"curl/7.54.0",
      "accept":"*/*",
      "x-api-key":"DvUdLlFwG9AvGGpEgfnNGwtvaXIlUUvP",
      "client_received_start_timestamp":"1535134472699",
      "x-authorization-claims":"eyJhdDbiO...M1OTE5MTA1NDkifQ==",
      "target_sent_start_timestamp":"1535134472702",
      "x-request-id":"678e3080-a7ae-11e8-a70f-87ae30db3896.8cc81cb0-a7c9-11e8-a70f-87ae30db3896",
      "x-forwarded-proto":"http",
      "x-forwarded-host":"localhost:8000",
      "host":"mocktarget.apigee.net",
      "x-cloud-trace-context":"e2ac4fa0112c2d76237e5473714f1c85/1746478453618419513",
      "via":"1.1 localhost, 1.1 google",
      "x-forwarded-for":"::1, 216.98.205.223, 35.227.194.212",
      "connection":"Keep-Alive"
   },
   "method":"GET",
   "url":"/",
   "body":""
}
Using local proxy mode
In local proxy mode, Edge Microgateway does not require a microgateway-aware proxy to be deployed on Apigee Edge. Instead, you configure a "local proxy" by providing a local proxy name, basepath, and target URL when you start the microgateway. API calls to the microgateway are then sent to the target URL of the local proxy. In all other respects, local proxy mode works exactly the same as running Edge Microgateway in its normal mode. Authentication works the same, as do spike arrest and quota enforcement, custom plugins, and so on.
Use case and example
Local proxy mode is useful when you only need to associate one single proxy with an Edge Microgateway instance. For example, you can inject Edge Microgateway into Kubernetes as a sidecar proxy, where a microgateway and a service each run in a single pod, and where the microgateway manages traffic to and from its companion service. The following figure illustrates this architecture where Edge Microgateway functions as a sidecar proxy in a Kubernetes cluster. Each microgateway instance talks only to a single endpoint on its companion service:
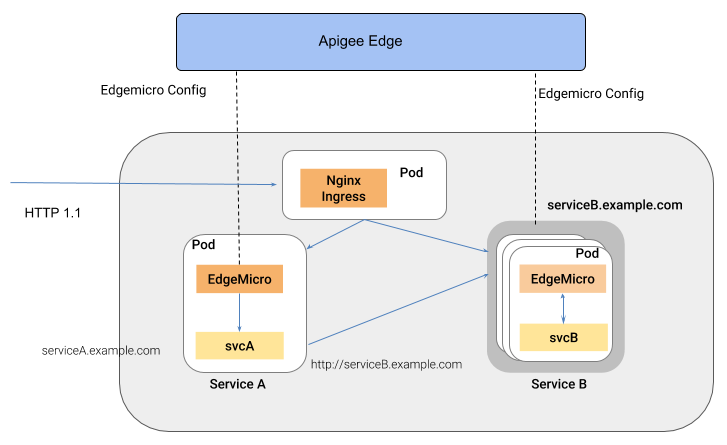
A benefit of this style of architecture is that Edge Microgateway provides API management for individual services deployed to a container environment, such as a Kubernetes cluster.
Configuring local proxy mode
To configure Edge Microgateway to run in local proxy mode, follow these steps:
- Run
edgemicro initto set up your local configuration environment, exactly as you would in a typical Edge Microgateway setup. See also Configure Edge Microgateway . - Run
edgemicro configure, as you would in a typical Edge Microgateway setup procedure. For example:edgemicro configure -o your_org -e your_env -u your_apigee_username
This command deploys the edgemicro-auth policy to Edge and returns a key and secret that you will need to start the microgateway. If you need help, see Configure Edge Microgateway .
- On Apigee Edge, create an API product and with the following mandatory configuration requirements (you can manage all other configurations as you wish):
- You must add the edgemicro-auth proxy to the product. This proxy was deployed automatically when you ran
edgemicro configure. - You must provide a resource path. Apigee recommends adding this path to the product:
/**. To learn more, see Configuring the behavior of the resource path . See also Create API products in the Edge documentation.
- You must add the edgemicro-auth proxy to the product. This proxy was deployed automatically when you ran
On Apigee Edge, create a developer, or you can use an existing developer if you wish. For help, see Adding developers using the Edge management UI .
- On Apigee Edge, create a developer app. You must add the API product you just created to the app. For help, see Registering an app in the Edge management UI .
- On the machine where Edge Microgateway is installed, export the following environment variable with the value "1".
export EDGEMICRO_LOCAL_PROXY=1
- Execute the following
startcommand:edgemicro start -o your_org -e your_environment -k your_key -s your_secret \ -a local_proxy_name -v local_proxy_version -t target_url -b base_pathکجا:
- your_org is your Apigee organization.
- your_environment is an environment in your organization.
- your_key is the key that was returned when you ran
edgemicro configure. - your_secret is the secret that was returned when you ran
edgemicro configure. - local_proxy_name is the name of the local proxy that will be created.
- local_proxy_version is the version number for the proxy.
- target_url is the URL for the target of the proxy (the service the proxy will call).
- base_path is the base path of the proxy. This value must start with a forward slash. For a root base path, specify just a forward slash; for example, "/".
برای مثال:
edgemicro start -o your_org -e test -k 7eb6aae644cbc09035a...d2eae46a6c095f \
  -s e16e7b1f5d5e24df...ec29d409a2df853163a -a proxy1 -v 1 \
  -t http://mocktarget.apigee.net -b /echo
Testing the configuration
You can test the local proxy configuration by calling the proxy endpoint. For example, if you specified a basepath of /echo , you can call the proxy as follows:
curl  http://localhost:8000/echo
{
  "error" : "missing_authorization",
  "error_description" : "Missing Authorization header"
}
This initial API call produced an error because you did not provide a valid API key. You can find the key in the Developer app you created previously. Open the app in the Edge UI, copy the Consumer Key, and use that key as follows:
curl http://localhost:8000/echo -H 'x-api-key:your_api_key'
برای مثال:
curl http://localhost:8000/echo -H "x-api-key:DvUdLlFwG9AvGGpEgfnNGwtvaXIlUUvP"
خروجی مثال:
{
  "headers":{
    "user-agent":"curl/7.54.0",
    "accept":"*/*",
    "x-api-key":"DvUdLlFwG9AvGGpEgfnNGwtvaXIlUUvP",
    "client_received_start_timestamp":"1535134472699",
    "x-authorization-claims":"eyJhdWQiOi...TQ0YmUtOWNlOS05YzM1OTE5MTA1NDkifQ==",
    "target_sent_start_timestamp":"1535134472702",
    "x-request-id":"678e3080-a7ae-11e8-a70f-87ae30db3896.8cc81cb0-a7c9-11e8-a70f-87ae30db3896",
    "x-forwarded-proto":"http",
    "x-forwarded-host":"localhost:8000",
    "host":"mocktarget.apigee.net",
    "x-cloud-trace-context":"e2ac4fa0112c2d76237e5473714f1c85/1746478453618419513",
    "via":"1.1 localhost, 1.1 google",
    "x-forwarded-for":"::1, 216.98.205.223, 35.227.194.212",
    "connection":"Keep-Alive"
  },
  "method":"GET",
  "url":"/",
  "body":""
}
Using the synchronizer
This section explains how to use the synchronizer, an optional feature that improves the resiliency of Edge Microgteway by allowing it to retrieve configuration data from Apigee Edge and write it to a local Redis database. With a synchronizer instance running, other Edge Microgateway instances running on different nodes can retrieve their configuration directly from this database.
The syncrhonizer feature is currently supported to work with Redis 5.0.x.
What is the synchronizer?
The synchronizer provides a level of resilience for Edge Microgateway. It helps ensure that every instance of Edge Microgateway uses the same configuration, and that in the event of an internet disruption, Edge Microgateway instances can start up and run properly.
By default, Edge Microgateway instances must be able to communicate with Apigee Edge to retrieve and refresh their configuration data, such as API proxy and API product configurations. If the internet connection with Edge is disrupted, microgateway instances can continue to function because the latest configuration data is cached. However, new microgateway instances cannot start up without a clear connection. Furthermore, it is possible for an internet disruption to result in one or more microgateway instances running with configuration information that is out of sync with other instances.
The Edge Microgateway synchronizer provides an alternative mechanism for Edge Microgateway instances to retrieve configuration data that they require to start up and process API proxy traffic. The configuration data retrieved from calls to Apigee Edge include: the jwk_public_keys call, the jwt_public_key call, the bootstrap call, and the API products call. The synchronizer makes it possible for all of the Edge Microgateway instances running on different nodes to start up properly and stay in sync even if the internet connection between Edge Microgateway and Apigee Edge is disrupted.
The synchronizer is a specially configured instance of Edge Microgateway. Its only purpose is to poll Apigee Edge (the timing is configurable), retrieve configuration data, and write it to a local Redis database. The synchronizer instance itself cannot process API proxy traffic. Other instances of Edge Microgateway running on different nodes can be configured to retrieve configuration data from the Redis database rather than from Apigee Edge. Because all microgateway instances pull their configuration data from the local database, they can start up and process API requests even in the event of an internet disruption.
Configuring a synchronizer instance
Add the following configuration to the org-env /config.yaml file for the Edge Microgateway installation that you wish to use as the synchronizer:
edgemicro:
  redisHost: host_IP
  redisPort: host_port
  redisDb: database_index
  redisPassword: password
edge_config:
  synchronizerMode: 1
  redisBasedConfigCache: true
برای مثال:
edgemicro:
  redisHost: 192.168.4.77
  redisPort: 6379
  redisDb: 0
  redisPassword: codemaster
edge_config:
  synchronizerMode: 1
  redisBasedConfigCache: true
| گزینه | توضیحات |
|---|---|
redisHost | The host where your Redis instance is running. Default: 127.0.0.1 |
redisPort | The port of the Redis instance. Default: 6379 |
redisDb | The Redis DB to use. Default: 0 |
redisPassword | Your database password. |
Finally, save the configuration file and start the Edge Microgateway instance. It will begin polling Apigee Edge and storing downloaded configuration data in the Redis database.
Configuring regular Edge Microgateway instances
With the synchronizer running, you can configure additional Edge Microgateway nodes to run regular microgateway instances that process API proxy traffic. However, you configure these instances to obtain their configuration data from the Redis database rather than from Apigee Edge.
Add the following configuration to each additional Edge Microgateway node's org-env /config.yaml file. Note that the synchronizerMode property is set to 0 . This property sets the instance to operate as a normal Edge Microgateway instance that processes API proxy traffic, and the instance will obtain its configuration data from the Redis database.
edgemicro:
  redisHost: host_IP
  redisPort: host_port
  redisDb: database_index
  redisPassword: password
edge_config:
  synchronizerMode: 0
  redisBasedConfigCache: true
برای مثال:
edgemicro:
  redisHost: 192.168.4.77
  redisPort: 6379
  redisDb: 0
  redisPassword: codemaster
edge_config:
  synchronizerMode: 0
  redisBasedConfigCache: true
Configuration properties
The following configuration properties have been added to support the use of the synchronizer:
| ویژگی | ارزشها | توضیحات |
|---|---|---|
edge_config.synchronizerMode | ۰ یا ۱ | If 0 (the default) Edge Microgateway operates in its standard mode. If 1, start the Edge Microgateway instance to operate as a synchronizer. In this mode, the instance will pull configuration data from Apigee Edge and store it in a local Redis database. This instance is not able to process API proxy requests; its only purpose is to poll Apigee Edge for configuration data and write it to the local database. You must then configure other microgateway instances to read from the database. |
edge_config.redisBasedConfigCache | درست یا غلط | If true, the Edge Microgateway instance fetches its configuration data from the Redis database instead of from Apigee Edge. The Redis database must be the same one that the synchronizer is configured to write to. If the Redis database is unavailable or if the database is empty, the microgateway looks for an existing cache-config.yaml file for its configuration.If false (the default), the Edge Microgateway instance fetches configuration data from Apigee Edge as usual. |
edgemicro.config_change_poll_interval | Time interval, in seconds | Specifies the polling interval for the synchronizer to pull data from Apigee Edge. |
Configuring exclude URLs for plugins
You can configure the microgateway to skip the processing of plugins for specified URLs. You can configure these "exclude" URLs globally (for all plugins) or for specific plugins.
برای مثال:
...
edgemicro:
  ...
  plugins:
    excludeUrls: '/hello,/proxy_one' # global exclude urls
    sequence:
      - oauth
      - json2xml
      - quota
json2xml:
  excludeUrls: '/hello/xml'  # plugin level exclude urls
...
In this example, plugins will not process incoming API proxy calls with the paths /hello or /proxy_one . In addition, the json2xml plugin will be skipped for APIs with /hello/xml in their path.
Setting configuration attributes with environment variable values
You can specify environment variables using tags in the configuration file. The specified environment variable tags are replaced by the actual environment variable values. Replacements are stored in memory only and not stored in the original configuration or cache files.
In this example, the attribute key is replaced by the value of the TARGETS_SSL_CLIENT_KEY environment variable, and so on.
targets:
  - ssl:
      client:
        key: <E>TARGETS_SSL_CLIENT_KEY</E>
        cert: <E>TARGETS_SSL_CLIENT_CERT</E>
        passphrase: <E>TARGETS_SSL_CLIENT_PASSPHRASE</E>
In this example, the <n> tag is used to indicate an integer value. Only positive integers are supported.
edgemicro:
  port: <E><n>EMG_PORT</n></E>
In this example, the <b> tag is used to indicate a boolean ( that is, true or false) value.
quotas:
  useRedis: <E><b>EMG_USE_REDIS</b></E>