

Вы просматриваете документацию Apigee Edge .
Перейдите в документацию Apigee X.info
Edge Microgateway v. 3.3.x
В этой теме рассматривается управление и настройка Edge Microgateway.
Обновление Edge Microgateway при наличии подключения к интернету.
В этом разделе объясняется, как обновить существующую установку Edge Microgateway. Если вы работаете без подключения к интернету, см. раздел «Можно ли установить Edge Microgateway без подключения к интернету?» .
Компания Apigee рекомендует протестировать существующую конфигурацию с новой версией перед обновлением производственной среды.
- Выполните следующую команду
npmдля обновления Edge Microgateway до последней версии:npm upgrade edgemicro -g
Для установки определенной версии Edge Microgateway необходимо указать номер версии в команде установки. Например, для установки версии 3.2.3 используйте следующую команду:
npm install edgemicro@3.2.3 -g
- Проверьте номер версии. Например, если вы установили версию 3.2.3:
edgemicro --version current nodejs version is v12.5.0 current edgemicro version is 3.2.3 - Наконец, обновите прокси-сервер edgemicro-auth до последней версии:
edgemicro upgradeauth -o $ORG -e $ENV -u $USERNAME
Внесение изменений в конфигурацию
К числу необходимых конфигурационных файлов относятся:
- Файл конфигурации системы по умолчанию
- Файл конфигурации по умолчанию для только что инициализированного экземпляра Edge Microgateway.
- Динамический конфигурационный файл для запущенных экземпляров
В этом разделе рассматриваются эти файлы и то, что вам нужно знать об их изменении.
Файл конфигурации системы по умолчанию
При установке Edge Microgateway в это место помещается файл конфигурации системы по умолчанию:
prefix/lib/node_modules/edgemicro/config/default.yaml
Где prefix — это каталог префикса npm . Если вы не можете найти этот каталог, см. раздел «Где установлен Edge Microgateway» .
Если вы изменили файл конфигурации системы, необходимо повторно инициализировать, перенастроить и перезапустить Edge Microgateway:
edgemicro initedgemicro configure [params]edgemicro start [params]
Файл конфигурации по умолчанию для вновь инициализированных экземпляров Edge Microgateway.
При запуске edgemicro init системный конфигурационный файл (описанный выше), default.yaml , помещается в каталог ~/.edgemicro .
Если вы измените конфигурационный файл в ~/.edgemicro , вам потребуется перенастроить и перезапустить Edge Microgateway:
edgemicro stopedgemicro configure [params]edgemicro start [params]
Динамический конфигурационный файл для запущенных экземпляров
При выполнении команды edgemicro configure [params] в каталоге ~/.edgemicro создаётся динамический конфигурационный файл. Имя файла соответствует следующему шаблону: org - env -config.yaml , где org и env — это названия вашей организации и среды Apigee Edge. Вы можете использовать этот файл для внесения изменений в конфигурацию, а затем перезагружать её без простоя. Например, если вы добавите и настроите плагин, вы сможете перезагрузить конфигурацию без простоя, как описано ниже.
Если Edge Microgateway запущен (опция с нулевым временем простоя):
- Перезагрузите конфигурацию Edge Microgateway:
edgemicro reload -o $ORG -e $ENV -k $KEY -s $SECRET
Где:
- $ORG — это имя вашей организации Edge (вы должны быть администратором организации).
- $ENV — это среда в вашей организации (например, "test" или "prod").
- $KEY — это ключ, возвращенный ранее командой configure.
- $SECRET — это ключ, возвращенный ранее командой configure.
Например
edgemicro reload -o docs -e test -k 701e70ee718ce6dc188...78b6181d000723 \
  -s 05c14356e42ed1...4e34ab0cc824
Если Edge Microgateway остановлен:
- Перезапустите Edge Microgateway:
edgemicro start -o $ORG -e $ENV -k $KEY -s $SECRET
Где:
- $ORG — это имя вашей организации Edge (вы должны быть администратором организации).
- $ENV — это среда в вашей организации (например, "test" или "prod").
- $KEY — это ключ, возвращенный ранее командой configure.
- $SECRET — это ключ, возвращенный ранее командой configure.
Например:
edgemicro start -o docs -e test -k 701e70ee718ce...b6181d000723 \
  -s 05c1435...e34ab0cc824
Here is an example config file. For details about configuration file settings, see Edge Microgateway configuration reference .
edge_config:
  bootstrap: >-
    https://edgemicroservices-us-east-1.apigee.net/edgemicro/bootstrap/organization/docs/environment/test
  jwt_public_key: 'https://docs-test.apigee.net/edgemicro-auth/publicKey'
  managementUri: 'https://api.enterprise.apigee.com'
  vaultName: microgateway
  authUri: 'https://%s-%s.apigee.net/edgemicro-auth'
  baseUri: >-
    https://edgemicroservices.apigee.net/edgemicro/%s/organization/%s/environment/%s
  bootstrapMessage: Please copy the following property to the edge micro agent config
  keySecretMessage: The following credentials are required to start edge micro
  products: 'https://docs-test.apigee.net/edgemicro-auth/products'
edgemicro:
  port: 8000
  max_connections: 1000
  max_connections_hard: 5000
  config_change_poll_interval: 600
  logging:
    level: error
    dir: /var/tmp
    stats_log_interval: 60
    rotate_interval: 24
  plugins:
    sequence:
      - oauth
headers:
  x-forwarded-for: true
  x-forwarded-host: true
  x-request-id: true
  x-response-time: true
  via: true
oauth:
  allowNoAuthorization: false
  allowInvalidAuthorization: false
  verify_api_key_url: 'https://docs-test.apigee.net/edgemicro-auth/verifyApiKey'
analytics:
  uri: >-
    https://edgemicroservices-us-east-1.apigee.net/edgemicro/axpublisher/organization/docs/environment/test
Настройка переменных среды
Команды интерфейса командной строки, требующие значений для вашей организации и среды Edge, а также ключ и секрет, необходимые для запуска Edge Microgateway, могут быть сохранены в следующих переменных среды:
-
EDGEMICRO_ORG -
EDGEMICRO_ENV -
EDGEMICRO_KEY -
EDGEMICRO_SECRET
Установка этих переменных необязательна. Если вы их установите, вам не нужно будет указывать их значения при использовании интерфейса командной строки (CLI) для настройки и запуска Edge Microgateway.
Настройка SSL на сервере Edge Microgateway
Посмотрите следующие видеоролики, чтобы узнать о настройке TLS в Apigee Edge Microgateway:
| Видео | Описание |
|---|---|
| Настройте одностороннее TLS-соединение в северном направлении. | Узнайте о настройке TLS в Apigee Edge Microgateway. В этом видео представлен обзор TLS и его важности, показано, как использовать TLS в Edge Microgateway, а также продемонстрировано, как настроить одностороннее TLS-соединение в северном направлении. |
| Настройте двусторонний TLS-трафик в северном направлении. | Это второе видео по настройке TLS в Apigee Edge Microgateway. В этом видео объясняется, как настроить двусторонний TLS-трафик для подключения к серверу. |
| Настройте одностороннее и двустороннее соединение TLS в южном направлении. | В этом третьем видеоролике о настройке TLS в Apigee Edge Microgateway объясняется, как настроить односторонний и двусторонний TLS-трафик для передачи данных на юг. |
Вы можете настроить сервер Microgateway для использования SSL. Например, при настроенном SSL вы можете вызывать API через Edge Microgateway по протоколу «https», следующим образом:
https://localhost:8000/myapi
Для настройки SSL на сервере Microgateway выполните следующие действия:
- Сгенерируйте или получите SSL-сертификат и ключ, используя утилиту openssl или любой другой удобный для вас способ.
- Добавьте атрибут
edgemicro:sslв конфигурационный файл Edge Microgateway . Полный список параметров см. в таблице ниже. Например:edgemicro: ssl: key: <absolute path to the SSL key file> cert: <absolute path to the SSL cert file> passphrase: admin123 #option added in v2.2.2 rejectUnauthorized: true #option added in v2.2.2 requestCert: true
- Перезапустите Edge Microgateway. Следуйте инструкциям, изложенным в разделе «Внесение изменений в конфигурацию» , в зависимости от того, какой файл конфигурации вы редактировали: файл по умолчанию или файл конфигурации времени выполнения.
Вот пример раздела edgemicro в конфигурационном файле с настроенным SSL:
edgemicro:
  port: 8000
  max_connections: 1000
  max_connections_hard: 5000
  logging:
    level: error
    dir: /var/tmp
    stats_log_interval: 60
    rotate_interval: 24
  plugins:
    sequence:
      - oauth
  ssl:
    key: /MyHome/SSL/em-ssl-keys/server.key
    cert: /MyHome/SSL/em-ssl-keys/server.crt
    passphrase: admin123 #option added in v2.2.2
    rejectUnauthorized: true #option added in v2.2.2
Ниже приведён список всех поддерживаемых вариантов серверов:
| Вариант | Описание |
|---|---|
key | Путь к файлу ca.key (в формате PEM). |
cert | Путь к файлу ca.cert (в формате PEM). |
pfx | Путь к файлу pfx содержащему закрытый ключ, сертификат и сертификаты центра сертификации клиента в формате PFX. |
passphrase | Строка, содержащая парольную фразу для закрытого ключа или PFX-файла. |
ca | Путь к файлу, содержащему список доверенных сертификатов в формате PEM. |
ciphers | Строка, описывающая используемые шифры, разделённые символом ":". |
rejectUnauthorized | Если значение истинно, сертификат сервера проверяется по списку предоставленных центров сертификации. Если проверка не удается, возвращается ошибка. |
secureProtocol | Метод SSL для использования. Например, SSLv3_method для принудительного использования SSL версии 3. |
servername | Имя сервера для расширения TLS SNI (Server Name Indication). |
requestCert | true для двустороннего SSL; false для одностороннего SSL |
Использование клиентских параметров SSL/TLS
Вы можете настроить Edge Microgateway как TLS- или SSL-клиент при подключении к целевым конечным точкам. В файле конфигурации Microgateway используйте элемент targets для установки параметров SSL/TLS. Обратите внимание, что вы можете указать несколько конкретных целевых точек. Пример с несколькими целевыми точками приведен ниже.
В этом примере приведены настройки, которые будут применены ко всем хостам:
edgemicro:
...
targets:
  ssl:
    client:
      key: /Users/jdoe/nodecellar/twowayssl/ssl/client.key
      cert: /Users/jdoe/nodecellar/twowayssl/ssl/ca.crt
      passphrase: admin123
      rejectUnauthorized: true
В этом примере настройки применяются только к указанному хосту:
edgemicro:
...
targets:
  - host: 'myserver.example.com'
    ssl:
      client:
        key: /Users/myname/twowayssl/ssl/client.key
        cert: /Users/myname/twowayssl/ssl/ca.crt
        passphrase: admin123
        rejectUnauthorized: true
Вот пример использования TLS:
edgemicro:
...
targets:
  - host: 'myserver.example.com'
    tls:
      client:
        pfx: /Users/myname/twowayssl/ssl/client.pfx
        passphrase: admin123
        rejectUnauthorized: true
В случае, если вы хотите применить настройки TLS/SSL к нескольким конкретным целям, необходимо указать первый хост в конфигурации как «пустой», что включает универсальные запросы, а затем указать конкретные хосты в любом порядке. В этом примере настройки применяются к нескольким конкретным хостам:
targets:
 - host:   ## Note that this value must be "empty"
   ssl:
     client:
       key: /Users/myname/twowayssl/ssl/client.key
       cert: /Users/myname/twowayssl/ssl/ca.crt
       passphrase: admin123
       rejectUnauthorized: true
 - host: 'myserver1.example.com'
   ssl:
     client:
       key: /Users/myname/twowayssl/ssl/client.key
       cert: /Users/myname/twowayssl/ssl/ca.crt
       rejectUnauthorized: true
 - host: 'myserver2.example.com'
   ssl:
     client:
       key: /Users/myname/twowayssl/ssl/client.key
       cert: /Users/myname/twowayssl/ssl/ca.crt
       rejectUnauthorized: true
Ниже приведён список всех поддерживаемых клиентских опций:
| Вариант | Описание |
|---|---|
pfx | Путь к файлу pfx содержащему закрытый ключ, сертификат и сертификаты центра сертификации клиента в формате PFX. |
key | Путь к файлу ca.key (в формате PEM). |
passphrase | Строка, содержащая парольную фразу для закрытого ключа или PFX-файла. |
cert | Путь к файлу ca.cert (в формате PEM). |
ca | Путь к файлу, содержащему список доверенных сертификатов в формате PEM. |
ciphers | Строка, описывающая используемые шифры, разделённые символом ":". |
rejectUnauthorized | Если значение истинно, сертификат сервера проверяется по списку предоставленных центров сертификации. Если проверка не удается, возвращается ошибка. |
secureProtocol | Метод SSL для использования. Например, SSLv3_method для принудительного использования SSL версии 3. |
servername | Имя сервера для расширения TLS SNI (Server Name Indication). |
Настройка прокси-сервера edgemicro-auth
По умолчанию Edge Microgateway использует прокси-сервер, развернутый на Apigee Edge, для аутентификации OAuth2. Этот прокси-сервер развертывается при первом запуске edgemicro configure . Вы можете изменить конфигурацию этого прокси-сервера по умолчанию, чтобы добавить поддержку пользовательских утверждений в JSON Web Token (JWT), настроить срок действия токена и генерировать токены обновления. Подробности см. на странице edgemicro-auth в GitHub.
Использование собственной службы аутентификации
По умолчанию Edge Microgateway использует прокси-сервер, развернутый на Apigee Edge, для аутентификации OAuth2. Этот прокси-сервер развертывается при первом запуске edgemicro configure . По умолчанию URL-адрес этого прокси-сервера указывается в файле конфигурации Edge Microgateway следующим образом:
authUri: https://myorg-myenv.apigee.net/edgemicro-auth
Если вы хотите использовать собственную пользовательскую службу для обработки аутентификации, измените значение authUri в файле конфигурации, указав путь к вашей службе. Например, у вас может быть служба, использующая LDAP для проверки личности.
Управление файлами журналов
Edge Microgateway регистрирует информацию о каждом запросе и ответе. Файлы журналов содержат полезную информацию для отладки и устранения неполадок.
Где хранятся файлы журналов
По умолчанию файлы журналов хранятся в каталоге /var/tmp .
Как изменить каталог для файлов журналов по умолчанию
Каталог, в котором хранятся файлы журналов, указывается в конфигурационном файле Edge Microgateway. См. также раздел «Внесение изменений в конфигурацию» .
edgemicro:
  home: ../gateway
  port: 8000
  max_connections: -1
  max_connections_hard: -1
  logging:
    level: info
    dir: /var/tmp
    stats_log_interval: 60
    rotate_interval: 24
Измените значение параметра dir , чтобы указать другой каталог для файлов журналов.
Отправка логов в консоль
Вы можете настроить ведение журнала таким образом, чтобы информация отправлялась в стандартный вывод, а не в файл журнала. Установите флаг to_console в значение true следующим образом:
edgemicro:
  logging:
    to_console: true
При таких настройках логи будут отправляться в стандартный вывод. В настоящее время нельзя отправлять логи одновременно в стандартный вывод и в файл логов.
Как установить уровень логирования
Уровень логирования, который будет использоваться, указывается в конфигурации edgemicro . Полный список уровней логирования и их описания см. в разделе «Атрибуты edgemicro» .
Например, следующая конфигурация устанавливает уровень логирования в debug :
edgemicro:
  home: ../gateway
  port: 8000
  max_connections: -1
  max_connections_hard: -1
  logging:
    level: debug
    dir: /var/tmp
    stats_log_interval: 60
    rotate_interval: 24
Как изменить интервалы логирования
Эти интервалы можно настроить в конфигурационном файле Edge Microgateway. См. также раздел «Внесение изменений в конфигурацию» .
К настраиваемым атрибутам относятся:
- stats_log_interval : (по умолчанию: 60) Интервал в секундах, через который запись статистики записывается в файл журнала API.
- rotate_interval : (по умолчанию: 24) Интервал в часах, через который происходит ротация файлов журналов. Например:
edgemicro:
  home: ../gateway
  port: 8000
  max_connections: -1
  max_connections_hard: -1
  logging:
    level: info
    dir: /var/tmp
    stats_log_interval: 60
    rotate_interval: 24
Как ослабить строгие права доступа к файлам журналов
По умолчанию Edge Microgateway создает файл журнала приложения ( api-log.log ) с уровнем прав доступа 0600. Этот уровень прав доступа не позволяет внешним приложениям или пользователям читать файл журнала. Чтобы ослабить этот строгий уровень прав доступа, установите параметр logging:disableStrictLogFile в true . Если этот параметр имеет true , файл журнала создается с правами доступа 0755. Если false или если параметр не указан, права доступа по умолчанию устанавливаются на 0600.
Добавлено в версии 3.2.3.
Например:
edgemicro:
 logging:
   disableStrictLogFile: true
Правильные методы ведения журналов событий.
Поскольку данные в файлах журналов накапливаются со временем, Apigee рекомендует применять следующие методы:
- Поскольку файлы журналов могут достигать довольно больших размеров, убедитесь, что в каталоге файлов журналов достаточно места. См. следующие разделы «Где хранятся файлы журналов» и «Как изменить каталог файлов журналов по умолчанию» .
- Удаляйте или перемещайте файлы журналов в отдельную архивную директорию как минимум раз в неделю.
- Если ваша политика предусматривает удаление журналов, вы можете использовать команду CLI
edgemicro log -cдля удаления (очистки) старых журналов.
Соглашение об именовании файлов журналов
Каждый экземпляр Edge Microgateway создает файл журнала с расширением .log . Соглашение об именовании файлов журналов следующее:
edgemicro- HOST_NAME - INSTANCE_ID -api.log
Например:
edgemicro-mymachine-local-MTQzNTgNDMxODAyMQ-api.log
О содержимом файла журнала
Добавлено в: v2.3.3
По умолчанию служба логирования не отображает JSON-данные о загруженных прокси-серверах, продуктах и JSON Web Token (JWT). Если вы хотите вывести эти объекты в консоль, установите флаг командной строки DEBUG=* при запуске Edge Microgateway. Например:
DEBUG=* edgemicro start -o docs -e test -k abc123 -s xyz456
Содержимое файла журнала "api".
Файл журнала "api" содержит подробную информацию о потоке запросов и ответов через Edge Microgateway. Файлы журнала "api" называются следующим образом:
edgemicro-mymachine-local-MTQzNjIxOTk0NzY0Nw-api.log
Для каждого запроса, отправленного в Edge Microgateway, в лог-файл "api" записываются четыре события:
- Входящий запрос от клиента
- Исходящий запрос направлен целевому объекту.
- Входящий ответ от цели
- Исходящий ответ клиенту
Каждая из этих отдельных записей представлена в сокращенной записи, чтобы сделать файлы журналов более компактными. Вот четыре примера записей, представляющих каждое из четырех событий. В файле журнала они выглядят так (номера строк приведены только для справки в документе, в файле журнала они не отображаются).
(1) 1436403888651 info req m=GET, u=/, h=localhost:8000, r=::1:59715, i=0
(2) 1436403888665 info treq m=GET, u=/, h=127.0.0.18080, i=0
(3) 1436403888672 info tres s=200, d=7, i=0
(4) 1436403888676 info res s=200, d=11, i=0
Рассмотрим их по очереди:
1. Пример входящего запроса от клиента:
1436403888651 info req m=GET, u=/, h=localhost:8000, r=::1:59715, i=0
- 1436403888651 - Метка даты Unix
- info — Уровень логирования. Это значение зависит от контекста транзакции и уровня логирования, установленного в конфигурации
edgemicro. См. раздел «Как установить уровень логирования» . Для статистических записей уровень устанавливается наstats. Статистические записи выводятся с регулярным интервалом, установленным в конфигурацииstats_log_interval. См. также раздел «Как изменить интервалы логирования» . - req — Идентифицирует событие. В данном случае, запрос от клиента.
- m — HTTP-глагол, используемый в запросе.
- u - Часть URL-адреса, следующая за базовым путем.
- h - Хост и номер порта, на котором работает Edge Microgateway.
- r - Удаленный хост и порт, откуда поступил запрос от клиента.
- i - Идентификатор запроса. Все четыре записи событий будут иметь этот идентификатор. Каждому запросу присваивается уникальный идентификатор. Сопоставление записей журнала по идентификатору запроса может дать ценную информацию о задержке целевого устройства.
- d - Время в миллисекундах с момента получения запроса Edge Microgateway. В приведенном выше примере ответ целевого устройства на запрос 0 был получен через 7 миллисекунд (строка 3), а ответ был отправлен клиенту еще через 4 миллисекунды (строка 4). Другими словами, общая задержка запроса составила 11 миллисекунд, из которых 7 миллисекунд пришлись на целевое устройство и 4 миллисекунды — на само Edge Microgateway.
2. Пример исходящего запроса, направленного адресату:
1436403888665 info treq m=GET, u=/, h=127.0.0.1:8080, i=0
- 1436403888651 - Метка даты Unix
- info — Уровень логирования. Это значение зависит от контекста транзакции и уровня логирования, установленного в конфигурации
edgemicro. См. раздел «Как установить уровень логирования» . Для статистических записей уровень устанавливается наstats. Статистические записи выводятся с регулярным интервалом, установленным в конфигурацииstats_log_interval. См. также раздел «Как изменить интервалы логирования» . - treq — Идентифицирует событие. В данном случае, целевой запрос.
- m — HTTP-глагол, используемый в целевом запросе.
- u - Часть URL-адреса, следующая за базовым путем.
- h - Номер хоста и порта целевого бэкэнда.
- i - Идентификатор записи в журнале. Все четыре записи событий будут иметь этот идентификатор.
3. Пример входящего ответа от целевого объекта.
1436403888672 info tres s=200, d=7, i=0
1436403888651 - Метка даты Unix
- info — Уровень логирования. Это значение зависит от контекста транзакции и уровня логирования, установленного в конфигурации
edgemicro. См. раздел «Как установить уровень логирования» . Для статистических записей уровень устанавливается наstats. Статистические записи выводятся с регулярным интервалом, установленным в конфигурацииstats_log_interval. См. также раздел «Как изменить интервалы логирования» . - tres — Идентифицирует событие. В данном случае, целевую реакцию.
- s - Статус HTTP-ответа.
- d - Длительность в миллисекундах. Время, затраченное целевым устройством на вызов API.
- i - Идентификатор записи в журнале. Все четыре записи событий будут иметь этот идентификатор.
4. Пример исходящего ответа клиенту.
1436403888676 info res s=200, d=11, i=0
1436403888651 - Метка даты Unix
- info — Уровень логирования. Это значение зависит от контекста транзакции и уровня логирования, установленного в конфигурации
edgemicro. См. раздел «Как установить уровень логирования» . Для статистических записей уровень устанавливается наstats. Статистические записи выводятся с регулярным интервалом, установленным в конфигурацииstats_log_interval. См. также раздел «Как изменить интервалы логирования» . - res — Идентифицирует событие. В данном случае, ответ клиенту.
- s - Статус HTTP-ответа.
- d - Продолжительность в миллисекундах. Это общее время, затраченное на вызов API, включая время, затраченное целевым API, и время, затраченное самим Edge Microgateway.
- i - Идентификатор записи в журнале. Все четыре записи событий будут иметь этот идентификатор.
расписание файлов журналов
Файлы журналов ротируются с интервалом, указанным в атрибуте конфигурации rotate_interval . Записи будут продолжать добавляться в тот же файл журнала до истечения интервала ротации. Однако при каждом перезапуске Edge Microgateway он получает новый UID и создает новый набор файлов журналов с этим UID. См. также раздел «Рекомендации по правильному обслуживанию файлов журналов» .
Сообщения об ошибках
Некоторые записи в журнале будут содержать сообщения об ошибках. Чтобы определить, где и почему возникают ошибки, см. справочник ошибок Edge Microgateway .
Справочник по настройке Edge Microgateway
Расположение файла конфигурации
Атрибуты конфигурации, описанные в этом разделе, находятся в файле конфигурации Edge Microgateway. См. также раздел «Внесение изменений в конфигурацию» .
атрибуты edge_config
Эти параметры используются для настройки взаимодействия между экземпляром Edge Microgateway и Apigee Edge.
- bootstrap : (по умолчанию: none) URL-адрес, указывающий на службу, специфичную для Edge Microgateway и работающую на Apigee Edge. Edge Microgateway использует эту службу для связи с Apigee Edge. Этот URL-адрес возвращается при выполнении команды для генерации пары открытого/закрытого ключей:
edgemicro genkeys. См. раздел «Настройка и конфигурирование Edge Microgateway» для получения подробной информации. - jwt_public_key : (по умолчанию: none) URL-адрес, указывающий на прокси-сервер Edge Microgateway, развернутый на Apigee Edge. Этот прокси-сервер служит конечной точкой аутентификации для выдачи подписанных токенов доступа клиентам. Этот URL-адрес возвращается при выполнении команды развертывания прокси-сервера: edgemicro configure . См. раздел «Настройка и конфигурирование Edge Microgateway» для получения подробной информации.
- quotaUri : Установите это свойство конфигурации, если вы хотите управлять квотами через прокси-сервер
edgemicro-auth, развернутый в вашей организации. Если это свойство не задано, по умолчанию используется внутренняя конечная точка Edge Microgateway для управления квотами.edge_config: quotaUri: https://your_org-your_env.apigee.net/edgemicro-auth
атрибуты edgemicro
Эти параметры настраивают процесс Edge Microgateway.
- порт : (по умолчанию: 8000) Номер порта, на котором процесс Edge Microgateway прослушивает запросы.
- max_connections : (по умолчанию: -1) Задает максимальное количество одновременных входящих соединений, которые может принимать Edge Microgateway. Если это число превышено, возвращается следующий статус:
res.statusCode = 429; // Too many requests - max_connections_hard : (по умолчанию: -1) Максимальное количество одновременных запросов, которые Edge Microgateway может получить до разрыва соединения. Этот параметр предназначен для предотвращения атак типа «отказ в обслуживании». Обычно его следует устанавливать на значение больше, чем max_connections.
- ведение журнала :
- уровень : (по умолчанию: ошибка)
- info - (Рекомендуется) Регистрирует все запросы и ответы, проходящие через экземпляр Edge Microgateway.
- Предупреждение - Регистрирует только предупреждающие сообщения.
- error - Регистрирует только сообщения об ошибках.
- debug — Регистрирует отладочные сообщения, а также информационные сообщения, предупреждения и сообщения об ошибках.
- trace — регистрирует информацию о трассировке ошибок, а также информационные, предупреждающие и сообщения об ошибках.
- нет - Не создавать файл журнала.
- dir : (по умолчанию: /var/tmp) Каталог, где хранятся файлы журналов.
- stats_log_interval : (по умолчанию: 60) Интервал в секундах, через который запись статистики записывается в файл журнала API.
- rotate_interval : (по умолчанию: 24) Интервал в часах, через который происходит ротация файлов журналов.
- уровень : (по умолчанию: ошибка)
- Плагины : Плагины добавляют функциональность в Edge Microgateway. Подробную информацию о разработке плагинов см. в разделе «Разработка пользовательских плагинов» .
- dir : Относительный путь от каталога ./gateway до каталога ./plugins или абсолютный путь.
- sequence : Список модулей плагинов для добавления в ваш экземпляр Edge Microgateway. Модули будут выполняться в том порядке, в котором они указаны здесь.
- debug: Добавляет удаленную отладку в процесс Edge Microgateway.
- порт : Номер порта, на котором будет осуществляться прослушивание. Например, настройте отладчик вашей IDE на прослушивание этого порта.
- args : Аргументы для процесса отладки. Например:
args --nolazy
- config_change_poll_interval: (по умолчанию: 600 секунд) Edge Microgateway периодически загружает новую конфигурацию и выполняет перезагрузку, если что-либо изменилось. Опрос отслеживает любые изменения, внесенные в Edge (изменения в продуктах, прокси-серверы, поддерживающие Microgateway и т. д.), а также изменения, внесенные в локальный файл конфигурации.
- disable_config_poll_interval: (по умолчанию: false) Установите значение true , чтобы отключить автоматический опрос изменений.
- request_timeout : Устанавливает тайм-аут для целевых запросов. Тайм-аут задается в секундах. В случае превышения тайм-аута Edge Microgateway отвечает кодом состояния 504. (Добавлено в версии 2.4.x)
- keep_alive_timeout : Это свойство позволяет установить тайм-аут Edge Microgateway (в миллисекундах). (По умолчанию: 5 секунд) (Добавлено в версии 3.0.6)
- headers_timeout : Этот атрибут ограничивает время (в миллисекундах), в течение которого HTTP-парсер будет ждать получения полных HTTP-заголовков.
Например:
edgemicro:
  keep_alive_timeout: 6000
  headers_timeout: 12000
Внутри системы этот параметр устанавливает атрибут
Server.headersTimeoutв запросах Node.js. (По умолчанию: на 5 секунд больше, чем время, установленное с помощьюedgemicro.keep_alive_timeout. Эта настройка по умолчанию предотвращает ошибочное разрыв соединения балансировщиками нагрузки или прокси-серверами.) (Добавлено в версии 3.1.1) - noRuleMatchAction: (String) Действие, которое следует предпринять (разрешить или запретить доступ), если правило соответствия, указанное в плагине
accesscontrolне найдено (не соответствует условию). Допустимые значения:ALLOWилиDENYПо умолчанию:ALLOW(Добавлено: v3.1.7) - enableAnalytics: (по умолчанию: true) Установите атрибут в значение false , чтобы предотвратить загрузку плагина аналитики. В этом случае вызовы к Apigee Edge analytics выполняться не будут. Если установлено значение true или этот атрибут не указан, плагин аналитики будет работать как обычно. Подробнее см. в атрибутах edgemicro . (Добавлено в версии 3.1.8).
Пример:
edgemicro
  enableAnalytics=false|true
- on_target_response_abort : Этот атрибут позволяет управлять поведением Edge Microgateway в случае преждевременного разрыва соединения между клиентом (Edge Microgateway) и целевым сервером.
Ценить Описание По умолчанию Если on_target_response_abortне указан, то по умолчанию ответ обрезается без отображения ошибки. В лог-файлах отображается предупреждение с сообщениемtargetResponse abortedи кодом ответа 502.appendErrorToClientResponseBodyКлиенту возвращается пользовательская ошибка TargetResponseAborted. В лог-файлах отображается предупреждающее сообщение с сообщениемtargetResponse abortedи кодом ответа 502. Кроме того, в лог записывается ошибкаTargetResponseAbortedс сообщениемTarget response ended prematurely.abortClientRequestEdge Microgateway прерывает запрос, и в файлы журналов записывается предупреждение: TargetResponseAbortedс кодом состояния запроса 502.
Пример:
edgemicro:
 on_target_response_abort: appendErrorToClientResponseBody | abortClientRequest
атрибуты заголовков
Эти настройки определяют, как обрабатываются определенные HTTP-заголовки.
- x-forwarded-for : (по умолчанию: true) Установите значение false, чтобы предотвратить передачу заголовков x-forwarded-for целевому объекту. Обратите внимание, что если заголовок x-forwarded-for присутствует в запросе, его значение будет установлено равным значению client-ip в Edge Analytics.
- x-forwarded-host : (по умолчанию: true) Установите значение false, чтобы предотвратить передачу заголовков x-forwarded-host целевому объекту.
- x-request-id : (по умолчанию: true) Установите значение false, чтобы предотвратить передачу заголовков x-request-id целевому объекту.
- x-response-time : (по умолчанию: true) Установите значение false, чтобы предотвратить передачу заголовков x-response-time целевому объекту.
- via : (по умолчанию: true) Установите значение false, чтобы предотвратить передачу заголовков via целевому объекту.
атрибуты OAuth
Эти параметры определяют, как Edge Microgateway обеспечивает аутентификацию клиента.
- allowNoAuthorization : (по умолчанию: false) Если установлено значение true, вызовы API разрешаются через Edge Microgateway без заголовка Authorization. Установите значение false, чтобы требовать заголовок Authorization (по умолчанию).
- allowInvalidAuthorization : (по умолчанию: false) Если установлено значение true, вызовы API разрешаются, если токен, переданный в заголовке Authorization, недействителен или истек. Установите значение false, чтобы требовать действительные токены (по умолчанию).
- authorization-header : (по умолчанию: Authorization: Bearer) Заголовок, используемый для отправки токена доступа в Edge Microgateway. Вы можете изменить значение по умолчанию в случаях, когда целевому устройству необходимо использовать заголовок Authorization для других целей.
- api-key-header : (по умолчанию: x-api-key) Имя заголовка или параметра запроса, используемого для передачи ключа API в Edge Microgateway. См. также Использование ключа API .
- keep-authorization-header : (по умолчанию: false) Если установлено значение true, заголовок Authorization, отправленный в запросе, передается целевому объекту (он сохраняется).
- allowOAuthOnly — Если установлено значение true, каждый API должен содержать заголовок Authorization с токеном доступа Bearer. Позволяет разрешить только модель безопасности OAuth (с сохранением обратной совместимости). (Добавлено в версии 2.4.x)
- allowAPIKeyOnly — Если установлено значение true, каждый API должен содержать заголовок x-api-key (или пользовательское местоположение) с ключом API. Позволяет разрешить только модель безопасности с использованием ключа API (с сохранением обратной совместимости). (Добавлено в версии 2.4.x)
- gracePeriod — Этот параметр помогает предотвратить ошибки, вызванные незначительными расхождениями между системными часами и временем «Не раньше» (nbf) или «Выдано в» (iat), указанными в токене авторизации JWT. Установите этот параметр равным количеству секунд, которое следует учитывать при таких расхождениях. (Добавлено в версии 2.5.7)
Атрибуты, специфичные для плагина
Подробную информацию о настраиваемых атрибутах каждого плагина см. в разделе «Использование плагинов».
Фильтрация прокси
Вы можете отфильтровать, какие прокси-серверы, поддерживающие microgateway, будет обрабатывать экземпляр Edge Microgateway. При запуске Edge Microgateway загружает все прокси-серверы, поддерживающие microgateway, в организации, с которой он связан. Используйте следующую конфигурацию, чтобы ограничить круг обрабатываемых прокси-серверов. Например, эта конфигурация ограничивает количество обрабатываемых прокси-серверов тремя: edgemicro_proxy-1 , edgemicro_proxy-2 и edgemicro_proxy-3 :
edgemicro:
  proxies:
  - edgemicro_proxy-1
  - edgemicro_proxy-2
  - edgemicro_proxy-3
Фильтрация товаров по названию
Используйте следующую конфигурацию, чтобы ограничить количество продуктов API, которые Edge Microgateway загружает и обрабатывает. Для фильтрации загруженных продуктов добавьте параметр запроса productnamefilter к API /products указанному в файле *.config.yaml Edge Microgateway. Например:
edge_config:
  bootstrap: >-
    https://edgemicroservices.apigee.net/edgemicro/bootstrap/organization/willwitman/environment/test
  jwt_public_key: 'https://myorg-test.apigee.net/edgemicro-auth/publicKey'
  managementUri: 'https://api.enterprise.apigee.com'
  vaultName: microgateway
  authUri: 'https://%s-%s.apigee.net/edgemicro-auth'
  baseUri: >-
    https://edgemicroservices.apigee.net/edgemicro/%s/organization/%s/environment/%s
  bootstrapMessage: Please copy the following property to the edge micro agent config
  keySecretMessage: The following credentials are required to start edge micro
  products: 'https://myorg-test.apigee.net/edgemicro-auth/products?productnamefilter=%5E%5BEe%5Ddgemicro.%2A%24'
Обратите внимание, что значение параметра запроса должно быть указано в формате регулярного выражения и закодировано в формате URL. Например, регулярное выражение ^[Ee]dgemicro.*$ обрабатывает такие имена, как: "edgemicro-test-1", "edgemicro_demo" и "Edgemicro_New_Demo". Закодированное в формате URL значение, подходящее для использования в параметре запроса, выглядит следующим образом: %5E%5BEe%5Ddgemicro.%2A%24 .
Приведенный ниже отладочный вывод показывает, что были загружены только отфильтрованные товары:
...
2020-05-27T03:13:50.087Z [76060] [microgateway-config network] products download from https://gsc-demo-prod.apigee.net/edgemicro-auth/products?productnamefilter=%5E%5BEe%5Ddgemicro.%2A%24 returned 200 OK
...
....
....
{
   "apiProduct":[
      {
         "apiResources":[

         ],
         "approvalType":"auto",
         "attributes":[
            {
               "name":"access",
               "value":"public"
            }
         ],
         "createdAt":1590549037549,
         "createdBy":"k***@g********m",
         "displayName":"test upper case in name",
         "environments":[
            "prod",
            "test"
         ],
         "lastModifiedAt":1590549037549,
         "lastModifiedBy":"k***@g********m",
         "name":"Edgemicro_New_Demo",
         "proxies":[
            "catchall"
         ],
         "quota":"null",
         "quotaInterval":"null",
         "quotaTimeUnit":"null",
         "scopes":[

         ]
      },
      {
         "apiResources":[

         ],
         "approvalType":"auto",
         "attributes":[
            {
               "name":"access",
               "value":"public"
            }
         ],
         "createdAt":1590548328998,
         "createdBy":"k***@g********m",
         "displayName":"edgemicro test 1",
         "environments":[
            "prod",
            "test"
         ],
         "lastModifiedAt":1590548328998,
         "lastModifiedBy":"k***@g********m",
         "name":"edgemicro-test-1",
         "proxies":[
            "Lets-Encrypt-Validation-DoNotDelete"
         ],
         "quota":"null",
         "quotaInterval":"null",
         "quotaTimeUnit":"null",
         "scopes":[

         ]
      },
      {
         "apiResources":[
            "/",
            "/**"
         ],
         "approvalType":"auto",
         "attributes":[
            {
               "name":"access",
               "value":"public"
            }
         ],
         "createdAt":1558182193472,
         "createdBy":"m*********@g********m",
         "displayName":"Edge microgateway demo product",
         "environments":[
            "prod",
            "test"
         ],
         "lastModifiedAt":1569077897465,
         "lastModifiedBy":"m*********@g********m",
         "name":"edgemicro_demo",
         "proxies":[
            "edgemicro-auth",
            "edgemicro_hello"
         ],
         "quota":"600",
         "quotaInterval":"1",
         "quotaTimeUnit":"minute",
         "scopes":[

         ]
      }
   ]
}
Фильтрация товаров по пользовательским атрибутам
Для фильтрации товаров на основе пользовательских атрибутов:
- В пользовательском интерфейсе Edge выберите прокси-сервер edgemicro_auth в организации/среде, где вы настроили Edge Microgateway.
- На вкладке «Разработка» откройте политику JavaCallout в редакторе.
- Добавьте пользовательский атрибут с ключом
products.filter.attributes, содержащий список имен атрибутов, разделенных запятыми. В Edge Microgateway будут возвращены только те продукты, которые содержат хотя бы одно из имен пользовательских атрибутов. - При желании вы можете отключить проверку на включение продукта в текущей среде, установив для пользовательского атрибута
products.filter.env.enableзначениеfalse. (По умолчанию — true.) - (Только для частного облака) Если вы используете Edge для частного облака, установите свойство
org.noncpsвtrue, чтобы получать продукты для сред, не использующих CPS.
Например:
<?xml version="1.0" encoding="UTF-8" standalone="yes"?>
<JavaCallout async="false" continueOnError="false" enabled="true" name="JavaCallout">
    <DisplayName>JavaCallout</DisplayName>
    <FaultRules/>
    <Properties>
        <Property name="products.filter.attributes">attrib.one, attrib.two</Property>
        <Property name="products.filter.env.enable">false</Property>
        <Property name="org.noncps">true</Property>
    </Properties>
    <ClassName>io.apigee.microgateway.javacallout.Callout</ClassName>
    <ResourceURL>java://micro-gateway-products-javacallout-2.0.0.jar</ResourceURL>
</JavaCallout>Фильтрация товаров по статусу отзыва
Продукты API имеют три кода состояния: «Ожидание», «Одобрено» и «Отозвано». В политику «Установка переменных JWT» в прокси-сервере edgemicro-auth добавлено новое свойство allowProductStatus . Чтобы использовать это свойство для фильтрации продуктов API, перечисленных в JWT:
- Откройте прокси-сервер edgemicro-auth в редакторе прокси-серверов Apigee.
- Добавьте свойство
allowProductStatusв XML-файл политики SetJWTVariables и укажите список кодов состояния, разделенных запятыми, по которым будет производиться фильтрация. Например, для фильтрации по статусу «Ожидание» и «Отменено» :<?xml version="1.0" encoding="UTF-8" standalone="yes"?> <Javascript timeLimit="20000" async="false" continueOnError="false" enabled="true" name="Set-JWT-Variables"> <DisplayName>Set JWT Variables</DisplayName> <FaultRules/> <Properties> <Property name="allowProductStatus">Pending,Revoked</Property> </Properties> <ResourceURL>jsc://set-jwt-variables.js</ResourceURL> </Javascript>
Если вы хотите отображать только одобренные товары, установите это свойство следующим образом:
<Property name="allowProductStatus">Approved</Property>
- Сохраните прокси.
Если тег «Свойства» отсутствует, то в JWT будут перечислены товары со всеми кодами состояния.
Для использования этой новой функции необходимо обновить прокси-сервер edgemicro-auth .
Настройка частоты отправки аналитических уведомлений
Используйте следующие параметры конфигурации для управления частотой отправки аналитических данных Edge Microgateway в Apigee:
- bufferSize (Optional): The maximum number of analytics records that the buffer can hold before beginning to drop the oldest records. Default: 10000
- batchSize (необязательно): Максимальный размер пакета аналитических записей, отправляемых в Apigee. По умолчанию: 500
- flushInterval (необязательно): количество миллисекунд между отправкой пакета аналитических записей в Apigee. По умолчанию: 5000
Например:
analytics:
  bufferSize: 15000
  batchSize: 1000
  flushInterval: 6000
Маскирование аналитических данных
Следующая конфигурация предотвращает отображение информации о пути запроса в Edge Analytics. Добавьте следующее в конфигурацию микрошлюза, чтобы скрыть URI запроса и/или путь запроса. Обратите внимание, что URI состоит из имени хоста и пути запроса.
analytics:
  mask_request_uri: 'string_to_mask'
  mask_request_path: 'string_to_mask'
Разделение вызовов API в Edge Analytics
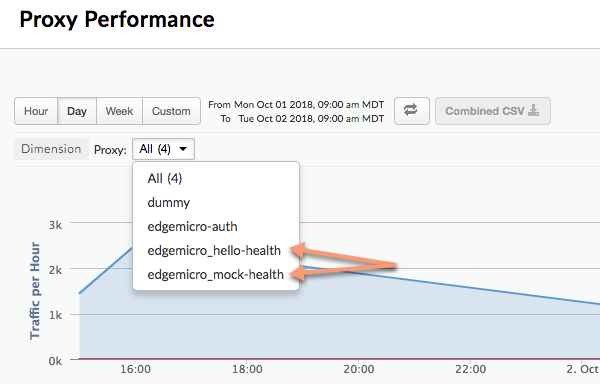
Вы можете настроить плагин аналитики таким образом, чтобы определенный путь к API отображался как отдельный прокси-сервер на панелях мониторинга Edge Analytics. Например, вы можете выделить API проверки работоспособности на панели мониторинга, чтобы избежать путаницы с фактическими вызовами прокси-серверов API. На панели мониторинга Analytics выделенные прокси-серверы имеют следующий шаблон именования:
edgemicro_proxyname-health
На следующем изображении показаны два отдельных прокси-сервера на панели аналитики: edgemicro_hello-health и edgemicro_mock-health :
Используйте эти параметры для разделения относительных и абсолютных путей на панели аналитики в качестве отдельных прокси-объектов:
- relativePath (необязательно): указывает относительный путь для разделения на панели мониторинга Analytics. Например, если вы укажете
/healthcheck, все вызовы API, содержащие путь/healthcheckбудут отображаться на панели мониторинга какedgemicro_ proxyname -health. Обратите внимание, что этот флаг игнорирует базовый путь прокси. Для разделения на основе полного пути, включая базовый путь, используйте флагproxyPath. - proxyPath (Optional): Specifies a full API proxy path, including the proxy basepath, to segregate in the analytics dashboard. For example, if you specify
/mocktarget/healthcheck, where/mocktargetis the proxy basepath, all API calls with the path/mocktarget/healthcheckwill appear in the dashboard asedgemicro_ proxyname -health.
For example, in the following configuration any API path that contains /healthcheck will be segregated by the analytics plugin. This means, /foo/healthcheck and /foo/bar/healthcheck will be segregated as a separate proxy called edgemicro_ proxyname -health in the analytics dashboard.
analytics:
  uri: >-
    https://xx/edgemicro/ax/org/docs/environment/test
  bufferSize: 100
  batchSize: 50
  flushInterval: 500
  relativePath: /healthcheck
In the following configuration any API with the proxy path /mocktarget/healthcheck will be will be segregated as a separate proxy called edgemicro_ proxyname -health in the analytics dashboard.
analytics:
  uri: >-
    https://xx/edgemicro/ax/org/docs/environment/test
  bufferSize: 100
  batchSize: 50
  flushInterval: 500
  proxyPath: /mocktarget/healthcheck
Setting up Edge Microgateway behind a company firewall
Use an HTTP proxy for communication with Apigee Edge
Added in version 3.1.2.
To use an HTTP proxy for communication between Edge Microgateway and Apigee Edge, do the following:
- Set the environment variables
HTTP_PROXY,HTTPS_PROXY, andNO_PROXY. These variables control the hosts for each HTTP proxy that you wish to use for communication with Apigee Edge, or which hosts should not handle communication with Apigee Edge. For example:export HTTP_PROXY='http://localhost:3786' export HTTPS_PROXY='https://localhost:3786' export NO_PROXY='localhost,localhost:8080'
Note that
NO_PROXYcan be a comma delimited list of domains that Edge Microgateway should not proxy to.For more information on these variables, see https://www.npmjs.com/package/request#controlling-proxy-behaviour-using-environment-variables
- Restart Edge Microgateway.
Use an HTTP proxy for target communication
Added in version 3.1.2.
To use an HTTP proxy for communication between Edge Microgateway and backend targets, do the following:
- Add the following configuration to the microgateway config file:
edgemicro:
  proxy:
    tunnel: true | false
    url: proxy_url
    bypass: target_host # target hosts to bypass the proxy.
    enabled: true | false
Где:
- tunnel : (Optional) When true, Edge Microgateway uses the HTTP CONNECT method to tunnel HTTP requests over a single TCP connection. (The same is true if the environment variables, as mentioned below, for configuring the proxy are TLS enabled). Default:
false - url : The HTTP proxy URL.
- bypass : (Optional) Specifies one or more comma-separated target host URLs that should bypass the HTTP proxy. If this property is not set, then use the NO_PROXY environment variable to specify which target URLs to bypass.
- enabled : If true and
proxy.urlis set, use theproxy.urlvalue for the HTTP proxy. If true andproxy.urlis not set, use the proxies specified in the HTTP proxy environment variablesHTTP_PROXYandHTTPS_PROXY, as described in Use an HTTP proxy for communication with Apigee Edge .
Например:
edgemicro: proxy: tunnel: true url: 'http://localhost:3786' bypass: 'localhost','localhost:8080' # target hosts to bypass the proxy. enabled: true - tunnel : (Optional) When true, Edge Microgateway uses the HTTP CONNECT method to tunnel HTTP requests over a single TCP connection. (The same is true if the environment variables, as mentioned below, for configuring the proxy are TLS enabled). Default:
- Restart Edge Microgateway.
Using wildcards in Microgateway-aware proxies
You can use one or more "*" wildcards in the base path of an edgemicro_* (Microgateway-aware) proxy. For example, a base path of /team/*/members allows clients to call https://[host]/team/blue/members and https://[host]/team/green/members without you needing to create new API proxies to support new teams. Note that /**/ is not supported.
Important: Apigee does NOT support using a wildcard "*" as the first element of a base path. For example, this is NOT supported: /*/ search.
Rotating JWT keys
At some time after you initially generate a JWT, you might need to change the public/private key pair stored in the Edge encrypted KVM. This process of generating a new key pair is called key rotation.
How Edge Microgateway uses JWTs
JSON Web Token (JWT) is a token standard described in RFC7519 . JWT provides a way to sign a set of claims, which can be verified reliably by the recipient of the JWT.
You can generate a JWT using the CLI and use it in the Authorization header of API calls instead of an API key. For example:
curl -i http://localhost:8000/hello -H "Authorization: Bearer eyJhbGciOiJ..dXDefZEA"
For information on generating JWTs with the CLI, see Generate a token .
What is key rotation?
At some time after you initially generate a JWT, you might need to change the public/private key pair stored in the Edge encrypted KVM. This process of generating a new key pair is called key rotation. When you rotate keys, a new private/public key pair is generated and stored in the "microgateway" KVM in your Apigee Edge organization/environment. In addition, the old public key is retained along with its original key ID value.
To generate a JWT, Edge uses information stored in the encrypted KVM. A KVM called microgateway was created and populated with keys when you initially set up (configured) Edge Microgateway. The keys in the KVM are used to sign and encrypt a JWT.
The KVM keys include:
private_key - The latest (most recently created) RSA private key used to sign JWTs.
public_key - The latest (most recently created) certificate used to verify JWTs signed with the private_key.
private_key_kid - The latest (most recently created) private key ID. This key ID is associated with the private_key value and is used to support key rotation.
public_key1_kid - The latest (most recently created) public key ID. This key is associated with the public_key1 value and is used to support key rotation. This value is the same as the private key kid.
public_key1 - The latest (most recently created) public key.
When you perform key rotation, existing key values are replaced in the map and new keys are added to retain the old public keys. For example:
public_key2_kid - The old public key ID. This key is associated with the public_key2 value and is used to support key rotation.
public_key2 - The old public key.
JWTs presented for verification will be verified using the new public key. If verification fails, then the old public key will be used, until the JWT expires (after token_expiry* interval, default 30 mins). In this way, you can "rotate" keys without immediately disrupting API traffic.
How to do key rotation
This section explains how to perform a key rotation.
- To upgrade the KVM, use the
edgemicro upgradekvmcommand. For details on running this command, see Upgrading the KVM . You only need to do this step one time. - To upgrade the edgemicro-oauth proxy, use the
edgemicro upgradeauthcommand. For details on running this command, see Ugrading the edgemicro-auth proxy . You only need to do this step one time. - Add the following line to your
~/.edgemicro/org-env-config.yamlfile, where you must specify the same organization and environment that you configured the microgateway to use:jwk_public_keys: 'https://$ORG-$ENV.apigee.net/edgemicro-auth/jwkPublicKeys'
Run the key rotation command to rotate the keys. For details on this command, see Rotating keys .
edgemicro rotatekey -o $ORG -e $ENV -k $KEY -s $SECRET
Например:
edgemicro rotatekey -o docs -e test \
-k 27ee39567c75e4567a66236cbd4e86d1cc93df6481454301bd5fac4d3497fcbb \
-s 4618b0008a6185d7327ebf53bee3c50282ccf45a3cceb1ed9828bfbcf1148b47
After key rotation, Edge returns multiple keys to Edge Microgateway. Note in the following example, each key has a unique "kid" (Key ID) value. The microgateway then uses these keys to validate authorization tokens. If the token validation fails, the microgateway looks to see if there is an older key in the key set and tries that key. The format of the returned keys is JSON Web Key (JWK). You can read about this format in RFC 7517 .
{
  "keys": [
    {
      "kty": "RSA",
      "n": "nSl7R_0wKLiWi6cO3n8aOJwYGBtinq723Jgg8i7KKWTSTYoszOjgGsJf_MX4JEW1YCScwpE5o4o8ccQN09iHVTlIhk8CNiMZNPipClmRVjaL_8IWvMQp1iN66qy4ldWXzXnHfivUZZogCkBNqCz7VSC5rw2Jf57pdViULVvVDGwTgf46sYveW_6h8CAGaD0KLd3vZffxIkoJubh0yMy0mQP3aDOeIGf_akeZeZ6GzF7ltbKGd954iNTiKmdm8IKhz6Y3gLpC9iwQ-kex_j0CnO_daHl1coYxUSCIdv4ziWIeM3dmjQ5_2dEvUDIGG6_Az9hTpNgPE5J1tvrOHAmunQ",
      "e": "AQAB",
      "kid": "2"
    },
    {
      "kty": "RSA",
      "n": "8BKwzx34BMUcHwTuQtmp8LFRCMxbkKg_zsWD6eOMIUTAsORexTGJsTy7z-4aH0wJ3fT-3luAAUPLBQwGcuHo0P1JnbtPrpuYjaJKSZOeIMOnlryJCspmv-1xG4qAqQ9XaZ9C97oecuj7MMoNwuaZno5MvsY-oi5B_gqED3vIHUjaWCErd4reONyFSWn047dvpE6mwRhZbcOTkAHT8ZyKkHISzopkFg8CD-Mij12unxA3ldcTV7yaviXgxd3eFSD1_Z4L7ZRsDUukCJkJ-8qY2-GWjewzoxl-mAW9D1tLK6qAdc89yFem3JHRW6L1le3YK37-bs6b2a_AqJKsKm5bWw",
      "e": "AQAB",
      "kid": "1"
    }
  ]
}
Configuring a "not before" delay
For versions 3.1.5 and before, the new private key generated by the rotatekey command took effect immediately, and new tokens generated were signed with the new private key. However, the new public key was only made available to Edge Microgateway instances every 10 minutes (by default) when the microgateway configuration was refreshed. Because of this lag between the token signing and microgateway instance refresh, tokens signed with the latest key would be rejected until all instances received the public latest key.
In cases where multiple microgateway instances exist, the public key lag sometimes resulted in intermittent runtime errors with status 403, because token validation would pass on one instance, but fail on another instance until all instances were refreshed.
Starting in version 3.1.6, a new flag on the rotatekey command allows you to specify a delay for the new private key to become effective, allowing time for all microgateway instances to be refreshed and receive the new public key. The new flag is --nbf , which stands for "not before." This flag takes an integer value, the number of minutes to delay.
In the following example, the delay is set to 15 minutes:
edgemicro rotatekey -o docs -e test \
-k 27ee39567c75e4567a66236cbd4e86d1cc93df6481454301bd5fac4d3497fcbb \
-s 4618b0008a6185d7327ebf53bee3c50282ccf45a3cceb1ed9828bfbcf1148b47 \
--nbf 15
Note that a good practice is to set the delay to be more than the config_change_poll_internal configuration setting, which is 10 minutes by default. See also edgemicro attributes .
Filtering downloaded proxies
By default, Edge Microgateway downloads all of the proxies in your Edge organization that start with the naming prefix "edgemicro_". You can change this default to download proxies whose names match a pattern.
- Open your Edge Micro config file:
~/.edgemicro/org-env-config.yaml - Add the proxyPattern element under edge_config. For example, the following pattern will download proxies such as edgemicro_foo, edgemicro_fast, and edgemicro_first.
edge_config:
…
proxyPattern: edgemicro_f*
Specifying products without API proxies
In Apigee Edge, you can create an API product that does not contain any API proxies. This product configuration allows an API key associated with that product to work for with any proxy deployed in your organization. As of version 2.5.4, Edge Microgateway supports this product configuration.
Отладка и устранение неполадок
Connecting to a debugger
You can run Edge Microgateway with a debugger, such as node-inspector . This is useful for troubleshooting and debugging custom plugins.
- Restart Edge Microgateway in debug mode. To do this, add
DEBUG=*to the beginning of thestartcommand:DEBUG=* edgemicro start -o $ORG -e $ENV -k $KEY -s $SECRET
To direct debug output to a file, you can use this command:
export DEBUG=* nohup edgemicro start \
-o $ORG -e $ENV -k $KEY -s $SECRET 2>&1 | tee /tmp/file.log
- Start your debugger and set it to listen on the port number for the debugging process.
- You can now step through the Edge Microgateway code, set breakpoints, watch expressions, and so on.
You can specify standard Node.js flags related to debug mode. For example, --nolazy helps with debugging asynchronous code.
Checking log files
If you're having problems, be sure to examine the log files for execution details and error information. For details, see Managing log files .
Using API key security
API keys provide a simple mechanism for authenticating clients making requests to Edge Microgateway. You can obtain an API key by copying the Consumer Key (also called Client ID) value from an Apigee Edge product that includes the Edge Microgateway authentication proxy.
Caching of keys
API keys are exchanged for bearer tokens, which are cached. You can disable caching by setting the Cache-Control: no-cache header on incoming requests to Edge Microgateway.
Using an API key
You can pass the API key in an API request either as a query parameter or in a header. By default, the header and query param name are both x-api-key .
Query parameter example:
curl http://localhost:8000/foobar?x-api-key=JG616Gjz7xs4t0dvpvVsGdI49G34xGsz
Header example:
curl http://localhost:8000/foobar -H "x-api-key:JG616Gjz7xs4t0dvpvVsGdI49G34xGsz"
Configuring the API key name
By default, x-api-key is the name used for both the API key header and query parameter. You can change this default in the configuration file, as explained in Making configuration changes . For example, to change the name to apiKey :
oauth:
  allowNoAuthorization: false
  allowInvalidAuthorization: false
  api-key-header: apiKey
In this example, both the query parameter and header name are changed to apiKey . The name x-api-key will no longer work in either case. See also Making configuration changes .
Например:
curl http://localhost:8000/foobar -H "apiKey:JG616Gjz7xs4t0dvpvVsGdI49G34xGsz"
For more information about using API keys with proxy requests, see Secure Edge Microgateway .
Enable upstream response codes
By default, the oauth plugin returns only 4xx error status codes if the response is not a 200 status. You can change this behavior so that it always returns the exact 4xx or 5xx code, depending on the error.
To enable this feature, add the oauth.useUpstreamResponse: true property to your Edge Microgateway configuration. For example:
oauth:
  allowNoAuthorization: false
  allowInvalidAuthorization: false
  gracePeriod: 10
  useUpstreamResponse: true
Using OAuth2 token security
This section explains how to get OAuth2 access tokens and refresh tokens. Access tokens are used to make secure API calls through the microgateway. Refresh tokens are used to obtain new access tokens.
How to get an access token
This section explains how to use the edgemicro-auth proxy to get an access token.
You can also get an access token using the edgemicro token CLI command. For details on the CLI, see Managing tokens .
API 1: Send credentials as body parameters
Substitute your org and environment names in the URL, and substitute the Consumer Id and Consumer Secret values obtained from a developer app on Apigee Edge for the client_id and client_secret body parameters:
curl -i -X POST "http://<org>-<test>.apigee.net/edgemicro-auth/token" \
-d '{"grant_type": "client_credentials", "client_id": "your_client_id", \
"client_secret": "your_client_secret"}' -H "Content-Type: application/json"
API 2: Send credentials in a Basic Auth header
Send the client credentials as a Basic Authentication header and the grant_type as a form parameter. This command form is also discussed in RFC 6749: The OAuth 2.0 Authorization Framework .
http://<org>-<test>.apigee.net/edgemicro-auth/token -v -u your_client_id:your_client_secret \
-d 'grant_type=client_credentials' -H "Content-Type: application/x-www-form-urlencoded"
Sample output
The API returns a JSON response. Note that there's no difference between thetoken and access_token properties. You can use either one. Note that expires_in is an integer value specified in seconds. { "token": "eyJraWQiOiIxIiwidHlwIjoi", "access_token": "eyJraWQiOiIxIiwid", "token_type": "bearer", "expires_in": 1799 }
How to get a refresh token
To get a refresh token, make an API call to the /token endpoint of the edgemicro-auth proxy. You MUST make this API call with the password grant type. The following steps walk through the process.
- Get an access and refresh token with the
/tokenAPI. Note that the grant type ispassword:curl -X POST \ https://your_organization-your_environment.apigee.net/edgemicro-auth/token \ -H 'Content-Type: application/json' \ -d '{ "client_id":"mpK6l1Bx9oE5zLdifoDbF931TDnDtLq", "client_secret":"bUdDcFgv3nXffnU", "grant_type":"password", "username":"mpK6lBx9RoE5LiffoDbpF931TDnDtLq", "password":"bUdD2FvnMsXffnU" }'The API returns an access token and a refresh token. The response looks similar to this. Note that
expires_invalues integers and are specified in seconds.{ "token": "your-access-token", "access_token": "your-access-token", "token_type": "bearer", "expires_in": 108, "refresh_token": "your-refresh-token", "refresh_token_expires_in": 431, "refresh_token_issued_at": "1562087304302", "refresh_token_status": "approved" } - You can now use the refresh token to get a new access token by calling the
/refreshendpoint of the same API. For example:curl -X POST \ https://willwitman-test.apigee.net/edgemicro-auth/refresh \ -H 'Content-Type: application/json' \ -d '{ "client_id":"mpK6l1Bx9RoE5zLifoDbpF931TDnDtLq", "client_secret":"bUdDc2Fv3nMXffnU", "grant_type":"refresh_token", "refresh_token":"your-refresh-token" }'The API returns a new access token. The response looks similar to this:
{
    "token": "your-new-access-token"
    }
Постоянный мониторинг
Specifying a config file endpoint
If you run multiple Edge Microgateway instances, you may wish to manage their configurations from a single location. You can do this by specifying an HTTP endpoint where Edge Micro can download its configuration file. You can specify this endpoint when you start Edge Micro using the -u flag.
Например:
edgemicro start -o jdoe -e test -u http://mylocalserver/mgconfig -k public_key -s secret_key
where the mgconfig endpoint returns the contents of your configuration file. This is the file that, by default, is located in ~/.edgemicro and has the naming convention: org-env-config.yaml .
Disabling TCP connection data buffering
You can use the nodelay configuration attribute to disable data buffering for TCP connections used by Edge Microgateway.
By default TCP connections use the Nagle algorithm to buffer data before sending it off. Setting nodelay to true , disables this behavior (data will immediately fire off data each time socket.write() is called). See also the Node.js documentation for more details.
To enable nodelay , edit the Edge Micro config file as follows:
edgemicro:
  nodelay: true
  port: 8000
  max_connections: 1000
  config_change_poll_interval: 600
  logging:
    level: error
    dir: /var/tmp
    stats_log_interval: 60
    rotate_interval: 24
Running Edge Microgateway in standalone mode
You can run Edge Microgateway disconnected completely from any Apigee Edge dependency. This scenario, called standalone mode, lets you run and test Edge Microgateway without an Internet connection.
In standalone mode, the following features do not work, as they require connection to Apigee Edge:
- OAuth and API key
- Квота
- Аналитика
On the other hand, custom plugins and spike arrest work normally, because they do not require a connection to Apigee Edge. In addition, a new plugin called extauth lets you authorize API calls to the microgateway with a JWT while in standalone mode.
Configuring and starting the gateway
To run Edge Microgateway in standalone mode:
- Create a configuration file named as follows:
$HOME/.edgemicro/ $ORG-$ENV -config.yamlНапример:
vi $HOME/.edgemicro/foo-bar-config.yaml
- Paste the following code into the file:
edgemicro: port: 8000 max_connections: 1000 config_change_poll_interval: 600 logging: level: error dir: /var/tmp stats_log_interval: 60 rotate_interval: 24 plugins: sequence: - extauth - spikearrest headers: x-forwarded-for: true x-forwarded-host: true x-request-id: true x-response-time: true via: true extauth: publickey_url: https://www.googleapis.com/oauth2/v1/certs spikearrest: timeUnit: second allow: 10 buffersize: 0 - Export the following environment variable with the value "1":
export EDGEMICRO_LOCAL=1
- Execute the following
startcommand, where you provide values to instantiate the local proxy:edgemicro start -o $ORG -e $ENV -a $LOCAL_PROXY_NAME \ -v $LOCAL_PROXY_VERSION -t $TARGET_URL -b $BASE_PATH
Где:
- $ORG is the "org" name that you used in the configuration file name.
- $ENV is the "env" name that you used in the configuration file name.
- $LOCAL_PROXY_NAME is the name of the local proxy that will be created. You can use any name you want.
- $LOCAL_PROXY_VERSION is the version number for the proxy.
- $TARGET_URL is the URL for the target of the proxy. (The target is the service that the proxy calls.)
- $BASE_PATH is the base path of the proxy. This value must start with a forward slash. For a root base path, specify just a forward slash; for example, "/".
Например:
edgemicro start -o local -e test -a proxy1 -v 1 -t http://mocktarget.apigee.net -b /
- Test the configuration.
curl http://localhost:8000/echo { "error" : "missing_authorization" }Because the
extauthplugin is in thefoo-bar-config.yamlfile, you get a "missing_authorization" error. This plugin validates a JWT that must be present in the Authorization header of the API call. In the next section, you will obtain a JWT that will allow API calls to go through without the error.
Example: Obtaining an authorization token
The following example shows how to obtain a JWT from the Edge Microgateway JWT endpoint on Apigee Edge ( edgemicro-auth/jwkPublicKeys ). This endpoint is deployed when you perform a standard setup and configuration of Edge Microgateway. To obtain the JWT from the Apigee endpoint, you must first do the standard Edge Microgateway setup, and be connected to the Internet. The Apigee endpoint is used here for example purposes only and is not required. You can use another JWT token endpoint if you wish. If you do, then you'll need to obtain the JWT using the API provided for that endpoint.
The following steps explain how to get a token using the edgemicro-auth/jwkPublicKeys endpoint:.
- You must perform a standard setup and configuration of Edge Microgateway to deploy the
edgemicro-authproxy to your organization/environment on Apigee Edge. If you did this step previously, you do not need to repeat it. - If you deployed Edge Microgateway to Apigee Cloud, you must be connected to the Internet so that you can obtain a JWT from this endpoint.
- Stop Edge Microgateway:
edgemicro stop
- In the configuration file you created previously (
$HOME/.edgemicro/ org - env-config.yaml), point theextauth:publickey_urlattribute to theedgemicro-auth/jwkPublicKeysendpoint in your Apigee Edge organization/environment. For example:extauth: publickey_url: 'https://your_org-your_env.apigee.net/edgemicro-auth/jwkPublicKeys'
- Restart Edge Microgateway as you did previously, using the org/env names you used in the config file name. For example:
edgemicro start -o foo -e bar -a proxy1 -v 1 -t http://mocktarget.apigee.net -b /
- Get a JWT token from the authorization endpoint. Because you are using the
edgemicro-auth/jwkPublicKeysendpoint, you can use this CLI command:
You can generate a JWT for Edge Microgateway using the edgemicro token command or an API. For example:
edgemicro token get -o your_org -e your_env \
  -i G0IAeU864EtBo99NvUbn6Z4CBwVcS2 -s uzHTbwNWvoSmOy
Где:
- your_org is the name of your Apigee organization for which you previously configured Edge Microgateway.
- your_env is an environment in the organization.
- The
ioption specifies the Consumer Key from a developer app that has a product that includes theedgemicro-authproxy. - The
soption specifies the Consumer Secret from a developer app that has a product that includes theedgemicro-authproxy.
This command asks Apigee Edge to generate a JWT that can then be used to verify API calls.
See also Generate a token .Test the standalone configuration
To test the configuration, call the API with the token added in the Authorization header as follows:
curl http://localhost:8000/echo -H "Authorization: Bearer your_token
Пример:
curl http://localhost:8000/echo -H "Authorization: Bearer eyJraWQiOiIxIiwidHlwIjo...iryF3kwcDWNv7OQ"
Пример выходных данных:
{
   "headers":{
      "user-agent":"curl/7.54.0",
      "accept":"*/*",
      "x-api-key":"DvUdLlFwG9AvGGpEgfnNGwtvaXIlUUvP",
      "client_received_start_timestamp":"1535134472699",
      "x-authorization-claims":"eyJhdDbiO...M1OTE5MTA1NDkifQ==",
      "target_sent_start_timestamp":"1535134472702",
      "x-request-id":"678e3080-a7ae-11e8-a70f-87ae30db3896.8cc81cb0-a7c9-11e8-a70f-87ae30db3896",
      "x-forwarded-proto":"http",
      "x-forwarded-host":"localhost:8000",
      "host":"mocktarget.apigee.net",
      "x-cloud-trace-context":"e2ac4fa0112c2d76237e5473714f1c85/1746478453618419513",
      "via":"1.1 localhost, 1.1 google",
      "x-forwarded-for":"::1, 216.98.205.223, 35.227.194.212",
      "connection":"Keep-Alive"
   },
   "method":"GET",
   "url":"/",
   "body":""
}
Using local proxy mode
In local proxy mode, Edge Microgateway does not require a microgateway-aware proxy to be deployed on Apigee Edge. Instead, you configure a "local proxy" by providing a local proxy name, basepath, and target URL when you start the microgateway. API calls to the microgateway are then sent to the target URL of the local proxy. In all other respects, local proxy mode works exactly the same as running Edge Microgateway in its normal mode. Authentication works the same, as do spike arrest and quota enforcement, custom plugins, and so on.
Use case and example
Local proxy mode is useful when you only need to associate one single proxy with an Edge Microgateway instance. For example, you can inject Edge Microgateway into Kubernetes as a sidecar proxy, where a microgateway and a service each run in a single pod, and where the microgateway manages traffic to and from its companion service. The following figure illustrates this architecture where Edge Microgateway functions as a sidecar proxy in a Kubernetes cluster. Each microgateway instance talks only to a single endpoint on its companion service:
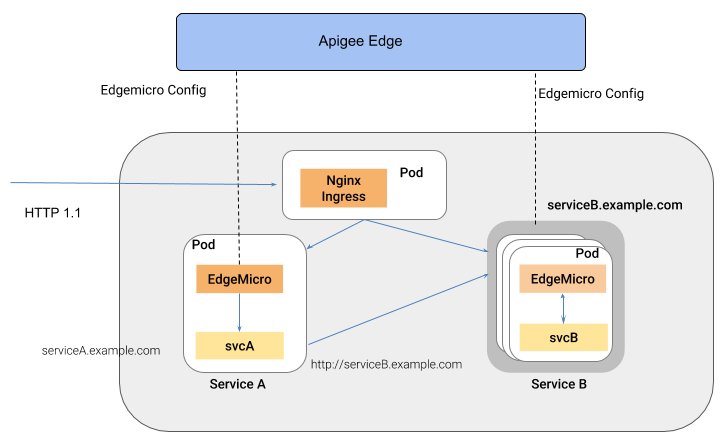
A benefit of this style of architecture is that Edge Microgateway provides API management for individual services deployed to a container environment, such as a Kubernetes cluster.
Configuring local proxy mode
To configure Edge Microgateway to run in local proxy mode, follow these steps:
- Run
edgemicro initto set up your local configuration environment, exactly as you would in a typical Edge Microgateway setup. See also Configure Edge Microgateway . - Run
edgemicro configure, as you would in a typical Edge Microgateway setup procedure. For example:edgemicro configure -o your_org -e your_env -u your_apigee_username
This command deploys the edgemicro-auth policy to Edge and returns a key and secret that you will need to start the microgateway. If you need help, see Configure Edge Microgateway .
- On Apigee Edge, create an API product and with the following mandatory configuration requirements (you can manage all other configurations as you wish):
- You must add the edgemicro-auth proxy to the product. This proxy was deployed automatically when you ran
edgemicro configure. - You must provide a resource path. Apigee recommends adding this path to the product:
/**. To learn more, see Configuring the behavior of the resource path . See also Create API products in the Edge documentation.
- You must add the edgemicro-auth proxy to the product. This proxy was deployed automatically when you ran
On Apigee Edge, create a developer, or you can use an existing developer if you wish. For help, see Adding developers using the Edge management UI .
- On Apigee Edge, create a developer app. You must add the API product you just created to the app. For help, see Registering an app in the Edge management UI .
- On the machine where Edge Microgateway is installed, export the following environment variable with the value "1".
export EDGEMICRO_LOCAL_PROXY=1
- Execute the following
startcommand:edgemicro start -o your_org -e your_environment -k your_key -s your_secret \ -a local_proxy_name -v local_proxy_version -t target_url -b base_pathГде:
- your_org is your Apigee organization.
- your_environment is an environment in your organization.
- your_key is the key that was returned when you ran
edgemicro configure. - your_secret is the secret that was returned when you ran
edgemicro configure. - local_proxy_name is the name of the local proxy that will be created.
- local_proxy_version is the version number for the proxy.
- target_url is the URL for the target of the proxy (the service the proxy will call).
- base_path is the base path of the proxy. This value must start with a forward slash. For a root base path, specify just a forward slash; for example, "/".
Например:
edgemicro start -o your_org -e test -k 7eb6aae644cbc09035a...d2eae46a6c095f \
  -s e16e7b1f5d5e24df...ec29d409a2df853163a -a proxy1 -v 1 \
  -t http://mocktarget.apigee.net -b /echo
Testing the configuration
You can test the local proxy configuration by calling the proxy endpoint. For example, if you specified a basepath of /echo , you can call the proxy as follows:
curl  http://localhost:8000/echo
{
  "error" : "missing_authorization",
  "error_description" : "Missing Authorization header"
}
This initial API call produced an error because you did not provide a valid API key. You can find the key in the Developer app you created previously. Open the app in the Edge UI, copy the Consumer Key, and use that key as follows:
curl http://localhost:8000/echo -H 'x-api-key:your_api_key'
Например:
curl http://localhost:8000/echo -H "x-api-key:DvUdLlFwG9AvGGpEgfnNGwtvaXIlUUvP"
Пример выходных данных:
{
  "headers":{
    "user-agent":"curl/7.54.0",
    "accept":"*/*",
    "x-api-key":"DvUdLlFwG9AvGGpEgfnNGwtvaXIlUUvP",
    "client_received_start_timestamp":"1535134472699",
    "x-authorization-claims":"eyJhdWQiOi...TQ0YmUtOWNlOS05YzM1OTE5MTA1NDkifQ==",
    "target_sent_start_timestamp":"1535134472702",
    "x-request-id":"678e3080-a7ae-11e8-a70f-87ae30db3896.8cc81cb0-a7c9-11e8-a70f-87ae30db3896",
    "x-forwarded-proto":"http",
    "x-forwarded-host":"localhost:8000",
    "host":"mocktarget.apigee.net",
    "x-cloud-trace-context":"e2ac4fa0112c2d76237e5473714f1c85/1746478453618419513",
    "via":"1.1 localhost, 1.1 google",
    "x-forwarded-for":"::1, 216.98.205.223, 35.227.194.212",
    "connection":"Keep-Alive"
  },
  "method":"GET",
  "url":"/",
  "body":""
}
Using the synchronizer
This section explains how to use the synchronizer, an optional feature that improves the resiliency of Edge Microgteway by allowing it to retrieve configuration data from Apigee Edge and write it to a local Redis database. With a synchronizer instance running, other Edge Microgateway instances running on different nodes can retrieve their configuration directly from this database.
The syncrhonizer feature is currently supported to work with Redis 5.0.x.
What is the synchronizer?
The synchronizer provides a level of resilience for Edge Microgateway. It helps ensure that every instance of Edge Microgateway uses the same configuration, and that in the event of an internet disruption, Edge Microgateway instances can start up and run properly.
By default, Edge Microgateway instances must be able to communicate with Apigee Edge to retrieve and refresh their configuration data, such as API proxy and API product configurations. If the internet connection with Edge is disrupted, microgateway instances can continue to function because the latest configuration data is cached. However, new microgateway instances cannot start up without a clear connection. Furthermore, it is possible for an internet disruption to result in one or more microgateway instances running with configuration information that is out of sync with other instances.
The Edge Microgateway synchronizer provides an alternative mechanism for Edge Microgateway instances to retrieve configuration data that they require to start up and process API proxy traffic. The configuration data retrieved from calls to Apigee Edge include: the jwk_public_keys call, the jwt_public_key call, the bootstrap call, and the API products call. The synchronizer makes it possible for all of the Edge Microgateway instances running on different nodes to start up properly and stay in sync even if the internet connection between Edge Microgateway and Apigee Edge is disrupted.
The synchronizer is a specially configured instance of Edge Microgateway. Its only purpose is to poll Apigee Edge (the timing is configurable), retrieve configuration data, and write it to a local Redis database. The synchronizer instance itself cannot process API proxy traffic. Other instances of Edge Microgateway running on different nodes can be configured to retrieve configuration data from the Redis database rather than from Apigee Edge. Because all microgateway instances pull their configuration data from the local database, they can start up and process API requests even in the event of an internet disruption.
Configuring a synchronizer instance
Add the following configuration to the org-env /config.yaml file for the Edge Microgateway installation that you wish to use as the synchronizer:
edgemicro:
  redisHost: host_IP
  redisPort: host_port
  redisDb: database_index
  redisPassword: password
edge_config:
  synchronizerMode: 1
  redisBasedConfigCache: true
Например:
edgemicro:
  redisHost: 192.168.4.77
  redisPort: 6379
  redisDb: 0
  redisPassword: codemaster
edge_config:
  synchronizerMode: 1
  redisBasedConfigCache: true
| Вариант | Описание |
|---|---|
redisHost | The host where your Redis instance is running. Default: 127.0.0.1 |
redisPort | The port of the Redis instance. Default: 6379 |
redisDb | The Redis DB to use. Default: 0 |
redisPassword | Your database password. |
Finally, save the configuration file and start the Edge Microgateway instance. It will begin polling Apigee Edge and storing downloaded configuration data in the Redis database.
Configuring regular Edge Microgateway instances
With the synchronizer running, you can configure additional Edge Microgateway nodes to run regular microgateway instances that process API proxy traffic. However, you configure these instances to obtain their configuration data from the Redis database rather than from Apigee Edge.
Add the following configuration to each additional Edge Microgateway node's org-env /config.yaml file. Note that the synchronizerMode property is set to 0 . This property sets the instance to operate as a normal Edge Microgateway instance that processes API proxy traffic, and the instance will obtain its configuration data from the Redis database.
edgemicro:
  redisHost: host_IP
  redisPort: host_port
  redisDb: database_index
  redisPassword: password
edge_config:
  synchronizerMode: 0
  redisBasedConfigCache: true
Например:
edgemicro:
  redisHost: 192.168.4.77
  redisPort: 6379
  redisDb: 0
  redisPassword: codemaster
edge_config:
  synchronizerMode: 0
  redisBasedConfigCache: true
Свойства конфигурации
The following configuration properties have been added to support the use of the synchronizer:
| Атрибут | Ценности | Описание |
|---|---|---|
edge_config.synchronizerMode | 0 or 1 | If 0 (the default) Edge Microgateway operates in its standard mode. If 1, start the Edge Microgateway instance to operate as a synchronizer. In this mode, the instance will pull configuration data from Apigee Edge and store it in a local Redis database. This instance is not able to process API proxy requests; its only purpose is to poll Apigee Edge for configuration data and write it to the local database. You must then configure other microgateway instances to read from the database. |
edge_config.redisBasedConfigCache | верно или неверно | If true, the Edge Microgateway instance fetches its configuration data from the Redis database instead of from Apigee Edge. The Redis database must be the same one that the synchronizer is configured to write to. If the Redis database is unavailable or if the database is empty, the microgateway looks for an existing cache-config.yaml file for its configuration.If false (the default), the Edge Microgateway instance fetches configuration data from Apigee Edge as usual. |
edgemicro.config_change_poll_interval | Time interval, in seconds | Specifies the polling interval for the synchronizer to pull data from Apigee Edge. |
Configuring exclude URLs for plugins
You can configure the microgateway to skip the processing of plugins for specified URLs. You can configure these "exclude" URLs globally (for all plugins) or for specific plugins.
Например:
...
edgemicro:
  ...
  plugins:
    excludeUrls: '/hello,/proxy_one' # global exclude urls
    sequence:
      - oauth
      - json2xml
      - quota
json2xml:
  excludeUrls: '/hello/xml'  # plugin level exclude urls
...
In this example, plugins will not process incoming API proxy calls with the paths /hello or /proxy_one . In addition, the json2xml plugin will be skipped for APIs with /hello/xml in their path.
Setting configuration attributes with environment variable values
You can specify environment variables using tags in the configuration file. The specified environment variable tags are replaced by the actual environment variable values. Replacements are stored in memory only and not stored in the original configuration or cache files.
In this example, the attribute key is replaced by the value of the TARGETS_SSL_CLIENT_KEY environment variable, and so on.
targets:
  - ssl:
      client:
        key: <E>TARGETS_SSL_CLIENT_KEY</E>
        cert: <E>TARGETS_SSL_CLIENT_CERT</E>
        passphrase: <E>TARGETS_SSL_CLIENT_PASSPHRASE</E>
In this example, the <n> tag is used to indicate an integer value. Only positive integers are supported.
edgemicro:
  port: <E><n>EMG_PORT</n></E>
In this example, the <b> tag is used to indicate a boolean ( that is, true or false) value.
quotas:
  useRedis: <E><b>EMG_USE_REDIS</b></E>